2
Table of contents
Installation.......................................................................................................................................4
How to install Tabulizer on Joomla 4.x.......................................................................................5
How to update or upgrade Tabulizer on Joomla 4.x...................................................................5
How to uninstall Tabulizer on Joomla 4.x...................................................................................5
How to install Tabulizer on Joomla 3.x.......................................................................................5
How to update or upgrade Tabulizer on Joomla 3.x...................................................................6
How to uninstall Tabulizer on Joomla 3.x...................................................................................6
How to install Tabulizer on Joomla 2.5.......................................................................................6
How to update or upgrade Tabulizer on Joomla 2.5...................................................................6
How to uninstall Tabulizer on Joomla 2.5...................................................................................6
How to Use......................................................................................................................................7
Before you start: Check your permissions!.................................................................................7
Creating a table with Tabulizer...................................................................................................9
Editing a table with ReTabulizer...............................................................................................12
Basic Concepts: What is a rule, a ruleset and a ruleset archive.....................................................13
Overview...................................................................................................................................13
What is a rule............................................................................................................................16
What is a ruleset........................................................................................................................30
What is a ruleset archive...........................................................................................................31
Preview ruleset styling..............................................................................................................32
Automatically create and edit CSS skeleton for rulesets..........................................................32
Where are the files located........................................................................................................33
Example: Creating a ruleset from scratch......................................................................................35
Setting the requirements............................................................................................................35
Creating the rules......................................................................................................................35
Defining the CSS Selectors.......................................................................................................36
Putting it all together.................................................................................................................38
Naming conventions.................................................................................................................38
Taking our example to the next level.............................................................................................39
Calculating automatically the total sum....................................................................................39
Format the cells as currency......................................................................................................39
Using Autospan for our table title.............................................................................................40
Putting it all together.................................................................................................................41
Importing ruleset archives ............................................................................................................43
Request a custom-made ruleset for you....................................................................................43
Copying tables from another application.......................................................................................45
Importing tables directly from an Excel document ..................................................................45
Exporting tables and data from an Excel document .................................................................46
Exporting tables from a Word document..................................................................................47
Data Sources for tables with dynamic content ..............................................................................48
How to create a new data source...............................................................................................48
How to insert your data sources into articles, modules or 3rd party extensions.......................50
Add more flexibility with data source variable parameters......................................................51
Convert your tables into graphs.....................................................................................................54
Create a graph ruleset – Basic Example....................................................................................55
Using more options to adjust your graph..................................................................................61
Exporting table data and graphs as files (download + email)........................................................63
Exporting table data as file........................................................................................................63
3
Exporting graph image as file (download + email)...................................................................64
User Preferences............................................................................................................................65
Status – Tabulizer, Joomla and System Information......................................................................66
Troubleshooting common issues....................................................................................................67
Issue #1: Unable to insert the produced HTML code into the article.......................................67
Issue #2: The produced table does not appear as expected.......................................................67
Issue #3: Rulesets are missing or have different rules and attributes ......................................68
Issue #4: Unable to import rulesets, write files or create folders..............................................68
Issue #5: Internal Server Error (500)........................................................................................68
Issue #6: The Tabulizer's CSS directives are visible in the front-end.......................................69
Issue #7: “The number of columns must be the same on each row” error message.................69
Issue #8: Magic quotes are on, causing slashes to be added automatically in front of double
quotes (\”)..................................................................................................................................69
Issue #9: HTML links and other elements are removed or set to “undefined” when I click the
insert button...............................................................................................................................69
Issue #10: Strict error reporting (E_STRICT) is causing error messages similar to “Strict
Standards: Only variables should be assigned by reference in ...”...........................................69
Issue #11: Fix for “JFolder::create: Could not create directory” Error.....................................70
Issue #12: Fix for “datatables warning (table id): Requested unknown parameter X from the
data source for row Y”..............................................................................................................70
Issue #13: Fix for “MySQL server has gone away”..................................................................70
Issue #14: Error while uploading installation file similar to “There was an error uploading this
file to the server”.......................................................................................................................70
Getting more help and updates......................................................................................................72
4
Installation
The Tabulizer application consists of the following Joomla extensions:
1. The Tabulizer component (Tabulizer)
2. The Tabulizer editor plugin (Button – Tabulizer)
3. The Re-Tabulizer editor plugin (Button – ReTabulizer)
4. The Data Source editor plugin (Button - Tabulizer Data Source)
5. The TabulizerCSS content plugin (Content - Tabulizer CSS)
6. The TabulizerCSS system plugin (System - Tabulizer CSS)
7. The Tabulizer search plugin (Search - Tabulizer Data Source Tables)
8. The TabulizerCSS Legacy system plugin (System - Tabulizer CSS Legacy)
The Tabulizer editor plugin is responsible for converting your raw input text into a regular HTML
table that can be edited or re-edited like a regular HTML table. The ReTabulizer editor plugin has
a similar functionality, but it's applied on existing tables, not new ones. As you will see later, this is
very useful if you want to apply a new table template to an existing table.
Since the actual styling (what color, background color, font style, etc) is done via CSS selectors, one
or more CSS files are required to be included in your Joomla site. The TabulizerCSS content
plugin takes care of that, so all CSS files that are required by the selected table or graph template
are included automatically. The TabulizerCSS system plugin has similar functionality but different
scope, as it applies outside the main Joomla content component. The TabulizerCSS Legacy plugin
is used to include automatically CSS files used in tables created with versions of Tabulizer prior to
version 2.5.
Starting from version 4.0 you can also create dynamic tables, that is tables that are created on the fly
with data that are taken from an external source, that can be:
• an external CSS file
• an external Excel file
• an RSS Feed
• a remote web page that contains a valid HTML table
• a Joomla article
• a database query to the local Joomla database
• a query to an external database
In order to do that you define a data source and you link the table with that data source. The Data
Source editor plugin helps you to insert the resulting data source into your site.
The Tabulizer component is a safe environment where you can browse, preview and edit rules,
rulesets and ruleset archives (don't worry if you don't understand what a rule or ruleset is - these
concepts are explained in the following section). Since each ruleset is stored in a XML file, if you
are familiar with the XML syntax you could work directly with the XML file and not use the
component. Nevertheless, it is highly recommended that you use the Tabulizer component for the
editing and the creation of new ruleset, because it provides you with many tools and validation

5
utilities that makes the whole experience more convenient and error free.
How to install Tabulizer on Joomla 4.x
We have packaged all extensions in a single installation file that you can install just like any other
standard Joomla extension. More specifically, do the following steps:
1. Download the tabulizer_UNZIPME.zip file from the http:// www.tabulizer.com site
2. Unzip the archive. In the joomla4.x you will find the 2 files:
• The README.txt file that contains brief instructions
• The com_tabulizer.zip file that is the Joomla installation file for the Tabulizer
application.
3. From the backend of your Joomla site (i.e. administration) select Extensions →
Extension Manager. In the form entry “Upload Package File” click the browse button to
select the com_tabulizer.zip. Then, click on the “Upload & Install” button and wait for
the installation to complete.
4. All extensions are installed and activated automatically.
How to update or upgrade Tabulizer on Joomla 4.x
To update Tabulizer or upgrade from a previous version, simply install it as described in the
previous paragraph (How to install Tabulizer on Joomla 4.x). The installer is smart enough to tell
whether this is a fresh new install or an update and execute the proper tasks.
How to uninstall Tabulizer on Joomla 4.x
Should you need to uninstall the Tabulizer application, you only need to uninstall the Tabulizer
component. All other plugins will be uninstalled automatically.
From the backend of your Joomla site (i.e. administration) select Extensions → Extension Manager.
Click on the Manage left-side menu and look for the Tabulizer component. Check the box right next
to it and then click on the Uninstall button.
How to install Tabulizer on Joomla 3.x
We have packaged all extensions in a single installation file that you can install just like any other
standard Joomla extension. More specifically, do the following steps:
5. Download the tabulizer_UNZIPME.zip file from the http:// www.tabulizer.com site
6. Unzip the archive. In the joomla3.x you will find the 2 files:
• The README.txt file that contains brief instructions
• The com_tabulizer.zip file that is the Joomla installation file for the Tabulizer
application.
7. From the backend of your Joomla site (i.e. administration) select Extensions →
Extension Manager. In the form entry “Upload Package File” click the browse button to
select the com_tabulizer.zip. Then, click on the “Upload & Install” button and wait for
the installation to complete.
8. All extensions are installed and activated automatically.

6
How to update or upgrade Tabulizer on Joomla 3.x
To update Tabulizer or upgrade from a previous version, simply install it as described in the
previous paragraph (How to install Tabulizer on Joomla 3.x). The installer is smart enough to tell
whether this is a fresh new install or an update and execute the proper tasks.
How to uninstall Tabulizer on Joomla 3.x
Should you need to uninstall the Tabulizer application, you only need to uninstall the Tabulizer
component. All other plugins will be uninstalled automatically.
From the backend of your Joomla site (i.e. administration) select Extensions → Extension Manager.
Click on the Manage left-side menu and look for the Tabulizer component. Check the box right next
to it and then click on the Uninstall button.
How to install Tabulizer on Joomla 2.5
We have packaged all extensions in a single installation file that you can install just like any other
standard Joomla extension. More specifically, do the following steps:
1. Download the tabulizer_UNZIPME.zip file from the http:// www.tabulizer.com site
2. Unzip the archive. In the joomla2.5 folder you will find the 2 files:
• The README.txt file that contains brief instructions
• The com_tabulizer.zip file that is the Joomla installation file for the Tabulizer
application.
3. From the backend of your Joomla site (i.e. administration) select Extensions → Extension
Manager. In the form entry “Upload Package File” click the browse button to select the
com_tabulizer.zip. Then, click on the Upload & Install button and wait for the installation
to complete.
4. All extensions are installed and activated automatically.
How to update or upgrade Tabulizer on Joomla 2.5
To update Tabulizer or upgrade from a previous version, simply install it as described in the
previous paragraph (How to install Tabulizer on Joomla 2.5). The installer is smart enough to tell
whether this is a fresh new install or an update and execute the proper tasks.
How to uninstall Tabulizer on Joomla 2.5
Should you need to uninstall the Tabulizer application, you only need to uninstall the Tabulizer
component. All other plugins will be uninstalled automatically.
From the backend of your Joomla site (i.e. administration) select Extensions → Extension Manager.
Click on the Manage tab and look for the Tabulizer component. Check the box right next to it and
then click on the Uninstall button.
7
How to Use
Before you start: Check your permissions!
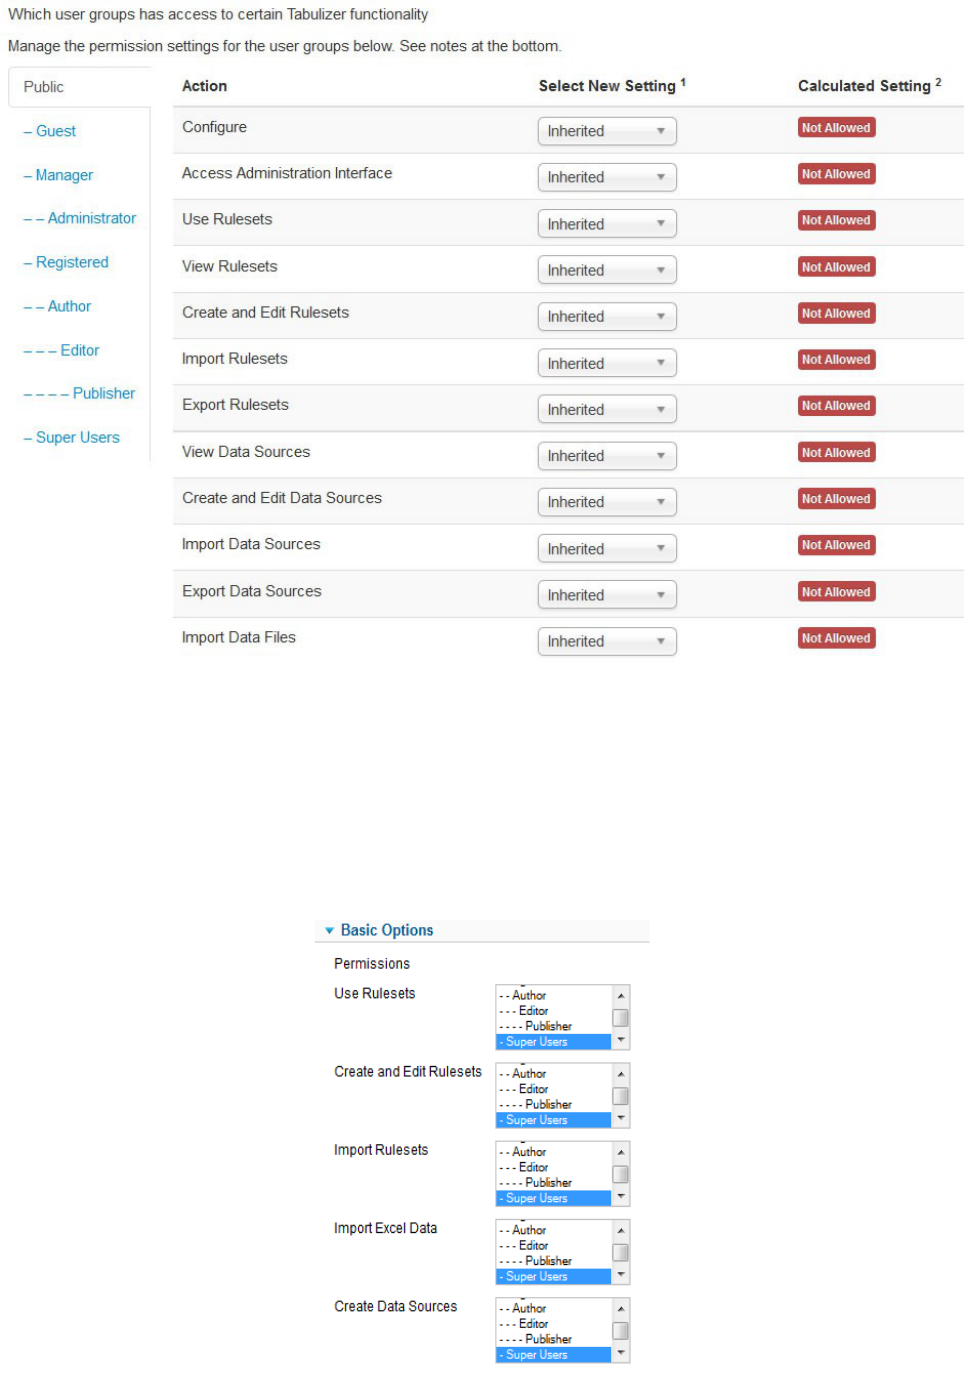
Starting from Tabulizer version 3.0, you need to have enough permissions to execute a specific
group of tasks. More specifically, any Joomla user must belong to a user group that is allowed to:
• Use Rulesets
• View Rulesets
• Create and Edit Rulesets
• Import Rulesets
• Export Rulesets
• View Data Sources
• Create and Edit Data Sources
• Import Data Sources
• Export Data Sources
• Import Data Files
This was done for security purposes and when you install Tabulizer only the Administrators have
access to these operations.
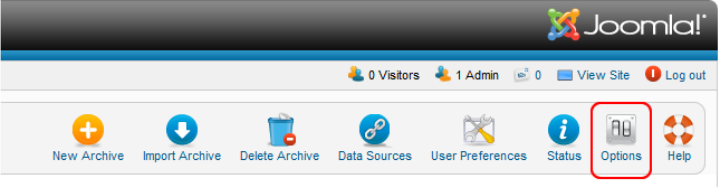
If you are running Tabulizer on Joomla 2.5 or Joomla 3.x you can change the default permissions
for each user group by clicking on the Options button of the Tabulizer's component backend panel.
8
If you are using Joomla 1.5, if you want to add another group of users you have to do this manually,
by changing the corresponding permission parameters of the Button - Tabulizer plugin. From the
menu Extensions select the sub-menu Plug-in Manager. Then, search for the plugin Button –
Tabulizer (type: editor-xtd), and click on its name. In the configuration page that appears, on the
right panel click with the mouse on all user groups that you want to have access to a specific
feature. Keep the control button pressed (Ctrl), if you want to select more than one user groups.
9
Creating a table with Tabulizer
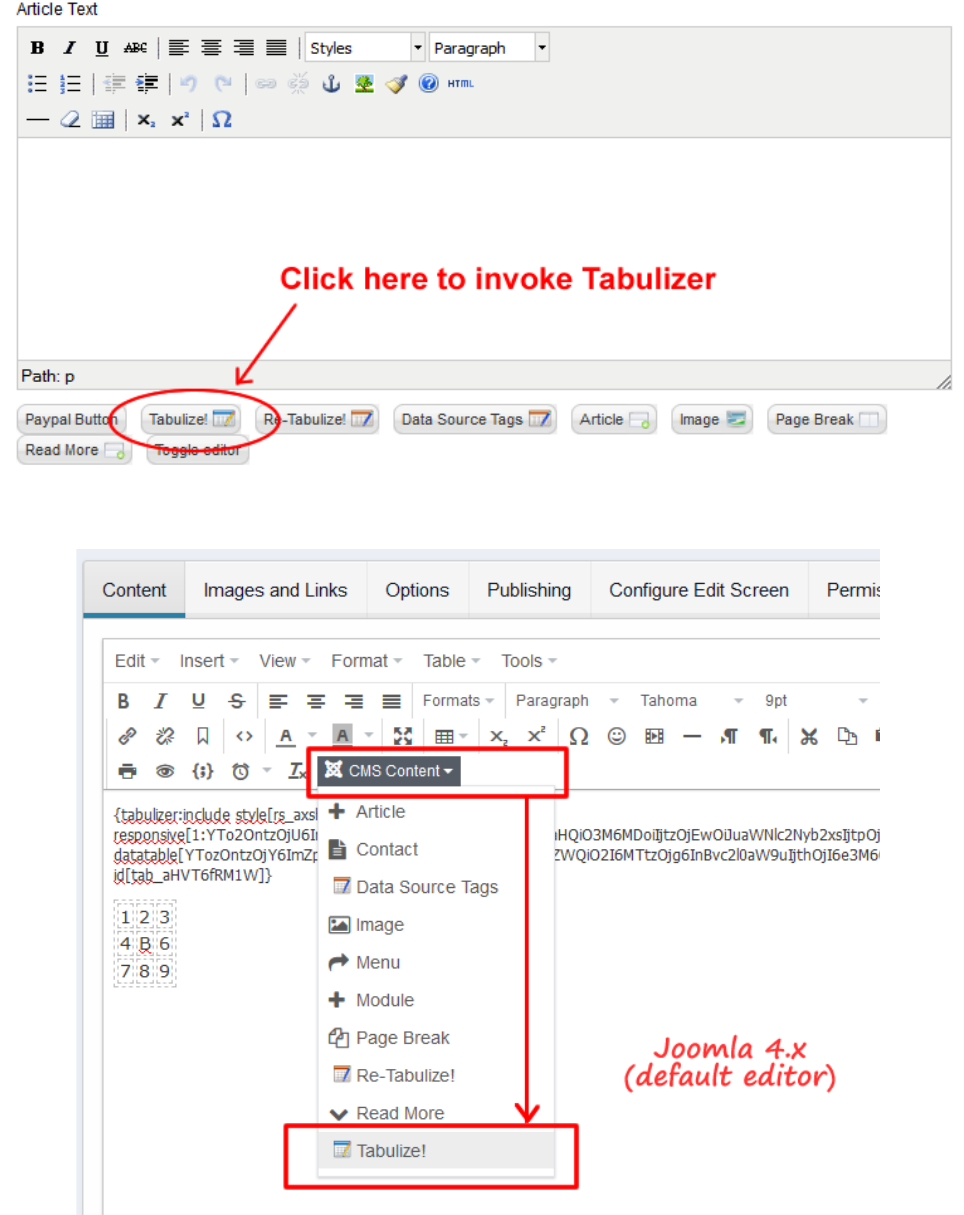
Adding tables with Tabulizer in your Joomla articles is very easy. When you are editing your article
click on the Tabulize! button to invoke Tabulizer's popup window.
Note: The Tabulize! button may be hidden under the "CMS Content" drop-down box in some
modern Joomla versions, as shown below:
10
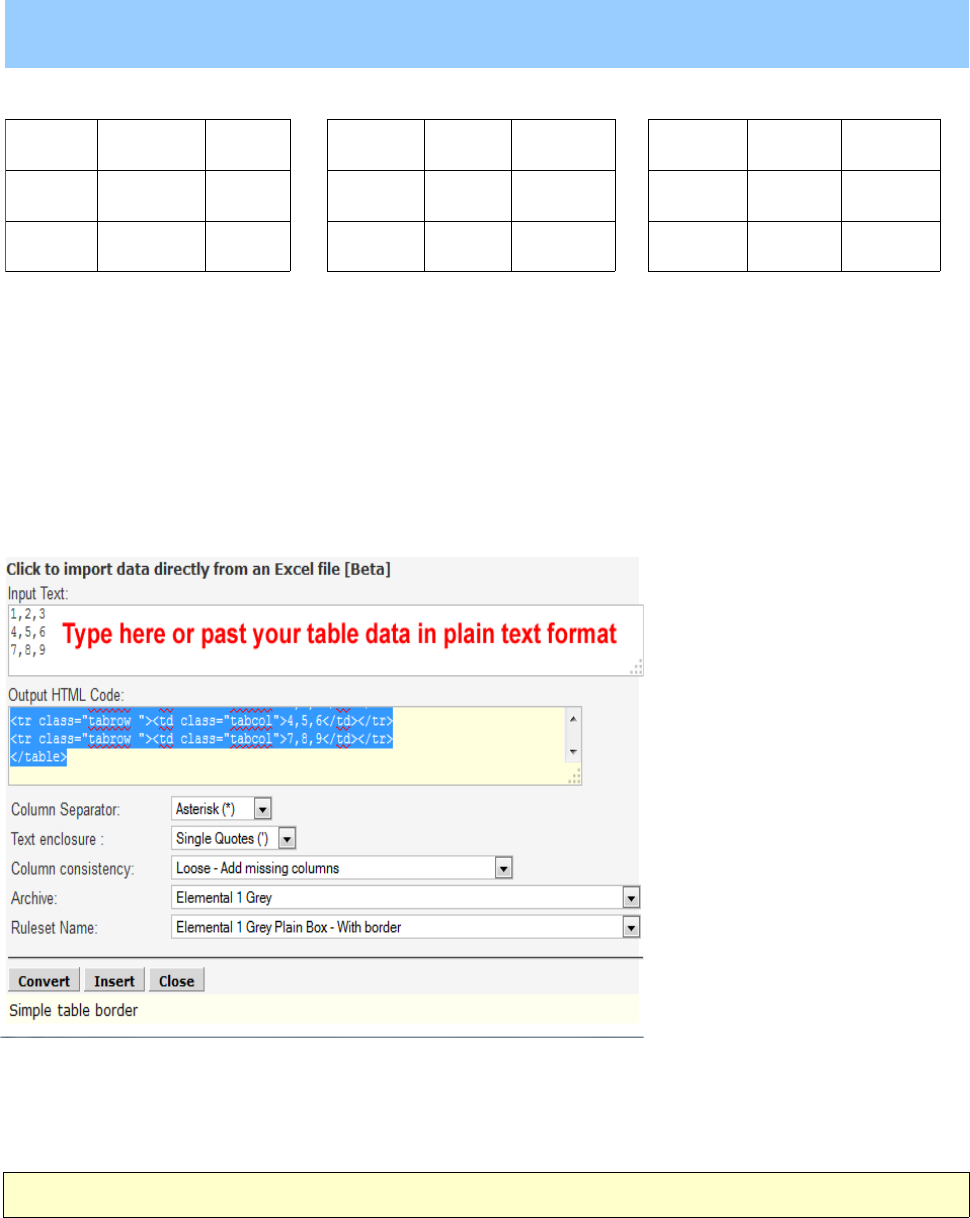
In the popup window type in the Input Text box the table data according to the following rules:
1) Each line corresponds to a table row
2) Each column is separated with the Column Separator character that can be a comma (,) or
a few other available characters. If the column value contains the separator character, use double or
single quotes as text enclosure. So, for instance all the lines below are acceptable:
• one,two,three (column separator: comma, text enclosure: none or double quotes)
• one,”two”,three (column separator: comma, text enclosure: double quotes)
• one,”two,two”,three (column separator: comma, text enclosure: double quotes)
• one;two;three (column separator: semicolon, text enclosure: none or double quotes)
• one;two,two;three (column separator: semicolon, text enclosure: none or double quotes)
3) The number of columns on each row must be the same. Since the number of columns is
specified by the number of column separators, it is implied the every column must have the same
number of column separators (e.g. commas). We do not count column separators that are text
enclosed. Here is a valid input:
1,2,3,4
5,6,7,8
79,10,11,12
There are 3 rows and 4 columns on each row, using comma (,) as our column separator.
Obviously, the following formula applies:
# of column separators = # columns – 1
In our example, the number of commas (column separators) on each line (row) is 3, since
we have 4 columns (3 = 4 – 1).
Rule #3 tells us that the number of columns on each row must be the same, otherwise an error
message will appear when we try to convert the input text into a table:
“Please correct the following errors before you try to convert the input text again:
1. The number of columns must be the same on each row. Please make sure the column separator in
not used in the field value of any column. Hint: Row(s) 1 have 3 columns, while row 2 has 2
columns.”
The hint tells us where the column inconsistency lies. Here is the input that caused the above error
message:
1,2,3 ← 3 columns
4,5 ← 2 columns
7,8,9 ← 3 columns
As you can see row 2 has only one comma, therefore only two columns, while row 1 and row 3
have two commas, therefore 3 columns. To solve this problem, you need to add an extra column in
row 2 by adding the missing comma. Note, that the place where you put the missing comma will
specify the place of the messing empty cell. For instance, all the following inputs are valid:
1,2,3 1,2,3 1,2,3
11
4,5,, 4,,5 ,4,5
7,8,9 7,8,9 7,8,9
and they will create the following tables:
1 2 3
4 5
6 7 8
1 2 3
4 5
7 8 9
1 2 3
4 5
7 8 9
Starting from version 3.0 Tabulizer applies by default “loose” column consistency, meaning that it
will try to append automatically the missing column separators at the end of each (inconsistent) line,
if any. You can enforce strict column consistency by setting the Column consistency field to Strict.
Once you have typed your input text, the next step is to select the desired Ruleset. You can filter the
list of the available rulesets by selecting a specific Archive. A ruleset is a table template, while an
archive contains one or more rulesets.
When you are ready click on the Convert button. If there were no errors, the produced HTML table
will appear in the Output HTML Code box. Review the code and then click on the Insert button
to add the table into your article.
Important! First select the desired ruleset and then click the convert button.
Right before the produced table will be a Tabulizer directive, similar to {tabulizer:include
style[gr.alterora.elemental_1_grey.css] id[tab_ngmtYlaDYk]} . This directive is invisible to the
visitors of your site and it is used internally by Tabulizer to know which action to take (e.g. include
as CSS file, convert the table to graph, etc).

12
Editing a table with ReTabulizer
Sometimes, you want to edit an existing table. You can change the values of the cells, or simply the
style of the table. Starting from version 3.0 you can click anywhere inside the table you want to edit
and then click on the Re-Tabulize! button. It will popup the same window as if you had clicked on
the Tabulize! Button, but with a difference: the Input Text is filled with the tabular data in plain text
format.
One of the uses for ReTublizer is to apply a new ruleset to an existing table. So, let's say you have
an existing table and you want to beautify it with a new sexy ruleset. Here is what you should do:
1. Click anywhere inside the table (preferably in the middle of the table) and you make sure
that the cursor is inside the table cells.
2. Click on the Re-Tabulize! button to open the Tabulizer window. The Input Box should have
the contents of the table as plain text. Only the cell values are copied, but if they contain
HTML code, it will be preserved (e.g. <span class=”emphatic”>Top Plays</span>).
3. Select the desired ruleset from the available list.
4. Click on the Convert button and then the Insert button to add the table with the new ruleset
in the original content.
Note: The Re-Tabulize! button may be hidden under the "CMS Content" drop-down box in some
modern Joomla versions, as shown below:

13
Basic Concepts: What is a rule, a ruleset and a ruleset archive
Overview
The Tabulizer component allows you to create sets of rules (i.e. rulesets) that specify how to style
specific elements of a given table, do simple arithmetic calculations or even merge automatically
neighboring cells. For instance, you can add a rule that will change the background color of the first
table row or add another rule that will calculate automatically the sum of all the values of certain
rows or columns. You can set as many rules as you want and these rules can be combined together
giving you unlimited possibilities.
For better flexibility, the styling rules only specify the CSS selector that will be applied to the table
element (row/column/cell), while the definition of the CSS selector is done in a separate CSS file.
This means that you can use for your rules CSS selectors that are already defined elsewhere (e.g.
your template's CSS files) and if you decide to change the CSS selector definition in the future, it's
only a matter of editing a regular CSS file.
Let's see an example to illustrate these ideas. Let's assume that we have a sports site and you want
to display after each matchday the results and the current standings of each major sports league in
your country. This apparently involves the creation of many tables and you want to do that fast with
a consistent feel and look. Tabulizer fits these needs perfectly. Using the Tabulizer you create a set
of rules for each table you want to add or update repeatedly. For instance, the ruleset for the
standings of the national basketball league could contain the following styling rules:
• A rule to make the background color of the first row unique and the font weight bold, as the
first row contains the column headers for the rest of the table.
• A rule to make the background of the first column different than the rest of the table and the
font weight bold, as the first column contains the names of the teams.
• A rule to make the table more readable, so the even rows will have a slightly different
background color than the odd ones.
In order these rules to be effective, we need at least two types of file:
1. One XML file to store the definition of the rules/how to apply the CSS selectors on each
element of the table
2. One CSS file to store the definition of the CSS selectors/what properties should have each
CSS selector.
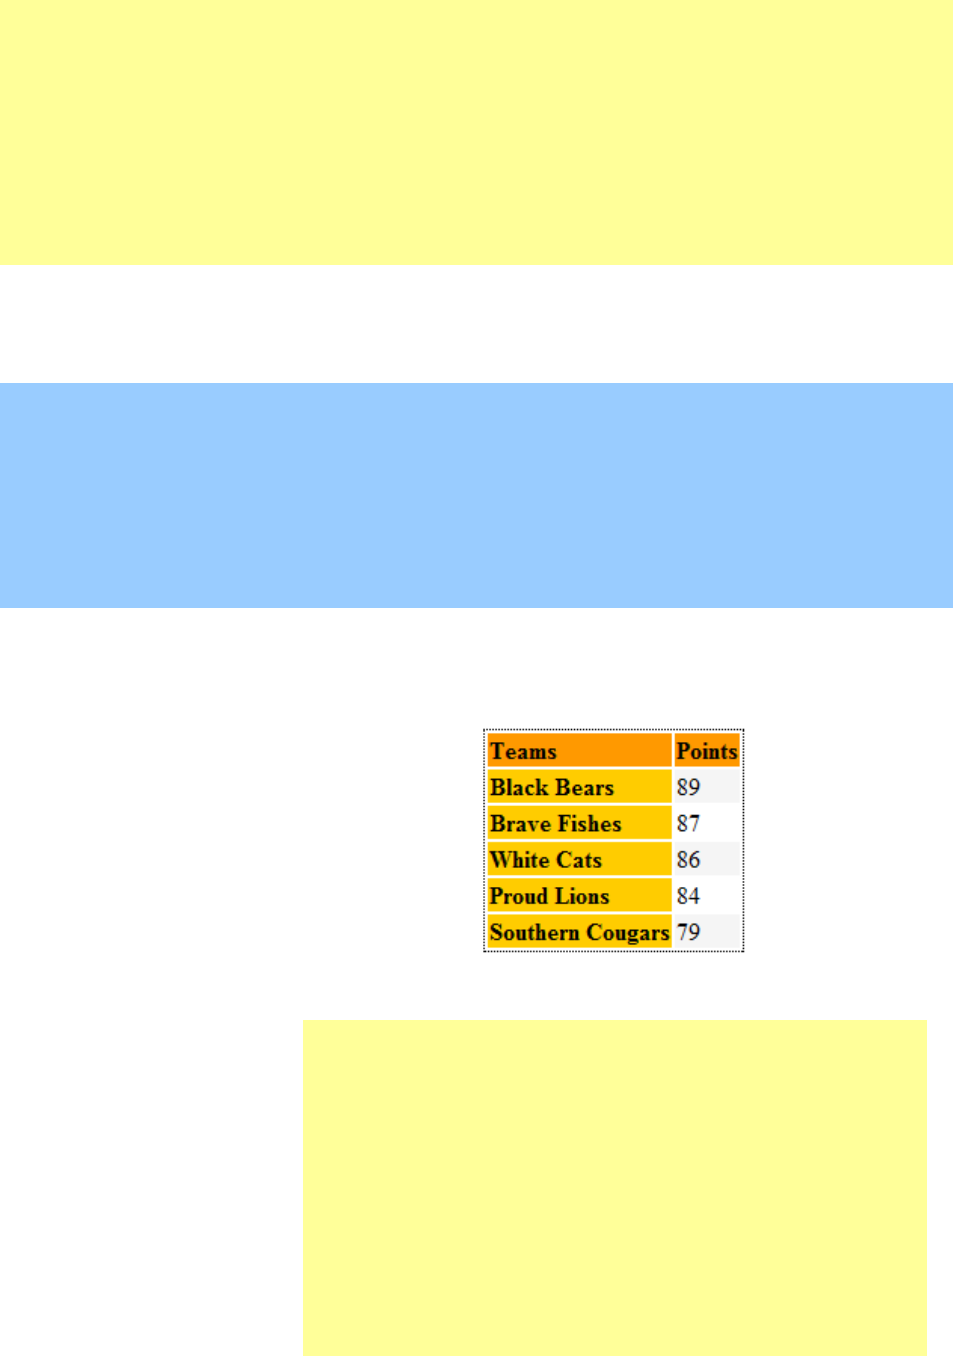
In our example these files might look like this:
1) XML file (nbl.xml):
<ruleset name="ruleset_nbl" title="Nationαl Basketball League" suffix="ruleset_nbl"
style="nbl.css" >
<rule element="row" range="1" style="nbl_header"></rule>
<rule element="column" range="1" style="nbl_teams"></rule>
<rule element="row" range="EVEN" style="row_even"></rule>
</ruleset>
2) CSS file (nbl.css):
/* first row */
.nbl_header { background-color: #FF9900; font-weight: bold; }
/* first column */
14
.nbl_teams { background-color: #FFCC00; font-weight: bold; }
/* even rows */
.row_even { background-color: #f5f5f5; }
/* take special care of the cell that is part of the first row and the first column */
tr.nbl_header td.nbl_teams { background-color: #FF9900; font-weight: bold; }
/* add a table border */
.tabtable-ruleset_nbl { border: 1px dotted #030303; }
For input text:
Teams,Points
Black Bears,89
Brave Fishes,87
White Cats,86
Proud Lions,84
Southern Cougars,79
The resulting table would look like this:
Table: Visual Display
Table: HTML Source Code <table class="tabtable-ruleset_nbl">
<tr class="tabrow nbl_header">
<td class="tabcol nbl_teams">Teams</td><td class="tabcol
">Points</td>
</tr>
<tr class="tabrow row_even">
<td class="tabcol nbl_teams">Black Bears</td><td
class="tabcol ">89</td>
</tr>
<tr class="tabrow ">

15
<td class="tabcol nbl_teams">Brave Fishes</td><td
class="tabcol ">87</td>
</tr>
<tr class="tabrow row_even">
<td class="tabcol nbl_teams">White Cats</td><td
class="tabcol ">86</td>
</tr>
<tr class="tabrow ">
<td class="tabcol nbl_teams">Proud Lions</td><td
class="tabcol ">84</td>
</tr>
<tr class="tabrow row_even">
<td class="tabcol nbl_teams">Southern Cougars</td><td
class="tabcol ">79</td>
</tr>
< /table>
The XML file is created and updated automatically by the Tabulizer component, even though it is
possible to edit it manually using a standard text editor (like Notepad) if you are familiar with the
XML format. The recommended option is to use exclusively the Tabulizer component to create and
edit the resulting XML files, because not only it is more convenient but also more robust and error-
free thanks to all the validation tools that come with. All the XML files containing the rulesets are
located in the /templates/tabulizer/rules directory.
The CSS file can be edited via the Tabulizer component as well, or it can be edited manually using a
standard text editor, or a specialized CSS editor. The Tabulizer component has built-in functionality
that allows you to create the skeleton CSS file contents, once the rules has been set. Not all CSS
selectors need to be defined. Only those you are interested in should be defined from the very
beginning and the rest could be defined later on or never. The important thing to remember is that
all CSS files that contain CSS selectors for the rules you want to use, must be included in your
Joomla site. For this to happen you have three options:
1. (Recommended Option) Add the CSS file in /templates/tabulizer/css directory and set the
style property of the corresponding ruleset to point to that file. In such case, the Tabulizer
editor plugin will create a CSS directive that will be read by the Tabulizer content/system
plugin which will include the requested CSS file automatically. This process may sound
complicated but it is helps Joomla to include only those CSS files that are actually needed.
If you create and save the CSS file with the Tabulizer component, this will happen
automatically.
2. Modify the index.php of your active Joomla template to include the desired CSS files
3. Edit your Joomla template's CSS files to include the desired CSS selectors.
You can familiarize yourself with the concept of rulesets by examining some existing ruleset
archives to see how they are constructed. For a detailed description of the attributes for rules,
rulesets and archives read the following paragraphs.
16
What is a rule
A rule is an instruction on how to apply a specific CSS selector to a table element or on how to
format a cell or calculate its value from neighboring cells. Note, there are many other “actions” that
a rule can take, including replacing one text with another, converting a regular table into a graph,
adding responsive behavior and many more. For the sake of simplicity we will stick with the basic
ones. When you define a new rule you have to specify the following properties/fields:
1. Element: This is the type of elements to which the rule applies and it can be:
• row: indicates a table row
• column: indicates a table column
• cell: indicates a table cell
• table: indicates the whole table
2. Range:
The value of this field gives the range of the selected elements to which the rule applies, and
therefore it depends on the element type.
Starting from version 4.0, as acceptable integer value is consider the L<integer value>
annotation that indicates the X element from the end. So, for instance if you have a table
with 10 rows, the L3 row would be the 8
th
(L1 → 10
th
, L2 → 9
th
, L3 → 8
th
, etc).
Also, you can combine multiple range selections in a single assignment, giving you more
control over the final (combined) range selection. More specifically, you can:
• unify multiple range selection, using the symbol ; as your range separator
• filter any existing element selection using the # symbol as your filter flag
• exclude elements from any existing selection using the ^ symbol as your exclusion
flag
For instance, in a table with 10 rows, the combined row range selection <3;>=5#2-4;4-6^3-5
is interpreted as follows:
Subrange #1: < 3 select row ids less than 3 => 1,2
Subrange #2: >=5#2-4;4-6^3-5 select rows ids greater or equal to 5 => rows 5,6,7,8,9,10.
Filter the results so only row ids that are between 2 and 4 are kept => no rows
Subrange #3: 4-6^3-5 select row ids between 4 and 6. From them, exclude row ids between
3 and 5 => 6
United all previous results 1,2 + 6 => 1,2,6
If the type is ROW or COLUMN, this can be:
• <integer value>: An integer value which indicates which row or column you are
referring to. Example value: 1
• <integer value from>-<integer value to>: A range of integers which indicates the
range of rows or columns you are referring to. Example value: 1-3
• <integer value>,<integer value>,...,<integer value>: A comma separated list of
integers, indicating the specific rows/columns you are referring to. Example value:
1,3,5
• > <integer value from>: A lower limit which indicates the range of rows or columns
you are referring to. Example value: > 3
• >= <integer value from>: Same as above, but instead of "greater than" we use for
comparison "greater than or equal". Example value: >= 3
• < <integer value to>: An upper limit which indicates the range of rows or columns
you are referring to. Example value: < 3
17
• <= <integer value to>: Same as above, but instead of "less than" we use for
comparison "less than or equal". Example value: <= 3
• FIRST <integer value>: the integer value indicates the first X rows/columns you are
referring to. Example value: FIRST 3
• LAST <integer value>: the integer value indicates the last X rows/columns you are
referring to. Example value: LAST 3
• MOD <integer value>: the integer value indicates the modulo X rows/columns you
are referring to. Example value: MOD 3
• MOD<integer value>[LIMIT SUBRANGE]: same as the previous case, but you limit
the modulo operation to a specific subrange. See below for acceptable values for
LIMIT RANGE. Example value: MOD 3 [>1]
• ODD: indicates the the rule applies only to odd rows/columns. Example value: ODD
• ODD [LIMIT SUBRANGE]: same as the previous case, but you limit the modulo
operation to a specific subrange. Example value: ODD [>3]
• EVEN: indicates the the rule applies only to even rows/columns. Example value:
EVEN
• EVEN [LIMIT SUBRANGE]: same as the previous case, but you limit the modulo
operation to a specific subrange. Example value: EVEN [>3]
• ALL: all rows/columns. This is equivalent to range 1-L1. Example value: ALL
• SAME <base64 encoded text value>: the row/column must contain at least one cell
whose value is equal to the text value for the rule to apply. You can also search part
of the row/column using the optional column/row specifier that is described later on.
Example value: SAME V2lubmVy
• SAMEi <base64 encoded text value>: same as above but case insensitive. Example
value: SAMEi V2lubmVy
• SAMEn <base64 encoded text value>: the row/column must contain at least one cell
whose value is NOT equal to the text value for the rule to apply. You can also search
part of the row/column using the optional column/row specifier that is described later
on. Example value: SAMEn V2lubmVy
• SAMEni <base64 encoded text value>: same as above but case insensitive. Example
value: SAMEni V2lubmVy
• CONTAIN <base64 encoded text value>: the row/column must contain at least one
cell whose value contains the text value for the rule to apply. You can also search part
of the row/column using the optional column/row specifier that is described later on.
Example value: CONTAIN V2lubmVy
• CONTAINi <base64 encoded text value>: same as above but case insensitive.
Example value: CONTAINi V2lubmVy
• CONTAINn <base64 encoded text value>: the row/column must contain at least one
cell whose value does not contain the text value for the rule to apply. You can also
search part of the row/column using the optional column/row specifier that is
described later on. Example value: CONTAINn V2lubmVy
• CONTAINni <base64 encoded text value>: same as above but case insensitive.
Example value: CONTAINni V2lubmVy
• EMPTY: the row/column must contain at least one cell whose value is empty.
• EMPTYT: the row/column must contain at least one cell whose value is empty after
being trimmed.
• GREATER <base64 encoded argument>: the row/column must contain at least one
cell whose value is greater than the specified argument for the rule to apply. The

18
argument can be:
1. a numeric value, e.g. #32 → GREATER IzMy
2. a date string, e.g. [2013-12-01] or [-30 days] → GREATER
WzIwMTMtMTItMDFd or GREATER Wy0zMCBkYXlzXQ==
3. a text value, e.g. “Jones” → GREATER 4oCcSm9uZXPigJ0=
Note that the # indicates a numeric value, the double quotes a text value and the
square brackets a date string. IzMy is the based64 encoded value of #32,
WzIwMTMtMTItMDFd is the based64 encoded value of [2013-12-01] and
4oCcSm9uZXPigJ0= the based64 encoded value of “Jones”. The comparison is done
according to the specified data type. You can also search part of the row/column
using the optional column/row specifier that is described later on.
• GREATERE <base64 encoded argument>: the row/column must contain at least one
cell whose value is greater than or equal to the specified argument for the rule to
apply. See GREATER above for examples and available argument data types.
• LESS <base64 encoded argument>: the row/column must contain at least one cell
whose value is less than the specified argument for the rule to apply. You can also
search part of the row/column using the optional column/row specifier that is
described later on. See GREATER above for examples and available argument data
types.
• LESSE <base64 encoded argument>: the row/column must contain at least one cell
whose value is less than or equal to the specified argument for the rule to apply. See
GREATER above for examples and available argument data types.
• EQUAL <base64 encoded argument>: the row/column must contain at least one cell
whose value is equal to the specified argument for the rule to apply. You can also
search part of the row/column using the optional column/row specifier that is
described later on. See GREATER above for examples and available argument data
types.
One really cool option that you can use is the column/row specifier so only in
certain columns/rows the comparison will take place. Here is an example:
Suppose that you want to highlight all table rows in which the 4
th
column contains
dates that are recent. The 5
th
column also contains dates, but they have a different
purpose and you don't want to include them in the date comparison. In such case,
you can define a range similar to:
GREATER Wy0zMCBkYXlzXQ== [4].
Only cells on the 4
th
column will be compared with the date argument. You could
also specify more columns, using the comma separator as shown in the following
range:
GREATER Wy0zMCBkYXlzXQ== [4,6,8]
In this case, cells on 4
th
, 6
th
and 8
th
column will be compared with the date
argument.
The optional column/row specifier can be an integer or a list of integers separated
by comma and enclosed in square brackets, just like the examples above.
The optional column/row specifier can be used with:
SAMEi, SAMEn, SAMEni, CONTAIN, CONTAINi, CONTAINn,
CONTAINni, GREATER, GREATERE, LESS, LESSE, EQUAL
• MIN [ROW SEARCH RANGE],[COLUMN SEARCH RANGE]: the row/column cells
contain the lowest (minimum) value within the range specified by the row/column
range arguments. See below for acceptable values for ROW/COLUMN SEARCH
RANGE. Example value: MIN [1-3][1-L1]
19
• MAX [ROW SEARCH RANGE],[COLUMN SEARCH RANGE]: the row/column cells
must contain the highest (maximum) value within the range specified by the
row/column range arguments. Example value: MAX [1-3][1-L1]
• MEDIAN [ROW SEARCH RANGE],[COLUMN SEARCH RANGE]: the row/column
cells must contain the middle (median) value within the range specified by the
row/column range arguments. Example value: MEDIAN [1-3][1-L1]
If the type is CELL, this can be:
• <integer value>,<integer value>: The specific coordinates of a cell in which the
rule applies. Example value: 1,3 (i.e. the cell of the intersection of first row, third
column)
• <integer or decimal value from>-<integer or decimal value to>: The value range in
which a numeric cell value must fall for the rule to apply. For decimal numbers, use
the dot (.) as the separator for the decimal point. Example value: 0-3.5
• > <integer or decimal value from>: The value range in which a numeric cell value
must fall for the rule to apply. For decimal numbers, use the dot (.) as the separator
for the decimal point. Example value: > 3
• >= <integer or decimal value from>: Same as above, but instead of "greater than"
we use for comparison "greater than or equal". Example value: >= 3
• < <integer or decimal value to>: The value range in which a numeric cell value
must fall for the rule to apply. For decimal numbers, use the dot (.) as the separator
for the decimal point. Example value: < 3
• <= <integer or decimal value to>: Same as above, but instead of "less than" we use
for comparison "less than or equal". Example value: <= 3
• = <integer or decimal value to>: The numeric value that must be equal for the rule
to apply. Example value: = 3
• SAME <base64 encoded text value>: the cell must be equal to the text value for the
rule to apply. Example value: SAME V2lubmVy
• SAMEi <base64 encoded text value>: same as above but case insensitive. Example
value: SAMEi V2lubmVy
• SAMEn <base64 encoded text value>: the cell must NOT be equal to the text value
for the rule to apply. Example value: SAMEn V2lubmVy
• SAMEni <base64 encoded text value>: same as above but case insensitive. Example
value: SAMEni V2lubmVy
• CONTAIN <base64 encoded text value>: the cell must contain the text value for the
rule to apply. Example value: CONTAIN V2lubmVy
• CONTAINi <base64 encoded text value>: same as above but case insensitive.
Example value: CONTAINi V2lubmVy
• CONTAINn <base64 encoded text value>: the cell must NOT contain the text value
for the rule to apply. Example value: CONTAINn V2lubmVy
• CONTAINni <base64 encoded text value>: same as above but case insensitive.
Example value: CONTAINni V2lubmVy
• EMPTY: the row/column must contain at least one cell whose value is empty.
• EMPTYT: the row/column must contain at least one cell whose value is empty after
being trimmed.
• GREATER <base64 encoded argument>: the row/column must contain at least one
cell whose value is greater than the specified argument for the rule to apply. The
argument can be:
20
1. a numeric value, e.g. #32 → GREATER IzMy
2. a date string, e.g. [2013-12-01] or [-30 days] → GREATER
WzIwMTMtMTItMDFd or GREATER Wy0zMCBkYXlzXQ==
3. a text value, e.g. “Jones” → GREATER 4oCcSm9uZXPigJ0=
Note that the # indicates a numeric value, the double quotes a text value and the
square brackets a date string. IzMy is the based64 encoded value of #32,
WzIwMTMtMTItMDFd is the based64 encoded value of [2013-12-01] and
4oCcSm9uZXPigJ0= the based64 encoded value of “Jones”. The comparison is done
according to the specified data type.
• GREATERE <base64 encoded argument>: the row/column must contain at least one
cell whose value is greater than or equal to the specified argument for the rule to
apply. See GREATER above for examples and available argument data types.
• LESS <base64 encoded argument>: the row/column must contain at least one cell
whose value is less than the specified argument for the rule to apply. See GREATER
above for examples and available argument data types.
• LESSE <base64 encoded argument>: the row/column must contain at least one cell
whose value is less than or equal to the specified argument for the rule to apply. See
GREATER above for examples and available argument data types.
• EQUAL <base64 encoded argument>: the row/column must contain at least one cell
whose value is equal to the specified argument for the rule to apply. See GREATER
above for examples and available argument data types.
• MIN [ROW SEARCH RANGE],[COLUMN SEARCH RANGE]: the cell must be
numeric and contain the lowest (minimum) value within the range specified by the
row/column range arguments. See below for acceptable values for ROW/COLUMN
SEARCH RANGE. Example value: MIN [1-3][1-L1]
• MAX [ROW SEARCH RANGE],[COLUMN SEARCH RANGE]: the cell must be
numeric and contain the highest (maximum) value within the range specified by the
row/column range arguments. Example value: MAX [1-3][1-L1]
• MEDIAN [ROW SEARCH RANGE],[COLUMN SEARCH RANGE]: the cell must be
numeric and contain the middle (median) value within the range specified by the
row/column range arguments. Example value: MEDIAN [1-3][1-L1]
If the type element is TABLE, this case be:
• ALL: the rules applies all times, regardless of the size and the contents of the table
• ROWS> <integer value>: The minimum number of rows the table must have for the
rule to apply. Example value: ROWS > 3
• ROWS>= <integer value>: Same as above, but instead of "greater than" we use for
comparison "greater than or equal". Example value: ROWS >= 3.
• ROWS< <integer value>: The maximum number of rows the table must have for the
rule to apply. Example value: ROWS < 10
• ROWS<= <integer value>: Same as above, but instead of "less than" we use for
comparison "less than or equal". Example value: ROWS <= 10.
• COLUMNS> <integer value>: The minimum number of columns the table must
21
have for the rule to apply. Example value: COLUMNS > 3
• COLUMNS>= <integer value>: Same as above, but instead of "greater than" we use
for comparison "greater than or equal". Example value: COLUMNS >= 3.
• COLUMNS< <integer value>: The maximum number of columns the table must
have for the rule to apply. Example value: COLUMNS < 10
• COLUMNS<= <integer value>: Same as above, but instead of "less than" we use
for comparison "less than or equal". Example value: COLUMNS <= 10.
• CELLS> <integer value>: The minimum number of cells the table must have for the
rule to apply. Example value: CELLS > 3
• CELLS>= <integer value>: Same as above, but instead of "greater than" we use for
comparison "greater than or equal". Example value: CELLS >= 3.
• CELLS< <integer value>: The maximum number of cells the table must have for the
rule to apply. Example value: CELLS < 10
• CELLS<= <integer value>: Same as above, but instead of "less than" we use for
comparison "less than or equal". Example value: CELLS <= 10.
• SAME <base64 encoded text value>: the row/column cells must be equal to the text
value for the rule to apply. Example value: SAME V2lubmVy
• SAMEi <base64 encoded text value>: same as above but case insensitive. Example
value: SAMEi V2lubmVy
• SAMEn <base64 encoded text value>: the row/column cells must NOT be equal to
the text value for the rule to apply. Example value: SAMEn V2lubmVy
• SAMEni <base64 encoded text value>: same as above but case insensitive. Example
value: SAMEni V2lubmVy
• CONTAIN <base64 encoded text value>: the row/column cells must contain the text
value for the rule to apply. Example value: CONTAIN V2lubmVy
• CONTAINi <base64 encoded text value>: same as above but case insensitive.
Example value: CONTAINi V2lubmVy
• CONTAINn <base64 encoded text value>: the row/column cells must NOT contain
the text value for the rule to apply. Example value: CONTAINn V2lubmVy
• CONTAINni <base64 encoded text value>: same as above but case insensitive.
Example value: CONTAINni V2lubmVy
The LIMIT SUBRANGE can be:
• <integer value from>-<integer value to>: A range of integers which indicates the
range of rows or columns you are referring to. Example value: 1-3
• > <integer value from>: A lower limit which indicates the range of rows or columns
you are referring to. Example value: > 3
• >= <integer value from>: Same as above, but instead of "greater than" we use for
comparison "greater than or equal". Example value: >= 3
• < <integer value to>: An upper limit which indicates the range of rows or columns
you are referring to. Example value: < 3
• <= <integer value to>: Same as above, but instead of "less than" we use for
comparison "less than or equal". Example value: <= 3
• FIRST <integer value>: the integer value indicates the first X rows/columns you are
referring to. Example value: FIRST 3

22
• LAST <integer value>: the integer value indicates the last X rows/columns you are
referring to. Example value: LAST 3
• ALL: all rows/columns. This is equivalent to range 1-L1. Example value: ALL
The ROW/COLUMN SEARCH RANGE can be:
• <integer value>: An integer value which indicates which row or column you are
referring to. Example value: 1
• <integer value from>-<integer value to>: A range of integers which indicates the
range of rows or columns you are referring to. Example value: 1-3
• <integer value>,<integer value>,...,<integer value>: A comma separated list of
integers, indicating the specific rows/columns you are referring to. Example value:
1,3,5
• > <integer value from>: A lower limit which indicates the range of rows or columns
you are referring to. Example value: > 3
• >= <integer value from>: Same as above, but instead of "greater than" we use for
comparison "greater than or equal". Example value: >= 3
• < <integer value to>: An upper limit which indicates the range of rows or columns
you are referring to. Example value: < 3
• <= <integer value to>: Same as above, but instead of "less than" we use for
comparison "less than or equal". Example value: <= 3
• FIRST <integer value>: the integer value indicates the first X rows/columns you are
referring to. Example value: FIRST 3
• LAST <integer value>: the integer value indicates the last X rows/columns you are
referring to. Example value: LAST 3
• SAME: the same row/column. This value is considered dynamic, as it changes
depending on the current cell we are examining. Example value: SAME
• P<integer value>: The X previous row/column from the current element. So, for
instance if the current id is 5, P1 = 4, P2=3, P3=2, etc. Example value: P1
• N<integer value>: The X next row/column from the current element. So, for instance
if the current id is 5, N1 = 6, N2=7, N3=8, etc. Example value: N1
• ALL: all rows/columns. This is equivalent to range 1-L1. Example value: ALL
Important note: Starting from version 4.0 all text values used in text comparison range selections
(CONTAIN, SAME, etc) are stored as base64 encoded string in the rules archive file. For this
reason, at the end of the rule form there is a base64 encoder/decoder. Use this utility to convert
plain text to base64 encoded text or vice versa.
3. Range Key: This field can be used to fine tune the range selection when autospan (i.e. cell
merging) occurs. For instance, we may have a table where the second column contains the
days of week and the third column contains the activities for that day. In order to make the
table easier to read, you apply a rule with Range=ODD and Range Key=2. What this means
is that the range counter will increment every time a new day appears on the second column
and not on every new table row. Note: In previous versions it was called Range Count.
4. Priority: This affects the execution order of the rule that in some cases makes a different.
Up to version 5.0, the execution order was defined automatically using an algorithm that was
suitable for most users. Nevertheless, in some cases it's hard to decide which rule to execute
first as both execution paths make sense. In such cases, use the priority field to specify
explicitly the execution order. Note that priority must be an integer number and the higher

23
the priority the faster the rule will be executed. Leave the default priority = 0 for all the rules
that you want the system to define their execution order.
5. Style/CSS Selector: The CSS selector that will be applied to the specified table element
(row/column/cell/table) when the element range is within limits. The specific attributes of
the CSS selector need to be defined elsewhere, in a separate CSS file. Example value:
rsheader
6. Autospan: The autospan field indicates whether or not an automatic cell merging should
take place when empty neighboring cells are present. The typical case scenario is when the
first row of a table is used to display the table title/caption and you want to merge all cells of
the first row into a single one.
Note: Autospan should not be used together with some other rules that do not like cell
merging. One of the is the dynamic table sorting on the client side which requires a fixed
number of cells on each row.
7. Remove: Check this box if you want all the table rows/columns that fall in the specified
range to be removed. Very handy in cases you want to remove table rows that contain a
specific text value, or dates outside a certain range.
8. Data/Format: If you want the cells of the specified range to have a specific format, you can
use this field to specify one. For each available datatype there is a list a applicable options,
as described in the list below:
▪ Text:
• Uppercase: HELLO WORLD
• Lowercase: hello world
• Capitalize first letter: Hello world
• Capitalize first letter of each word: Hello World
▪ Number:
• Decimals: most likely 2. Example 12.30
• Decimal point: For US is the dot, for most European countries is the comma.
Example 12,30 (US) 12.30 (Europe)
• Thousands separator: For US is the comma, for most European countries is the dot.
Example:1,000 (US) 1.000 (Europe)
▪ Currency:
• Decimals: most likely 2. Example 12.30
• Decimal point: For US is the dot, for most European countries is the comma.
Example 12,30 (US) 12.30 (Europe)
• Thousands separator: For US is the comma, for most European countries is the dot.
Example:1,000 (US) 1.000 (Europe)
• Currency symbol: The currency symbol such as € or $. Note, the currency symbol is
not required and it can be omitted.
• Currency symbol position: If the currency symbol is present, whether it should
appear before or after the numeric value.
▪ Date:
• DD-MM-YY (e.g. 21-10-09)

24
• DD/MM/YY (e.g. 21/10/09)
• DD.MM.YY (e.g. 21.10.09)
• MM-DD-YY (e.g. 10-21-09)
• MM/DD/YY (e.g. 10/21/09)
• DD-MM-YYYY (e.g. 21-10-2009)
• DD.MM.YYYY (e.g. 21.10.2009)
• DD/Month/YYYY (e.g. 21/Oct/2009)
• MM-DD-YYYY (e.g. 10-21-2009)
• MM/DD/YYYY (e.g. 10/21/2009)
• Month Day, Year (e.g. Jan 1, 2009)
• Weekday, DD-Month-YYYY (e.g. Monday, 21-Oct-2009)
• Weekday, DD/Month/Year (e.g. Monday, 21/Oct/2009)
• Weekday, Month Day, Year (e.g. Monday, Oct 1, 2009)
• Weekday, DD-Month-YYYY (e.g. Monday, 21-Oct-2009)
• Weekday, Day Month (e.g. Monday, 21 October)
• Weekday, Month Day (e.g. Monday, October 21)
9. Data/Replacement: Another new feature that may come in handy is the ability to replace
one text with another. For example you could replace the text TS with Total Sales or the
word STAR with the html code <img src=”star.png” />. Note, the flag CS stands for “Case
Sensitive”. Starting from version 4.0 the text values need to be base64 encoded. You can use
the base64 encoder/decoder at the end of the Rule form to covert between plain text and
base64 encoded text.
Important: The PHP function behind the replacements is the mb_ereg_replace. Therefore all
“replace from” and “replace to” are treated as POSIX extended regular expressions and you
may need to escape some special characters, such as the period (.)
10.Data/Calculation: With Tabulizer you can do simple calculations based on the values of
other cells, similar to Word or Excel. For instance, you can calculate the sum of all the cells
above, or find the average value of all cells on the right. The calculation applies to numeric
values only; cells with non numeric values get ignored. You can use one of the system
calculation functions listed below, or define your own custom function:
• Add
• Multiply
• Average
• Median
• Min
• Max
Let's say you want to add all the (numeric values) above. Here are the correct settings:

25
Function: ADD
Arguments Range: [SAME][1-P1]
Custom Arg:
The function name is ADD, since you are going to use the pre-built function ADD, that
adds all specified table cells. These are defined in the arguments range in the following
format: [row range][column range]
In our example:
• row range: SAME → same row with the current cell
• column range: 1-P1 → P1 means the previous element from the current one,
therefore 1-P1 means all columns from 1 up to the previous column, compared to the
column of the current cell.
If the current cell (on which the calculation is executed) is the intersection of row #3 and
column #5, then for cell[3,5] the specified range [SAME][1-P1] = range[3][1-4] => cell[3,1]
+ cell[3,2] + cell[3,3] + cell[3,4].
For a better understanding of what values the Arguments Range can take, please read the
paragraph on “ROW/COLUMN SEARCH RANGE”.
Another advanced feature when it comes to calculation is that you can build your own
custom calculation functions and distribute them along with rest of the ruleset archive.
This advanced feature will be covered elsewhere.
9. Table/Split: When you have a large table, it may be a good idea to split it into smaller
tables. These tables can be on the same page, or on multiple pages. Here are the available
options:
• Max Rows/Table: The number of rows each smaller table will have, taking into
account any column span that may occur.
• Group Rows By Value of Column #: All rows that have the same value in the selected
column will be grouped together to the same table.
• Multipart: this means that the table will break into smaller tables on the same page.
• Multipage: this means that the table will break into smaller tables on separate pages.
• Index: When you add the keyword index, an index of all multipart tables will be
created.
• Top: the top rows of the original table that will be used as top header to all smaller
tables.
• Bottom: the bottom rows of the original table that will be used as bottom header to
all smaller tables.
26
10. Table/Pagination: Another approach to display a large table into a smaller space is to use
in-line pagination. The pagination takes places on the client-side via Javascript code. Here
are the available parameters for this feature:
• Type: Select if you want to display only the “next/previous page” arrows, or the
arrows and the page numbers.
• Limit (Rows/Page): How many rows to display on each page table. The default value
is 10 table rows per page.
• Limit Selection: Where to place the limit selection control.
• Position: Where the pagination control will appear (e.g. top-right side of the table)
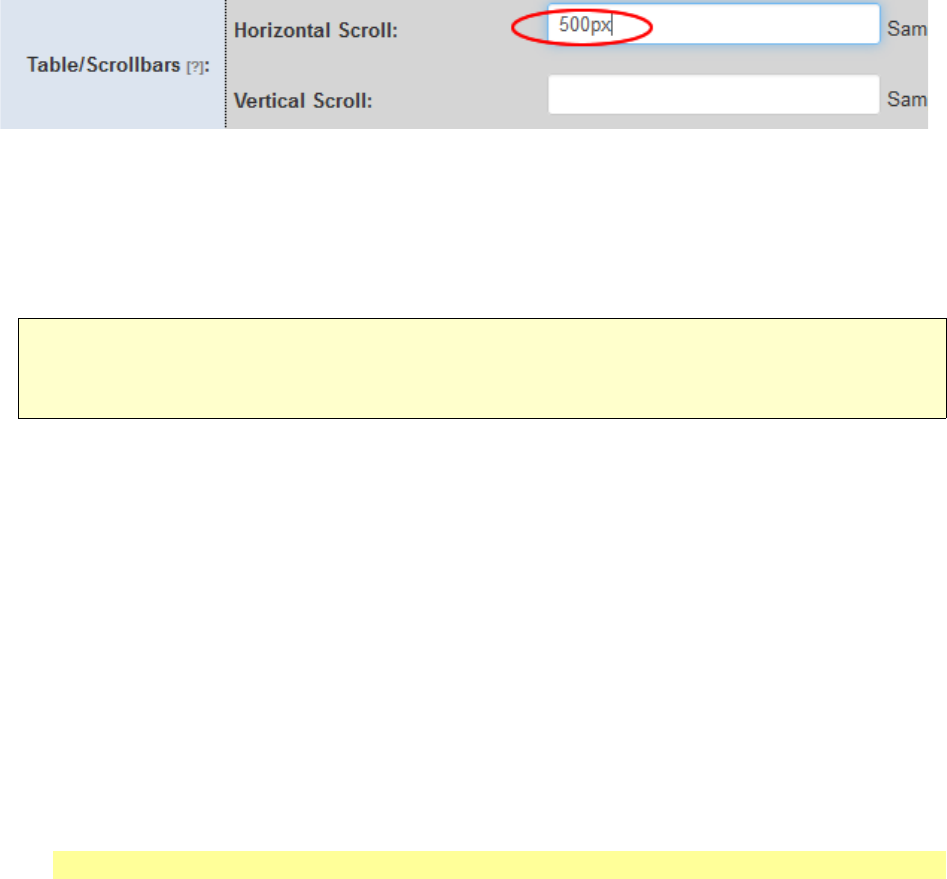
11. Table/Scrollbars: If the table contents are too wide or too long, you can add horizontal
and/or vertical scrollbars. Not in the case of vertical scrollbars, the top header row will
remain fixed and it will not get scrolled down with the rest of the table contents. In order to
activate this feature simple type the scrollbar dimensions.
12. Table/Sort: Tabulizer allows you to sort your table data on the client-side by activating this
feature. You can set the sort order (ascending/descending) and the initial sorting header, i.e.
if “Sort by Column #' is 2 it means that the table will initially be sorted by the header of the
second column. Once the table is displayed, the user can click on other columns headers and
change the sorting order.
Important note: Table sorting does not like rowspans and columns spans because cell
merging makes the dynamic sorting complicated. For this reason, if you have in the same
ruleset another rule that uses autospan you will need to remove it.
13. Table/Search Filter: When a table has many rows it might be difficult to spot what you are
looking for. The Search Filter comes to rescue and you can type a text and only the rows that
contain this particular text will remain on display. Starting with version 5.0 you have many
more options when it comes to search filtering, that are described below.
• Table Filter: Table filters will be applied to the whole table, not any specific column. The
parameters you can set are:
1. Enabled: Check this to enable table-wide search filtering
2. Header Size: How many top headers rows are regarded as “header”. The header is
excluded from any search filtering, so you many increase the default value of 1.
3. Position: Where to display the search filter box. This box, like any other element, can
be styled with regular CSS statements.
You can also pre-populate the value of the search filter using the URL parameter
filter_preselection that has the following format:
table_id_1:value_1^table_id_2:value_2^....^table_id_n:value_n
Note that:
• table_id is not the id of the table HTML element, but the table ordering (the sequence

27
of appearance in the page, counting only tables with search filtering enabled) that
starts from 0, instead of 1. So, the first table in the page has table_id = 0, the second
has table_id = 1 and so on.
• value should be URL encoded, as this is part of the URL.
• Column Filters: Sometimes you want to filter specific columns, not just the whole table.
One of the great new features that came along with Tabulizer version 5.0 is the full control
you have over the column search filters. In the previous versions, when you type the key
phrase in the filter input box all column cells would be searched if they contained the
phrase.
For instance, if the search phrase was "ten" and all cells that contained anywhere the string
"ten" would be included in the results, e.g. Ten, Tenterous, Apten etc. This is called a smart
search and it's still available as the default search method. On top of that, there are a few
other search methods that may be suitable in some cases and they are described in the table
below:
Search Method Description
smart The default search method. Will return
all cells that contain anywhere the key
phrase.
exact This method will return only cells that
contain the exact phrase. Example: The
key phrase is "20" will return only cells
with value "20", but not "120" or "220",
i.e. that contain the value "20".
start_with This method will return only cells that
contain the key phrase at the beginning.
Example: The key phrase "20" will
return "20" and "209" but not "320".
numeric_period Use this method to search for numeric
ranges. For instance, if the column
contain prices and you want to display
only cells whose price is greater than
$1000 or less than $500. You could also
search for prices between $500 and
$1000. The syntax is quite simple and it's
summarized in the examples below:
1000 : will search for all values equal
to 1000
> 1000 : will search for all values
greater then 1000
< 500 : will search for all values less
then 1000
28
500 & 1000 : will search for all values
between 500 and 1000
This search method is smart enough to
remove currency symbol, or other extra
characters. Nevertheless, when you have
decimal numbers (e.g. 12.564) the period
will be treated as the separator for the
decimal number, and the comma (,) as
the thousands separator. If it's the other
way around use the next search method
numeric_comma.
numeric_comma Same as above. The only difference is in
decimal numbers, where the comma will
be treated as the separator for the
decimal number, and the period (.) as the
thousands separator.
Apart from the search method, you can also specify the control type for our column filters.
This can be:
1. input: An input search box, where you can type you key phrase. This is the default
control type.
2. select: An select drop-down box, where you can select a value from a populated
list with all the unique cell values for the specified column. This is recommend
when the column contains a limited number of unique cell values.
The column id, the search method and the control type are combined using the following
format:
column_id_1:control_type_1:search_method_1,column_id_2:control_type_2:search_metho
d_2,...,column_id_n:control_type_n:search_method_n
Only the column_id is required. The control type and the search method will take the default
value, if omitted. So, for instance:
Initial Equivalent
1,2,3 1:input:smart,2:input:smart,3:input:smart
1,2:select,3:input 1:input:smart,2:select:smart,3:input:smart
1:input:start_with,2:select:exact,3:input 1:input:start_with,2:select:exact,3:input:smart
The column search filters appear in the table header, but you can specify:
• The exact header row that they will appear. The default value is 1, which means they

29
will appear on the top row, but you can change that if you want to keep the top row
for the headers and set the filter's row to be the second one (header row = 2).
• Also, you can set the header size to be any value. This is useful, if you want to
exclude some headers rows from the filtering process.
Pre-selected filter values
It is possible to pre-populate the value of an input searh filter or pre-select a drop-down
control box using the URL parameter column_filter_preselection, using the following
format:
table_id_1:column_id_1:value_1^table_id_2:column_id_2:value_2^....^table_id_n:column_
id_n:value_n
Note that:
• table_id is not the id of the table HTML element, but the table ordering (the sequence
of appearance in the page, counting only tables with search filtering enabled) that
starts from 0, instead of 1. So, the first table in the page has table_id = 0, the second
has table_id = 1 and so on.
• column_id is the column ordering (the sequence of appearance in the row) that starts
from from 0, instead of 1. So, the first row column has column_id = 0, the second
has column_id = 1 and so on.
• value should be URL encoded, as this is part of the URL.
14. Table/Responsive: The “responsive design” is the next big thing in wed design, as small
devices (iPads, smart phones, etc) increase their share in web browsing. It's called
responsive because the goal is to have a web page (or a table in our case) that “responds” or
adjusts to the screen size of the user's device. One thing that needs to be clear in your mind
it that “responsiveness” is a characteristic not a concrete implementation and this is way
Tabulizer offers you 6 different responsive design patterns to choose from. Not everyone is
good for everybody, so you need to examine them to see which one is better for your
particular needs. The six responsive patterns where selected and implemented based on their
current popularity among internet users and they are:
• Horizontal Scrollbar
• Table reflow
• Header selection
• Fixed headers + Expand
• Fixed left header + Scroll
• Flip headers
15. Table/Modify: Use this feature to define a custom function that will accept as input the
table, modify it in some way and return it for further processing by Tabulizer.
16. Table/Export: Exporting table data as file is as simple as checking the enable box.
• Allow Download: Check if you want the user to be able to download the table
• Allow Email: Check if you want the user to be able to email the table
• Strip Tags: Check if you want to remove the HTML tags from the table data before
30
saving them into the table.
17. Table/Prepend: This feature gives you the possibility to add text or HTML code right
before the table, all the times or under certain conditions (combined with the proper range
value).
It is possible to use javascript code as well, but note that if your Joomla editor is using
filtering (for security purposes) that code will get stripped out. So, you may need to
disable input filtering.
18. Table/Append: This feature gives you the possibility to add text or HTML code right after
the table, all the times or under certain conditions (combined with the proper range value).
The note about input filtering stripping out HTML code applies here as well.
19. Add Files: This gives you a change to add CSS and Javascript files required by your ruleset.
For security purposes, these files should reside only in the appropriate folders, which are:
• {joomla root directory}/template/tabulizer/css ← for CSS files
• {joomla root directory}/template/tabulizer/js ← for Javascript files
If you want to add more than one files, use the semicolon (;) as your file's separator.
20. Table/Graph Conversion: One new exciting new feature of Tabulizer v4.0 is the ability to
convert tables into graphs. In order to do that you need a graph ruleset that specifies exactly
the various aspects of the graph, e.g. its type, colors, preferences, etc. Currently you can
create your own graph ruleset online at www.tabulizer.com. The resulting ruleset archive
contains the graph ruleset file that is stored in {your joomla root
directory}/templates/tabuluzer/graph folder.
Currently, the online graph creation wizard creates a ruleset archive that is complete,
therefore it is not required to create your own ruleset and add a new rule with Table/Graph
field set to the graph ruleset file value. So, for the time being just remember that is possible
that a graph ruleset created with the online creation wizard can be used into multiple rulesets
by creating a new rule and setting the Table/Graph field to the appropriate value.
Example value:
Table/Graph: rs_ctsjqeex.xml
The rs_ctsjqeex.xml resides in{your joomla root directory}/templates/tabuluzer/graph folder
and it was added there when you imported the rs_ctsjqeex.zip archive file that was
produced by the online graph creation wizard at www.tabulizer.com
A rule belongs to a ruleset, so before you create a new rule you must create first the corresponding
ruleset.
What is a ruleset
A ruleset is a set (i.e. a group) of rules. When you insert a new table via the Tabulizer editor plugin
you are asked to specify the applicable ruleset. All rules that belong to the selected ruleset will be
applied during the conversion of the input text to the final table HTML code. In other words, a
ruleset is nothing more than a group of rules that all together achieve the desired visual appearance
and data transformation. When you create a new ruleset, you must specify the following
properties/fields:

31
1. Ruleset Title: The title of the ruleset. Because ruleset selection is based on the title field, (a)
it must be unuiqe, i.e. each ruleset must have a unique title and no two rulesets should share
the same one (b) it must be short but descriptive.
2. Ruleset Description: An optional description of the ruleset.
3. Ruleset Name: The ruleset name identifies the ruleset in all internal operations and it can be
any combination of latin letters (a-z), digits (0-9), the underscore (_) and the hyphen (-). No
white spaces or special characters are permitted. The ruleset name, even though it does not
appear on the ruleset selection controls, it must be globally unique, i.e. no two rulesets
should have the same name.
4. Ruleset Suffix: The ruleset suffix is a CSS selector that will be added to the resulting table
css class. For example, is the ruleset suffix is "ruleset_nbl" and we apply the ruleset to an
input text, the HTML source code of the resulting table might look like this:
<table class="tabtable-ruleset_nbl"> ... </table>
The combined CSS selector "tabtable-ruleset_nbl" could be defined in a css file to style the
whole table, similar to the example of the Overview paragraph.
5. Ruleset Style: The associated CSS file that is needed by the ruleset. If left empty, the ruleset
style will be inherited by the archive style. The usual approach would be to leave this field
empty and the define the style in the Ruleset Archive edit form, since most of the times all
rulesets that belong to the same archive share the same CSS file.
6. Sample date: If you check this optional field, a textarea appears where you can store your
sample data for the preview operation. If you leave this field blank, when one previews the
ruleset, random data will be used instead.
In order to create a ruleset, you must create first a ruleset archive that will contain it.
What is a ruleset archive
A ruleset archive is an XML file that contains one or more rulesets. Even though it is possible to
edit a ruleset archive via an XML editor or a simple text editor, like Windows Notepad, it is
recommended that you create, edit and delete a ruleset archive via the Tabulizer component. When
you create a new ruleset archive, you must specify the following properties/fields:
1. Archive Filename: The filename of the archive. It should have an xml extension and like
every other file on the system it must be unique, i.e. no two ruleset archives can have the
same filename. Important! The xml extension should be in lowercase (e.g. archive.xml, not
archive.XML) otherwise the Tabulizer might not recognize it.
2. Archive Title: The title of the rulset archive can be any short description of the archive.
3. Archive Name: The name of the ruleset archive is used internally and it should be globally
unique, i.e. no two ruleset archives should have the same name.
4. Archive Style: The associated CSS file that is needed by the ruleset. This value will be
inherited by all containing rulesets.
5. Archive Version: The version of this ruleset archive. Useful if you have multiple versions of
the same archive.
6. Author Name: The author of this archive (full name).
7. Author Email: The author's email address.
8. Author URL: The author's web address (URL).
The default directory in which all ruleset archives reside is templates/tabulizer/rules.
32
Preview ruleset styling
The Tabulizer component allows you to preview the ruleset, so you can have and idea of how it
looks like before you use it. This is very useful for rulesets that were created by someone else, or
for a new ruleset you are creating and you want to verify that it looks as expected.
In order to preview a ruleset, from the Tabulizer component click on ruleset archive that contains
the ruleset you want to preview and then click on the "Preview" link in the actions column. In this
case you will preview all rulesets of the particular archive. If you want to preview a single ruleset,
the click first on the “View” link of the ruleset archive and then click on the “Preview” link of the
desired ruleset.
When previewing a ruleset and no sample data are specified, Tabulizer will create a random sample
data set for you. Most of the times this is sufficient, but if the ruleset has specific requirements (let's
say a replacement rule and needs to be demonstrated) you need to set the sample data of the ruleset
manually.
Automatically create and edit CSS skeleton for rulesets
Since for each styling rule you define, there must be a corresponding CSS selector in the companion
CSS file, the Tabulizer component offers you the option to create automatically a skeleton code for
all CSS selectors defined in the ruleset with a single click. For instance, if you export the following
ruleset archive (basic_rulesets.xml):
<?xml version="1.0" encoding="utf-8"?>
<rules name="basic_rulesets" title="Basic Rulesets" style="basic_rulesets.css">
<ruleset name="ruleset_nbl" title="National Basketball League" suffix="ruleset_nbl" >
<rule element="row" range="1" style="nbl_header"></rule>
<rule element="column" range="1" style="nbl_teams"></rule>
<rule element="row" range="EVEN" style="row_even"></rule>
</ruleset>
</rules>
it will produce the following CSS skeleton:
/* ruleset_nbl */
table.tabtable-ruleset_nbl {}
table.tabtable-ruleset_nbl tr.tabrow {}
table.tabtable-ruleset_nbl tr.tabrow td.tabcol {}
table.tabtable-ruleset_nbl tr.tabrow td.nbl_teams {}
table.tabtable-ruleset_nbl tr.nbl_header {}
table.tabtable-ruleset_nbl tr.nbl_header td.tabcol {}
table.tabtable-ruleset_nbl tr.nbl_header td.nbl_teams {}
table.tabtable-ruleset_nbl tr.row_even {}
table.tabtable-ruleset_nbl tr.row_even td.tabcol {}
table.tabtable-ruleset_nbl tr.row_even td.nbl_teams {}
Not all CSS selectors need to be defined. If don't need a selector you can either keep it for future
use or delete it in order to make the resulting CSS file smaller and cleaner. Note also that the CSS
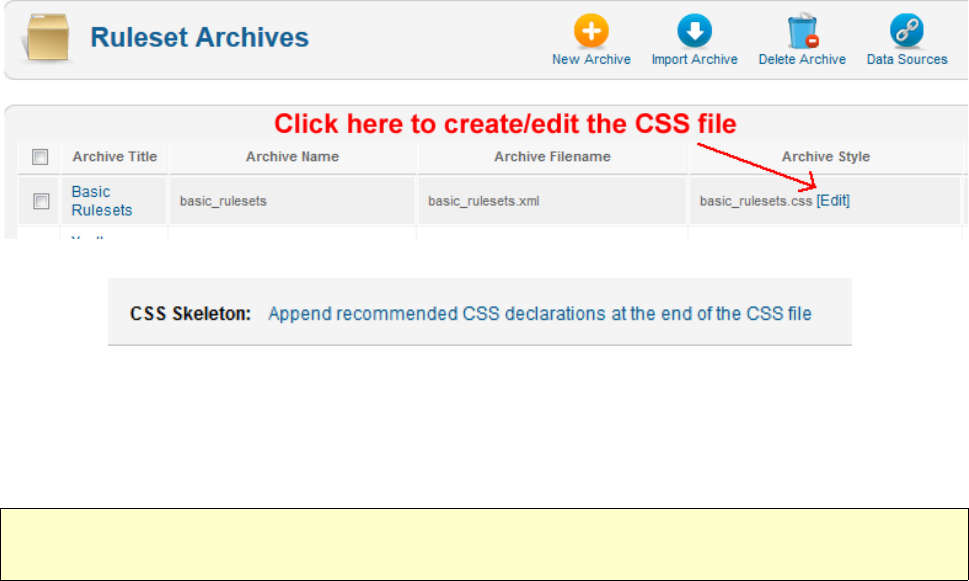
33
skeleton contains no styling properties (background color , font size, etc) for the exported CSS
selectors. This is a task for you to do, based on your specific needs.
If you save the CSS file and it's not already created, it will be created for you and stored in the
templates/tabulizer/css folder. At the end of the CSS editing form you will find the current preview
of the ruleset. This is very convenient as you can watch how the appearance changes as you set the
CSS selectors.
When you modify a CSS file and see no changes in the preview section, you may need to reload
the page just to make sure the browser does not use the older version of the CSS file.
Where are the files located
All files used by ruleset archives are stored in the appropriate {your joomla
directory}/templates/tabulizer subfolder. More specifically, you will find the following subfolders
that contain files used by the available rulesets:
• rules: the actual rules files (extension xml)
• css: the companion CSS files
• images: image files
• js: javascript files
• calc: the built-in and custom (user defined) calculation functions.
• modify: the built-in and custom (user defined) modification functions.
• graph: graph rulesets (how to draw a dynamic graph – used for converting a table into a
graph)
• docs: documentation files for the various ruleset archives.
• data: the data files used by the data sources (e.g. Excel and CSV).
• data_sources: the installation files of the various data sources.
• language: the language files used by the modification functions.
• htc: behaviour files for internet explorer.
34
If you had previously installed Tabulizer (version 2.0 or older) you may find a legacy folder
templates/tabulizer/legacy that contains previously created ruleset archives and CSS files. All CSS
files that are contained in templates/tabulizer/legacy/css directory will be included automatically by
the TabulizerCSSLegacy system plugin.
The location of these folders/files cannot be changed.
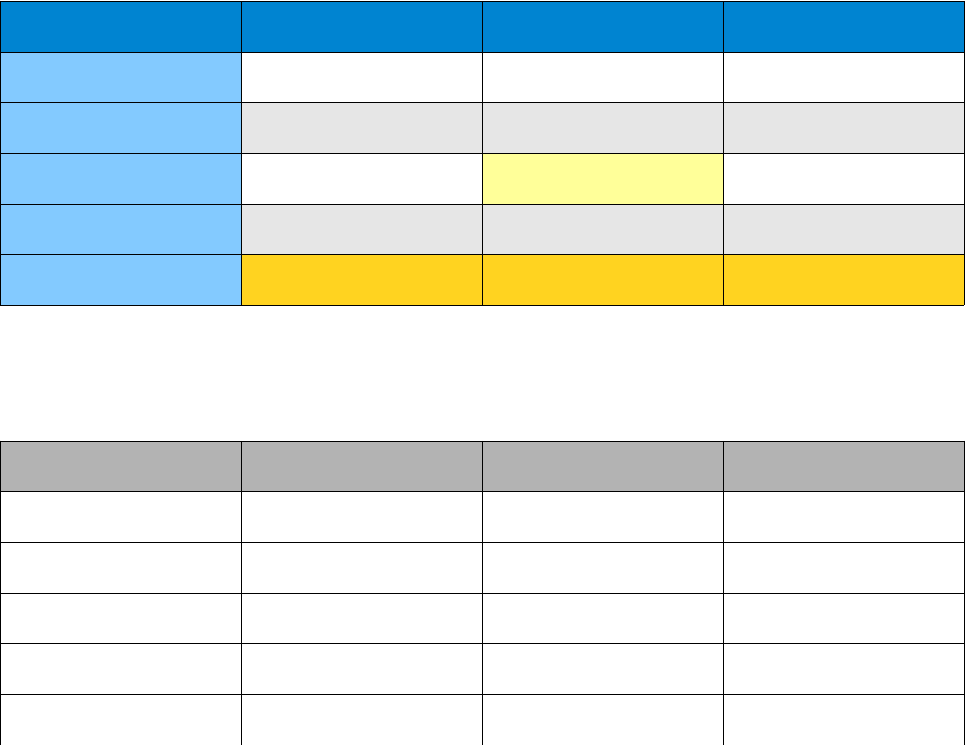
35
Example: Creating a ruleset from scratch
In order to demonstrate the concepts described previously, we will give an example of how to create
your own ruleset that you will use to style a table for your regional sales. If you are not familiar
with the terms “rules”, “rulesets” and “ruleset archives” please read the previous section in this
document.
Setting the requirements
The first step is to write down your styling requirements. In this example we assume the
requirements are:
• You want the first row to have white bold letters on a blue background
• You want the first column to have bold black letters on a blueish background
• You want even rows to have a slightly greyish background, so it is easier to read the table
rows
• You want the last row to have an orange background with bold letters
• You want cells with large values (let's say larger than 50) to have a yellow background, so it
is easier to visually spot regions/periods with large sales.
Based on the previous requirements, a sample sales table would look like this:
Region/Period June July August
North 10 5 19
South 15 17 16
East 20 65 24
West 16 28 27
Total 61 115 86
Creating the rules
Each requirement most likely will correspond to one styling rule. In our example, the following
rules must be created:
Rule # Type Range Style/CSS Selector
1 Row 1 st_periods
2 Column 1 st_regions
3 Row EVEN st_row_even
4 Row L1 st_total
5 Cell > 50 st_large_amount
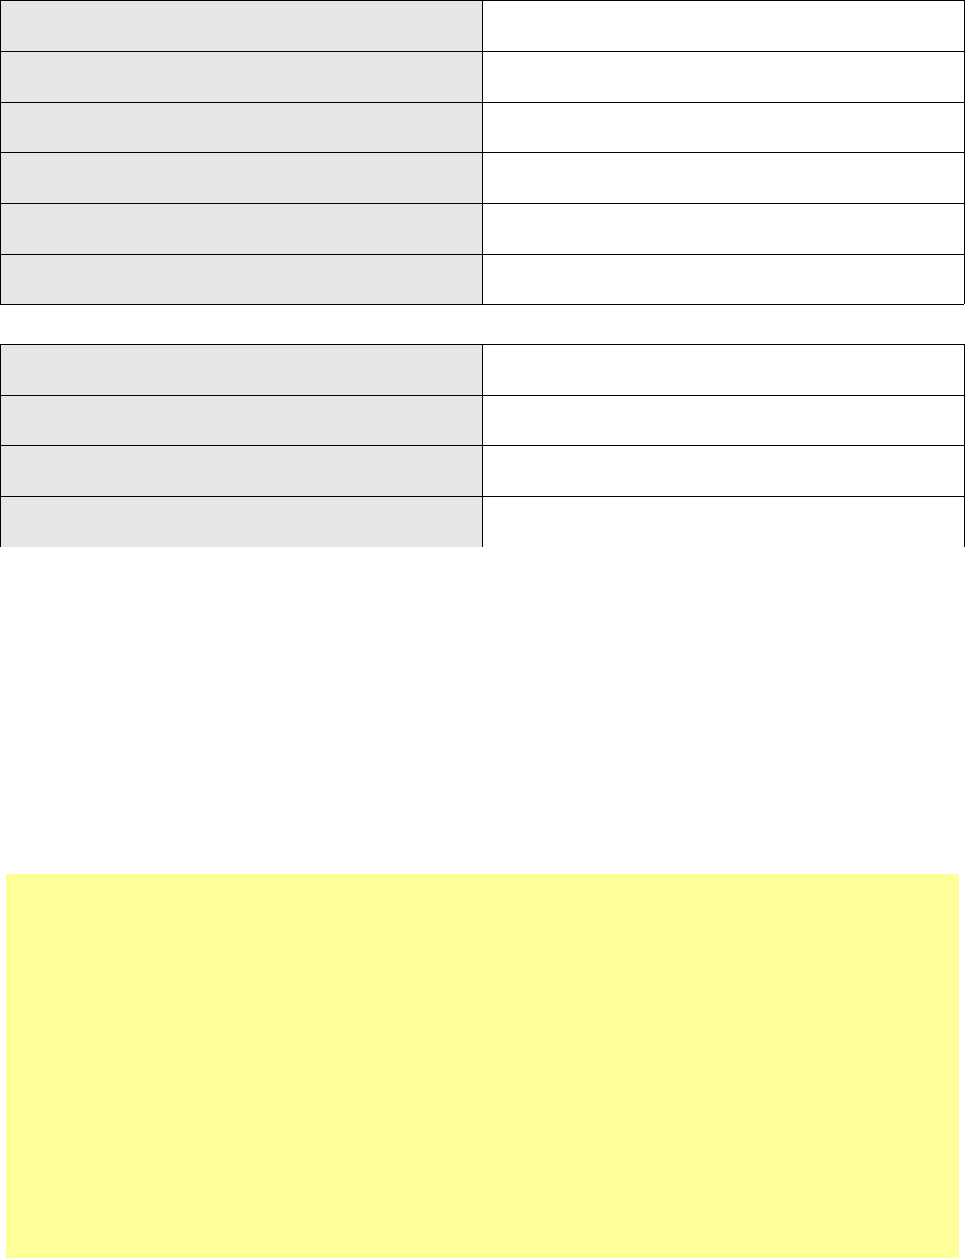
36
We group all these five rules in a ruleset with the following properties:
Rulset Title Regional Sales
Ruleset Description The regional sales of our company
Ruleset Name regional_sales
Ruleset Suffix regional_sales
Ruleset Style
Sample Data No
Finally, we create a new ruleset archive file to store the ruleset with the following properties:
Archive Filename sales.xml
Archive Title Sales Rulesets
Archive Name sales
Archive Style sales.css
Of course, the actual order of ruleset creation is the opposite, i.e. we first create the ruleset archive,
then the ruleset and finally the rules. We present them in the opposite order, because it's closer to the
way we conceptually design the rules in our mind.
Defining the CSS Selectors.
So far, we have created the rulesets but we have not specify how they will be interpreted. For
instance, we have said the we want to apply the styling selector st_periods to the first row of the
table, but we have not specified the properties of this selector (in our example: white bold letters on
a blue background). The definition of all CSS selectors is done in separate CSS files, unless of
course this is done already. Let's define them right now:
/* first row */
tr.st_periods { color: #FFFFFF; background-color: #0084D1; font-weight: bold; }
/* first column */
td.st_regions { color: #000000; background-color: #83CAFF; font-weight: bold; }
/* even rows */
tr.st_row_even { color: #000000; background-color: #E6E6E6; }
/* last row */
tr.st_total { color: #000000; background-color: #FFD320; font-weight: bold; }
/* cells with large amounts */
td.st_large_amount { color: #000000; background-color: #FFFF99; }
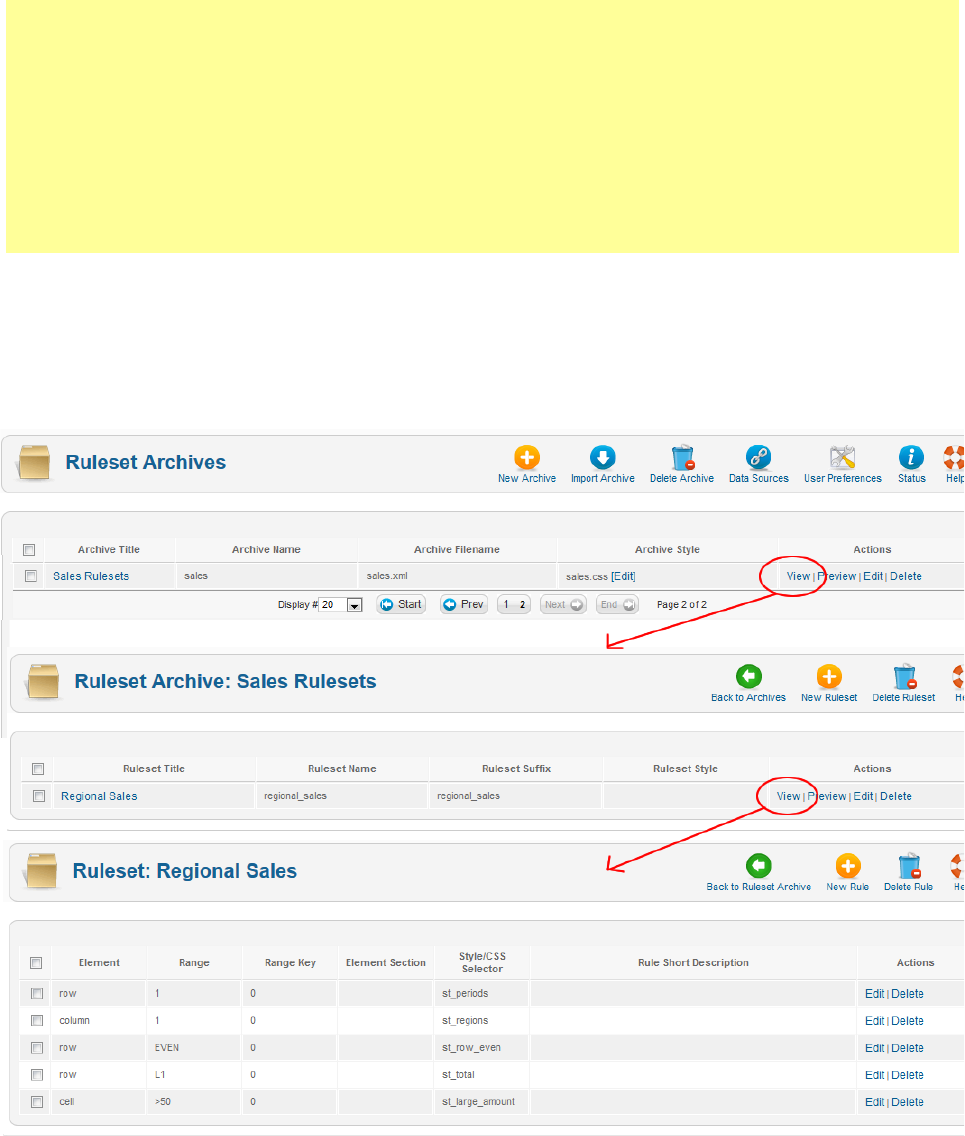
37
/* take special care of intersecting cells */
tr.st_periods td.st_regions { color: #FFFFFF; background-color: #0084D1; font-weight: bold; }
tr.st_total td.st_large_amount { color: #000000; background-color: #FFD320; font-weight:
bold; }
/* apply some styling to the whole table */
.tabtable-regional_sales { background-color: #FFFFFF; }
table.tabtable-regional_sales tr td.tabcol { padding: 5px; }
Save this file as sales.css in the templates/tabulizer/css directory, which is created automatically
during the Tabulizer installation. Notice, that we have set the archive style to this value, and as a
result, when a Tabulizer creates a table with the selected ruleset a CSS directive will be appended,
that looks like this: {tabulizer:include style[sales.css] id[tab_goustH6r82]}. This directive instructs
the TabulizerCSS plugin to include the sales.css file automatically.
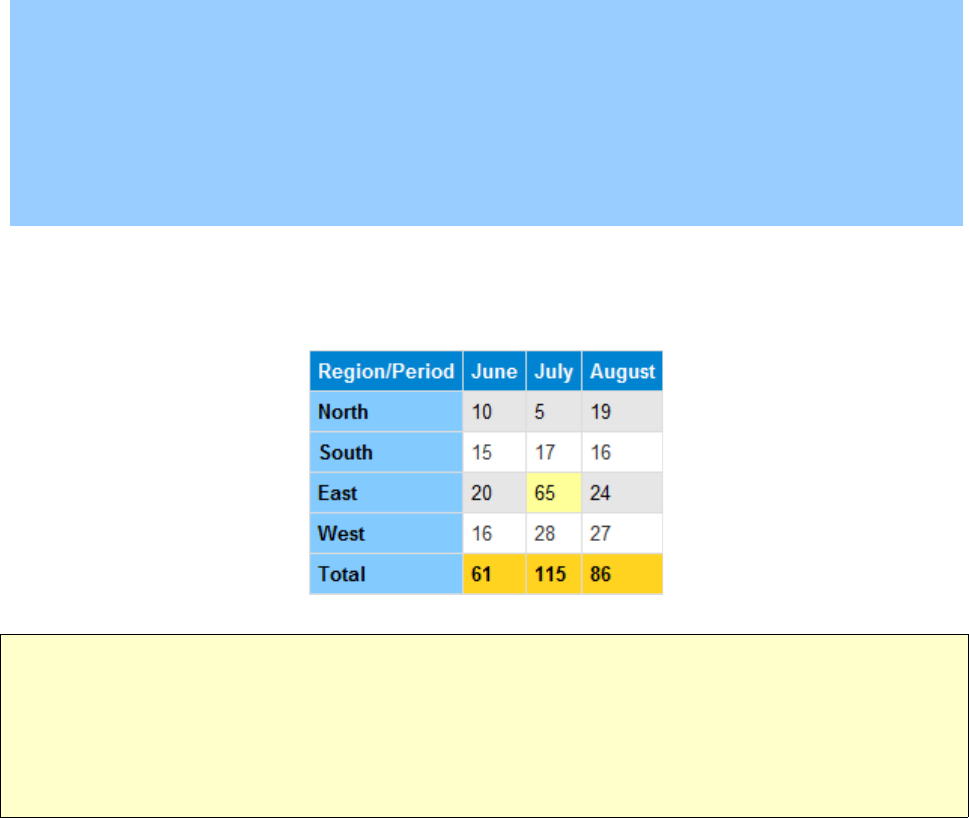
38
Putting it all together
So far we have created the ruleset and we have define the CSS selectors. The last step is to verify
that the resulting sales table appears as expected. To do so, we create a new article (Content →
Article Manager → Add New Article ) and we click on the Tabulize! button to pop-up the Tabulizer
form. If there is no Tabulize! button, make sure you have installed and activated the Tabulizer
editor plugin.
In the form that appears, type in the Input Text box the following sample data and click on the
Convert button, after you have set the Column separator to “Comma (,)” and the Ruleset to
“Regional Sales”.
Region/Period,June,July,August
North,10,5,19
South,15,17,16
East,20,65,24
West,16,28,27
Total,61,115,86
Click on the Insert button to copy the produced HTML to your article's body. Save the article and
preview it (from the site's view, not the admin view). The end result should look like this:
Note that it is quite common, that some parts of your table may appear different because some
parts of your table are defined differently in your template's CSS files. In order to override these
definitions, you must define your CSS selectors with higher specificity (search the internet for
“css selectors precedence” to understand how CSS selectors are applied). Alternatively, you could
use different CSS selectors to avoid the conflict between template's CSS defines and Tabulizer
CSS defines.
Naming conventions
In our example we used regional_sales as our rulset name. This is acceptable if we developed the
ruleset for local use, but what if we developed this ruleset for a third-party site? Since ruleset names
must be unique on any given system, we want to avoid name conflicts by using a proper naming
convention. Tabulizer has adopted a naming convention similar to Java, so a ruleset name with
global distribution in mind should start with the website of the developer in reverse order. So, for
example if regional_sales were developed by alterora.gr, the proper ruleset name would be
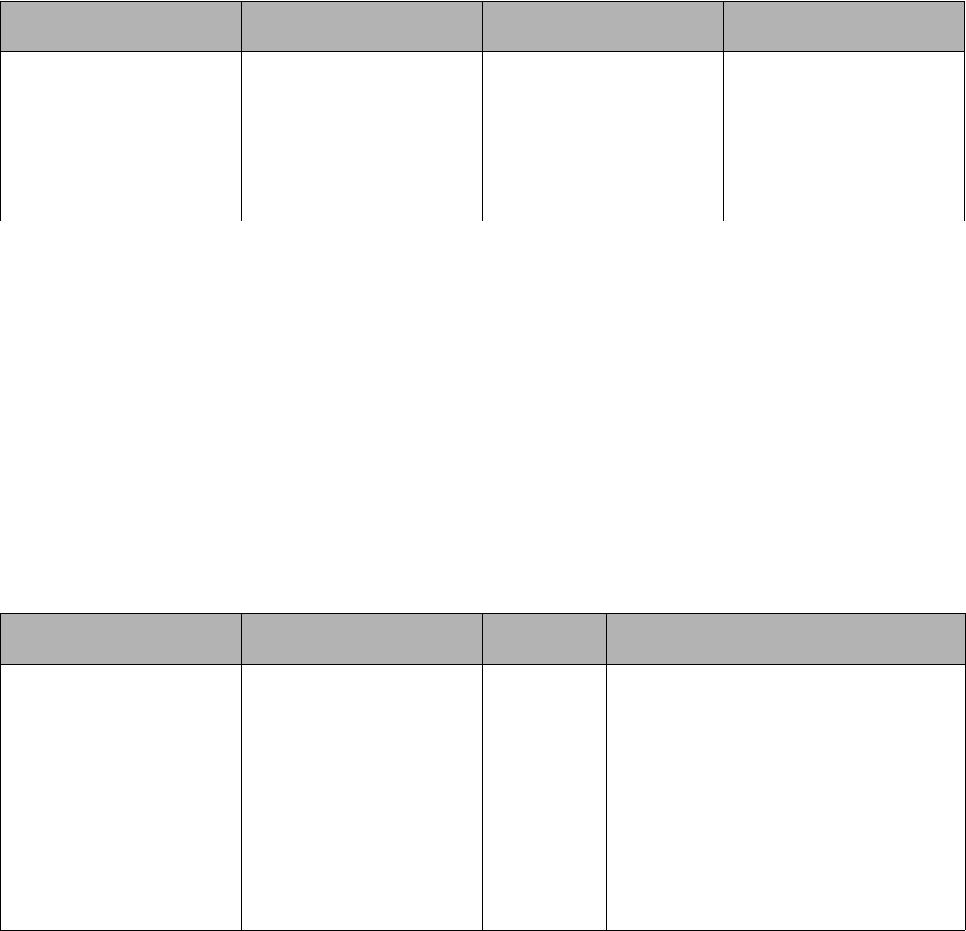
39
gr.alterora.regional_sales, the ruleset archive file would be gr.alterora.sales.xml and the
associated CSS file gr.alterora.sales.css.
Taking our example to the next level
So far we have used only styling rules. We can add a few more rules in order to:
a) Calculate automatically the total sum of the sales for each month
b) Apply the “currency” format in our sales amounts.
c) Merge the cells of the top row of the table that will contain the title/caption of our table
Calculating automatically the total sum
In our “Regional Sales” ruleset, we add the following rule:
Rule # Type Range Data/Calculation
6 Row L1 Function:
Add
Arguments Range:
[1-L2],[same]
What this rule says is that we want the cells of the last row (L1) to be the sum of all the numeric
cells above (row range 1-L2, column range: SAME). The last row contains the total sales of each
month, so there is no need to calculate it elsewhere. Note, we define range as “L1” instead of “6”
because even though that last row is the sixth row and therefore currently the two definitions have
the same effect, if we add a new row in the table the range “6” would be no longer accurate.
Format the cells as currency
Since our table cells contain amounts, it makes perfect sense to format them as currency. We can
add a currency symbol, to add more clarity, or leave each amount/cell with no currency symbol. In
our example, we choose the former option.
Rule # Type Range Data/Format
7 Column LAST 3
• Format: Currency
• Decimals: 2
• Decimal point: comma
• Thousands separator:
Period (.)
• Currency sumbol: €
• Currency sumbol position:
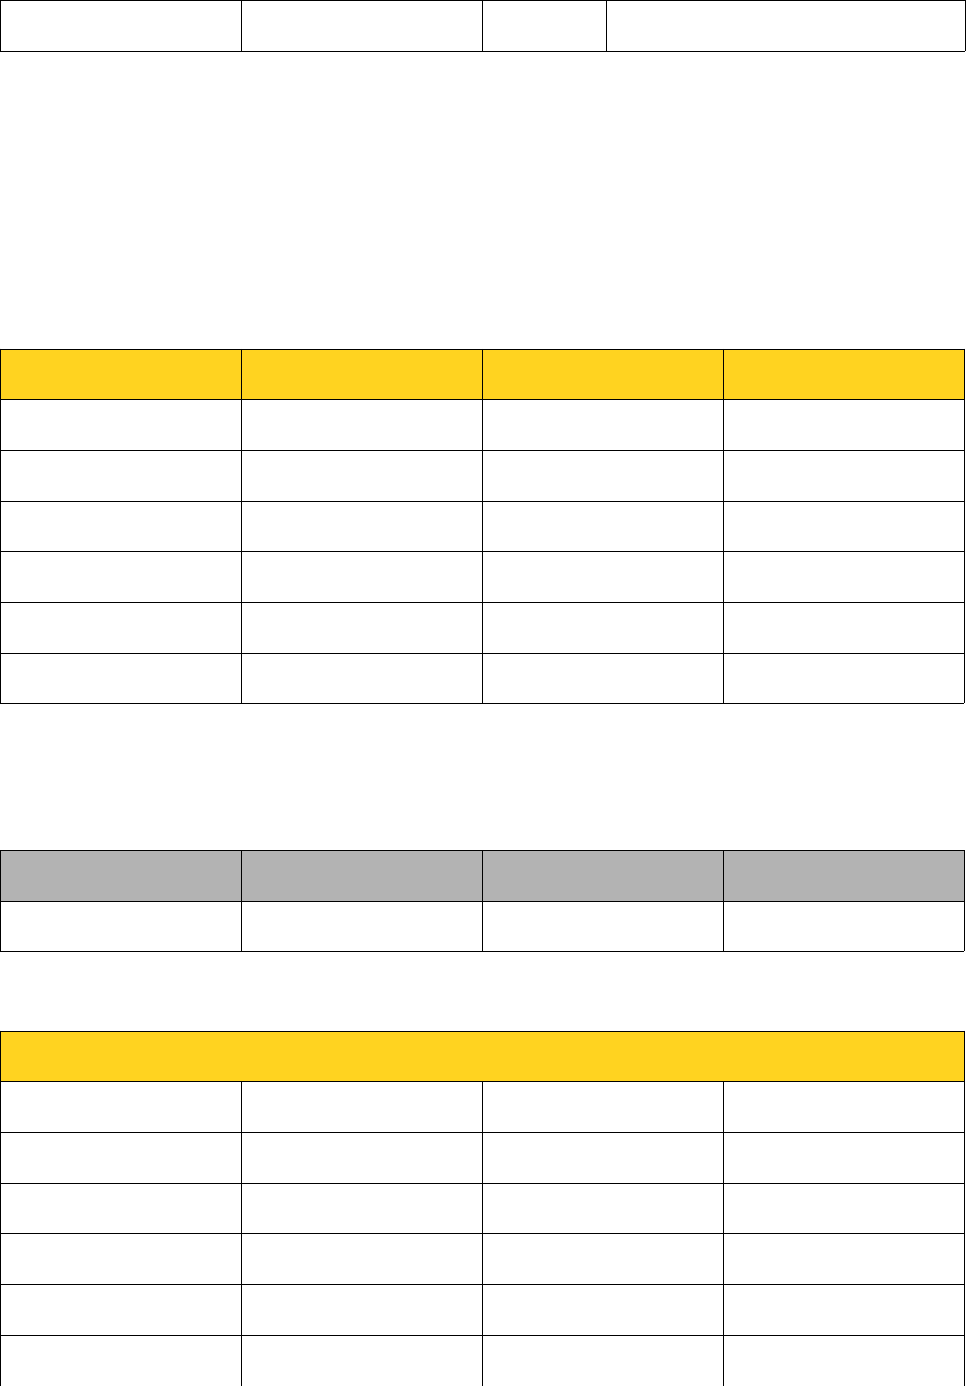
40
Before the amount
We choose the European currency representation and we use the euro sign as our currency symbol.
The range “LAST 3” means that we want to format the cells of the last 3 columns, i.e. the 2
nd
column (June sales), the 3
rd
column (July sales) and the 4
th
column (August sales).
Using Autospan for our table title
For better clarity we could add a new row at the top of the table that will contain a tittle/caption for
our table. Let's say that the caption of our table is “Summer sales”. If we do not apply any cell
merging the table will look like this:
Summer Sales
Region Period June July August
North 10 5 19
South 15 17 16
East 20 65 24
West 16 28 27
Total
It is much more aesthetically pleasant if we merge the empty cells of the top row, by applying the
following autospan rule:
Rule # Type Range Data/Calculation
8 Row 1 Autospan (checked)
The end result would be like this:
Summer Sales
Region Period June July August
North 10 5 19
South 15 17 16
East 20 65 24
West 16 28 27
Total
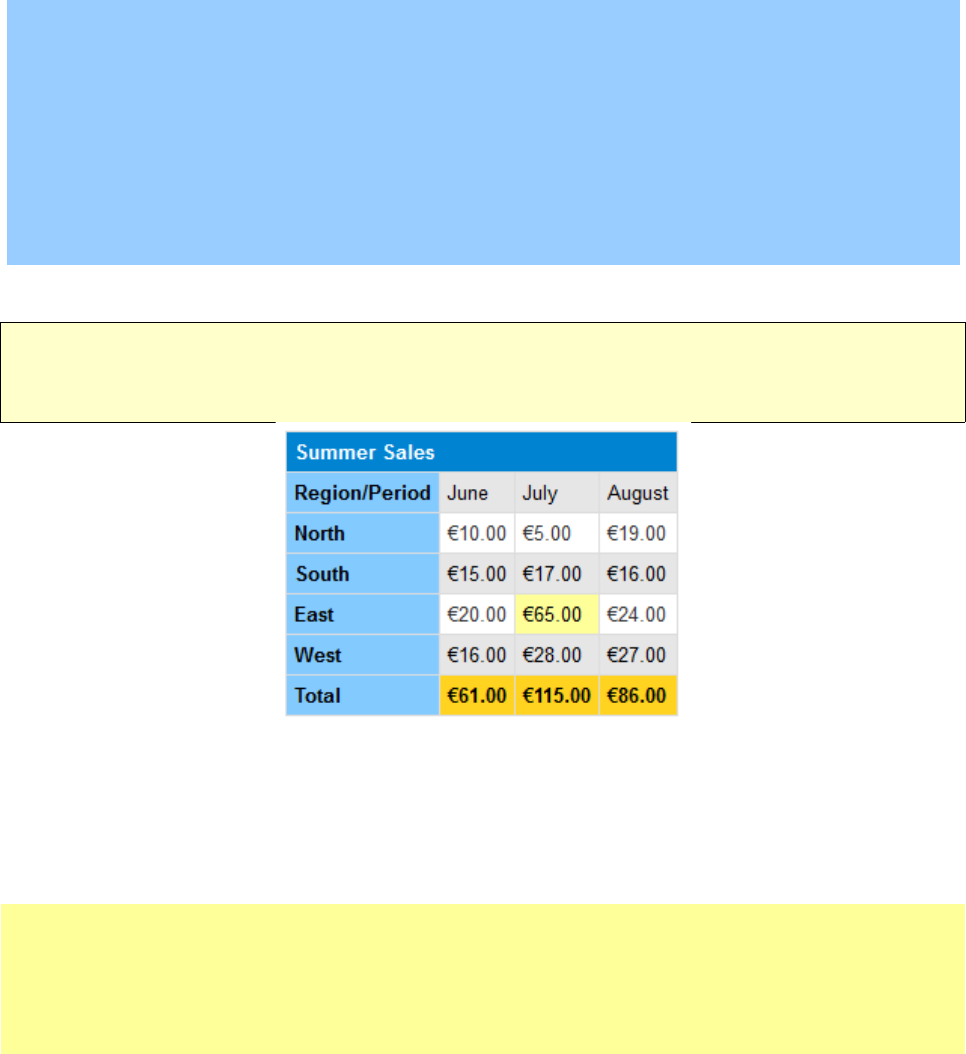
41
Putting it all together
Let's try the three new rules we have added in our example ruleset. As previously, we create a new
article (Content → Article Manager → Add New Article ) and we click on the Tabulize! button to
pop-up the Tabulizer form.
In the form that appears, type in the Input Text box the following sample data and click on the
Convert button, after you have set the Column separator to “Comma (,)” and the Ruleset to
“Regional Sales”.
Summer Sales,,,
Region/Period,June,July,August
North,10,5,19
South,15,17,16
East,20,65,24
West,16,28,27
Total,,,
Notice, that we left the last row with the totals empty, but we did put the required number of
commas to indicate the presence of empty cells. The same applies to the first row, i.e. we added as
many commas as the number of empty cells.
Click on the Insert button to copy the produced HTML to your article's body. Save the article and
preview it (from the site's view, not the admin view). The end result should look like this:
For your reference, final version of the ruleset archive (sales.xml) and the corresponding CSS file
(sales.css) is given below:
sales.xml
<?xml version="1.0" encoding="utf-8"?>
<rules name="sales" title="Sales Rulesets" style="sales.css">
<meta version="1" compatibility="4" generator="Tabulizer v.4.0.0" author_name="Super User"
author_email="info@alterora.gr"/>
<ruleset name="regional_sales" title="Regional Sales" description="The regional sales of our

42
company" suffix="regional_sales" >
<rule element="row" range="1" style="st_periods" ></rule>
<rule element="column" range="1" style="st_regions" ></rule>
<rule element="row" range="EVEN" style="st_row_even" ></rule>
<rule element="row" range="L1" style="st_total" ></rule>
<rule element="cell" range=">50" style="st_large_amount" ></rule>
<rule element="row" range="L1" calculation="add$[1-L2],[same]$" ></rule>
<rule element="column" range="LAST 3" format="400^2*2*2* €*1" ></rule>
<rule element="row" range="1" autospan="1" ></rule>
</ruleset>
</rules>
sales.css
/* first row */
tr.st_periods { color: #FFFFFF; background-color: #0084D1; font-weight: bold; }
/* first column */
td.st_regions { color: #000000; background-color: #83CAFF; font-weight: bold; }
/* even rows */
tr.st_row_even { color: #000000; background-color: #E6E6E6; }
/* last row */
tr.st_total { color: #000000; background-color: #FFD320; font-weight: bold; }
/* cells with large amounts */
td.st_large_amount { color: #000000; background-color: #FFFF99; }
/* take special care of intersecting cells */
tr.st_periods td.st_regions { color: #FFFFFF; background-color: #0084D1; font-weight: bold; }
tr.st_total td.st_large_amount { color: #000000; background-color: #FFD320; font-weight: bold; }
/* apply some styling to the whole table */
.tabtable-regional_sales { background-color: #FFFFFF; }
table.tabtable-regional_sales tr td.tabcol { padding: 5px; }
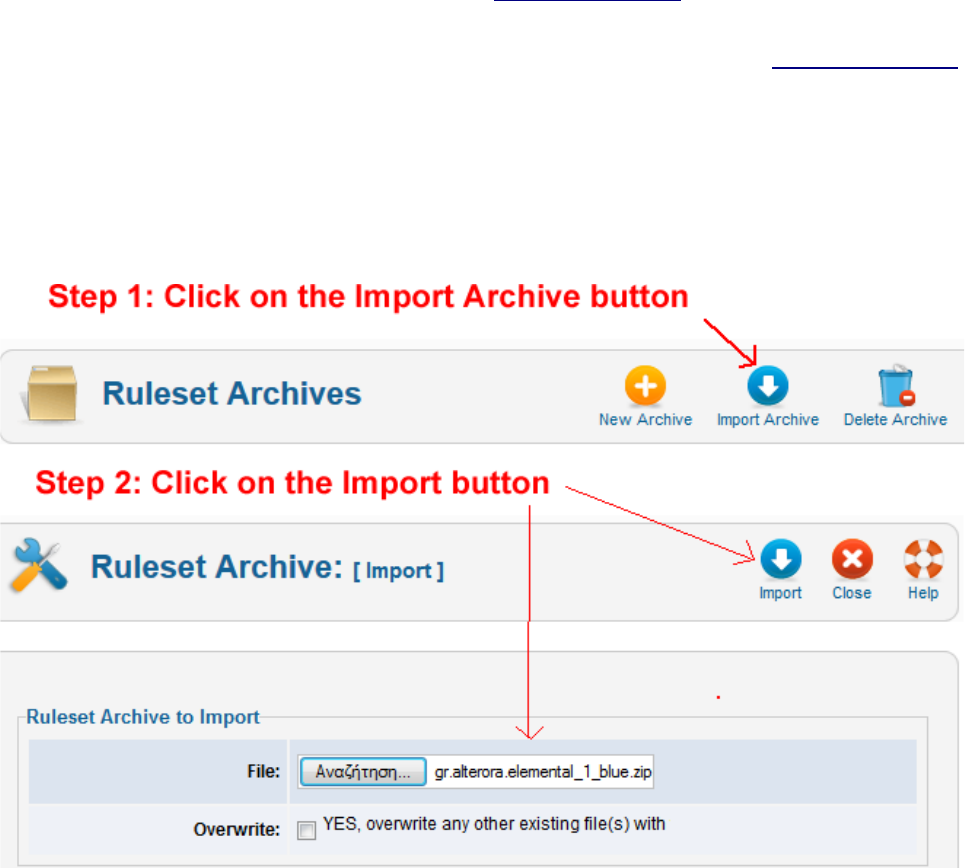
43
Importing ruleset archives
Not everybody is a web developer or a graphic designer. For this reason, it is perfectly normal for
most people not to have a full understanding of what an XML file is or what CSS stands for. If you
are not a technically oriented person or you feel you don't have enough time to go through the
learning curve of mastering the inner workings of ruleset creation, help is at hand.
You can choose one of the followings:
1. Use the online creation wizard available at www.tabulizer.com. This is very easy to use and
it's ideal for simple tables.
2. Download a ruleset archive from the online catalog, also available at www.tabulizer.com.
There is a preview button to see how a ruleset looks like before downloading it.
3. Ask us to create a custom-made ruleset specifically for your needs.
Once you have created or downloaded the desired ruleset archive you need to import it into your
system. To do so, click on the Import Archive button and select the zipped archive that you have
stored in your local disk. Click the Import button and the ruleset(s) is ready to use.
Request a custom-made ruleset for you.
For a small fee, you can ask us to create to ruleset specifically for you. You can describe to us what
you need, using one of the following ways:
1) Use a sample table you have created in Word. In your request, append the sample Word
document.
44
2) Use a sample table you have found in a web page. In your request, send us the URL
(address) of the web page that contains the table and some instructions on how to identify
the table (if there more than one tables in that page).
3) Use a short but accurate description of how the resulting table should look like.
Example:
◦ First row must have orange background and white bold letters.
◦ Last row should have light green background and red letters (normal weight).
◦ etc
Once we have your requirements, we will send you a reply with the cost. If you agree to the price,
we will create and send you the ruleset as a zipped archive that you can import as described in a
previous paragraph.
45
Copying tables from another application
All major text processing/spreadsheet application have the ability to export their data into various
formats. Therefore, similar procedures to those described in the following paragraphs exists for
many other applications (including the OpenOffice suite).
Importing tables directly from an Excel document
Starting from version 3.0 Tabulizer can import data directly from an Excel file, without the need to
export data in CSV format. Tabulizer 4.0 support all common Excel file types, that is:
• Excel 2007 (SpreadsheetML)
• BIFF5 (Excel 5.0 / Excel 95)
• BIFF8 (Excel 97 and later)
When you import data from Excel you need to take into consideration the following constraints:
1) The file should have the *.xls or *.xlsx extension (as mentioned previously)
2) The file size should not be very large. You will get an error message if the file size is too
long (larger than 8MB to be precise, but you can lift this limit).
3) You need to have special user rights in order to execute this operation. The reason is that for
security purposes, not everybody should be able to upload files to the server. When you are
importing data from an excel file, what you are doing essentially is you uploading a file to
the web server. Initially only administrators/super administrators can use this feature, but
you can add as many user groups as you wish by changing the related permission parameter.
When you are importing directly from Excel you have the following options:
1) Read hyperlinks: If excel cells have hyperlinks they will be preserved during importation.
2) Read Images: If the excel cells contain images, they will be imported, saved to the {joomla
root}/images/tabulizer folder and added automatically to the produced HTML table.
3) Keep font style: Check this option if you want to preserve the bold, italic or strike-through
font styles during importation. You can specify what will be preserved by editing the Excel
Reading Preferences section of the User Preferences page.
4) Keep color: The font color and/or the background color is preserved when this option is
checked. You can specify what will be preserved by editing the Excel Reading Preferences
section of the User Preferences page.
5) Remove empty row/columns: When you select the importation area you may select a larger
one than the actual area that contains the data for your convenience. When this option is
checked, empty rows and columns outside the data area will be removed automatically.
When you are importing an Excel file you need to specify apart from the filename, the importation
area. To do so you need to specify the upper-left and the bottom-right cells of the selected area
using the Excel coordinates of these two cells. Below is an example where the Sheet Selection
should be set to D6:F8
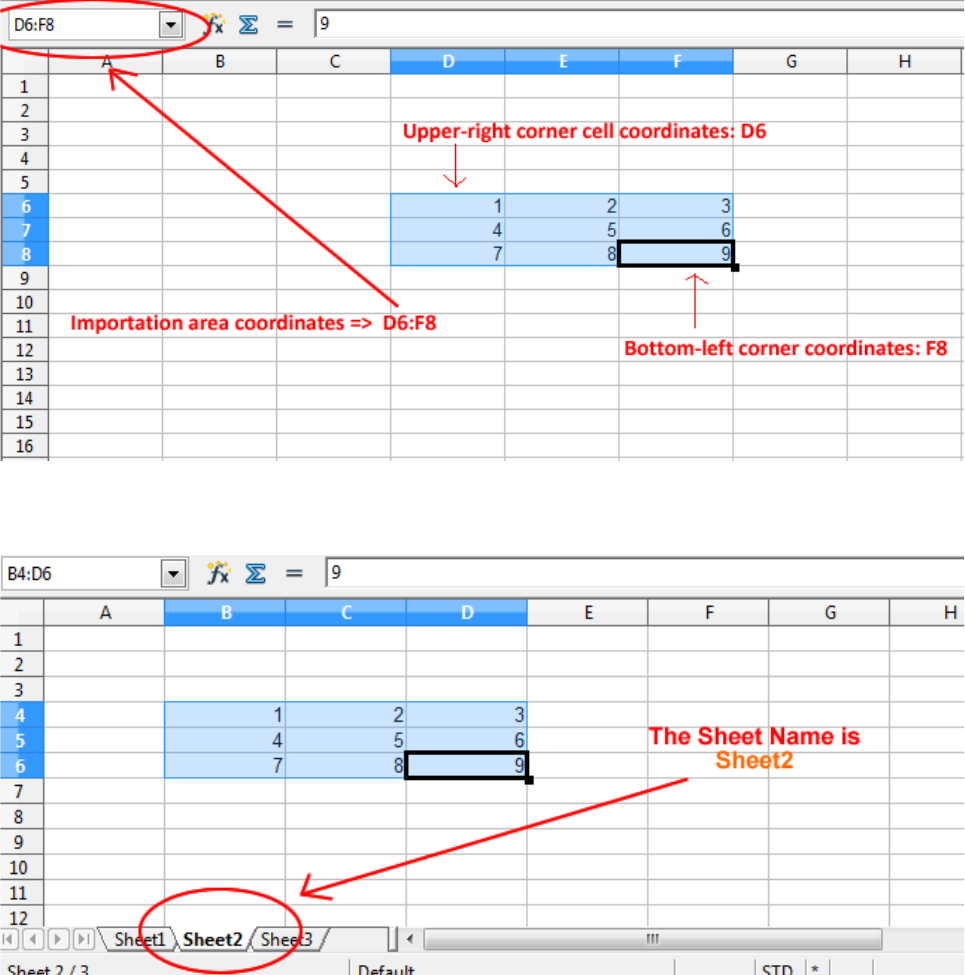
46
The Sheet Name is the exact label of the selected sheet as it appears appears in the spreadsheet
document. It's not the name of the sheet! Alternatively, you can reference the first sheet as #1, the
second as #2 and so on. The last sheet can be referenced as #L1, the second to last #L2 and so on.
In the latest versions you can even specify the Sheet Name by its order, i.e. #1 is the first sheet, #2
is the second sheet, wheras #L1 is the last sheet, #L2 is the second to last sheet and so on.
Exporting tables and data from an Excel document
At some times you may not want to import data directly from an Excel file. One reason might be
that you want to process them before importing them with Tabulizer. In such case, you need to
export the data from Excel using the old-fashioned way: The CSV plain text format.
To do so, save the stylesheet that contains the data you want to convert as a CSV text file (a.k.a.
Comma Separated Values). Choose as column separator/field delimiter one that is supported by the
Tabulizer plugin, like the comma (,) or the semicolon (;). Use double or single quotes as your text
separator/delimiter.
47
Exporting tables from a Word document
Depending on the application/version you are using the following procedure may differ.
a) Microsoft Word 2007:
1. Select the rows or table that you want to convert to paragraphs.
2. Under Table Tools, on the Layout tab, in the Data group, click Convert to Text.
3. Under Separate text at, click the option for the separator character (separator characters:
Characters you choose to indicate where you want text to separate when you convert a
table to text, or where you want new rows or columns to begin when you convert text to a
table.) that you want to use in place of the column boundaries.
b) Microsoft Word 2003:
1. Select the rows or table that you want to convert to paragraphs.
2. On the Table menu, point to Convert, and then click Table to Text.
3. Under Separate text with, click the option for the separator character (separator characters:
Characters you choose to indicate where you want text to separate when you convert a table
to text, or where you want new rows or columns to begin when you convert text to a table.)
you want to use in place of the column boundaries.
c) OpenOffice Writer:
1. Click inside the table.
2. Select the menu Table → Convert → Table to Text
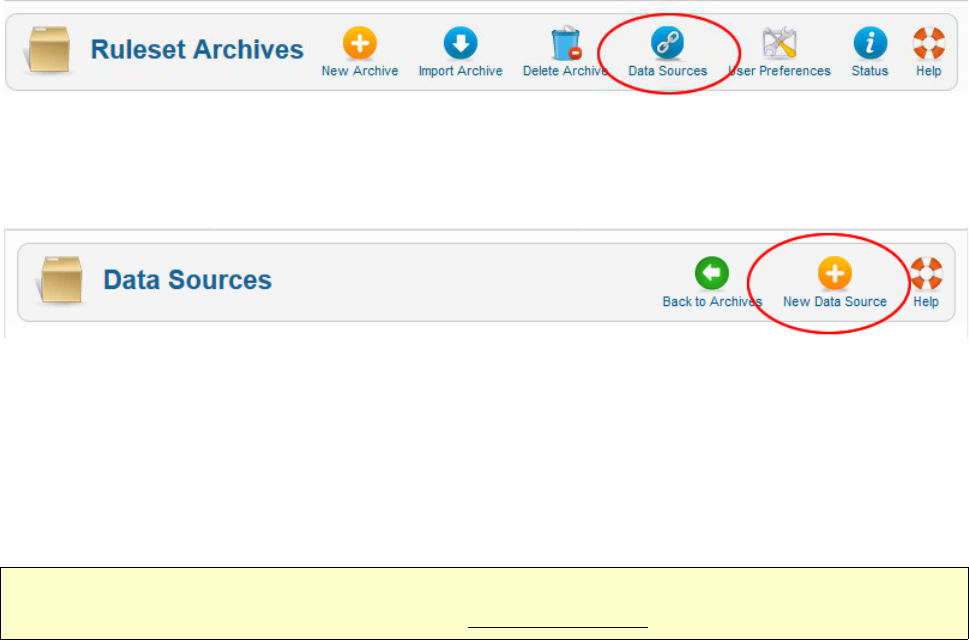
48
Data Sources for tables with dynamic content
Sometimes you want to create a table from an external source, let's say an Excel file. If this is one-
time operation, then you can create the table normally, by clicking on the Tabulizer editor button
invoking the Tabulizer dialog box to fill out the Excel importation parameters.
But what if this external file changes frequently and you want these changes to propagate to your
website? In this case, it's better create a data source that is associated with the Excel file and link
your table with that data source. With Tabulizer you can create data sources that are associated with
the following external/internal content types:
1. Excel files
2. CSV/Text files
3. HTML/XML files or other web pages
4. Database queries
5. Joomla articles
6. RSS Feeds (Atom and RSS2)
The following paragraphs show you how to create a new data source, so every time an excel file
changes that linked table is updated as well.
How to create a new data source
Go to Tabulizer's component panel ( Menu Components → Tabulizer) and then click on the Data
Source button.
Then click on the New Data Source button.
In the form that appears select the desired Source Type, let's say “Excel File”. When you do that the
Source Param(eter)s list will get updated to reflect the selected source type.
The tag is a unique identifier assigned by Tabulizer and it's read-only. The title will appear when
you want to add the data source in your articles and it should give a short description of your data
source.
The File path/URL parameter should point to the actual location of the Excel file. This location can
be an absolute filepath or a path relative to Joomla's root directory.
The Server Side option is a new experimental feature that instructs Tabulizer to load table data
dynamically from the server using Ajax calls only when needed. This can be very useful when
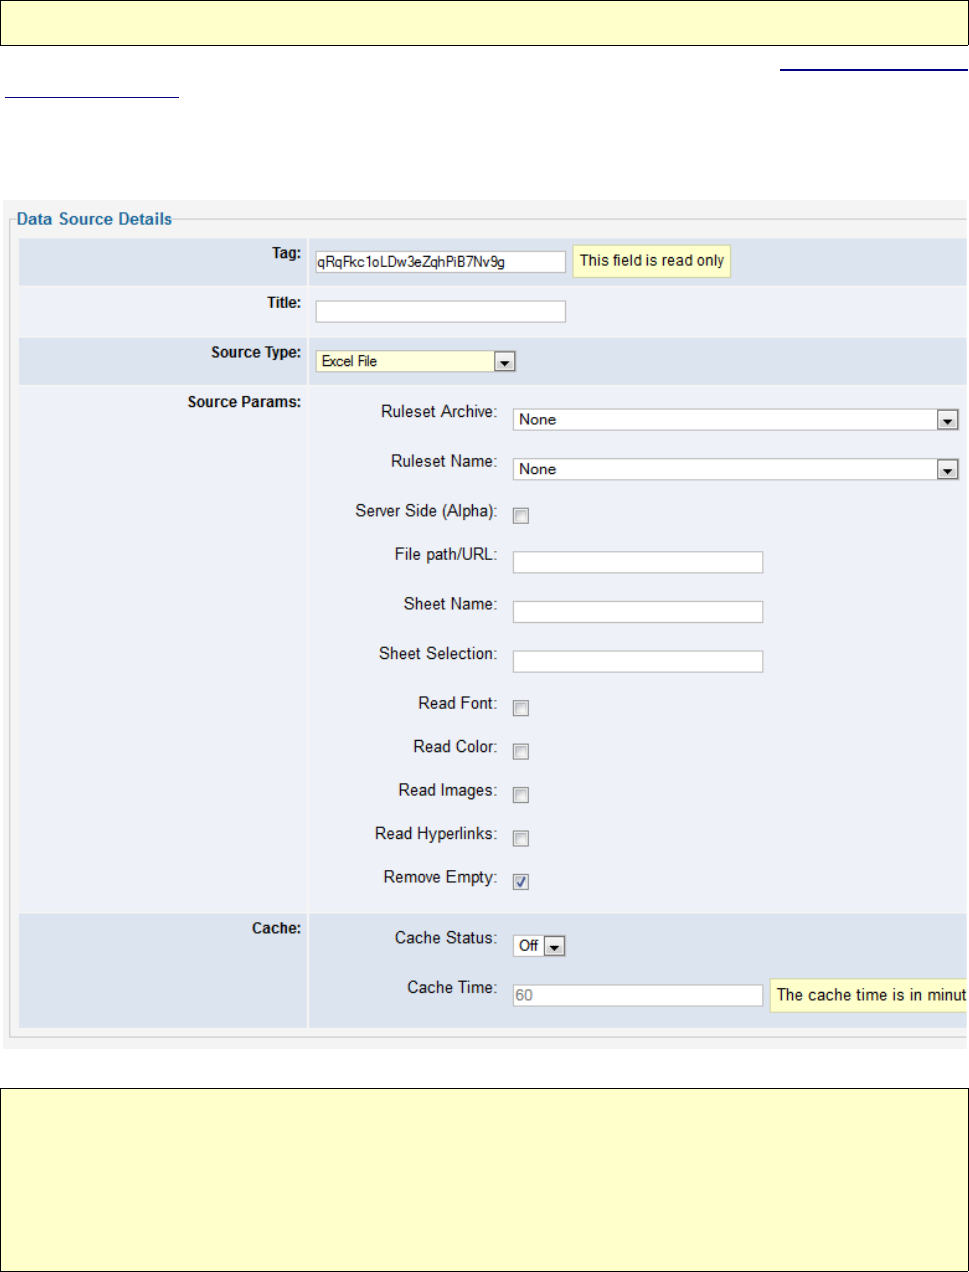
49
handling large data sets (over 10,000 rows).
The other parameters are the same as the ones mentioned in the section about how to import data
from an Excel file.
You also need to select the ruleset that you want to be applied to the produced table.
Data Source Cache: In order to improve performance, you can choose to enable caching for a
certain period of time (measured in minutes). This will be very useful, if your source does not
change very frequently and it takes some time for accessing its contents (e.g. a remote web page).
When you save the data source the cache contents get cleared automatically. Nevertheless, there
are cases in which enabling the cache will cause performance degradation, so do not consider it a
panacea.
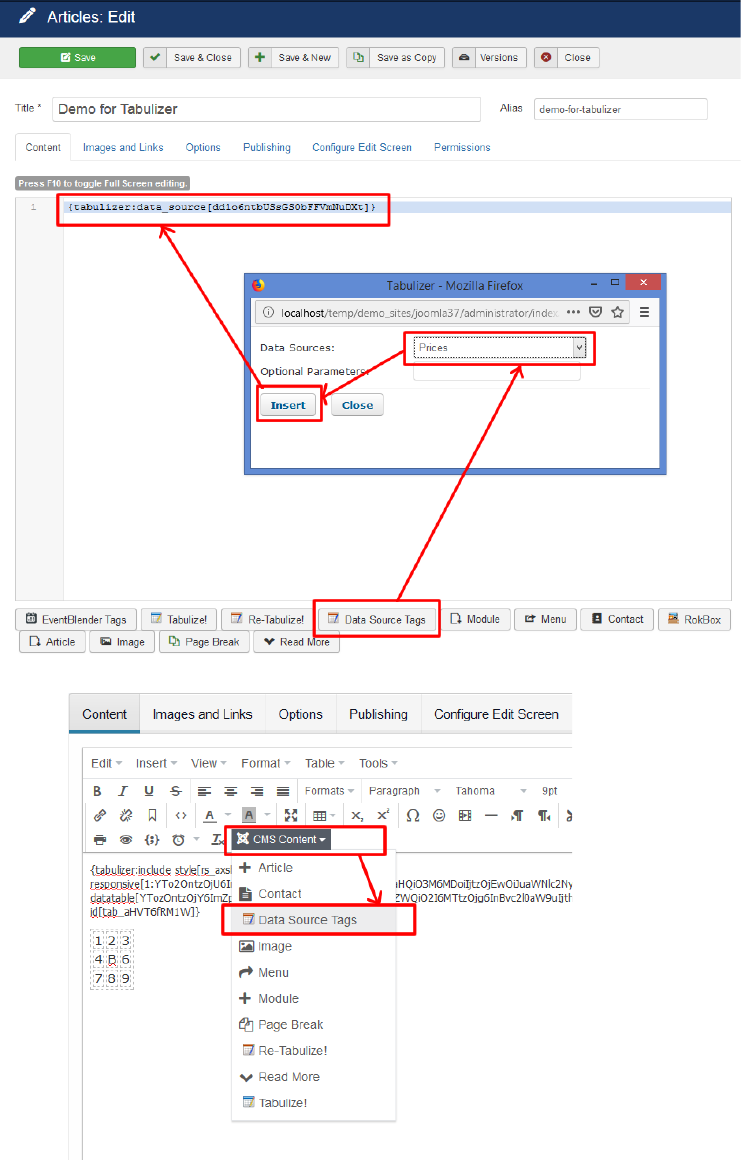
50
How to insert your data sources into articles, modules or 3rd party extensions
The easiest way to insert a data source that you have already created into an article is by clicking on
the Data Source Tags editor button. In the pop up that appears select the data source you want to
insert.
Note: The Data Source Tags button may be hidden under the "CMS Content" drop-down box in
some modern Joomla versions, as shown above.

51
Add more flexibility with data source variable parameters
Starting with version 4.1 the data sources parameters can contain variables that get their value in
one of the following ways:
• Joomla editor
• HTTP Request (GET/POST)
• Logged in User/System environment
For example, let's define a data source that is linked to the following database query:
SELECT * FROM #_shop_orders WHERE user_id = {user_id}
The {user_id} will be replaced by the user id of the logged in user. As a result, the data source will
contain different data and each user will see a different table view in the front-end that contains data
specifically for him. Here is a list of variables you can use while constructing your data source:
• {user_id}
• {user_name}
• {user_email}
• {user_fullname}
• {user_lastvisit_date}
• {user_register_date}
• {user_groupids}
• {site_lang}
• {current_datetime}
You can also use the following custom variables:
• {user_param_ID_url:DATA_TYPE}
• {user_param_ID_editor:DATA_TYPE}
• {user_param_ID:DATA_TYPE}
ID is an integer value (i.e. 1,2,3, ….)
DATA_TYPE can be:
• int: integer
• float: float, real, decimal
• date: date
• cmd: can contain latin letters (a-z), numbers (0-9), the underscore (_), the period (.) and the
hyphen (-).
Here are some examples:
{user_param_1_url:int}, {user_param_2_editor:cmd}, {user_param_10:float}
When trying to assigning a value to these user defined variables, the following rules apply:
• {user_param_ID_url:DATA_TYPE} can take the value only from the GET/POST request
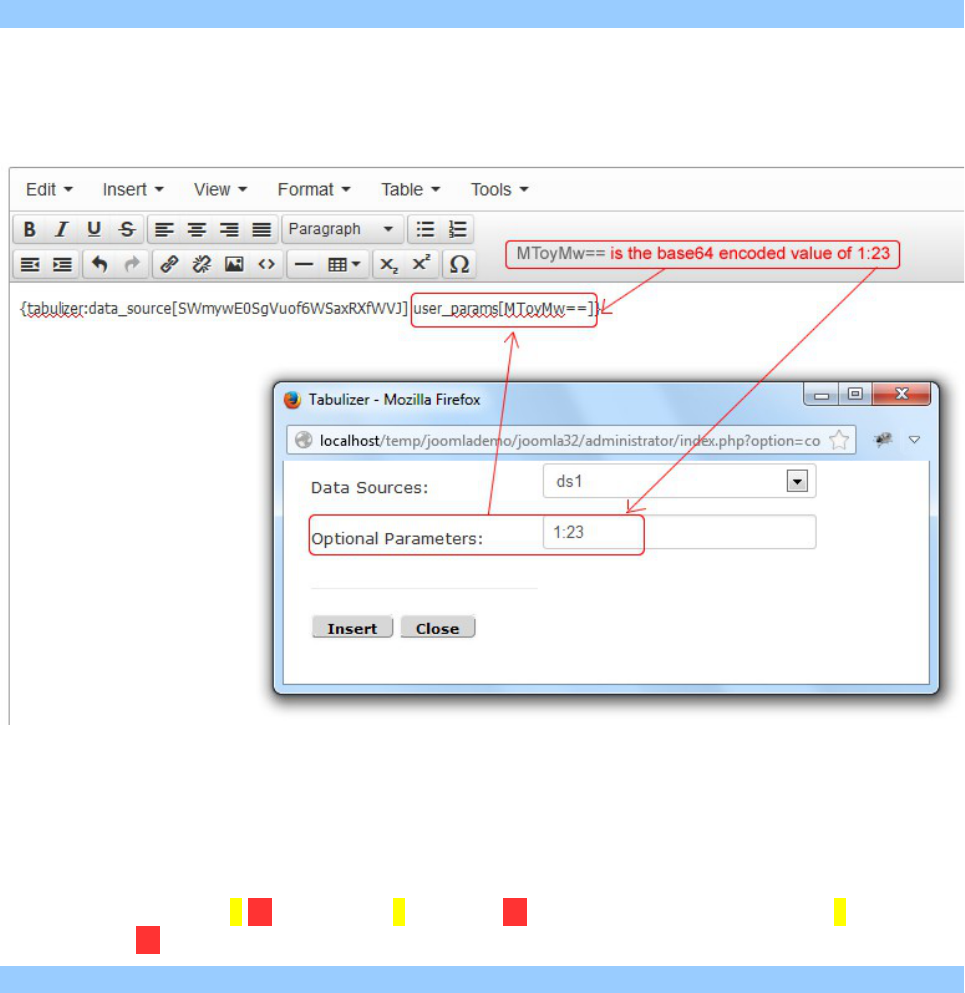
52
• {user_param_ID_editor:DATA_TYPE} can take the value only from the editor.
• {user_param_ID:DATA_TYPE} will take the value from the editor, and it will be
overwritten by the GET/POST value, is present. In other words:
if {user_param_ID_url:DATA_TYPE} is specified {user_param_ID:DATA_TYPE} =
{user_param_ID_url:DATA_TYPE} else {user_param_ID:DATA_TYPE} =
{user_param_ID_editor:DATA_TYPE}
Let's look at a specific example. We want to create many tables with a sales report for each region
of our company. The sales data are contained in the database and the database query looks like this:
SELECT * FROM #__sales WHERE region_id = {user_param_1:int}
Instead of creating a separate data source for each region, we have created one parametrized query
with one user parameter of type integer {user_param_1:int}. The value of this parameter can be
specified in the Joomla editor and/or in the GET/POST request. If it is defined in both places, the
value from the GET/POST request will prevail as it has higher precedence.
When we click on the Data Sources editor button the above popup will appear. In the Optional
Parameters input box we can write the user defined variables as follows:
ID:VALUE^ID:VALUE^ID:VALUE^....^ID:VALUE
ID is the ID of the user variable and VALUE is it's value. If you have more than one you can
separate them with the ^ symbol.
In the figure above the 1:23 means, ID=1 VALUE=23 and the value of {user_param_1:int} will be
replaced with 23. The resulting query will be:
SELECT * FROM #__sales WHERE region_id = 23
We can repeat the same process for all other region ids, so with a single data source we have
covered all regions instead a creating a separate data source for each region.
53
If you want to provide the values for the user defined variables from the GET/POST request, use the
data_source_user_params variable, which is similar to the “Optional Parameters”. For instance, in
a page that contains the data source in our example, we can overwrite the editor's value by calling
the page with the following url:
http://mysite.com/index.php/9-regional-sales?data_source_user_params=1%3A23
1%3A23 is the url encoded value of 1:23.
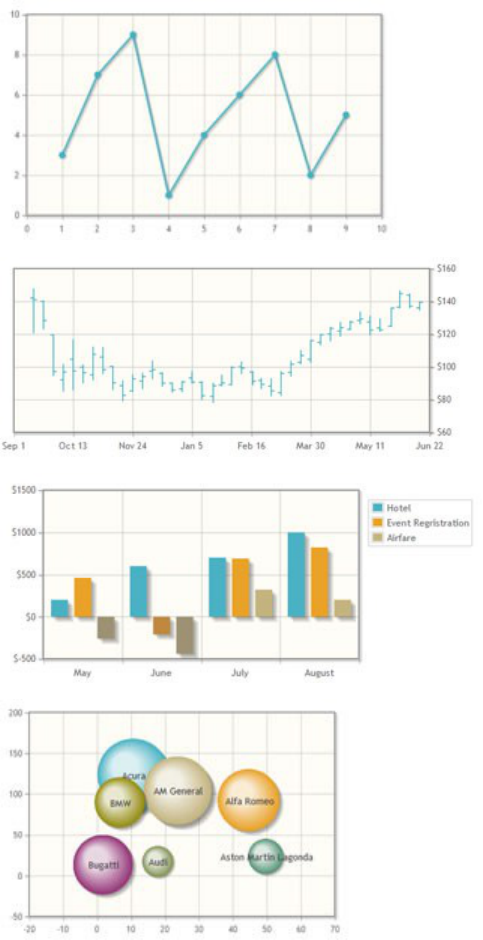
54
Convert your tables into graphs
Tabulizer allows you to convert a new or an existing table into an interactive graph. That fact that
the produced graph is not a plain static image means that it's lighter to download that has some extra
features, like animation, zooming, highlighter, etc. These are the graph type you can create:
Line
Candlestick
Bar
Bubble
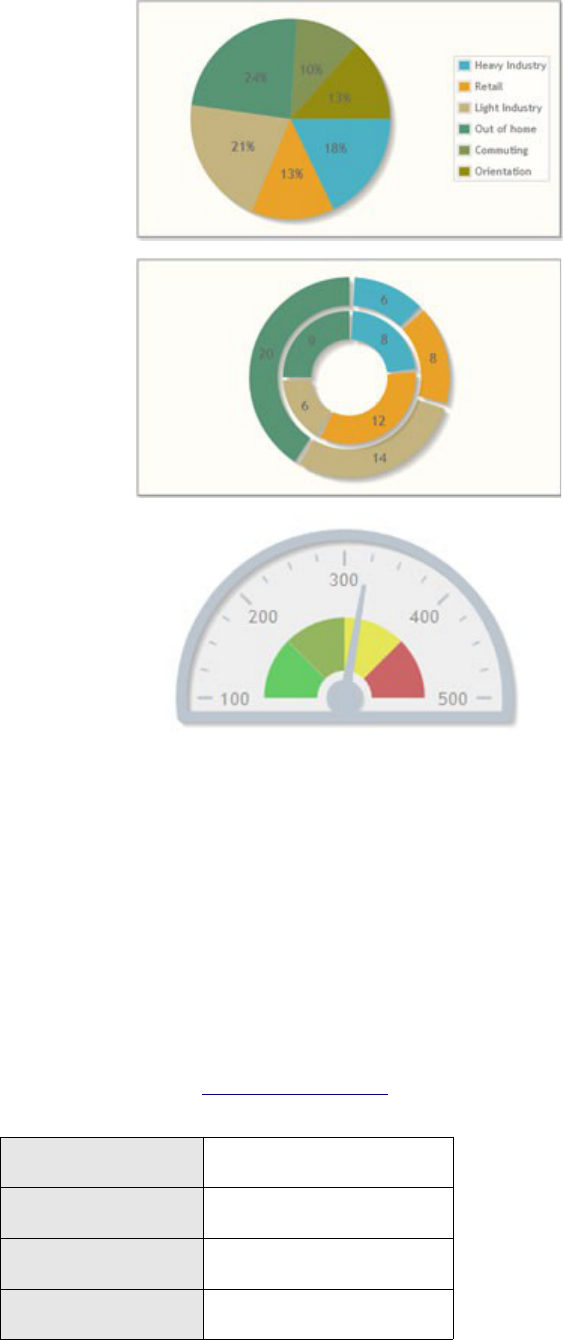
55
Pie
Donut
Meter Gauge
Before converting your tables into graph you need to create first a graph ruleset and contains all
these preferences (graph type, colors, input rows, etc) that will be used for the conversion.
Create a graph ruleset – Basic Example
A graph ruleset is a regular Tabulizer ruleset that contains only one rule which specifies how the
table-to-graph conversion should take place. What this means is that it can be combined with other
rules (i.e. calculations and formatting).
For the time being, in order to create a graph ruleset you have to use the online graph creation
wizard available at www.tabulizer.com. For this example, we will create a simple 1-series line
graph. Here are the specifications:
Graph Type Line
Number of Series 1
X-Axis Row 1 of input table
Y-Axis Row 2 of input table
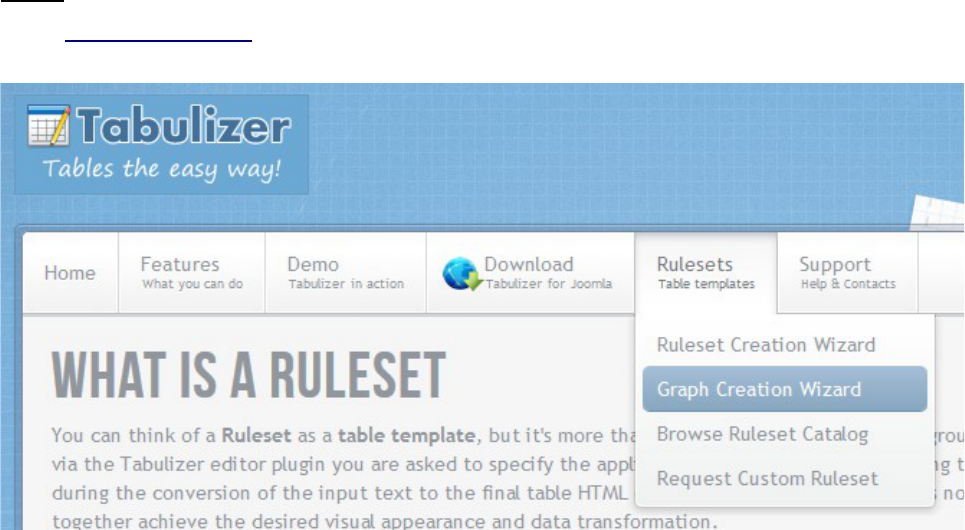
57

58
Step 2
In this step you are asked to specify all the preferences that you want the graph to have. In our basic
example we no particular preferences other than the data sources for the graph (row 1 → X Axis,
row 2 → Y axis).
Make the changes as shown in the figure below and when ready click on the Next Step button.
Step 3
In the final step you get the chance to see a preview of the graph and the corresponding sample
table input. Fill in the “Ruleset Title” and “Ruleset Description” field and click the Download
Ruleset button to save to your local disk the generated graph ruleset.
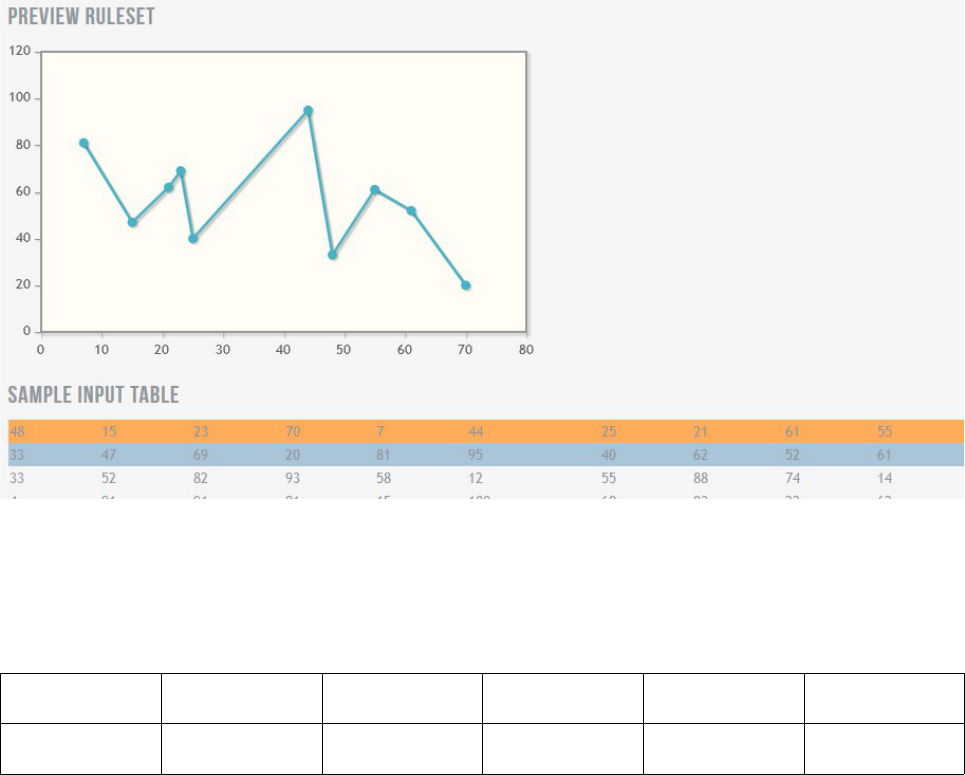
59
Note that only the first two rows of the input table will be used for the graph conversion, the rest of
the table rows will be ignored.
After importing the downloaded ruleset archive, we can use it in our Joomla site. So, let's say we
have an article that contains the following table (Average annual travel expenditures by age):
Under 25 25-34 35-44 45-54 55-64 65 and over
400 700 950 980 985 1050
Notice that the first row contains the X-Axis labels and the second row contains the Y-Axis values.
In order to convert this table into graph we move the cursor inside this table and then we click on
the ReTabulize! Button. When the Tabulizer dialog window popups we select as our ruleset archive
the one we created with the graph creation wizard (note: it contains only one ruleset which is
selected by default). Click Convert and Insert, like you would do with any other case.
The produced code should look like this:
{tabulizer:graph[rs_xxx54a2y.xml]}
Under 25 25-34 35-44 45-54 55-64 65 and over
400 700 950 980 985 1050
{tabulizer:hparg}
As you can see that table is wrapped around the special Tabulizer tags
{tabulizer:graph[rs_xxx54a2y.xml]} and {tabulizer:hparg}. You could add them directly, without
going through the ReTabulizer process, if you remembered the filename of the downloaded ruleset
archive (though, in the tag you have to replace the extension zip with xml).
When you edit the article you see only the table data and the graph tags. The graph will appear in
the front side of the website, as shown in the figure below:
60
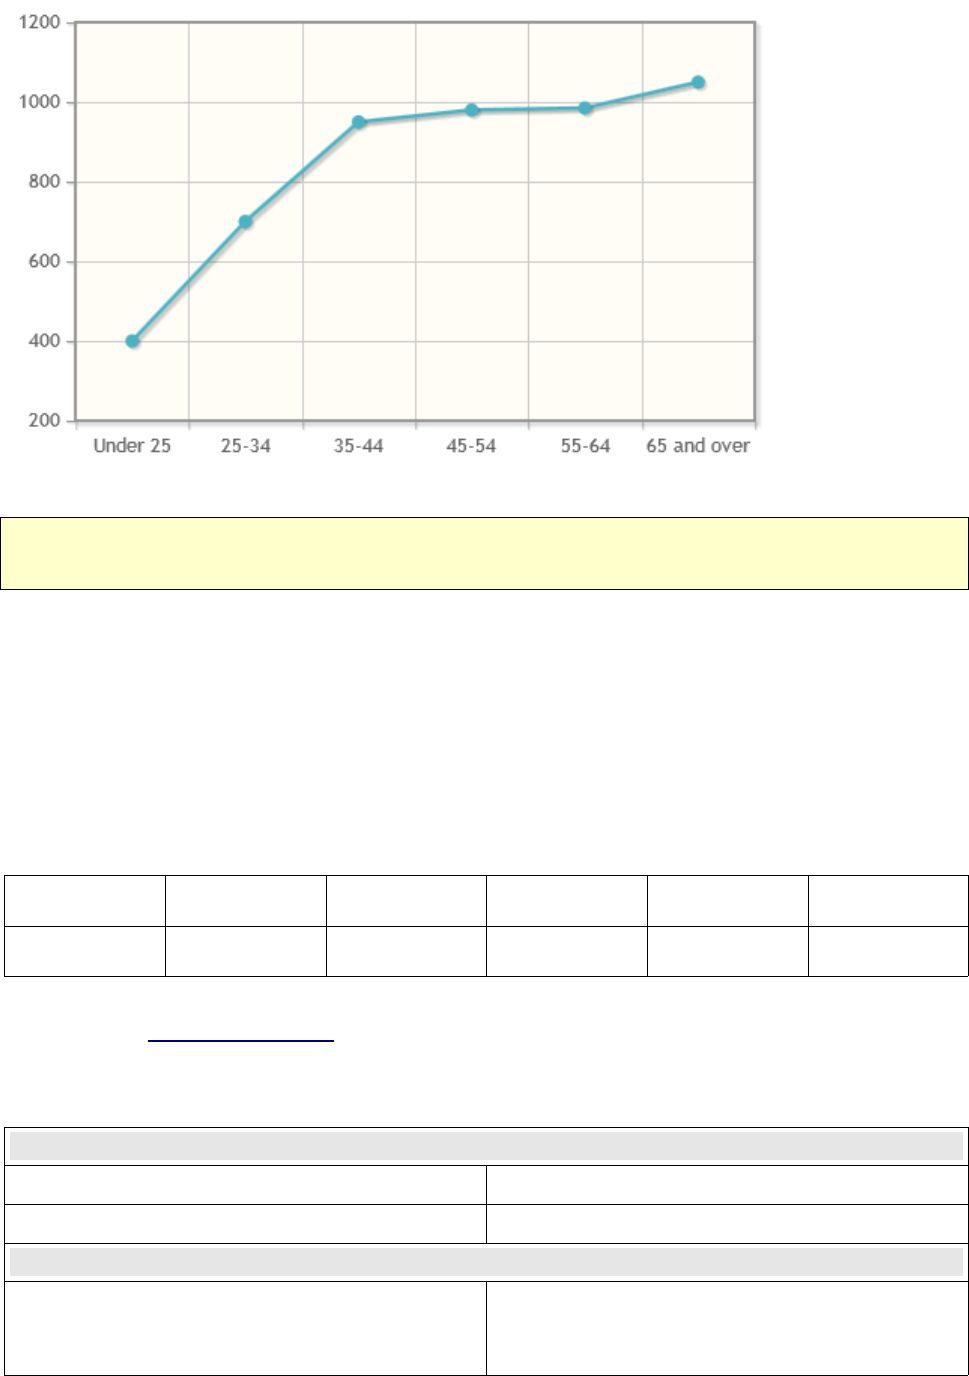
61
Tip: The table date can be edited any way you like, including adding new columns. Just make sure
you don't delete the Tabuluzer's graph tags around the table.
Using more options to adjust your graph
In the previous paragraphs a simple graph was created to demonstrate the basic use on the online
graph creation wizard. In reality you will be using much more options and features to bring the
produced graph closer to your actual needs. For instance, you will probably add a graph legend,
change the colors, put a label on your data series, add trendlines, change the format of the X-Axis
and so on.
Let's try to create a new graph ruleset with a few more options that will be used for the same input
table (Average annual travel expenditures by age):
Under 25 25-34 35-44 45-54 55-64 65 and over
400 700 950 980 985 1050
We go back to www.tabulizer.com and go to Graph creation wizard, only this time we make the
following selections:
Step 1
Graph Type Bar
Number of Data Series 1
Step 2
Graph Data/Series Serie Display/Label: Annual travel expenditures
Serie Display/Color: #d99694
Value/Element: Table Row
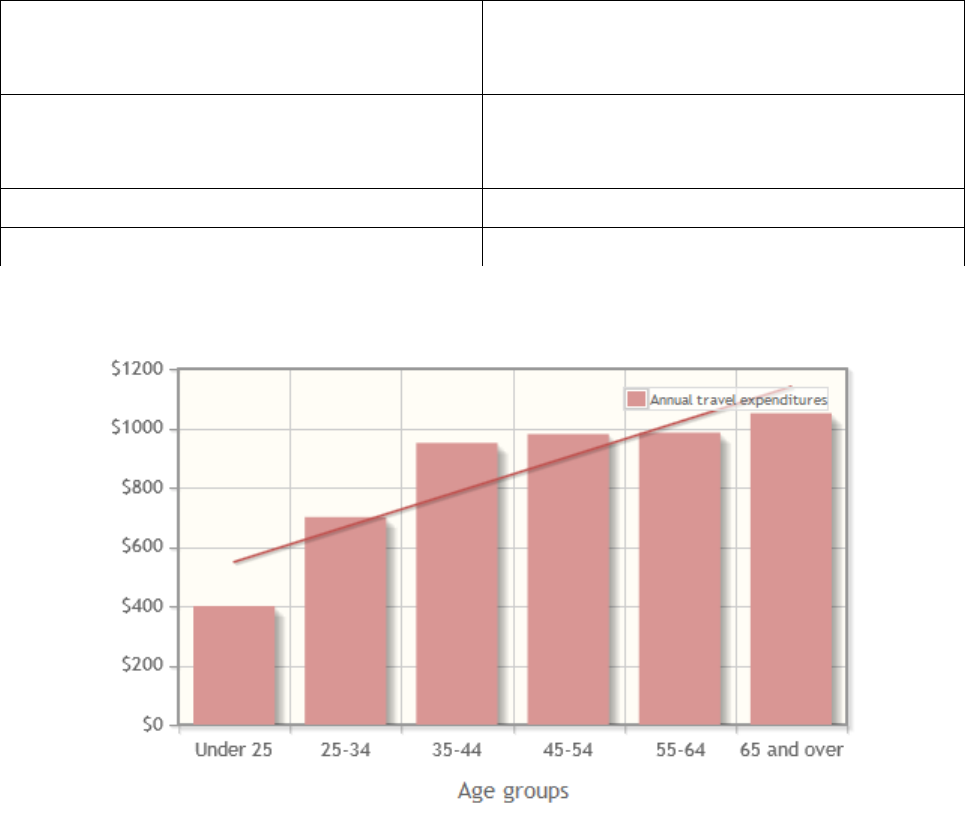
62
Value/Range:2
Trendline/Add Trendline:Yes
Trendline/Color:#c0504d
Graph Axes/X Axis Show Axis/Label: Age groups
Axis Tick Labels/Element: Table row
Axis Tick Labels/Range: 1
Graph Axes/Y Axis Axis Tick Labels/Prefix: $
Graph Options Legend Display/Show Legend: Yes
This is the how the new graph looks like:
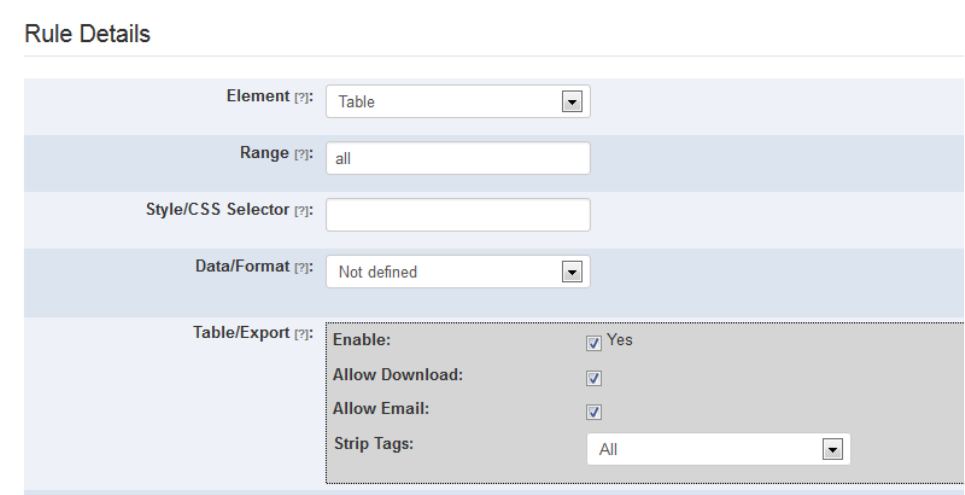
63
Exporting table data and graphs as files (download + email)
Exporting table data as file
Starting from Tabulizer 4.1 you can allow user to export table data as a file that can be downloaded
or emailed to selected recipients. Adding “export” capabilities to a table is as easy as adding a
simple table rule.
The exported file can have one the following formats:
1. CSV (Text, Comma Separated Values)
2. Excel (order format *.xls)
3. Excel (latest format: *.xlsx)
You can control the available file formats by editing the
EXPORT_TABLE_TEXT_EXPORTTYPE constant defined in {joomla root
directory}/administrator/components/com_tabulizer/assets/classes/common/defines.php file.
When it comes to email, you can specify if the user/visitor can specify the mail recipients or use
only his own email address (apparently this makes sense for registered users), specify the email
message subject and body or use the default one. The corresponding constants defined in {joomla
root directory}/administrator/components/com_tabulizer/assets/classes/common/defines.php are:
• EXPORT_TABLE_EMAIL_ALLOW_RECIPIENTS
• EXPORT_TABLE_EMAIL_ALLOW_SUBJECT
• EXPORT_TABLE_EMAIL_ALLOW_BODY
1 means “allow/enable” while 0 means “do not allow/disable”
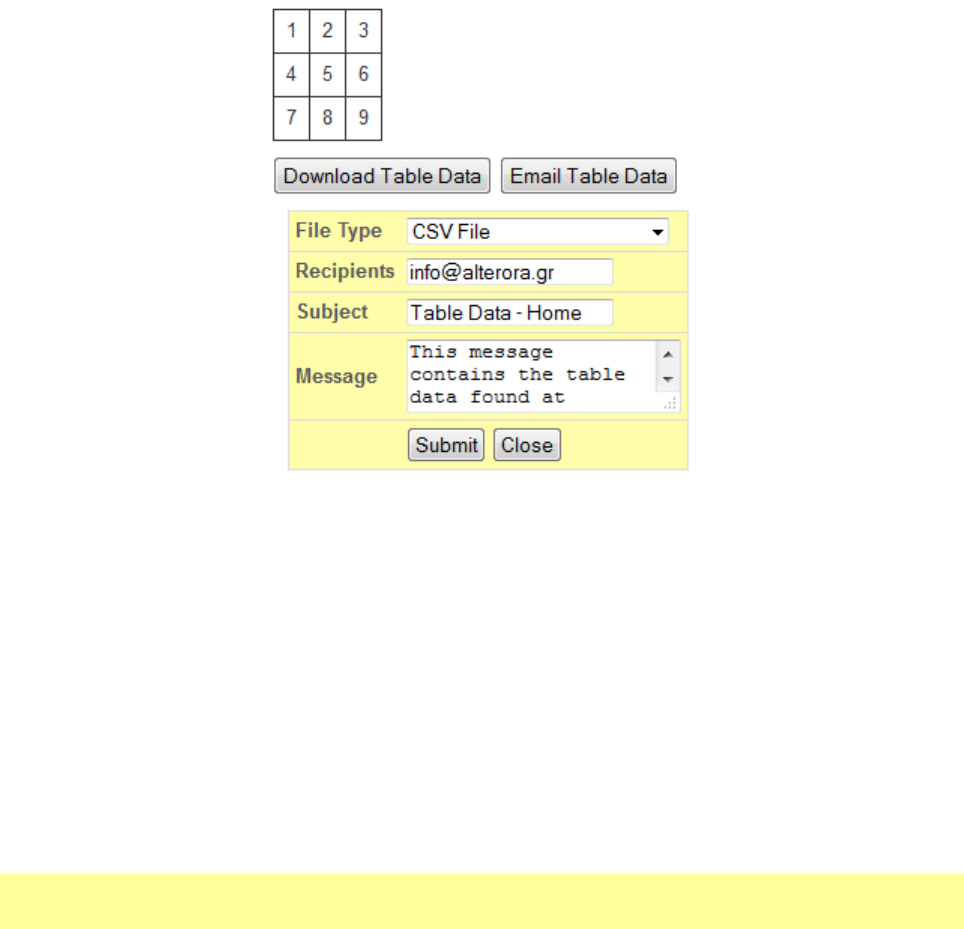
64
Exporting graph image as file (download + email)
Just like it is possible to download table data as file, it is also possible to download the graph as an
image file in the following file formats:
1. PNG
2. JPG
3. GIF
For existing graph rulesets, you can retrofit this feature by editing the corresponding file in the
{joomla root directory}/template/tabulizer/graph folder and add the following attribute in the graph
tag:
<graph type="line" num_of_series="1" width="500px" height="300px"
export_image="download email" />
You can control the available file formats by editing the
EXPORT_TABLE_IMAGE_EXPORTTYPE constant defined in {joomla root
directory}/administrator/components/com_tabulizer/assets/classes/common/defines.php file.
When it comes to email, you can specify if the user/visitor can specify the mail recipients or use
only his own email address (apparently this makes sense for registered users), specify the email
message subject and body or use the default one. The corresponding constants defined in {joomla
root directory}/administrator/components/com_tabulizer/assets/classes/common/defines.php are:
• EXPORT_TABLE_EMAIL_ALLOW_RECIPIENTS
• EXPORT_TABLE_EMAIL_ALLOW_SUBJECT
• EXPORT_TABLE_EMAIL_ALLOW_BODY
1 means “allow/enable” while 0 means “do not allow/disable”.
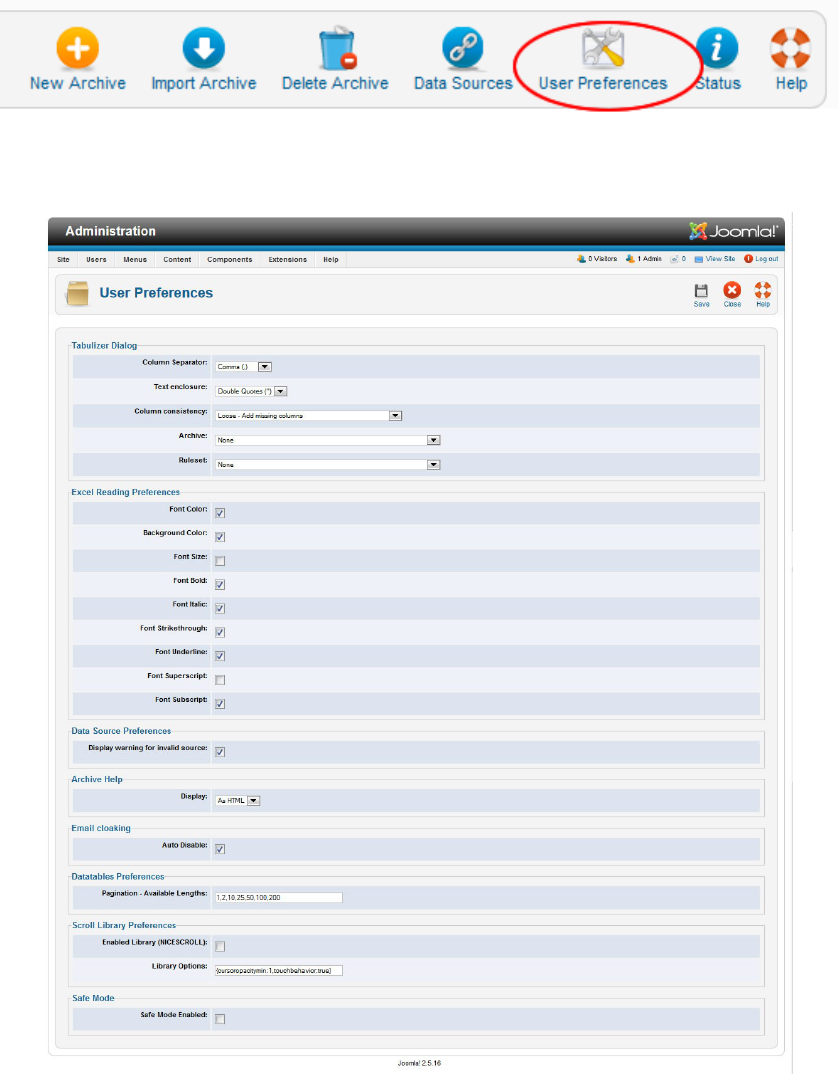
65
User Preferences
If you are using the same ruleset again and again you might find very useful to the set the user
preferences so it gets preselected every time you invoke the Tabulizer dialog box.
To access the preferences panel, go to Tabulizer component (Componets → Tabuluzer) and then
click on the User Preferences button.
In the form that appears select the desired ruleset archive and ruleset name and click on the Save &
Close button to keep the changes. You can also set the default column separator, text enclosure and
column consistency.
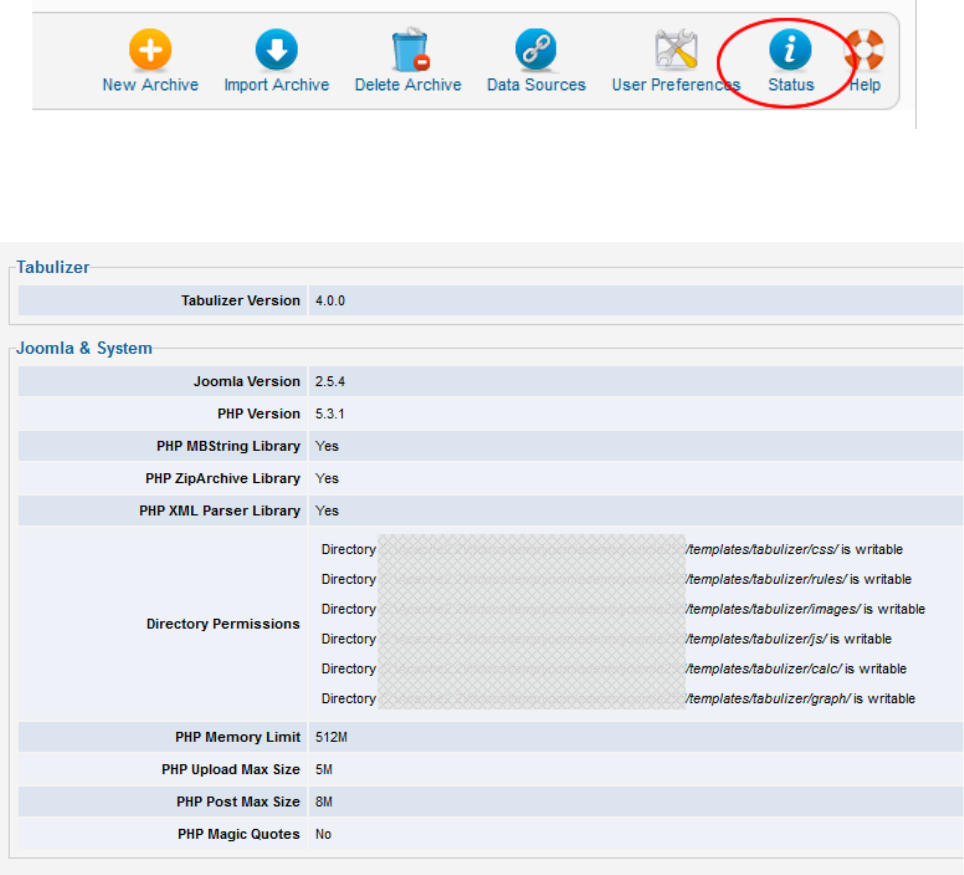
66
Status – Tabulizer, Joomla and System Information
Sometimes if useful to have a quick view of all the basic parameters that may affect the use of
Tabulizer. For this reason, you can go to Tabulizer's panel (menu Components → Tabulizer) and
click on the Status button.
When you contact the technical support to report an issue, it's always a good idea to include the
information found on this page.

67
Troubleshooting common issues
Please read this tutorial thoroughly before contacting us or sending a bug report. Below we describe
the most common problems and their resolutions.
Issue #1: Unable to insert the produced HTML code into the article.
Cause 1: Tabulizer has been tested with the default Joomla editor (TinyMCE) and other popular
editors available for Joomla. Nevertheless, it is possible that some new editor is not compatible with
Tabulizer or it's not working as expected.
Resolution: Switch back to TinyMCE or some other compatible editor before clicking on the
Tabulize! button.
Cause 2: Tabulizer uses Ajax and jQuery technology to transfer data between server and client as
well as between browser windows. If you browser is not 100% compatible with these technologies,
or if there is a conflict with another Javascript library that is included in your specific Joomla
environment, the Tabulizer popup may become unresponsive.
Resolution: Use a different web browser (preferably Firefox).
Issue #2: The produced table does not appear as expected
Cause 1: Any table produced with the Tabulizer uses CSS selectors for styling. What does this mean
is that in order for the table to have the proper appearance, all the required CSS files should be
included. This can be done:
a) Automatically, by installing and activating the TabulizerCSS plugin and putting all the required
CSS files in a given folder.
b) Manually, by modifying one or more active template's files to include the required CSS files.
Resolution: Make sure that the required CSS files are included in your Joomla site. You can view
the source code of any page to verify that. If they are not included, make sure you have installed
and activated the TabulizerCSS plugins (content and system). All required CSS files will be
included automatically.
Cause 2: If you have checked cause #1, and you have make sure that all required CSS files are
included, there might be a conflict between the definition of the CSS selectors used by the
Tabulizer rulesets and the Joomla's active template. When the same CSS selector is defined
multiple times, a CSS precedence takes place that control which css rule applies to a given html
element. For instance, if you have defined that CSS selector first_row should have a blue
background, but somewhere else the first_row is defined again with green background, the
definition with the higher specificity will take precedence.
Resolution: Try to increase the specificity of Tabulizer's CSS files, so they have higher precedence.
For instance, the table.class_table tr.class_tr td.class_td {} has higher specificity than .class_td {}.
Another thing to look is the use (or missue) of the exclamation mark (! ) that affects the normal CSS
selector precedence.
Cause 3: Another cause may be the use of tabs. Some Joomla extensions that offer tab
functionality get the tab contents form other elements of the Joomla site (e.g. articles, modules). It is
possible that when the TabulizerCSS plugin is called the tab content is not created yet, therefore the
Tabulizer CSS directive {tabulizer:style[ruleset_file.css]} is missed. In such case you need to
change the order of the plugins, so the Tabulizer plugin is called AFTER the tabs plugin.
68
Issue #3: Rulesets are missing or have different rules and attributes
Each ruleset should have a unique name and title. In other words, no two rulesets can have the same
name even though they belong to different ruleset archives (files).
Resolution: Use Tabulizer component to verify that all rulesets are valid and there are no conflicts
in their definition. With the Tabulizer component you can browse all available rulesets, view their
rules and preview their styling outcome with sample data. Avoid editing ruleset archives directly
with a text/xml editor as this is more error prone.
Issue #4: Unable to import rulesets, write files or create folders
When your import a ruleset archive or when you install the Tabulizer application you may get a
“file error” message.
Resolution: Most of the times this is a file permission error. Linux operating system is using file
permissions for security purposes, so when a user does not have access to a folder created by
another user a file permission error occurs. So, if some folders/files are owned by the Apache user
(because Joomla is running as Apache) and some other and owned by the FTP user (because you
copied all Joomla files via FTP) this issue may arise. Please contact your web hosting provider and
explain this problem and ask for a resolution. Most web hosting companies are able to handle it.
The other explanation is that the ZipArchive library is missing or it's not enabled. If that's the case
you need to contact your system administrator to enable this feature for you (Hint: In order to use
the missing zip functions you must compile PHP with zip support by using the --enable-zip
configure option).
Other “last resort” solutions:
1) Unzip the ruleset archive locally.
2) Copy the css/rules folders via FTP to {joomla root directory}/templates/tabulizer.
3) If needed, change the file permission settings temporarily (set to 0777) and when done
revert settings to their original values.
Issue #5: Internal Server Error (500)
When you invoke the Tabulizer while editing your article, in the popup window appears a “500
Internal Server Error”.
Resolution: This means that one or the required PHP libraries is missing or a file access restriction
is in place.
If there is a missing PHP library, then you need to examine the PHP error log file and look at the
last error to get a clue. If you can't find the error log file, check if the following libraries/extensions
are enabled:
• MBString (mbstring extension)
• ZipArchive ( zip extension)
If it is a file restriction case, then you need to examine anything that could cause that. For example,
some site for security purposes have installed an .htaccess file that prohibits that access to certain
files of folders. The presence of a SEF (Search Engine Friendly) extension may also be
responsible for such behavior.
69
Issue #6: The Tabulizer's CSS directives are visible in the front-end
Make sure the “Content - Tabulizer CSS” and “System – Tabulizer CSS” plugins are enabled and
last in the order. For example, it should be after the “Content - Core Design Magic Tabs” plugin,
otherwise the {} will appear and no CSS will be loaded. See also Issue #2 for an explanation.
Issue #7: “The number of columns must be the same on each row” error
message
Please read the paragraph on column consistency in Creating a table with Tabulizer.
Issue #8: Magic quotes are on, causing slashes to be added automatically in front
of double quotes (\”)
Magic quotes was a security tool of the past that in PHP v5.3 became deprecated and in PHP v5.4
was removed completely. It is recommended that you set the magic quotes to OFF, unless there is a
special requirement by another PHP application, Ask your system administrator to change this
setting.
Issue #9: HTML links and other elements are removed or set to “undefined”
when I click the insert button
TinyMCE, the default Joomla editor, may have enabled some plugins that do “filter” everything you
insert into the article/content. If you are suspecting that TinyMCE (or another Joomla editor) is
messing up the HTML code you insert by Tabulizer, you can try to set your Joomla editor to “No
Editor” and see what is happens. If that's the case, you can try to use another Joomla editor (like
JCE) and disable the “insert filtering” mechanism.
Issue #10: Strict error reporting (E_STRICT) is causing error messages similar
to “Strict Standards: Only variables should be assigned by reference in ...”
If the error reporting mode of the PHP language is set to strict, you may experience error messages
during the installation phase or later on. Since, this has to do with PHP it will affect not only
Tabulizer and other Joomla extensions, but everything that runs on PHP as well. In the php.ini file
your current settings most likely include the line error_reporting = E_ALL | E_STRICT meaning
the system is reporting as errors plain notices.
The E_STRICT flag is used by developers, it is an overkill for regular users and a bad practice for
"live sites".
Now, how to solve this issue, assuming you're using Joomla 3.x.
1) Login to your Joomla backend as administrator.
2) If you are running Joomla 2.5, login in the backend of your Joomla site as administrator and
then select the menu Site -> Global Configuration. Then click on the "Server" tab and look for
the Error Reporting parameters (should be in “Server Settings” group). Change it to Simple. If
you are running Joomla 3.x, login in the backend of your Joomla site as administrator and then
select the menu System -> Global Configuration. Then click on the "Server" tab and look for the
Error Reporting parameters (should be in “Server Settings” group). Change it to Simple.
Click on the Save button to save the changes and give it a try. Hopefully everything will work fine.
Otherwise, it means that you have to modify the php.ini file manually, which is not recommended if
70
you are not a developer. In such case you should ask the advice of your system/web server
administrator.
Issue #11: Fix for “JFolder::create: Could not create directory” Error
This error usually occurs when you move from one host to another host. It is because when we
move a Joomla site from one server to another server, the log & tmp functions present in the
configuration.php file contains the directory path where you had previously installed Joomla i.e. on
the old server.
How to resolve this issue:
1. Open the configuration file of your Joomla site (configuration.php).
2. Find var $log_path, it will contain the Directory path of your Old Server. Just replace the
whole line with the code var $log_path = './logs';
3. Find var $tmp_path, it will also have the Directory path of your Old Server. Replace the
whole line with the code var $tmp_path = './tmp';
Issue #12: Fix for “datatables warning (table id): Requested unknown
parameter X from the data source for row Y”
Some Tabulizer's advanced features are making use of a very powerful javascript library called
“Datatables”. One of them is the client-side table sorting, but there are others as well. Datatables
don't like cell merging, because generally speaking they expect the same number of cells on every
row. For this reason if a cell is empty and autospan is active, cell merging will occur giving the
“DataTables warning (table id): Requested unknown parameter X from the data source for row Y“
error message. In order to solve this issue you need to remove any rules that have the autospan
property set to true.
Issue #13: Fix for “MySQL server has gone away”
Tabulizer is using caching for some operations, including the data sources when cache is enabled. If
cases where the linked file is very large and the produced table is over 1MB, it is possible that you
will get a “MySQL server has gone away” error message. This is due to the fact that the query that
is storing the produced HTML to the database is over 1MB as well and if the maximum size of the
query is 1MB (or less) the connection to the database server is lost. In order to resolve this issue you
need to increase the packet size of your MySQL by adjusting the appropriate parameter in the
MySQL configuration file, similar to:
[mysqld]
max_allowed_packet=16M
Issue #14: Error while uploading installation file similar to “There was an error
uploading this file to the server”.
This can happen is the PHP max upload filesize limit is 2MB, as some of Tabulizer's installation
files are slightly over 2MB. The resolution is to increase the PHP max upload limit.
71

