
Oracle® Cloud
Configuring Oracle Analytics Cloud
E81766-78
July 2024
Oracle Cloud Configuring Oracle Analytics Cloud,
E81766-78
Copyright © 2017, 2024, Oracle and/or its affiliates.
Primary Author: Rosie Harvey
Contributing Authors: Suzanne Gill, Pete Brownbridge, Stefanie Rhone, Hemala Vivek, Padma Rao
Contributors: Oracle Analytics development, product management, and quality assurance teams
This software and related documentation are provided under a license agreement containing restrictions on use and
disclosure and are protected by intellectual property laws. Except as expressly permitted in your license agreement or
allowed by law, you may not use, copy, reproduce, translate, broadcast, modify, license, transmit, distribute, exhibit,
perform, publish, or display any part, in any form, or by any means. Reverse engineering, disassembly, or decompilation
of this software, unless required by law for interoperability, is prohibited.
The information contained herein is subject to change without notice and is not warranted to be error-free. If you find
any errors, please report them to us in writing.
If this is software, software documentation, data (as defined in the Federal Acquisition Regulation), or related
documentation that is delivered to the U.S. Government or anyone licensing it on behalf of the U.S. Government, then
the following notice is applicable:
U.S. GOVERNMENT END USERS: Oracle programs (including any operating system, integrated software, any
programs embedded, installed, or activated on delivered hardware, and modifications of such programs) and Oracle
computer documentation or other Oracle data delivered to or accessed by U.S. Government end users are "commercial
computer software," "commercial computer software documentation," or "limited rights data" pursuant to the applicable
Federal Acquisition Regulation and agency-specific supplemental regulations. As such, the use, reproduction,
duplication, release, display, disclosure, modification, preparation of derivative works, and/or adaptation of i) Oracle
programs (including any operating system, integrated software, any programs embedded, installed, or activated on
delivered hardware, and modifications of such programs), ii) Oracle computer documentation and/or iii) other Oracle
data, is subject to the rights and limitations specified in the license contained in the applicable contract. The terms
governing the U.S. Government's use of Oracle cloud services are defined by the applicable contract for such services.
No other rights are granted to the U.S. Government.
This software or hardware is developed for general use in a variety of information management applications. It is not
developed or intended for use in any inherently dangerous applications, including applications that may create a risk of
personal injury. If you use this software or hardware in dangerous applications, then you shall be responsible to take all
appropriate fail-safe, backup, redundancy, and other measures to ensure its safe use. Oracle Corporation and its
affiliates disclaim any liability for any damages caused by use of this software or hardware in dangerous applications.
Oracle®, Java, MySQL, and NetSuite are registered trademarks of Oracle and/or its affiliates. Other names may be
trademarks of their respective owners.
Intel and Intel Inside are trademarks or registered trademarks of Intel Corporation. All SPARC trademarks are used
under license and are trademarks or registered trademarks of SPARC International, Inc. AMD, Epyc, and the AMD logo
are trademarks or registered trademarks of Advanced Micro Devices. UNIX is a registered trademark of The Open
Group.
This software or hardware and documentation may provide access to or information about content, products, and
services from third parties. Oracle Corporation and its affiliates are not responsible for and expressly disclaim all
warranties of any kind with respect to third-party content, products, and services unless otherwise set forth in an
applicable agreement between you and Oracle. Oracle Corporation and its affiliates will not be responsible for any loss,
costs, or damages incurred due to your access to or use of third-party content, products, or services, except as set forth
in an applicable agreement between you and Oracle.

Contents
Preface
Audience xii
Documentation Accessibility xii
Diversity and Inclusion xii
Related Documents xiii
Conventions xiii
Part I Get Started with Configuration
1
About Configuring Oracle Analytics Cloud
Typical Workflow for Administrators 1-1
Understanding Administration Pages 1-3
About the Console 1-4
About the Classic Administration Page 1-5
Access the Console in Oracle Analytics Cloud 1-6
Access the Classic Administration Page 1-6
Top Tasks for Administrators 1-7
Top Tasks for Administrators 1-7
Part II Configure Your Service
2
Manage What Users Can See and Do
Typical Workflow to Manage What Users See and Do 2-1
About Users and Groups 2-2
Add a User or a Group 2-2
About Application Roles 2-3
Predefined Application Roles 2-3
About Permissions 2-5
Configure What Users Can See and Do 2-6
Get Started with Application Roles 2-7
iii

Add Members to Application Roles 2-8
Why Is the Administrator Application Role Important? 2-9
Assign Application Roles to Users 2-9
Assign Application Roles to Groups 2-10
Add Your Own Application Roles 2-11
Copy Permissions to an Existing User-Defined Application Role 2-13
View Permissions Granted to Application Roles 2-14
Grant and Revoke Permissions for Application Roles 2-16
Delete Application Roles 2-18
Add One Predefined Application Role to Another (Advanced) 2-18
View and Export Detailed Membership Data 2-19
Download Membership Data 2-20
Sample Scenarios: User-defined Application Roles 2-21
Allow a User to Export Workbooks to PDF 2-21
Prevent a User with the BI Consumer Role from Exporting Workbooks to PDF 2-21
Allow a User to Create Datasets and Workbooks 2-22
Prevent a User with the DV Content Author Role from Creating or Modifying Specific
Object Types 2-23
3
Take Snapshots and Restore
Typical Workflow to Take Snapshots and Restore 3-1
About Snapshots 3-2
Options When You Take a Snapshot 3-3
Options When You Restore a Snapshot 3-5
Take Snapshots and Restore Information 3-6
Take a Snapshot 3-7
Restore from a Snapshot 3-7
Track Who Restored What and When 3-9
Edit Snapshot Descriptions 3-9
Delete Snapshots 3-9
Schedule Regular Snapshots (Backups) 3-9
Export and Import Snapshots 3-10
Export Snapshots 3-10
Import Snapshots 3-12
Set Up a Oracle Cloud Storage Bucket for Snapshots 3-14
Migrate Oracle Analytics Cloud Using Snapshots 3-15
About Oracle Analytics Cloud Migration 3-15
Typical Workflow to Migrate Oracle Analytics Cloud 3-16
Migrate File-based Data 3-17
Manage Snapshots Using REST APIs 3-21
iv

4
Perform Common Configuration Tasks
Typical Workflow to Perform Common Administration Tasks 4-1
Configure a Virus Scanner 4-2
Register Safe Domains 4-2
Manage Safe Domains Using REST APIs 4-4
Typical Workflow for Using Safe Domain REST APIs 4-4
Examples for Safe Domain REST APIs 4-4
Set Up Social Channels For Sharing Visualizations 4-4
About Sharing Content on Social Channels 4-5
Enable Workbook Users to Share Visualizations in LinkedIn 4-6
Enable Workbook Users to Share Visualizations on Slack 4-7
Enable Workbook Users to Share Visualizations on X (formerly Twitter) 4-7
Set Up a Public Container to Share Visualizations 4-8
Set Up an Email Server to Deliver Reports 4-9
Use the SMTP Mail Server in Oracle Cloud Infrastructure for Email Delivery 4-11
Enable and Customize Content Delivery Through Agents 4-13
Send Email Reports and Track Deliveries 4-14
Send Email Reports Once, Weekly, or Daily 4-14
Email Security Alert 4-14
Track the Reports You Distribute By Email or Through Agents 4-15
View and Edit Recipients for Deliveries 4-17
Suspend and Resume Deliveries 4-18
Restore and Enable Delivery Schedules 4-18
Change the Owner or Time Zone for Deliveries 4-19
Generate and Download a Deliveries Report (CSV) 4-21
Manage the Types of Devices that Deliver Content 4-23
Manage Map Information For Analyses 4-23
Set Up Maps For Dashboards and Analyses 4-23
Edit Background Maps For Dashboards and Analyses 4-25
Switch to a Different Language 4-27
Update the Cloud Storage Password 4-30
Update the Cloud Storage Password for an Oracle-Managed Service 4-30
Update the Cloud Storage Password for a Customer-Managed Service 4-31
Make Preview Features Available 4-31
5
Manage Content and Monitor Usage
Typical Workflow to Manage Content and Monitor Usage 5-1
Manage How Content Is Indexed and Searched 5-2
Configure Search Indexing 5-2
Schedule Regular Content Crawls 5-3
v

Monitor Search Crawl Jobs 5-3
Certify a Dataset to Enable Users to Search It from the Home Page 5-4
Delete Unused Datasets 5-4
Migrate Content from Oracle BI Enterprise Edition 12c 5-5
Migrate Content to Other Catalogs 5-5
Save Content to a Catalog Archive 5-5
Upload Content from a Catalog Archive 5-6
Track the Progress of Your Catalog Unarchive Tasks 5-7
Monitor Users and Activity Logs 5-7
Monitor Users Who Are Signed In 5-8
Analyze SQL Queries and Logs 5-8
Query Information Recorded in the Cursor Cache Table 5-8
Run Test SQL Queries 5-9
Manage Content 5-10
Overview of Content Management 5-10
Change Ownership of Content 5-11
Change Ownership of Content in a User's Private Folder 5-12
Frequently Asked Questions About Content Management 5-13
6
Manage Publishing Options
About Administering Pixel-Perfect Reporting 6-1
Roles Required to Perform Pixel-Perfect Reporting Tasks 6-1
Navigate to the Administration Pages for Pixel-Perfect Reporting 6-2
Configure System Maintenance Properties 6-2
Set Server Caching Specifications 6-3
Set Retry Properties For Database Failover 6-3
Understand the Scheduler 6-3
About Scheduler Configuration 6-3
Review Scheduler Diagnostics 6-4
Set Report Viewer Properties 6-5
Clear Report Objects from the Server Cache 6-5
Clear the Subject Area Metadata Cache 6-5
Purge Job Diagnostic Logs 6-6
Purge Job History 6-6
Upload and Manage Configuration-Specific Files 6-6
Enable Diagnostics 6-6
Enable Diagnostics For Scheduler Jobs 6-7
Enable Diagnostics For Online Reports 6-7
Set Up Delivery Destinations 6-8
Configure Delivery Options 6-8
Understand Printer and Fax Server Configuration 6-9
vi

Add a Printer 6-10
Add a Fax Server 6-11
Add an Email Server 6-11
Deliver Reports Using Email Delivery Service on Oracle Cloud Infrastructure 6-11
Add an HTTP or HTTPS Server 6-14
Add an FTP or SFTP Server 6-14
SSH Options For SFTP 6-15
Add a Content Server 6-16
Add an Object Storage 6-18
Add a Common UNIX Printing System (CUPS) Server 6-19
Add an Oracle Content and Experience Server 6-20
Define Runtime Configurations 6-20
Set Runtime Properties 6-21
PDF Output Properties 6-21
PDF Digital Signature Properties 6-24
PDF Accessibility Properties 6-25
PDF/A Output Properties 6-25
PDF/X Output Properties 6-26
DOCX Output Properties 6-27
RTF Output Properties 6-28
PPTX Output Properties 6-28
HTML Output Properties 6-29
FO Processing Properties 6-30
RTF Template Properties 6-32
XPT Template Properties 6-32
PDF Template Properties 6-33
Excel Template Properties 6-33
CSV Output Properties 6-34
EText Output Properties 6-34
Excel Output Properties 6-34
All Outputs Properties 6-36
Memory Guard Properties 6-36
Data Model Properties 6-37
Report Delivery Properties 6-38
Define Font Mappings 6-39
Make Fonts Available For Publishing 6-39
Set Font Mapping at the Site Level or Report Level 6-39
Create a Font Map 6-39
Predefined Fonts 6-40
Open-Source Fonts Replace Licensed Monotype Fonts 6-41
Define Currency Formats 6-42
Understand Currency Formats 6-42
vii

Secure Reports 6-43
Use Digital Signatures in PDF Reports 6-43
Prerequisites and Limitations of Digital Signatures 6-44
Obtain Digital Certificates 6-44
Create PFX Files 6-44
Apply a Digital Signature 6-45
Run and Sign Reports with a Digital Signature 6-47
Use PGP Keys for Encrypted Report Delivery 6-47
Manage PGP Keys 6-47
Encrypt PDF Documents 6-47
PDF Document Encryption Algorithms 6-48
Audit Data of Publisher Catalog Objects 6-48
About Audit Data of Publisher Catalog Objects 6-48
Enable or Disable Viewing of Publisher Audit Data 6-49
Specify the Data Source Connection For Publisher Audit Data 6-49
View Publisher Audit Data 6-49
Add Translations For the Catalog and Reports 6-50
About Translation in Publisher 6-50
Limitations of Catalog Translation 6-50
Export and Import a Catalog Translation File 6-50
Translate Templates 6-51
Generate the XLIFF File from the Layout Properties Page 6-52
Translate the XLIFF File 6-52
Upload the Translated XLIFF File to Publisher 6-53
Use a Localized Template 6-53
Design the Localized Template File 6-53
Upload the Localized Template to Publisher 6-53
Part III Advanced Configuration
7
Customize and Configure Advanced Options
Typical Workflow For Advanced Customization and Configuration 7-1
Apply Custom Logos and Dashboard Styles 7-2
About Custom Logo and Dashboard Styles 7-2
Change the Default Style for Analyses and Dashboards 7-2
Manage Themes 7-3
Customize Links on the Classic Home Page 7-3
Localize the User Interface for Data Visualization 7-6
Localize Data Visualization User Interface Display Language 7-7
Localize Data Visualization Regional Data Formats 7-7
viii

Workbook Data Format Changes When You Select a Different Locale 7-7
Localize Custom Captions 7-8
Localize Data Visualization Workbook Captions 7-8
Export Workbook Captions 7-8
Localize Workbook Captions 7-8
Import Localized Workbook Captions 7-10
Localize Catalog Captions 7-10
Export Captions from the Catalog 7-10
Localize Your Captions 7-11
Upload Localized Captions to the Catalog 7-11
Enable Custom Java Script for Actions 7-12
Validate and Block Queries in Analyses Using Custom JavaScript 7-12
Block Queries in Analyses 7-13
Develop JavaScript to Block Analyses Based on Criteria 7-13
Develop JavaScript to Block Analyses Based on Formula 7-14
Validation Helper Functions 7-15
Deploy Write-back 7-15
About Write-back for Administrators 7-16
Enable Write-back in Analyses and Dashboards 7-17
Write-Back Limitations 7-19
Create Write-Back Template Files 7-20
Add Custom Knowledge for Data Enrichment 7-22
Working with Digit-only Keys 7-23
Track Usage 7-24
About Tracking Usage 7-24
Prerequisites for Usage Tracking 7-25
About the Usage Tracking Database 7-26
About Usage Tracking Parameters 7-26
About Analyzing Usage Data 7-26
Understand the Usage Tracking Tables 7-26
Typical Workflow for Tracking Usage 7-33
Specify the Usage Tracking Database 7-33
Specify the Usage Tracking Database Using Semantic Modeler 7-33
Specify the Usage Tracking Database Using Model Administration Tool 7-34
Set Usage Tracking Parameters 7-36
Analyze Usage Tracking Data 7-37
Analyze Usage Tracking Data by Creating a Dataset 7-37
Analyze Usage Tracking Data Using a Subject Area in the Semantic Model 7-38
Manage Query Caching 7-39
About the Query Cache 7-39
Advantages of Caching 7-39
Costs of Caching 7-39
ix

Cache Sharing Across Users 7-40
Enable or Disable Query Caching 7-40
Monitor and Manage the Cache 7-41
Choose a Cache Management Strategy 7-41
How Semantic Model Changes Affect the Query Cache 7-42
Strategies For Using the Cache 7-42
About Cache Hits 7-43
Run a Suite of Queries to Populate the Cache 7-46
Use Agents to Seed the Query Cache 7-47
Use Model Administration Tool to Automatically Purge the Cache for Specific Tables 7-48
Configure Advanced Options 7-48
About System Settings 7-48
Analytic Content Options 7-49
Connection Options 7-50
Email Delivered by Agents Options 7-51
Format Options 7-52
Other Options 7-54
Performance and Compatibility Options 7-57
Preview Options 7-62
Prompt Options 7-62
Security Options 7-64
Usage Tracking Options 7-67
View Options 7-68
Configure System Settings Using Console 7-71
Manage System Settings Using REST APIs 7-72
8
Replicate Data
Typical Workflow to Replicate Data 8-1
Overview of Data Replication 8-1
Prerequisites For Data Replication 8-2
Information You Need for Data Replication 8-3
What Data Can I Replicate? 8-3
What Target Databases Can I Replicate Data Into? 8-3
What Replication Tasks Can I Do? 8-4
What Privileges and Permissions Are Required? 8-4
What Options Are Available when Replicating Data from an Oracle Fusion Cloud
Applications Data Source 8-4
Replicate Your Data 8-5
Create a Replication Connection For Oracle Fusion Cloud Applications 8-6
Replicate Your Data Regularly 8-7
Modify a Replication Flow 8-8
x

Monitor and Troubleshoot a Replication Flow 8-8
Move Replicated Data to a Different Target Database 8-8
Part IV Reference
A
Frequently Asked Questions
Top FAQs to Configure and Manage Oracle Analytics Cloud A-2
Top FAQs to Back Up and Restore User Content (Snapshots) A-3
Top FAQs for Disaster Recovery A-4
Top FAQs to Index Content and Data A-5
Top FAQs to Configure and Manage Publisher A-7
Top FAQs for Data Replication A-7
B
Performance Tips
Gather and Analyze Query Logs B-1
Test Performance with Apache JMeter B-8
C
Troubleshoot
Troubleshoot General Issues C-1
Troubleshoot Configuration Issues C-5
Troubleshoot Indexing C-6
xi

Preface
Learn how to manage users, back up and restore, and configure your service.
Topics:
• Audience
• Documentation Accessibility
• Diversity and Inclusion
• Related Documents
• Conventions
Audience
Configuring Oracle Analytics Cloud is intended for administrators who use Oracle Analytics
Cloud:
• Administrators manage access to Oracle Analytics Cloud and perform other
administrative duties such as backing up and restoring information for others.
Documentation Accessibility
Oracle is committed to accessibility.
For information about Oracle's commitment to accessibility, visit the Oracle Accessibility
Program website at
http://www.oracle.com/pls/topic/lookup?ctx=acc&id=docacc
.
Access to Oracle Support
Oracle customers have access to electronic support through My Oracle Support. For
information, visit
http://www.oracle.com/pls/topic/lookup?ctx=acc&id=info
or visit
http://www.oracle.com/pls/topic/lookup?ctx=acc&id=trs
if you are hearing impaired.
Diversity and Inclusion
Oracle is fully committed to diversity and inclusion. Oracle respects and values having a
diverse workforce that increases thought leadership and innovation. As part of our initiative to
build a more inclusive culture that positively impacts our employees, customers, and partners,
we are working to remove insensitive terms from our products and documentation. We are also
mindful of the necessity to maintain compatibility with our customers' existing technologies and
the need to ensure continuity of service as Oracle's offerings and industry standards evolve.
Because of these technical constraints, our effort to remove insensitive terms is ongoing and
will take time and external cooperation.
Preface
xii

Related Documents
For a full list of guides, refer to the Books tab on Oracle Analytics Cloud Help Center.
•
http://docs.oracle.com/en/cloud/paas/analytics-cloud/books.html
Conventions
This document uses the standard Oracle text and image conventions.
Text Conventions
Convention Meaning
boldface
Boldface type indicates graphical user interface elements associated with an
action, or terms defined in text or the glossary.
italic Italic type indicates book titles, emphasis, or placeholder variables for which
you supply particular values.
monospace
Monospace type indicates commands within a paragraph, URLs, code in
examples, text that appears on the screen, or text that you enter.
Videos and Images
Skins and styles customize the look and feel of Oracle Analytics Cloud, dashboards, reports,
and other objects. Videos and images used in this guide may not have the same skin or style
that you're using, but the behavior and techniques shown are the same.
Preface
xiii

1
About Configuring Oracle Analytics Cloud
This topic describes how to get started with configuring Oracle Analytics Cloud.
Topics:
• Typical Workflow for Administrators
• Understanding Administration Pages
• Access the Console in Oracle Analytics Cloud
• Access the Classic Administration Page
• Top Tasks for Administrators
Typical Workflow for Administrators
If you’re configuring Oracle Analytics Cloud for the first time, follow these tasks as a guide.
Task User More Information
Sign-in as the administrator Sign-in to Oracle Analytics Cloud as
the administrator and navigate to
the Console.
Access the Console in Oracle Analytics Cloud
Manage what users see and do Configure what users see and do in
Oracle Analytics Cloud using the
Application Role page in the
Console.
Manage What Users Can See and Do
Back up and restore content Back up and restore your
environment (semantic model,
catalog content, application roles,
and so on) using a file called a
snapshot. You must take a snapshot
of your environment before people
start using the system and again at
suitable intervals so you can restore
the environment if something goes
wrong or you need to migrate to
different environment.
Take Snapshots and Restore
Schedule regular snapshots
(backups) of your content
Take snapshots regularly, as part of
your business continuity plan to
minimize data loss.
Schedule Regular Snapshots (Backups)
Set up virus scanning Connect to your virus scanning
server.
Configure a Virus Scanner
Set up social channels for content
sharing
Enable users to share content on
Twitter, Slack, Oracle Cloud
Storage, and Oracle Content
Management.
Set Up Social Channels For Sharing
Visualizations
Set Up a Public Container to Share
Visualizations
Set up email deliveries Connect to your email server. Set Up an Email Server to Deliver Reports
Track the Reports You Distribute By Email or
Through Agents
1-1

Task User More Information
Enable agents to deliver content Allow users to use agents to deliver
their content.
Enable and Customize Content Delivery
Through Agents
Suspend and Resume Deliveries
Restore and Enable Delivery Schedules
Manage the types of devices that
deliver content
Configure devices for your
organization.
Manage the Types of Devices that Deliver
Content
Free up storage space Delete data sources on behalf of
other users to free up storage
space.
Delete Unused Datasets
Manage how content is indexed and
searched
Set up how content is indexed and
crawled so users always find the
latest information when they search.
Manage How Content Is Indexed and Searched
Manage maps Manage map layers and
background maps.
Manage Map Information For Analyses
Register safe domains Authorize access to safe domains. Register Safe Domains
Manage session information Monitor who is signed in and
troubleshoot issues with analyses
by analyzing the SQL queries and
logs.
Monitor Users and Activity Logs
Change the default reporting page
and dashboard styles
Change the default logo, page style,
and dashboard style.
Apply Custom Logos and Dashboard Styles
Migrate from Oracle Business
Intelligence Enterprise Edition 12c
Migrate reporting dashboards and
analyses, semantic models, and
application roles.
Migrate Content from Oracle BI Enterprise
Edition 12c
Upload semantic models from
Oracle Analytics Server
Upload and edit semantic models
from Oracle Analytics Server
Upload Semantic Models from Oracle Analytics
Server
Edit a Semantic Model in the Cloud
Localize reporting dashboards and
analyses
Localize the names of catalog
objects (known as captions) into
different languages.
Localize Catalog Captions
Replicate data you want to visualize Import data from Oracle Fusion
Cloud Applications into high-
performant data stores, such as
Oracle Autonomous Data
Warehouse, and Oracle Big Data
Cloud, for visualization and analysis
in Oracle Analytics Cloud.
Replicate Data
Track usage Track the user-level queries to the
content in Oracle Analytics Cloud.
Track Usage
Set up write-back Enable users to update data from
analyses and dashboards.
Deploy Write-back
Set up custom JavaScript for
actions
Enable users to invoke browser
scripts from analyses and
dashboards.
Enable Custom Java Script for Actions
Chapter 1
Typical Workflow for Administrators
1-2

Understanding Administration Pages
You use the Console and Classic Administration pages to configure and manage your cloud
service.
You must have the BI Service Administrator role to access these pages and perform
administration tasks.
Product Administrati
on Page
Role
Required
Description and How to Access
Oracle
Analytics
Cloud
Console BI Service
Administrator
Use the Console to manage user permissions, back up
everyone's content, register safe domains, configure
your virus scanner, email server, deliveries, and more.
You can also see who is currently signed in and
diagnose issues with SQL queries from the Console.
• Manage What Users Can See and Do
• Take Snapshots and Restore
• Register Safe Domains
• Monitor Users and Activity Logs
• Run Test SQL Queries
Oracle
Analytics
Cloud
Classic
Administration
BI Service
Administrator
Most options on the Classic Administration page are
exposed through the Console. Only use the Classic
Administration page if you're familiar with on-premise
products that use a similar page. See About the Classic
Administration Page.
Tools for Other Administration Tasks
You use a different tool (Oracle Cloud Infrastructure Console) to perform service-level lifecycle
tasks and identity management tasks. Additional roles are required to access and perform
administrative tasks in Oracle Cloud Infrastructure Console and instructions for these tasks are
available in other guides.
Tasks Administrati
on Tool
Role
Required
More Information
Lifecycle
Service-level
tasks such as
create Oracle
Analytics
Cloud
instance,
pause,
resume,
monitor,
delete, scale,
and so on.
Oracle Cloud
Infrastructure
Console
Cloud
Account
Administrator
The way you perform lifecycle tasks depends whether
you deployed Oracle Analytics Cloud on Oracle Cloud
Infrastructure - Gen 2, Oracle Cloud Infrastructure - Gen
1, or Oracle Cloud Infrastructure - Classic. See
Administer Services.
Chapter 1
Understanding Administration Pages
1-3

Tasks Administrati
on Tool
Role
Required
More Information
Identity
Management
User and
group
management
for Oracle
Analytics
Cloud.
Oracle Cloud
Infrastructure
Console
Identity
Domain
Administrator
The way you add and manage users depends whether
your Oracle Cloud account includes IAM identity
domains or Oracle Identity Cloud Service. See About
Setting Up Users and Groups.
About the Console
You use the Console to configure and manage your service. You must have the BI Service
Administrator role to access the Console and perform administration tasks.
Task More Information
Maps
Define how users display their data on maps. See Manage Map
Information For Analyses.
Extensions
Upload custom visualization types or custom data actions. See Manage
Custom Plug-ins.
Social
Enable users to share content on various social channels. See Set Up
Social Channels For Sharing Visualizations.
Search Index
Set up how content is indexed and crawled so users always find the
latest information when they search. See Schedule Regular Content
Crawls and Monitor Search Crawl Jobs.
Safe Domains
Authorize access to safe domains. See Register Safe Domains.
Users and Roles
Configure what users see and do through application roles. See Manage
What Users Can See and Do .
Snapshots
Back up and restore the semantic model, catalog content, and
application roles using a file called a snapshot. See Take Snapshots and
Restore .
Connections
Create database connections for semantic models. See Manage
Database Connections for Model Administration Tool.
Virus Scanner
Connect to your virus scanning server. See Configure a Virus Scanner.
Session and Query Cache
See which users are signed in and troubleshoot report queries. See
Monitor Users and Activity Logs.
Issue SQL
Test and debug SQL queries. See Run Test SQL Queries.
Mail Server
Connect to your email server. See Set Up an Email Server to Deliver
Reports.
Monitor Deliveries
Track deliveries sent by the email server. See Track the Reports You
Distribute By Email or Through Agents.
System Settings
Set advanced options for Oracle Analytics Cloud. See Configure
Advanced Options.
Remote Data Connectivity
Register one or more Data Gateway agents for remote connectivity to
visualization workbooks. See Configure and Register Data Gateway for
Data Visualization .
Chapter 1
Understanding Administration Pages
1-4

About the Classic Administration Page
Only use the Classic Administration page if you're familiar with on-premise products that use a
similar page. Most options on the Classic Administration page are exposed through the
Console and where available, we recommend that you use the Console for configuration.
Task More Information
Manage Privileges
Oracle recommends that you keep the default privileges because they’re
optimized for Oracle Analytics. Editing privileges might result in
unexpected behavior or access to features.
Manage Sessions
See which users are signed in and troubleshoot report queries. See
Monitor Users and Activity Logs.
Manage Agent Sessions
Currently not available in Oracle Analytics Cloud.
Manage Device Types
Add devices that can deliver content for your organization. See Manage
the Types of Devices that Deliver Content
Toggle Maintenance Mode Indicates whether Maintenance Mode is on or off. In Maintenance
Mode, you make the catalog read-only so that other users can't modify
its content. Users can still view objects in the catalog, but they can't
update them. Some features, such as the "most recently used" list aren't
available.
Reload Files and Metadata
Use this link to reload XML message files, refresh metadata, and clear
caches. You might want to do this after uploading new data, for example
if you add or update a semantic model.
Reload Log Configuration
Oracle recommends that you keep the default log level. Oracle Support
might suggest you change the log level to help troubleshoot an issue.
Export Fallback Font
Oracle recommends that you use the default Go Noto font as the fallback
font in Classic reports and dashboards. Used when the default PDF
fonts (such as Helvetica, Times-Roman, and Courier) can’t display non-
Western characters included in the data when generating PDF output.
See Open-Source Fonts Replace Licensed Monotype Fonts.
Issue SQL
Test and debug SQL queries. See Run Test SQL Queries.
Scan and Update Catalog
Objects That Require
Updates
Use this link to scan the catalog and update any objects that were saved
with earlier updates of Oracle Analytics.
Manage Themes
Change the default logo, colors, and heading styles for reporting pages,
dashboards, and analyses. See Manage Themes.
Manage Captions
Localize the names (captions) of reporting objects that users create. See
Localize Your Captions.
Manage Map Data
Define how users display their data on maps. See Manage Map
Information For Analyses.
Manage Publisher
Set up data sources for pixel-perfect reports and delivery destinations.
Configure the scheduler, font mappings, and many other runtime
options. See Introduction to Publisher Administration .
Configure Crawl
This option is available through the Console. See Schedule Regular
Content Crawls.
Monitor Crawl
This option is available through the Console. See Monitor Search Crawl
Jobs.
Chapter 1
Understanding Administration Pages
1-5
Access the Console in Oracle Analytics Cloud
Use the Console to manage user permissions, back up everyone's content to a snapshot,
perform various configuration and administration tasks, and update system settings.
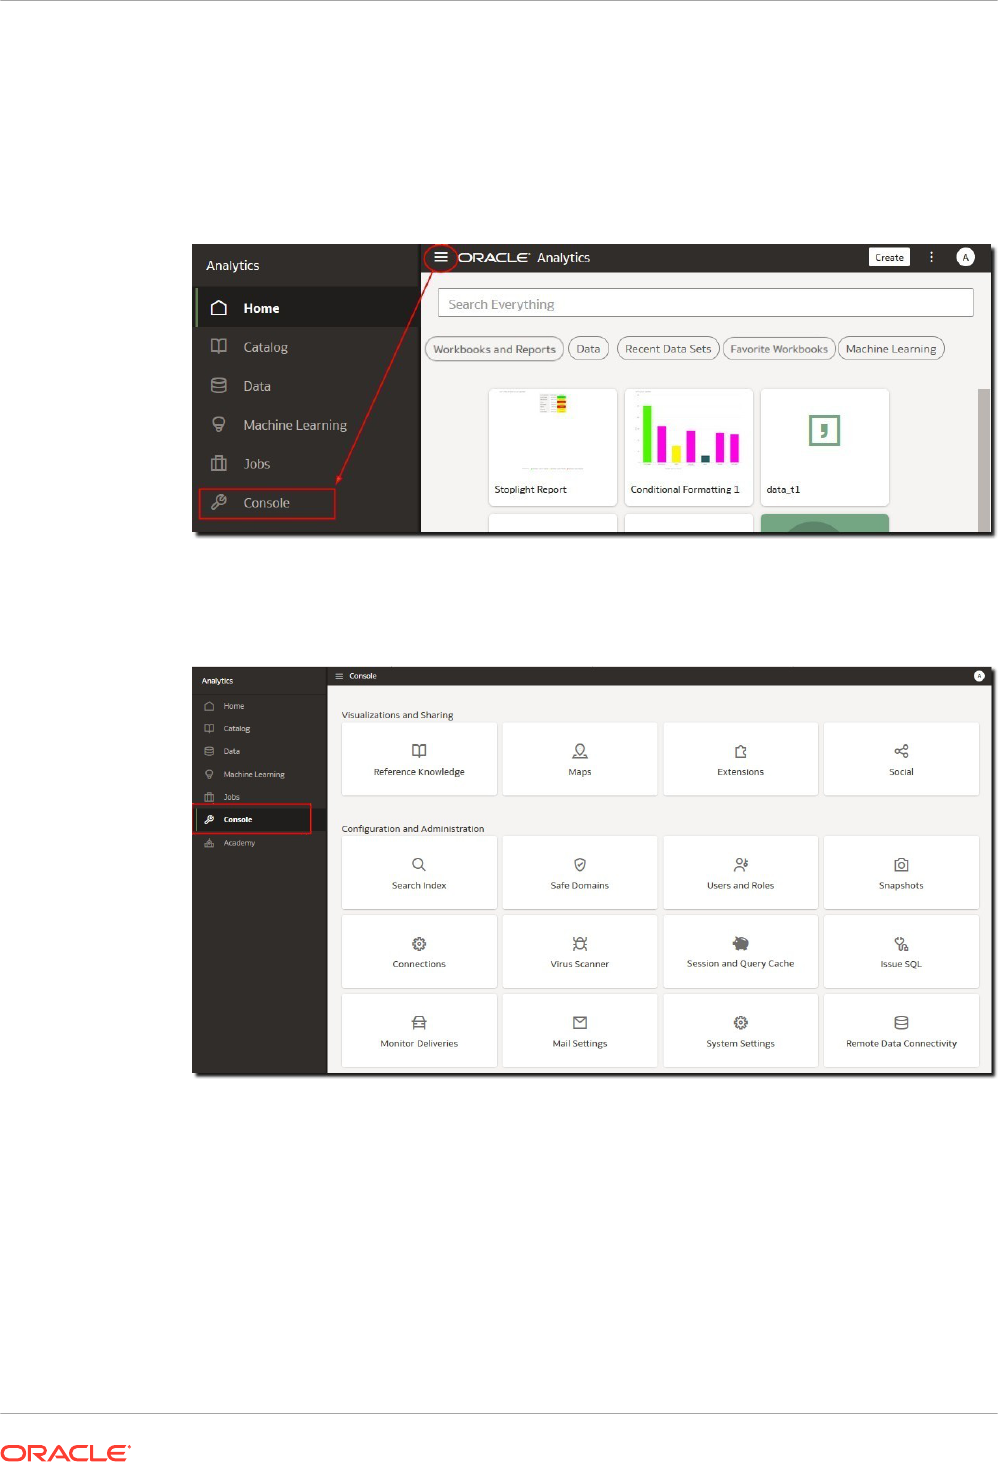
1. In the Home page, click the Navigator bar and click Console.
2. Under Configuration and Administration, click the option you want to configure.
You must have the BI Service Administrator role to configure Oracle Analytics.
Access the Classic Administration Page
Use the Classic Administration page if you're familiar with on-premises products that use a
similar page.
1. In the Home page, click the Page Menu and select Open Classic Home.
Chapter 1
Access the Console in Oracle Analytics Cloud
1-6

2. Click My Profile, and select Administration.
You must have the BI Service Administrator role to see the Administration menu.
3. Click the link for the feature you want to configure.
Top Tasks for Administrators
Here are the top tasks for configuring and managing Oracle Analytics Cloud.
Tasks:
• Top Tasks for Administrators
Top Tasks for Administrators
The top tasks for configuring and managing your cloud service are identified in this topic.
• Assign Application Roles to Users
• Add Your Own Application Roles
• Take Snapshots
• Restore from a Snapshot
• Free Up Storage Space
• Register Safe Domains
• Manage How Content Is Indexed and Searched
Chapter 1
Top Tasks for Administrators
1-7

Part II
Configure Your Service
This part explains how to configure and manage an Analytics Cloud instance offering data
visualization and business intelligence enterprise modeling services. The information is aimed
at administrators whose primary job is to manage users and keep them productive.
Administrators perform a long list of critical duties; they control user permissions and amend
accounts, keep regular backups so users don't risk losing their work, authorize access to
external content by registering safe domains, configure email servers and virus scanners,
manage data storage to avoid exceeding storage limits, troubleshoot user queries, and so
much more.
Chapters:
• Manage What Users Can See and Do
• Take Snapshots and Restore
• Perform Common Configuration Tasks
• Manage Content and Monitor Usage
• Manage Publishing Options
2
Manage What Users Can See and Do
Administrators can manage what other users are allowed to see and do when working with
data.
Video
Topics:
• Typical Workflow to Manage What Users See and Do
• About Users and Groups
• About Application Roles
• About Permissions
• Configure What Users Can See and Do
Typical Workflow to Manage What Users See and Do
Here are the common tasks to start managing what users can see and do when working with
Oracle Analytics Cloud.
Task Description More Information
Add users and groups Add user accounts for everyone who
needs access to Oracle Analytics Cloud
and set up user groups.
Add a User or a Group
Understand application
roles
Learn about the predefined application
roles and what they allow users to do in
Oracle Analytics Cloud.
About Application Roles
Understand permissions Learn about the permissions that enable
specific actions in Oracle Analytics
Cloud.
About Permissions
Add your own application
roles
Oracle Analytics Cloud provides
application roles that map directly to all
the main features but you can create
your own application roles that make
sense to your business too.
Add Your Own Application
Roles
Grant permissions to
application roles
You can't modify the permissions of
predefined application roles but you can
grant individual permissions to any
application roles that you create.
Grant and Revoke Permissions
for Application Roles
Assign application roles to
users
Give your users access to different
features by granting them application
roles.
Assign Application Roles to
Users
Assign application roles to
groups
Grant access to users more quickly
through groups. Give a group of users
access rather than to individual users.
Assign Application Roles to
Groups
2-1

Task Description More Information
Add members and actions
to application roles
Grant access to Oracle Analytics Cloud
features in a different way. Go to the
application role and assign users and
groups from there.
Add Members to Application
Roles
About Users and Groups
Identity domain administrators use Oracle Cloud Infrastructure Console to manage users and
set up user groups for Oracle Analytics Cloud.
After the user accounts are set up in Oracle Cloud Infrastructure Console, Oracle Analytics
Cloud administrators can use the Users and Roles page in Oracle Analytics Cloud to give
individual users or groups permissions through application roles. See About Application Roles
and Add Members to Application Roles.
Add a User or a Group
Use Oracle Cloud Infrastructure Console to add users and assign them to suitable user
groups.
The way that your identity domain administrator manages users for Oracle Analytics Cloud
depends whether identity domains are available in your Oracle Cloud account. See About
Setting Up Users and Groups.
Oracle Cloud Infrastructure Console - Option to Assign Basic Application Roles
Your identity domain administrator's main job is to set up users and groups. However, they can
also use Oracle Cloud Infrastructure Console to grant users basic permissions in Oracle
Analytics Cloud by assigning these three application roles: ServiceAdministrator, ServiceUser,
ServiceViewer.
Application Roles Available in
Oracle Cloud Infrastructure
Console
Permissions in Oracle Analytics Cloud
ServiceAdministrator
Member of BI Service Administrator, BI Data Model Author, and
BI Data Load Author. Allows users to administer Oracle Analytics
Cloud and delegate privileges to others.
The user who creates the service is automatically assigned this
application role.
ServiceUser
Member of BI Content Author and DV Content Author.
Allows users to create and share content.
ServiceViewer
Member of BI Consumer and DV Consumer.
Allows users to view and explore content.
ServiceDeployer Not used in Oracle Analytics Cloud.
ServiceDeveloper Not used in Oracle Analytics Cloud.
Chapter 2
About Users and Groups
2-2

About Application Roles
An application role comprises a set of permissions that determine what users can see and do
after signing in to Oracle Analytics Cloud. It’s your job as an administrator to assign users and
groups to one or more application roles.
There are two types of application role:
Type of Application Role Description
Predefined Include a fixed set of permissions.
User-defined Created by administrators. See Add Your Own Application Roles.
Predefined Application Roles
Oracle Analytics Cloud provides several predefined application roles to get you started. In
many cases, these predefined application roles are all that you need.
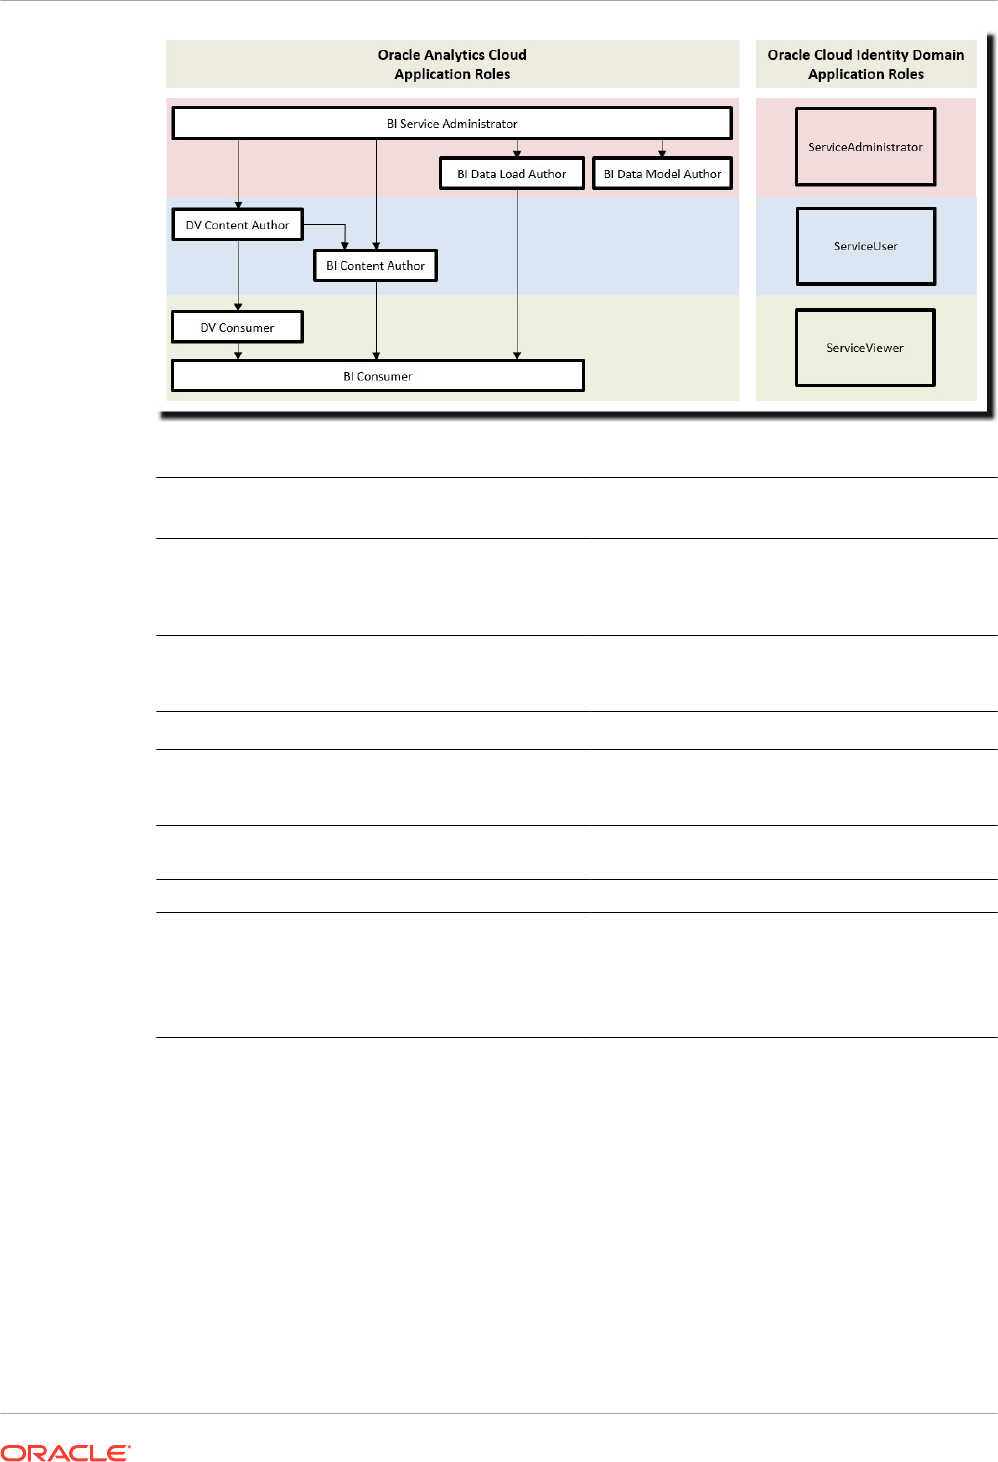
This diagram illustrates the predefined application role hierarchy and how they map to the
default application roles in your identity domain (ServiceAdministrator, ServiceUser,
ServiceViewer). When a user is a member of an application role (such as DV Content Author)
that's also a member of another application role in the hierarchy (such as DV Consumer), the
user becomes an indirect member of the second application role.
For example:
• BI Service Administrator - The diagram shows that a member of the BI Service
Administrator application role is an indirect member of all the other predefined application
roles (BI Data Model Author, BI Data Load Author, BI Consumer, and so on). This
means that users with the BI Service Administrator application role, can automatically do
everything that these individual application roles allow. For example, if you add a new
administrative user (John), you don’t need to give John every application role. Instead, you
simply give John the BI Service Administrator application role and this grants him all the
available permissions.
• DV Content Author - The diagram shows that a member of the DV Content Author
application role becomes and indirect member of the BI Content Author, DV Consumer,
and BI Consumer application roles. So, if you give a user the DV Content Author
application role, that user can create, share, explore, and view data visualizations, and
they can also create, share, run, and view analyses and dashboards.
Chapter 2
About Application Roles
2-3
Predefined Application Roles in Oracle Analytics
Cloud
Description
BI Service Administrator Allows users to administer Oracle Analytics Cloud
and delegate privileges to others using the
Console. This application role is assigned all the
available permissions.
BI Data Model Author Allows users to create and manage semantic
models in Oracle Analytics Cloud using Semantic
Modeler.
BI Dataload Author Not used.
DV Content Author Allows users to create workbooks, connect to
data and load data for data visualizations, and
explore data visualizations.
BI Content Author Allows users to create analyses, dashboards, and
pixel-perfect reports, and share them with others.
DV Consumer Allows users to explore data visualizations.
BI Consumer Allows users to view and run reports in Oracle
Analytics Cloud (workbooks, analyses,
dashboards, pixel-perfect reports).
Use this application role to control who has
access to the service.
You can’t delete predefined application roles or remove default memberships.
Application roles can have users, groups, or other application roles as members. This means
that a user who is a member of one application role might indirectly be a member of other
application roles.
Chapter 2
About Application Roles
2-4

About Permissions
Permissions allow you to perform specific actions in Oracle Analytics Cloud. Administrators
can grant specific permissions to application roles.
Permissions in Oracle Analytics Cloud
This table lists Oracle Analytics Cloud permissions.
Category Resource Permission Description Predefined
Application
Role
Catalog Connectio
ns
Create and Edit
Connections
Create and edit connections. DV Content
Author
Create and Edit
Connections to OCI Data
Science with Resource
Principal
Create and edit connections to Oracle Cloud
Infrastructure Data Science using a resource
principal.
Not used in Oracle Analytics Server.
BI Service
Administrator
Create and Edit
Connections to OCI
Document Understanding
with Resource Principal
Create and edit connections to Oracle Cloud
Infrastructure Document Understanding using
resource principal.
Not used in Oracle Analytics Server.
BI Service
Administrator
Create and Edit
Connections to OCI
Functions with Resource
Principal
Create and edit connections to Oracle Cloud
Infrastructure Functions using a resource
principal.
Not used in Oracle Analytics Server.
BI Service
Administrator
Create and Edit
Connections to OCI
Language with Resource
Principal
Create and edit connections to Oracle Cloud
Infrastructure Language using a resource
principal.
Not used in Oracle Analytics Server.
BI Service
Administrator
Create and Edit
Connections to OCI Vision
with Resource Principal
Create and edit connections to Oracle Cloud
Infrastructure Vision using a resource principal.
Not used in Oracle Analytics Server.
BI Service
Administrator
Data
Flows
Create and Edit Data Flows
Create and edit data flows. DV Content
Author
Create and Edit Sequences
Create and edit sequences. DV Content
Author
Datasets Create and Edit Datasets
Create and edit datasets. DV Content
Author
Download File-Based Data
Download dataset files. DV Content
Author
System Export Content
Export workbook content to archive files (DVA). DV Content
Author
Workbook
s
Create and Edit Watchlists
Create and edit watchlists. DV Content
Author
Create and Edit Workbooks
Create and edit workbooks. DV Content
Author
Export Workbook Data
Export data from workbooks. BI Consumer
Export Workbooks to
Documents
Export workbooks to documents, such as PDF. BI Consumer
Chapter 2
About Permissions
2-5
Category Resource Permission Description Predefined
Application
Role
Schedule Workbooks
Set up and edit schedules for workbooks.
Not used in Oracle Analytics Server.
BI Service
Administrator
Schedule Workbooks with
Bursting
Set up and edit schedules for workbooks with
bursting.
Not used in Oracle Analytics Server.
BI Service
Administrator
Schedule Workbooks with
RunAs User
Set up and edit schedules for workbooks with
RunAs user.
Not used in Oracle Analytics Server.
BI Service
Administrator
View Navigation Menu
View the curated list of dashboards and
workbooks.
BI Consumer
Administr
ation
Snapshot Manage Snapshots
Create and restore snapshots. BI Service
Administrator
System Manage Console
Connections
Create and manage connections. BI Service
Administrator
Manage Content
View a list of everyone's content and change
ownership.
BI Service
Administrator
Manage Extensions
Upload, download, and delete custom plug-ins
(custom visualization types or custom data
actions).
BI Service
Administrator
Manage Maps
Set up map information for dashboards and
analyses, so users can visualize and interact
with data through maps.
BI Service
Administrator
Manage Security
Manage security (users and application roles). BI Service
Administrator
Manage Social Integration
Manage social channels for sharing
visualizations.
BI Service
Administrator
Manage Virus Scanner
Configuration
Configure a virus scanner to scan any files
uploaded to Oracle Analytics.
BI Service
Administrator
Configure What Users Can See and Do
Administrators assign application roles to determine what other users can see and do in Oracle
Analytics Cloud.
Topics:
• Get Started with Application Roles
• Add Members to Application Roles
• Why Is the Administrator Application Role Important?
• Assign Application Roles to Users
• Assign Application Roles to Groups
• Add Your Own Application Roles
• Copy Permissions to an Existing User-Defined Application Role
• View Permissions Granted to Application Roles
Chapter 2
Configure What Users Can See and Do
2-6

• Grant and Revoke Permissions for Application Roles
• Delete Application Roles
• Add One Predefined Application Role to Another (Advanced)
• View and Export Detailed Membership Data
• Sample Scenarios: User-defined Application Roles
Get Started with Application Roles
Administrators configure what users see and do in Oracle Analytics Cloud from the Users and
Roles page in the Console. This page presents user information in four different views: User,
Groups, Application Roles, Permissions.
Users and Roles Page Description
Users tab Lists users from the identity domain associated with your Oracle Analytics
instance.
From the Users tab, you can:
• Discover the groups and application roles that each user directly
belongs to.
• Discover the permissions granted directly to a user.
• Add or remove application roles assigned to a user.
• Remove permissions granted directly to a user.
• Generate a report that lists the groups or application roles assigned to
a user, either directly or indirectly.
You can’t add or remove user accounts through the Users tab. Use your
identity management system to manage user accounts.
It's best practice to assign permissions to application roles. You can't grant
permissions to a user. However, if the user already has permission grants
(for example, though migration from an on-premise environment), you can
remove these permission grants from the user.
Groups tab Lists user groups from the identity domain associated with your Oracle
Analytics instance.
From the Groups tab, you can:
• Discover the members (users or groups) directly assigned to each
group.
• Discover the application roles or any other groups that a group is
directly assigned to.
• Add or remove application roles assigned to a group.
You can’t add or remove user groups through the Groups tab. Use your
identity management system to manage user groups.
Chapter 2
Configure What Users Can See and Do
2-7

Users and Roles Page Description
Application Roles tab Lists the predefined application roles for Oracle Analytics and any user-
defined application roles that you add.
From the Application Roles tab, you can:
• Create your own application roles.
• Discover the members (users, groups, application roles) directly
assigned to each application role.
• Discover the permissions directly granted to each application role.
•
• Add members or remove members from each application role.
• Discover whether an application role is a member of any other
application role.
• Add or remove memberships for each application role.
• Grant permissions to user-defined application roles.
• Remove permissions from user-defined application roles.
• Generate a report that lists the users assigned to an application role,
either directly or indirectly.
• Generate a report that lists the groups (or IDCS application roles)
assigned to an application role, either directly or indirectly.
• Generate a report that lists other application roles assigned to an
application role, either directly or indirectly.
• Generate a report that lists any other application roles an application
role is assigned to, either directly or indirectly.
Permissions tab Lists the permissions available in Oracle Analytics.
From the Permissions tab, you can:
• Search for permissions and filter the permissions list.
• Discover the application roles a permission is directly assigned to.
• Discover the users a permission is directly assigned to.
Add Members to Application Roles
Application roles determine what users are allowed to see and do in Oracle Analytics Cloud.
It’s the administrator’s job to assign appropriate application roles to all users and to manage
the privileges of each application role.
Remember:
• Members (users, groups, and other application roles) get the permissions granted to an
application role.
• Application roles can get permissions granted to other application roles. For example, DV
Content Author gets the permissions granted to BI Content Author, DV Consumer, and BI
Consumer.
You use the Users and Roles page in the Console to assign members to an application role.
1. Click Console.
2. Click Users and Roles.
3. Click Application Roles.
All the predefined application roles are displayed, together with any user-defined
application roles that you've added.
4. Select the name of an application role for more detail, and to see its current members.
Chapter 2
Configure What Users Can See and Do
2-8
5. Under Direct Members, click Users, Groups, or Application Roles to view the current,
direct members in each category.
For example, if you click Users you see a list of users directly assigned to the application
role.
6. To see a list of all the members in the selected category that are assigned to the
application role (both directly and indirectly), click the menu icon and select Show Indirect
Members.
7. To add a new member (user, group, application role, IDCS application role) to the
application role, click Add Users, Add Groups, or Add Application Roles, select one or
more members, and then click Add.
8. To remove a member from the application role, click the Delete icon next to the
member's name.
Why Is the Administrator Application Role Important?
You need the BI Service Administrator application role to access administrative options in the
Console.
There must always be at least one person in your organization with the BI Service
Administrator application role. This ensures there is always someone who can delegate
permissions to others. If you remove yourself from the BI Service Administrator role you’ll
see a warning message.
If no-one has administrative access to Oracle Analytics Cloud, ask your identity domain
administrator to add a user to the ServiceAdministrator IDCS application role.
ServiceAdministrator is assigned through the identity management system and is always
assigned to the BI Service Administrator application role in a regular Oracle Analytics Cloud
service instance.
Assign Application Roles to Users
The Users page lists the users from the identity domain associated with your Oracle Analytics
Cloud instance. As an administrator, you can assign these users to the appropriate application
roles.
1. Click Console.
Chapter 2
Configure What Users Can See and Do
2-9
2. Click Users and Roles.
3. Click Users.
4. On the Users page, click the name of a user.
To filter the list by name, enter all or part of a user name in the Search filter and press
enter. If you enter part of the name use * as the wild card. The search is case-insensitive,
and searches both name and display name. For example, enter
*admin*
to search for any
user that includes the letters
admin
.
5. In the Details page for the user, click Application Roles to see a list of application roles
directly assigned to this user.
6. Click the menu icon, and select Show Indirect Memberships to see a list of all the
application roles assigned to the user, that is, assigned both directly and indirectly.
7. To assign the user to an additional application role, click Add Application Roles.
8. In Add user to Application Roles, select one or more application roles from the list, and
then click Add.
9. To remove an application role from the user, click the Delete icon next to the name of
the application role you want to delete.
Assign Application Roles to Groups
The Groups page lists user groups from the identity domain associated with the Oracle
Analytics Cloud instance. It's best practice to assign application roles to groups rather than to
users.
1. Click Console.
2. Click Users and Roles.
3. Click Application Roles.
All the predefined application roles are displayed, together with any application roles that
you've added.
4. Select the name of the application role you want to assign to a group.
5. Under Direct Members, click Groups to view the groups currently assigned to this
application role.
For example, there is a group called AppTesters directly assigned to the DV Content
Author application role.
Chapter 2
Configure What Users Can See and Do
2-10
6. To see a list of all the groups that are assigned to the application role (both directly and
indirectly), click the menu icon and select Show Indirect Members.
7. To assign a new group of users to the application role, click Add Groups, select one or
more groups, and then click Add.
8. To remove a group from the application role, click the Delete icon next to the group's
name.
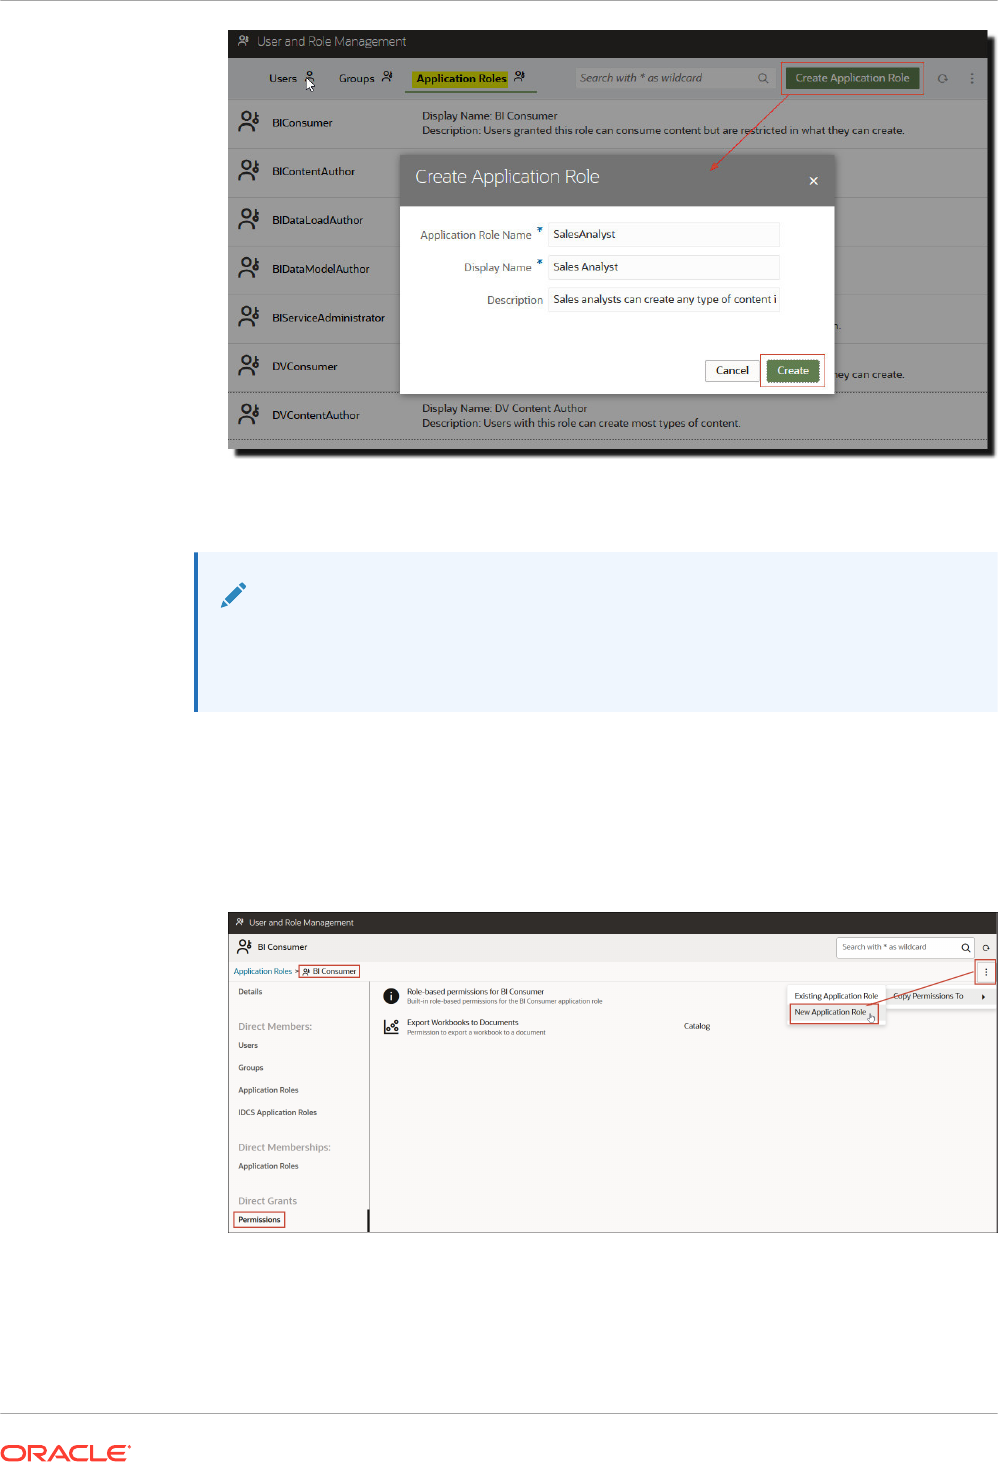
Add Your Own Application Roles
Oracle Analytics Cloud provides a set of predefined application roles. You can also create
user-defined application roles to suit your own requirements. For example, you might create an
application role that allows only a select group of people to view specific folders or workbooks.
Or you might create an application role with specific permissions assigned to it.
You can create an application role in two ways:
• Create an application role from scratch (no permissions).
• Create an application role with the same permissions as one of the predefined application
roles.
After creating the application role, you can grant permissions and add members (users,
groups, or other application roles).
1. Click Console.
2. Click Users and Roles.
3. Click Application Roles.
4. Do one of the following:
Create an application role from scratch (no permissions):
• Click Create Application Role.
Chapter 2
Configure What Users Can See and Do
2-11
Copy the permissions from a predefined application role to a user-defined
application role:
Note:
In this step, you're copying the permission grants for the predefined application
role that you choose. You aren't copying the application role's members or
memberships.
• Click the name of the application role you want to copy. For example, BIConsumer.
• Click Permissions.
• Click the action menu, and select Copy Permissions To and then select New
Application Role.
5. Enter suitable values for Application Role Name, Display Name, and Description.
The Application Role Name can contain alphanumeric characters (ASCII or Unicode) and
other printable characters (such as underscore or square brackets). The Application Role
Name must not contain any white space.
Chapter 2
Configure What Users Can See and Do
2-12

6. Click Create.
When you create an application role from scratch, it doesn't start with any members or
permissions. When you copy the permissions from one of the predefined application roles,
the application role starts with the same permissions as the role that you copied.
7. Grant permissions to the application role.
a. Under Direct Grants, select Permissions.
b. Click Add Permissions.
This option is available only to user-defined application roles.
c. Select one or more permissions, and then click Add.
8. Add members (users, groups, or application roles) to the new application role.
a. Under Direct Members, select the type of member you want to add: Users, Groups,
or Application Roles.
b. Click Add Users, Add Groups, or Add Application Roles.
c. Select one or more members, and then click Add.
9. Optional: Create hierarchical relationships between other application roles.
a. Under Direct Memberships, click Add to Application Roles.
b. Select all the application roles you want this application role to inherit privileges from,
and then click Add.
Copy Permissions to an Existing User-Defined Application Role
You can copy the permissions directly granted to a predefined application role to a user-
defined application role.
After you copy permissions to an existing role, you can grant additional permissions or revoke
any of the copied permissions. See Grant and Revoke Permissions for Application Roles.
1. Click Console.
2. Click Users and Roles.
3. Click Application Roles.
4. Click the name of a predefined application role.
To filter the list by name, enter all or part of a name in the Search filter and press enter. If
you enter part of the name use * as the wild card. The search is case-insensitive, and
searches both name and display name. For example, enter
*admin*
to search for any user
that includes the letters
admin
.
5. Click Permissions to see the permissions granted to the predefined application role.
6. Click the action menu, select Copy Permissions To, and then select Existing
Application Role.
Chapter 2
Configure What Users Can See and Do
2-13
7. Select an existing application role and click Copy.
View Permissions Granted to Application Roles
You can see a list of permissions granted to each user-defined application role as well as
permissions granted to the predefined application roles from the Application Roles page.
While you can view, add, and remove permissions for user-defined application roles, each
predefined application role includes a fixed set of permissions that you can't change.
Specifically, each predefined application role has a set of role-based permissions built into it
which aren't listed individually, plus zero or more regular permissions which are listed
individually but you can't remove them. For example, the predefined application role BI
Consumer has built-in, role-based permissions plus the permission Export Workbook to
Document.
1. Click Console.
2. Click Users and Roles.
3. Click Application Roles.
4. Click the name of an application role.
To filter the list by name, enter all or part of a name in the Search filter and press enter. If
you enter part of the name use * as the wild card. The search is case-insensitive, and
searches both name and display name. For example, enter
*admin*
to search for any
application role that includes the letters
admin
.
5. Click Permissions to see a list of permissions directly granted to the application role.
When you select an application role that you created from scratch, you see a list of
permissions granted to the role on the right. In this example, only one permission (Export
workbook to document) is granted to an application role you created (Finance
Consumer).
You can add and delete permissions, as required.
Chapter 2
Configure What Users Can See and Do
2-14
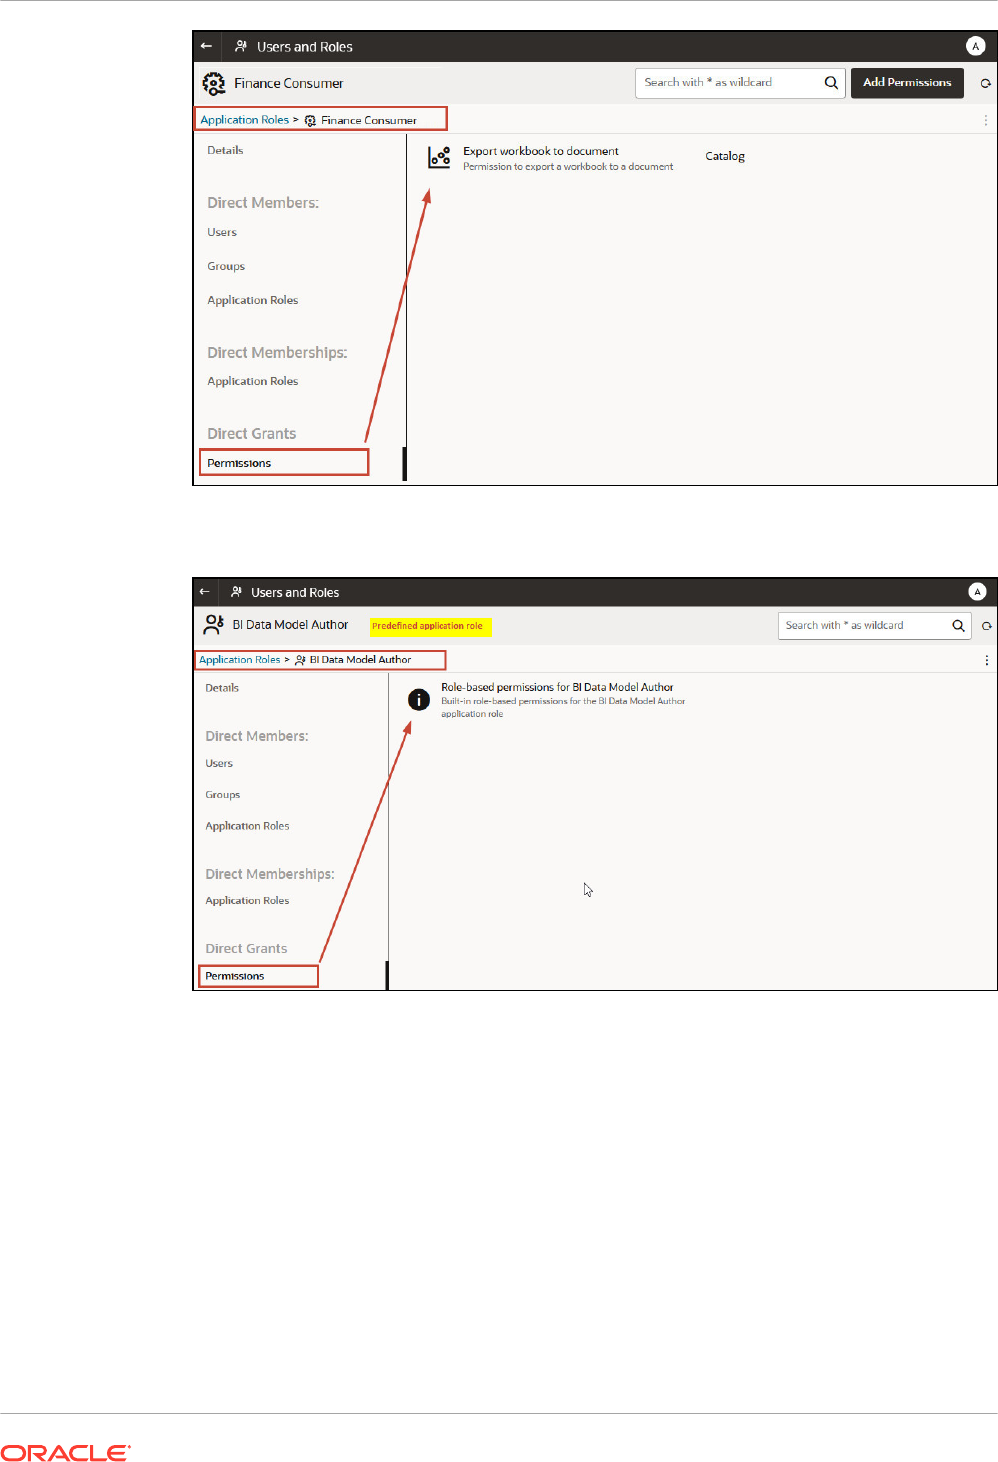
When you select one of the predefined application roles, such as BI Data Model Author,
you see a message indicating that the role contains a set of built-in, role-based
permissions. You can't change the permissions granted to a predefined application role.
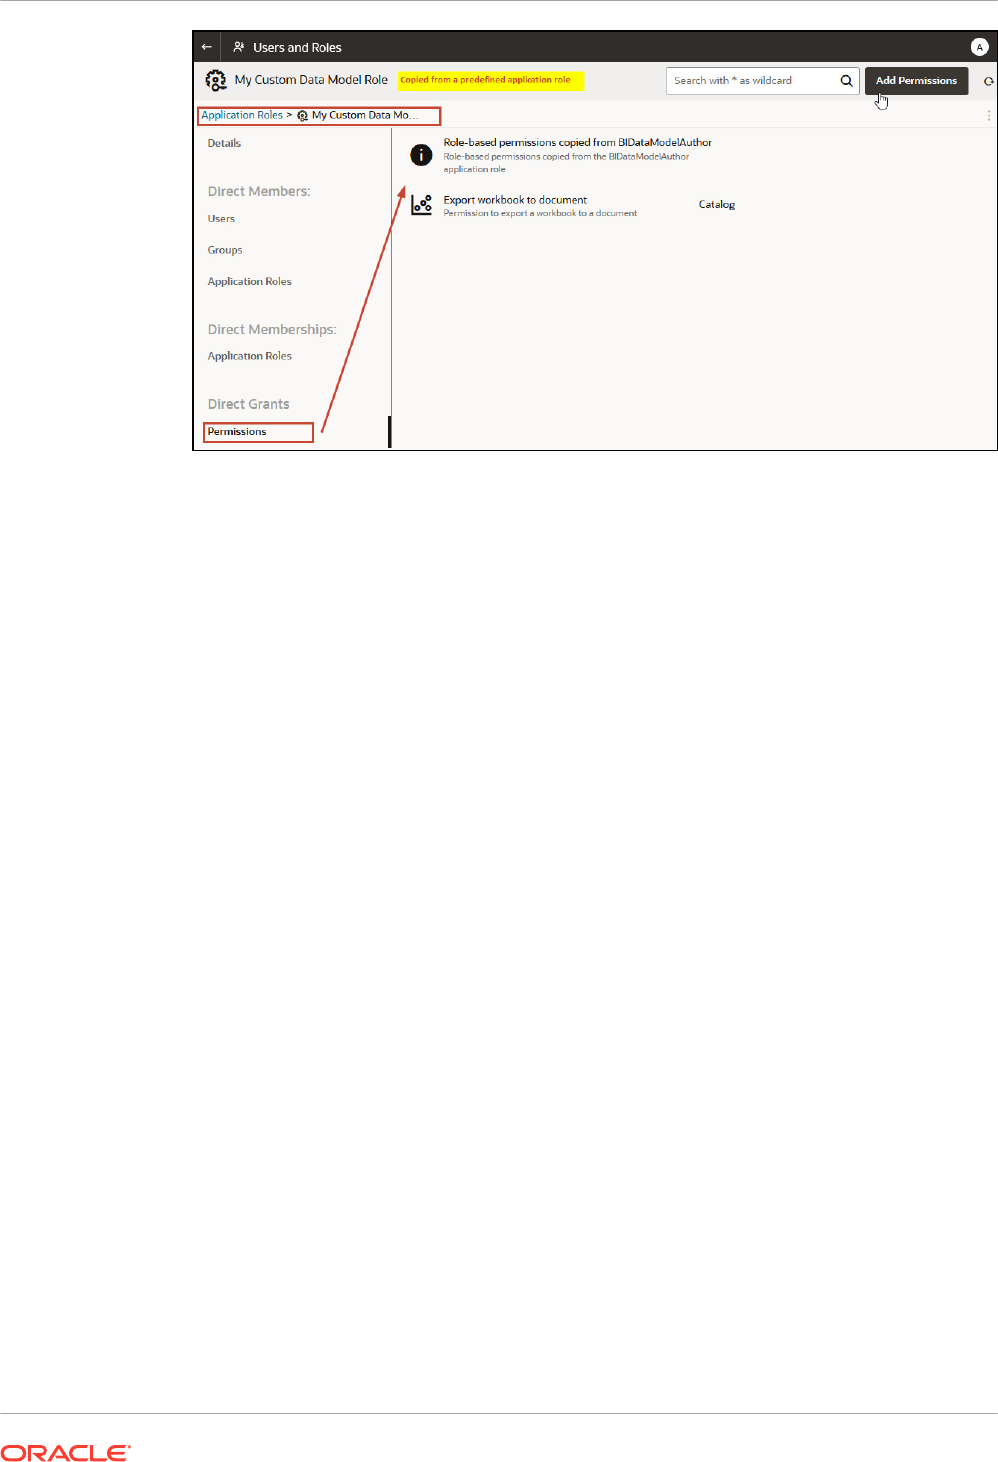
When you select a user-defined application role containing permissions copied from one of
the predefined application roles, such as BI Data Model Author, you see a message
indicating that the role contains a set of built-in, role-based permissions, plus any
additional permissions assigned to the predefined application role, as well as any
permissions that you granted the role.
Chapter 2
Configure What Users Can See and Do
2-15
Grant and Revoke Permissions for Application Roles
You can grant individual permissions to a user-defined application role or revoke permissions
that are no longer required. For example, you might want to provide an application role that
enables users to export their workbooks to a PDF by granting the permission Export workbook
to document.
1. Click Console.
2. Click Users and Roles.
3. Click Application Roles.
4. Click the name of a user-defined application role.
To filter the list by name, enter all or part of a name in the Search filter and press enter. If
you enter part of the name use * as the wild card. The search is case-insensitive, and
searches both name and display name. For example, enter
*admin*
to search for any user
that includes the letters
admin
.
5. Click Permissions to see the permissions granted to the user-defined application role.
6. To grant permissions to a user-defined application role.
a. Click Add Permissions.
Chapter 2
Configure What Users Can See and Do
2-16
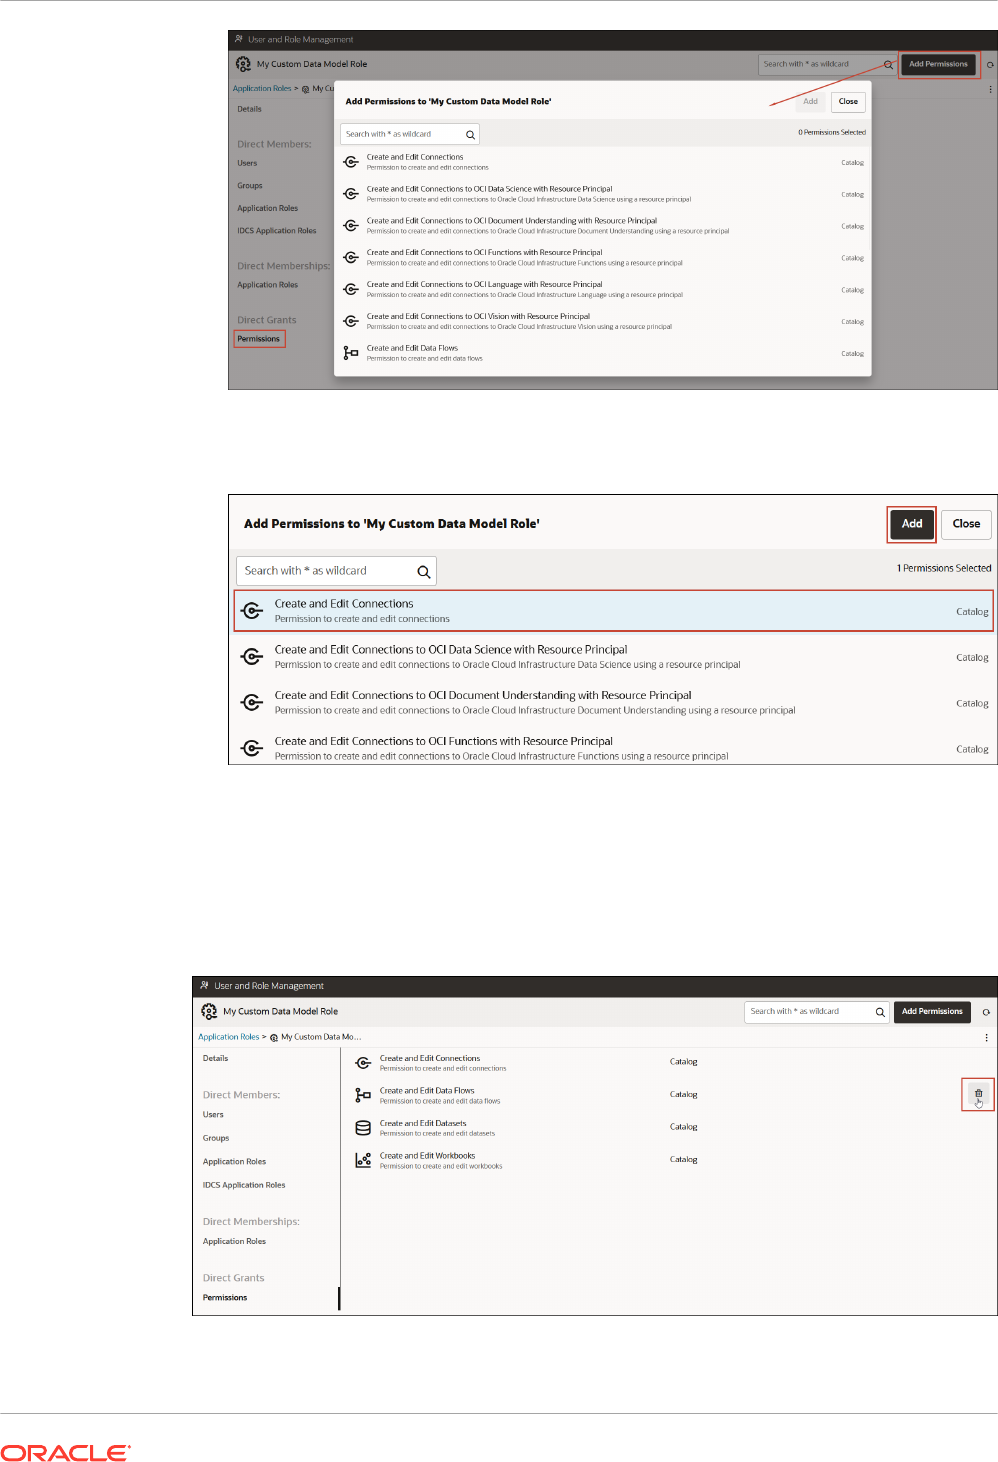
b. Select the permission you want, and click Add.
7. To revoke permissions from the application role.
a. Navigate to the permission you want to revoke.
b. Click the Remove Permission icon.
c. To confirm, click Remove.
Chapter 2
Configure What Users Can See and Do
2-17

Delete Application Roles
You can delete user-defined application roles that you don't need anymore.
1. Click Console.
2. Click Users and Roles.
3. Click Application Roles.
4. Navigate to the user-defined application role you want to delete.
5. Click the Delete icon next to the name of the application role you want to delete, and
then click Delete to confirm.
Add One Predefined Application Role to Another (Advanced)
Oracle Analytics Cloud provides several predefined roles: BI Service Administrator, BI Data
Model Author, BI Dataload Author, BI Content Author, DV Content Author, DV Consumer, BI
Consumer. In a very few advanced use cases, you might want to permanently include one
predefined application role in another.
Any changes that you make to predefined application roles are permanent, so don’t perform
this task unless you're sure you need to.
1. Take a snapshot of your system before making any predefined application role change.
Oracle recommends that you always take a snapshot before you start, as the only way you
can revert changes to predefined application roles is to restore your service from a
snapshot that was taken before the change.
a. Click Console.
b. Click Snapshots.
c. Click Create Snapshot.
2. In Console, click Users and Roles.
3. Click Application Roles.
4. Click the name of the predefined application role you want to change.
5. Under Direct Members, click Application Roles to see which application roles the
selected application role is currently a member of.
6. Click Add Application Roles.
By default, none of the predefined application roles are available.
Chapter 2
Configure What Users Can See and Do
2-18
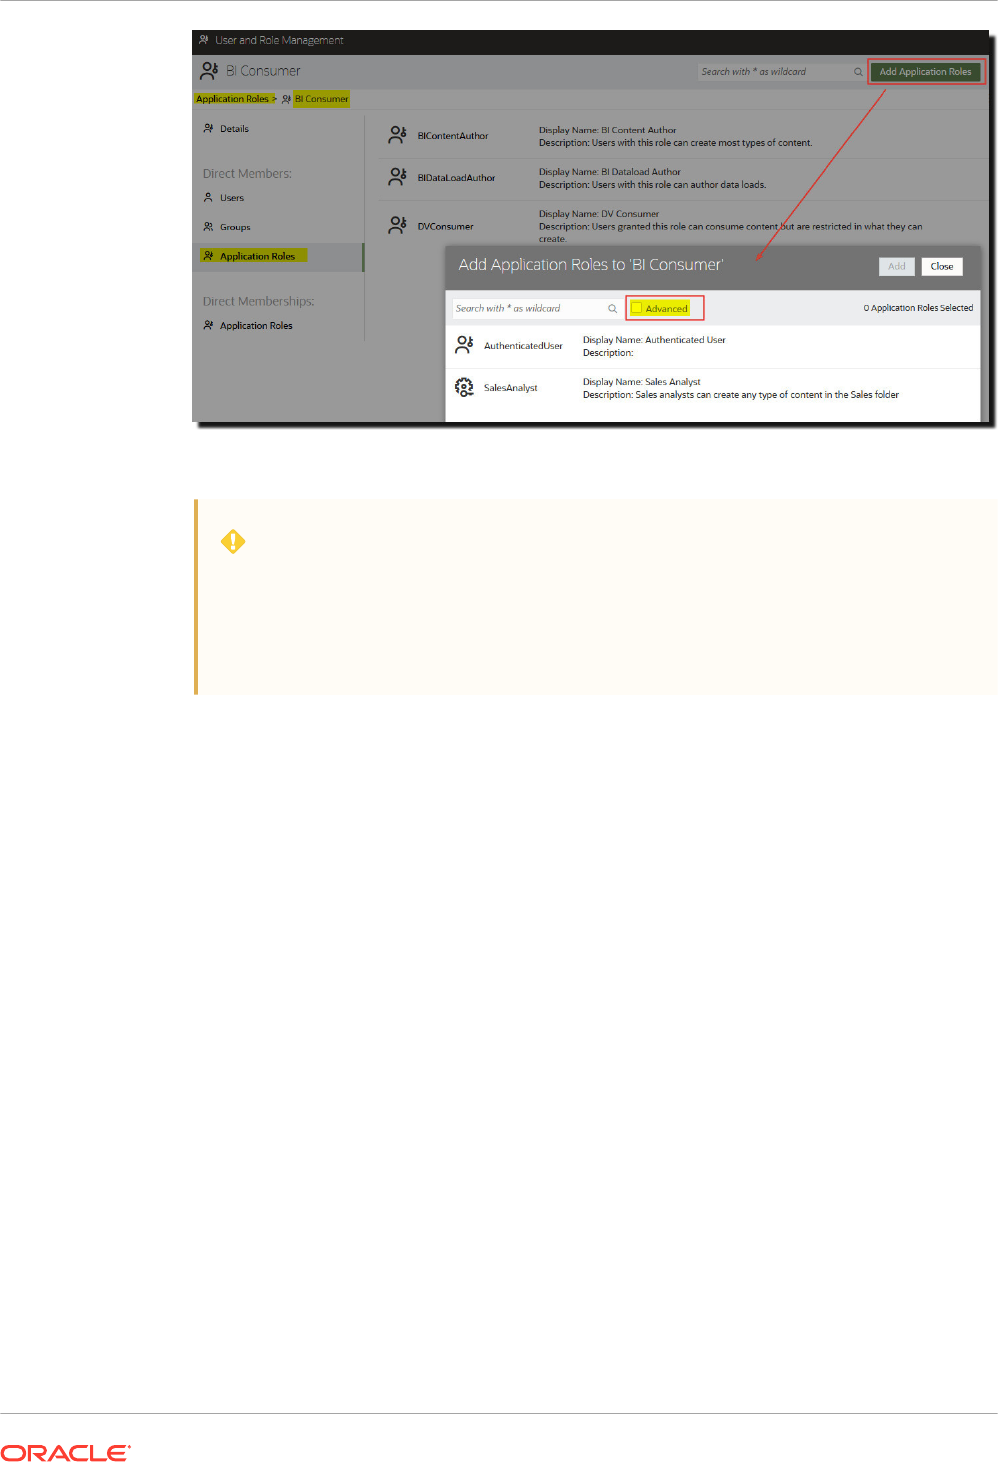
7. To add a predefined application role, click Advanced.
WARNING:
A warning is displayed. Read the information carefully before you proceed. When
you add one predefined application role to another, the change is permanent.
The only way you can revert predefined application role changes is to restore a
snapshot taken before the change.
8. Click OK to confirm that you’ve taken a snapshot and you're sure you want to permanently
modify the predefined application role you selected.
9. Select one or more predefined application roles from the list, and then click Add.
10. To reconfirm that you’ve taken a snapshot and want to permanently change the predefined
application role, click OK.
View and Export Detailed Membership Data
Each application role in Oracle Analytics Cloud can have direct members, but they might also
have one or more indirect members or memberships.
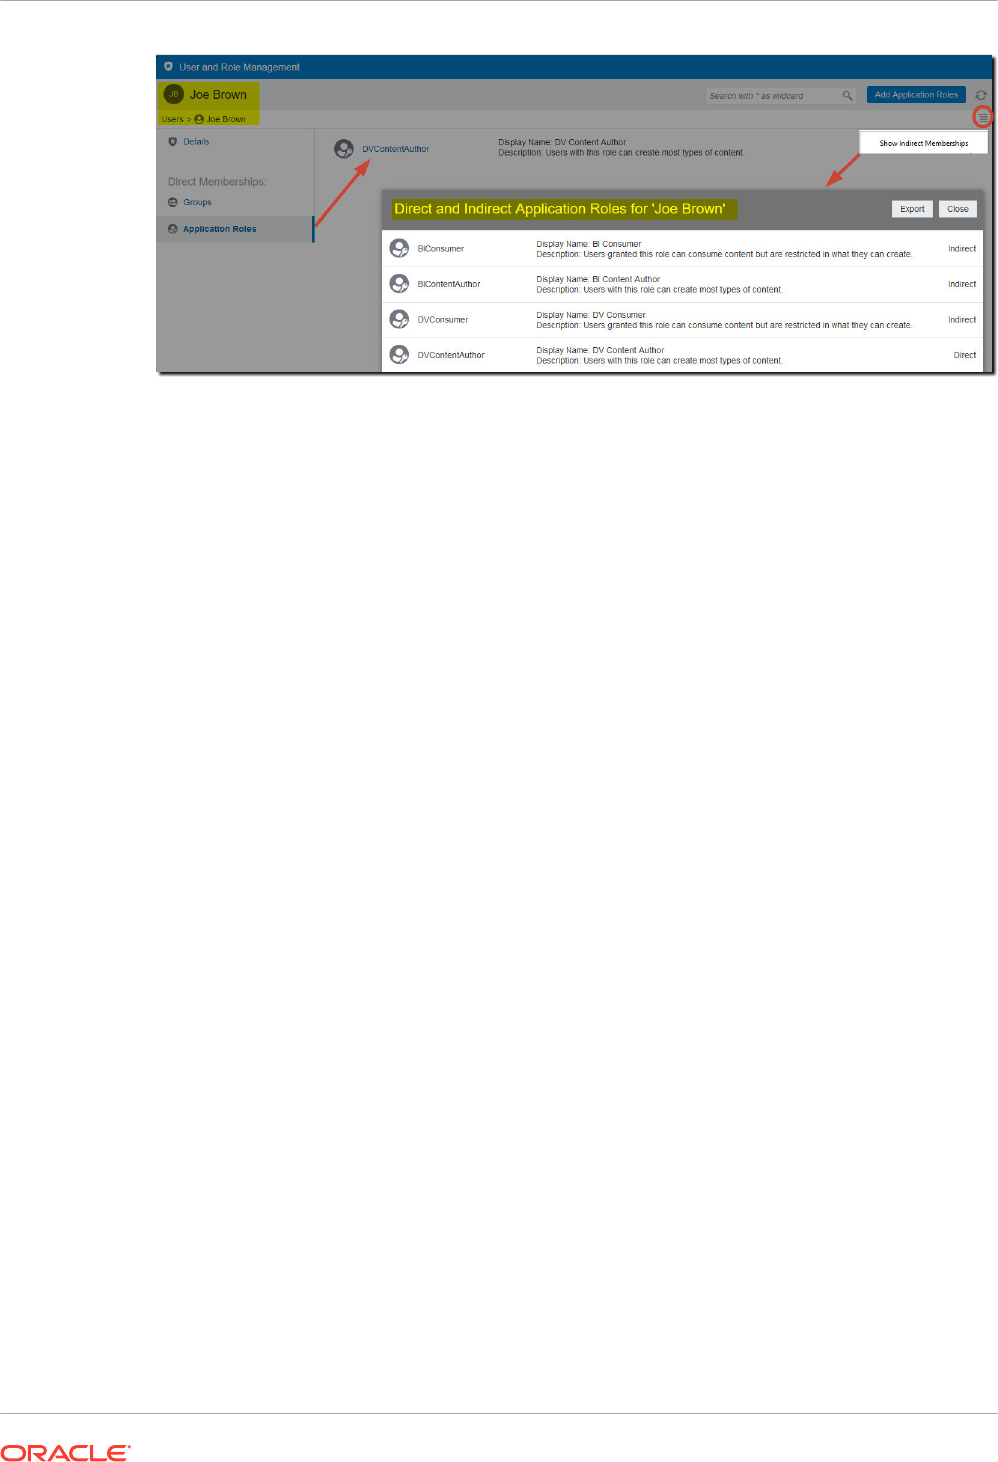
For example, Joe Brown is granted the DV Content Author application role. Joe is a direct
member of the DV Content Author role and an indirect member of BI Consumer, BI Content
Author, DV Consumer. You can view direct and indirect membership details from the User and
Chapter 2
Configure What Users Can See and Do
2-19
Role Management page and you can export this information to a CSV file.
1. Click Console.
2. Click Users and Roles.
3. To view direct and indirect membership data for a user:
a. Click the Users tab.
b. Select the name of the user whose membership details you want to see.
c. Under Direct Memberships, click Application Roles to see a list of all the or
application roles that the user you selected is directly assigned to.
d. Click the menu icon, and select Show Indirect Memberships to see a list of all the or
application roles that this user is both directly and indirectly assigned to.
4. To view direct and indirect membership data for an application role:
a. Click the Application Roles tab.
b. Select the name of the application role whose membership details you want to see.
c. Under Direct Members (or Direct Memberships), click Users, Groups, or
Application Roles to see a list of all the users, groups or application roles that the
application role you selected is a direct member of (or directly assigned to).
d. Click the menu icon, and select Show Indirect Members (or Show Indirect
Memberships) to see a list of all the users, groups, or application roles that this group
is both directly and indirectly a member of (or assigned to).
5. To export both direct and indirect membership data to a CSV file, click Export.
Download Membership Data
After displaying a list of the direct and indirect members for a user, group, or application role in
Oracle Analytics Cloud, you can download the report to a Comma Separated Values file (.csv).
1. From the Direct and Indirect Users | Groups | Application Roles view, click Export.
The direct and indirect members for the selected user, group, or application role are
exported to a file named
RoleReport.csv
.
2. Do one of the following:
• Click Open to open the CSV file in an application of your choice.
• Click Save to save the CSV file to a location of your choice.
Chapter 2
Configure What Users Can See and Do
2-20

Sample Scenarios: User-defined Application Roles
Here are some common scenarios for creating your own application roles .
Topics:
• Allow a User to Export Workbooks to PDF
• Prevent a User with the BI Consumer Role from Exporting Workbooks to PDF
• Allow a User to Create Datasets and Workbooks
• Prevent a User with the DV Content Author Role from Creating or Modifying Specific
Object Types
Allow a User to Export Workbooks to PDF
You can give users permission to perform specific actions in Oracle Analytics. For example,
you can enable users to export workbooks to PDF through an application role that includes the
Export Workbook to Document permission.
Note:
The predefined application role BI Consumer includes the permission Export
Workbook to Document. This means that any user who is a member of BI Consumer
(either directly or indirectly) automatically has this permission.
1. Create a new application role called Allow Document Export (or use a similar name).
See Add Your Own Application Roles.
2. Add the permission Export Workbook to Document.
See Grant and Revoke Permissions for Application Roles.
3. Assign the new application role Allow Document Export to a user or a group.
See Assign Application Roles to Users or Assign Application Roles to Groups.
4. Give users with the Allow Document Export application role access to one or more
workbooks.
These users can access workbooks and export the content to PDF.
See Add or Update Workbook Permissions.
Prevent a User with the BI Consumer Role from Exporting Workbooks to PDF
You can prevent users from performing specific actions in Oracle Analytics. For example, you
might want to provide an application role that prevents users with the BI Consumer role from
exporting workbooks to a PDF by removing the permission Export Workbook to Document.
1. Copy the BI Consumer application role and name the copy BI Consumer (prevent
export) (or use a similar name).
a. Use the option Copy Permissions to a New Application Role to create an
application role with the same permission set as BI Consumer.
Chapter 2
Configure What Users Can See and Do
2-21

b. Provide a suitable name and description for the new role. For example, BI Consumer
(prevent export).
See Add Your Own Application Roles.
2. Remove the Export Workbook to Document permission.
See Grant and Revoke Permissions for Application Roles.
3. Assign the new application role BI Consumer (prevent export) to a user or a group.
See Assign Application Roles to Users or Assign Application Roles to Groups.
4. Remove the predefined application role BI Consumer from the user or group.
5. Give users with the BI Consumer (prevent export) application role access to one or more
workbooks and access to the folders where the workbooks are saved.
When you give the BI Consumer (prevent export) application role access to the
workbook, you must accept the option to cascade access to any datasets used by the
workbook. That is, select the option Share related artifacts to ensure the workbook is
usable in the Share Related Artifacts dialog that displays when you save changes to
workbook permissions. See Add or Update Workbook Permissions.
These users can access workbooks but they can’t export the content to PDF.
See Add or Update Workbook Permissions.
Allow a User to Create Datasets and Workbooks
You can give users permission to perform specific actions in Oracle Analytics. For example,
you can enable users to create datasets and workbooks, and access and modify datasets and
workbooks through an application role that includes the Create and Edit Datasets and Create
and Edit Workbooks permissions.
Note:
The predefined application role DV Content Author includes the permissions Create
and Edit Datasets and Create and Edit Workbooks. This means that any user who is
a member of DV Content Author (either directly or indirectly) automatically has
these permissions.
1. Create a new application role called Allow Dataset and Workbook Creation (or use a
similar name).
See Add Your Own Application Roles.
2. Add the permissions Create and Edit Datasets and Create and Edit Workbooks.
See Grant and Revoke Permissions for Application Roles.
3. Assign the new application role Allow Dataset and Workbook Creation to a user or a
group.
See Assign Application Roles to Users or Assign Application Roles to Groups.
4. Give users with the Allow Dataset and Workbook Creation application role access to
one or more datasets and one or more workbooks.
These users can access and edit datasets and workbooks, and create datasets and
workbooks.
See Add or Update Workbook Permissions.
Chapter 2
Configure What Users Can See and Do
2-22

Prevent a User with the DV Content Author Role from Creating or Modifying Specific
Object Types
You can prevent users from performing specific actions in Oracle Analytics. For example, you
might want to provide an application role that prevents users with the DV Content Author role
from creating and modifying connections, data flows, sequences, and watchlists.
1. Copy the DV Content Author application role and name the copy DV Content Author
(limited create and modify) (or use a similar name).
a. Use the option Copy Permissions to a New Application Role to create an
application role with the same permission set as DV Content Author.
b. Provide a suitable name and description for the new role. For example, DV Content
Author (limited create and modify).
See Add Your Own Application Roles.
2. Remove the Create and Edit Connections, Create and Edit Data Flows, Create and
Edit Sequences, and Create and Edit Watchlists permissions.
See Grant and Revoke Permissions for Application Roles.
3. Assign the new application role DV Content Author (limited create and modify) to a user
or a group.
See Assign Application Roles to Users or Assign Application Roles to Groups.
4. Remove the predefined application role DV Content Author from the user or group.
5. Give users with the DV Content Author (limited create and modify) application role
access to one or more workbook and datasets and access to the folders where the
workbooks and datasets are saved.
When you give the DV Content Author (limit create and modify) application role access
to the workbook, you must accept the option to cascade access to any artifacts used by
the workbook. That is, select the option Share related artifacts to ensure the workbook
is usable in the Share Related Artifacts dialog that displays when you save changes to
workbook permissions. See Add or Update Workbook Permissions.
These users can access, create, and modify datasets and workbooks, but can't create and
modify connections, data flows, sequences, and watchlists.
See Add or Update Workbook Permissions.
Chapter 2
Configure What Users Can See and Do
2-23
3
Take Snapshots and Restore
This topic describes how to back up and restore application content using a file called a
snapshot.
Video
Topics:
• Typical Workflow to Take Snapshots and Restore
• About Snapshots
• Take Snapshots and Restore Information
• Export and Import Snapshots
• Migrate Oracle Analytics Cloud Using Snapshots
• Manage Snapshots Using REST APIs
Typical Workflow to Take Snapshots and Restore
Here are the common tasks to back up and restore your content with snapshots using the
Console.
Note:
You can also manage snapshots using the REST API. The Snapshots page in Oracle
Analytics Cloud Console lists the snapshots that you take using the Console.
Snapshots that you take and register using the REST API don't display in the
Snapshots page. See Manage Snapshots Using REST APIs.
Task Description More Information
Take a snapshot Capture content and settings in your
environment at a point in time.
Take a Snapshot
Schedule regular
snapshots (backups)
Take snapshots regularly, as part of your
business continuity plan to minimize data loss.
Schedule Regular Snapshots
(Backups)
Restore from a
snapshot
Restore the system to a previously working
state.
Restore from a Snapshot
Delete a snapshot Delete unwanted snapshots. Delete Snapshots
Download a snapshot Save a snapshot to a local file system. Export Snapshots
Upload a snapshot Upload content from a snapshot that is stored
on a local file system.
Import Snapshots
Migrate content using
a snapshot
Migrate content to another environment. Migrate Oracle Analytics Cloud
Using Snapshots
3-1

About Snapshots
A snapshot captures the state of your environment at a point in time. Snapshots don’t include
data that's hosted on external data sources.
Backup and Restore
Take a snapshot of your environment before people start using the system and again at
suitable intervals so you can restore the environment if something goes wrong. You can export
and store snapshots on your local file system or cloud storage and import them back to your
system if they’re required to restore content. The snapshot file that you download is a
compressed archive file (BAR file).
You can keep up to 40 snapshots online and export as many as you want to offline storage.
See Export Snapshots.
Oracle Analytics Cloud automatically takes a snapshot when someone publishes changes to
the semantic model and keeps the 5 most recent snapshots in case you unexpectedly need to
revert to an earlier model version. The minimum interval between these automatically
generated snapshots is one hour.
Note:
You can take and restore snapshots using the Console or REST API. The Snapshots
page in the Console lists the snapshots that you take using the Console. See Take
Snapshots and Restore Information. Snapshots that you take and register using the
REST API don't display in the Snapshots page. See Manage Snapshots Using REST
APIs.
Content Migration
Snapshots are also useful if you want to migrate your content to another environment. For
example, you might want to :
• Migrate content you created in a development or test environment to a production
environment.
• Migrate content you created in a different Oracle product and exported to a snapshot (BAR
file).
You can generate and migrate BAR files from several Oracle products.
– Oracle Analytics Cloud
– Oracle Analytics Server
– Oracle BI Enterprise Edition
When you restore a snapshot taken from a different environment:
• The snapshot must be taken from an environment at the same version (or earlier version)
as the target environment.
For example, if you take a snapshot of an Oracle Analytics environment that includes the
May 2022 update, you can restore it on other Oracle Analytics environments that include
the May 2022 update or a later update (such as July 2022). You can't restore this snapshot
on an Oracle Analytics environment that includes an earlier update, such as March 2022.
• Catalog objects that your target environment doesn’t support aren't migrated.
Chapter 3
About Snapshots
3-2

• In most cases, you must upload the data associated with your datasets on the target
environment.
Exclusions
There are a few items that aren't included in a snapshot:
• Data files - XLSX, XLS, CSV, or TXT files that users upload to create datasets. You can
include references to data files but not the actual files.
• Map layers and backgrounds - Custom map layers and map backgrounds that users
upload to enhance their visualizations and reports.
• Snapshot list - The list of snapshots that you see on the Snapshot page.
Options When You Take a Snapshot
When you take a snapshot you choose the content you want to include in it. You can take a
snapshot of your entire environment (everything) or specify only specific content that you want
to back up or migrate (custom).
• Everything - Saves your entire environment in the snapshot. This option is useful if you
want to:
– Back up everything in case something goes wrong.
– Migrate everything to a new environment.
– Clone an existing environment.
• Custom - You select which content to save in the snapshot. Some content types are
always included while others are optional.
Snapshot Option Description Optional?
Data Data visualization content that
users create (Data tab).
– Datasets Datasets that users create for
data visualizations and data
flows.
Always included
– File-based Data File-based data that users
upload to create datasets. For
example, data uploaded from a
spreadsheet. This option
captures references to your data
files. Actual data files aren't
included in the snapshot.
Optional
– Connections Data connections that users
create so they can visualize
their data.
Always included
– Data Flows Data flows that users create for
data visualization.
Always included
– Sequences Sequences that users create for
data visualization.
Always included
– Data Replications Data replications that users
create for data visualization.
Optional
– Semantic Models and
Subject Areas
Semantic models that users
develop (SMML) and semantic
models that users deploy
(RPDs).
Always included
Chapter 3
About Snapshots
3-3

Snapshot Option Description Optional?
Machine Learning Machine learning models that
users create from data flows.
Always included
Jobs Jobs that users schedule for
data flows, sequences, data
replications, and pixel-perfect
reports.
Optional
Plug-ins and Extensions Extensions that users upload to
implement custom visualizations
and custom maps.
Optional
Configuration and Settings Service configuration and
settings configured through
Console. For example, mail
settings, database connections,
safe domains, data connectivity
configurations, and so on.
Note: System settings aren't
included in the snapshot.
Optional
Day by Day Day by Day content such as the
"For You" feed, bring backs,
comments, and shared cards.
Optional
Application Roles – User-defined application
roles that administrators
create through Console.
– Membership details for
each application role, that
is, the users, groups, and
other application roles
assigned to each
application role.
Always included
Credentials
– Data connections:
Credentials and other
connection parameters,
such as host, port, user
name, and password. If you
exclude credentials, you
must reconfigure the
connection details after you
restore the snapshot.
– Cloud storage:
Credentials required to
access cloud storage
where file-based data that
users upload is stored. If
you include file-based data
in your snapshot, include
the storage credentials if
you plan to migrate the
content to another
environment. If you exclude
credentials, you can use
the Data Migration utility to
download and then upload
your data files separately.
Optional
Chapter 3
About Snapshots
3-4

Snapshot Option Description Optional?
Classic Content Content that users create in
Oracle Analytics Cloud, such as
workbooks, analyses,
dashboards, and pixel-perfect
reports.
Always included
– Catalog Content Catalog containing content that
users create and save for future
use, such as workbooks,
analyses, dashboards, reports,
deliveries, agents, and so on.
Always included
– Shared Folders (including
Workbooks)
Content that is being shared,
that is, content that everyone
with access to can see.
This includes any workbooks
saved in the shared folders.
Always included
– User Folders and
Personalizations (including
Workbooks)
Content stored in user folders.
Content that users create and
store for their private use.
This includes any workbooks
that users save in their private
folders and any personalizations
that they make to these
workbooks.
Optional
Options When You Restore a Snapshot
When you restore content from a snapshot you have several options. You can restore only the
content that's inside the snapshot, restore everything in your environment, or restore a specific
set of items in the snapshot (custom).
• Replace Snapshot Content Only - Everything in the snapshot that's supported in your
environment is restored. Any content type excluded from the snapshot remains unchanged
in your environment.
• Replace Everything - Replaces your entire environment using information in the
snapshot.
Any content type excluded from the snapshot is restored to its default state, that is, "no
content". For example, if you chose not to include jobs in the snapshot, any jobs that exist
on your system are deleted when you restore the snapshot and the jobs feature is restored
with default settings. There are some exceptions; if the snapshot doesn’t contain any file-
based datasets, plug-ins, or extensions these items are left unchanged.
This option is useful if you want to:
– Replace everything after something went wrong.
– Migrate from another service.
– Clone an existing service.
• Custom - You select the content you want to restore. If you don’t want to restore certain
content types, exclude them before you restore.
In most cases, the options on restore are the same as the options when you take a
snapshot. Some content types are always restored, while others are optional.
Chapter 3
About Snapshots
3-5
Note:
When you restore catalog content from a snapshot, delivery schedules aren’t
automatically restored or activated. This is so you can restore and activate
deliveries at a time that suits you. See Restore and Enable Delivery Schedules.
If your snapshot contains items that your environment doesn’t support, you see the
message "Not supported in this environment".
Restoring a Snapshot Taken from a Different Product
You can take snapshots in several Oracle products; Oracle BI Enterprise Edition 12c, Oracle
Analytics Cloud, and Oracle Analytics Server.
• Unsupported Content
If you take a snapshot in one product and try to restore it in a different Oracle product, you
might find the snapshot contains some items that the target environment doesn’t support.
When Oracle Analytics detects unsupported content, warning icons display on the Custom
page to highlight unsupported items in the snapshot that won't be restored.
For example, you take a snapshot in Oracle Analytics Cloud and include data replications,
file-based datasets, plug-ins and extensions in the snapshot. When you restore the
snapshot in Oracle Analytics Server, you notice that these items are marked not supported.
Oracle Analytics Server doesn’t allow you to include data replications, file-based datasets,
plug-ins and extensions in an Oracle Analytics Server snapshot or import them from
snapshots you created in other products.
Take Snapshots and Restore Information
You can take a snapshot of your system at any time using the Console.
Topics:
Note:
You can also manage snapshots using the REST API. The Snapshots page in Oracle
Analytics Cloud Console lists the snapshots that you take using the Console.
Snapshots that you take and register using the REST API don't display in the
Snapshots page. See Manage Snapshots Using REST APIs.
• Take a Snapshot
• Restore from a Snapshot
• Track Who Restored What and When
• Edit Snapshot Descriptions
• Delete Snapshots
• Schedule Regular Snapshots (Backups)
Chapter 3
Take Snapshots and Restore Information
3-6

Take a Snapshot
Administrators can take a snapshot of the system at any time.
1. Click Console.
2. Click Snapshots.
3. Click Create Snapshot.
4. Enter a short description for the snapshot to help you remember later why you took it.
For example, why you created the snapshot and what it contains.
5. Select the content you want to include, Everything or Custom.
• Everything - Include everything about your environment in the snapshot .
• Custom - Select only the content types you want to save in the snapshot. Deselect
any items that you don't want.
6. Click Create.
The latest content is saved to a snapshot.
Restore from a Snapshot
If something goes wrong, you can easily restore your content to a previous working state from
a snapshot. You also restore snapshots when you migrate content between environments.
Before you start, read these tips about restoring snapshots.
• As you start to restore the snapshot, users currently signed in have their session
terminated.
• After you restore from a snapshot, allow time for the restored content to refresh (for
example, approximately 15 to 30 minutes for a large snapshot).
• Delivery schedules aren’t automatically restored or activated when you restore catalog
content from a snapshot. This is so you can restore and activate deliveries at a time that
suits you. See Restore and Enable Delivery Schedules.
• You can restore snapshots taken at the same version (or earlier version) as the target
environment.
You might experience unexpected results if you try to restore from a snapshot that was
taken from a more recent update of Oracle Analytics.
• When you restore a snapshot taken from a different environment, you must upload the
data associated with your file-based datasets to the target environment.
• You can take and restore snapshots using the Console or REST API. The Snapshots page
in the Console lists the snapshots that you take using the Console. Snapshots that you
take and register using the REST API don't display in the Snapshots page. See Manage
Snapshots using REST APIs.
To restore a snapshot:
1. Click Console.
2. Click Snapshots.
3. Select the snapshot that you want to use to restore your system.
Chapter 3
Take Snapshots and Restore Information
3-7

4. Click Snapshot Actions .
5. Click Restore to return your system to the state when this snapshot was taken.
6. In the Restore Snapshot dialog, select only those elements you want to restore.
For example, you may not want to include application roles if you’re restoring a snapshot
taken from a pre-production environment, to a production environment. Pre-production
roles often have different members to the production environment. If so, select Custom
and deselect Application Roles before you restore.
a. Select the Restore option you want.
• Replace Snapshot Content Only - Replace all the content types included in
snapshot (listed in the description field) with the content inside the snapshot.
The restore process replaces entire content types on the target. For example, if
your target includes workbooks A and B and the snapshot contains workbook A,
only workbook A will exist on the target after you restore the snapshot.
Select this option if you don't want to replace or remove any other content types
that exist on the target, that is, only replace the content types inside the snapshot.
• Replace Everything - Overwrite all your existing content. Replace your existing
content with the content included in this snapshot (listed in the description field).
Any content types not included in the snapshot, excluding file-based datasets,
plug-ins and extensions, are removed and restored with default settings.
• Custom - Select only the content types you want to restore. You can restore with
content saved inside the snapshot or restore content with default settings if that
content is missing from the snapshot.
– Content saved inside the snapshot is listed in the description field.
– Content not included in the snapshot is marked with a warning icon
. Only
restore content marked with a warning icon if you want to restore that content
with default settings.
If you don’t want to restore everything, deselect all the items you want to keep.
b. If you select Custom, select only those items you want to restore.
7. For auditing purposes, enter the reason why you’re restoring.
It's good practice to include a restore reason. Later on you might want to analyze the
restore history, and this information can help you remember why you restored the
snapshot.
8. Click Restore.
A warning message is displayed because restoring a snapshot can be very disruptive.
9. Click Yes to restore the selected snapshot, or click No to abandon the restore.
10. Wait for the restore to complete, and then wait a few more minutes for the restored content
to refresh through your system.
The time it takes to restore your system depends on the size of your snapshot. For a large
snapshot, allow approximately 15 to 30 minutes.
11. Sign out and then sign back in to see the restored content and inherit newly restored
application roles, if any.
Chapter 3
Take Snapshots and Restore Information
3-8

Track Who Restored What and When
You can check the restore history to learn exactly when and what content was restored, and to
check for any errors during the restore process. This might be useful if you experience issues
during or after you restore a snapshot.
1. Click Console.
2. Click Snapshots.
3. Click the Page menu and select Show Restore History.
Edit Snapshot Descriptions
You can add or update the description for any snapshot.
1. Click Console.
2. Click Snapshots.
3. Select the snapshot you want to edit.
4. Click Snapshot Actions
.
5. Click Edit Name.
6. Update the description, and click OK.
Delete Snapshots
From time to time, delete snapshots that you don’t need.
1. Click Console.
2. Click Snapshots.
3. Select the snapshot that you want to delete.
4. Click Snapshot Actions
.
5. Click Delete to confirm that you want to delete the snapshot.
Schedule Regular Snapshots (Backups)
You must take snapshots regularly as part of your organization's business continuity plan to
minimize data loss. If something goes wrong with your content or service, you can revert to the
user content that you recently saved in a snapshot. For example, user content such as reports,
dashboards, data visualization workbooks, pixel-perfect reports, datasets, data flows, semantic
models, security roles, system settings, and so on.
Back Up Frequently
Oracle recommends that you take snapshots at significant checkpoints, for example, before
you make a major change to your content or environment. In addition, Oracle recommends that
you take regular weekly snapshots or at your own defined frequency based on the rate of
change of your environment and rollback requirements. You can keep up to 40 snapshots
Chapter 3
Take Snapshots and Restore Information
3-9

online and export as many as you want to offline storage (that is, to your local file system or to
your own Oracle Cloud storage). See Take a Snapshot and Export Snapshots.
Store Backups on Oracle Cloud
Oracle recommends that you adopt a regular practice of exporting snapshots to offline storage.
If you regularly export large snapshots (over 5GB or larger than the download limit of your
browser), Oracle recommends that you set up a storage bucket on Oracle Cloud and save your
snapshots to cloud storage. This way, you can avoid export errors due to size limitations and
timeouts that can sometimes occur when you export snapshots to your local file system. See
Set Up a Oracle Cloud Storage Bucket for Snapshots.
Automate Backups using REST APIs
Use REST APIs to programmatically create, restore, and manage your snapshots in Oracle
Cloud storage. For example, might create a script that takes regular backups (snapshots). See
Manage Snapshots Using REST APIs.
Disaster Recovery
If an unforeseen disaster happens, a well-architected business continuity plan will enable you
to recover as quickly as possible and continue to provide services to your Oracle Analytics
Cloud users. Taking regular snapshots is one of the ways you can help minimize disruption for
users.
You can also deploy a passive backup Oracle Analytics Cloud environment in a different region
to mitigate the risk of region-wide events. For more information and best practices, see
Disaster Recovery Configuration for Oracle Analytics Cloud.
Export and Import Snapshots
You can save snapshots to your local file system or cloud storage and upload them back to the
cloud. Exporting and importing snapshots enables you to back up and restore your content or
migrate content between development, test, and production environments.
Topics:
• Export Snapshots
• Import Snapshots
Export Snapshots
Use the export option to save a snapshot to your local file system or to a storage bucket on
Oracle Cloud Infrastructure. Exporting allows you to store and manage any snapshots you
might take of your system.
The snapshot exports as an archive file (.bar). The time it takes to export your snapshot
depends on the size of the
.bar
file.
Chapter 3
Export and Import Snapshots
3-10

Note:
If you regularly export large snapshots (over 5GB or larger than the download limit of
your browser), you must set up a storage bucket on Oracle Cloud Infrastructure and
save your snapshots to cloud storage. This way, you can avoid export errors due to
size limitations and timeouts that can sometimes occur when you save large
snapshots on your local file system. See Set Up a Oracle Cloud Storage Bucket for
Snapshots.
If you haven't taken the snapshot yet, you’ll need to do that first.
1. Click Console.
2. Click Snapshots.
3. Select the snapshot that you want to export.
4. Click Snapshot Actions
.
5. Click Export.
6. Select where you want to export the snapshot to.
• Local File Storage: Export the snapshot to your browser’s download folder.
• Oracle Cloud Storage: Export the snapshot to an existing storage bucket on Oracle
Cloud Infrastructure. Click Storage Details to specify connection details for the
storage bucket. If you need to create a storage bucket, see Set Up a Oracle Cloud
Storage Bucket for Snapshots.
7. If you select Oracle Cloud Storage, provide the connection details, a name for snapshot,
and the folder you want to use.
a. In Storage Container Details, specify a storage bucket for the snapshot, together with
the security keys and Oracle Cloud IDs (OCIDs) required to access the bucket on
Oracle Cloud Infrastructure Object Storage, and then click Next.
You need access to Oracle Cloud Infrastructure Console to generate or obtain this
information. If you don't have access, contact your administrator.
• Bucket Name: Name of the bucket. For example:
My_OAC_Snapshot_StorageBucket
• OCI Region: Region identifier for the region where the bucket is located. For
example:
us-phoenix-1
• OCI Tenancy ID: OCID for the tenancy that's hosting the bucket.
For example:
ocid1.tenancy.oc1..<unique_ID>
See Where to Get the Tenancy's OCID.
• OCI User ID: OCID for a user who created and uploaded the signing key pair
required to access the bucket.
For example:
ocid1.user.oc1..<unique_ID>
See Where to Get a User's OCID. See also How to Upload the Public Key.
• Key Fingerprint: Fingerprint of the private key required to access the bucket.
The fingerprint looks something like this:
99:34:56:78:90:ab:cd:ef:12:34:56:78:90:ab:cd:ef
See How to Get the Key's Fingerprint.
Chapter 3
Export and Import Snapshots
3-11

• Private Key: Name and location of the user's private key file in PEM format.
For example:
oci_private_key.pem
See How to Generate a Signing Key.
b. Optional: In Save Snapshot As, use the File Name field to change the name of
snapshot .bar file or select a different folder for the snapshot.
By default, snapshots are saved to the bucket's root folder and named
<timestamp>.bar
. For example:
20210824140137.bar
.
• To use a different name, enter a new name for the snapshot in the File Name field.
For example:
24August2021.bar
• To select a specific folder, either navigate to the required folder or type the folder
name in the File Name field. For example:
MyDaily_Snapshots/August/
24August2021.bar
Click the Refresh Data icon to switch back to the default file name and location.
Note:
You don't see every file and folder in the storage bucket through the Save
Snapshot As dialog. You see only snapshots (BAR files) and folders that
contain snapshots.
c. Click OK to confirm that you want to save the snapshot with this name and location.
8. In Snapshot Password, enter and confirm a password for the snapshot.
The password must be between 14 and 50 characters long and contain at least one
numeric character, one uppercase letter, and one lowercase letter.
Don’t forget this password. You’ll be asked for this password when you try to import the file
in the future. For example, if want to restore or migrate the content stored in the snapshot.
9. Click Export.
The time it takes to export depends on the size of the file.
Import Snapshots
You can import a snapshot that you previously saved on your local file system or a storage
bucket on Oracle Cloud Infrastructure. The time it takes to import the snapshot depends on the
size of the snapshot
.bar
file.
When you import a snapshot, the file itself is uploaded to your system but the artifacts stored
inside the snapshot aren’t immediately available in your environment. Snapshots you import
display in the snapshot list. When you’re ready to do so, you can overwrite your current
artifacts, such as your catalog, by restoring the snapshot.
1. Click Console.
2. Click Snapshots.
3. Click the Page actions menu
and select Import Snapshot.
4. Select where you want to import the snapshot from.
• Local File Storage: Import a snapshot from your local file system.
Chapter 3
Export and Import Snapshots
3-12

• Oracle Cloud Storage: Import a snapshot located in a storage bucket on Oracle
Cloud Infrastructure. Click Storage Details to specify connection details for the
storage bucket.
5. If you select Local File Storage, click Select to locate the snapshot that you want to
upload.
Select the snapshot file (.bar) that contains your snapshot. You can upload snapshots
taken from Oracle Analytics Cloud, Oracle Analytics Server, and Oracle BI Enterprise
Edition 12c.
6. If you select Oracle Cloud Storage, provide the connection details, and select the
snapshot you want to import.
a. In Storage Container Details, specify the storage bucket containing the snapshot,
together with the security keys and Oracle Cloud IDs (OCIDs) required to access the
bucket on Oracle Cloud Infrastructure Object Storage, and then click Next.
You need access to Oracle Cloud Infrastructure Console to obtain this information. If
you don't have access, contact your administrator.
• Bucket Name: Name of the bucket. For example:
My_OAC_Snapshot_StorageBucket
• OCI Region: Region identifier for the region where the bucket is located. For
example:
us-phoenix-1
• OCI Tenancy ID: OCID for the tenancy that's hosting the bucket.
For example:
ocid1.tenancy.oc1..<unique_ID>
See Where to Get the Tenancy's OCID.
• OCI User ID: OCID for a user who created and uploaded the signing key pair
required to access the bucket.
For example:
ocid1.user.oc1..<unique_ID>
See Where to Get a User's OCID. See also How to Upload the Public Key.
• Key Fingerprint: Fingerprint of the private key required to access the bucket.
The fingerprint looks something like this:
99:34:56:78:90:ab:cd:ef:12:34:56:78:90:ab:cd:ef
See How to Get the Key's Fingerprint.
• Private Key: Name and location of the user's private key file in PEM format.
For example:
oci_private_key.pem
See How to Generate a Signing Key.
b. In Select Snapshot, navigate to the snapshot you want to import.
Alternatively, type the folder path and the name of the snapshot in the File Name field.
For example:
MyDaily_Snapshots/August/24August2021.bar
Click the Refresh Data icon to clear your selection and start again.
Note:
You don't see every file and folder in the storage bucket through the Select
Snapshot dialog. You see only snapshots (BAR files) and folders that
contain snapshots.
c. Click OK to confirm that you want to import the selected snapshot.
Chapter 3
Export and Import Snapshots
3-13

7. Enter the snapshot password.
This is the password that you specify whenever you export a snapshot to your local file
system or cloud storage.
8. Click Import.
Set Up a Oracle Cloud Storage Bucket for Snapshots
If you want to store your Oracle Analytics Cloud snapshots on Oracle Cloud, you (or your
administrator) must complete several set up steps. You need to create the storage bucket that
you plan to use and generate an API signing key that authorizes you (or another user) to
access the bucket from Oracle Analytics Cloud.
1. In Oracle Cloud Infrastructure Console, create a user in IAM with authorization to create
and connect to the bucket.
You can skip this step if the user exists. See Adding Users.
2. Generate an API signing key pair for this user.
See How to Generate an API Signing Key.
When you use the Console to add the API signing key pair, a configuration file preview
snippet is generated with the following information.
•
user
- OCID of the user for whom the key pair is being added.
•
fingerprint
- Fingerprint of the key that was just added.
•
tenancy
- Your tenancy's OCID.
•
region
- Currently selected region in the Console.
•
key_file
- Path to the private key file you downloaded. You must update this value to
the path on your file system where you saved the private key file.
3. Make a note of the information displayed in the snippet. When you export snapshots from
Oracle Analytics Cloud to Oracle Cloud storage (or import a snapshot stored on Oracle
Cloud) you'll be asked to provide the following:
OCI User ID:
user
Key Fingerprint:
fingerprint
Private Key:
key_file
OCI Tenancy ID:
tenancy
OCI Region:
region
4. Create a storage bucket for snapshots.
You can skip this step if the bucket exists. See Create a Bucket.
The user you created the signing key for must have read-write access to the storage
bucket. Specifically, this user must have the following permissions on the storage bucket
where the snapshots are stored:
•
OBJECT_CREATE
•
OBJECT_OVERWRITE
Chapter 3
Export and Import Snapshots
3-14

Migrate Oracle Analytics Cloud Using Snapshots
Download and upload features enable you to save snapshots to your local file system and
upload them back to the cloud. Use these features to migrate content between two different
services, migrate between development, test, and production environments, and migrate
service deployed on Oracle Cloud Infrastructure Classic to Oracle Cloud Infrastructure.
Topics:
• About Oracle Analytics Cloud Migration
• Typical Workflow to Migrate Oracle Analytics Cloud
• Migrate File-based Data
About Oracle Analytics Cloud Migration
It's easy to migrate content and settings from one Oracle Analytics Cloud environment to
another using snapshots. You can migrate everything or you can migrate specific types of
content.
Prerequisites for Migration
Before you migrate user content using snapshots, verify your source and target environment:
• The source and target environment must both use Oracle Analytics Cloud 5.1.x or later.
Snapshots taken from earlier versions don't capture the entire environment.
If you're not sure, ask your Oracle representative.
• If you haven't done so already, create the target service on Oracle Cloud Infrastructure.
See Create a Service with Oracle Analytics Cloud in Administering Oracle Analytics Cloud
on Oracle Cloud Infrastructure (Gen 2).
• If you want to migrate file-based data, check the source and target environments are up
and running, and configured with valid storage credentials.
Storage access issues can prevent data file migration using snapshots. If this happens,
you can use the Data Migration utility to download your data files and then upload them
separately.
Items Not Migrated
Some Oracle Analytics Cloud artifacts aren’t included in snapshots. Non-Oracle Analytics
Cloud artifacts aren't included either.
Items Not Migrated More Information
Virus scanner configuration Record the virus scanner configuration used in your source
environment and use the same information to configure your
virus scanner on the target. See Configure a Virus Scanner.
Mail server configuration Record the SMTP mail server configuration used in your
source environment and use the information to configure your
mail server on the target. See Set Up an Email Server to
Deliver Reports.
Other saved snapshots in the source
environment
If required, download individual snapshots that you want to
migrate, and then upload them to the target. See Import
Snapshots.
Chapter 3
Migrate Oracle Analytics Cloud Using Snapshots
3-15

Items Not Migrated More Information
Users (and groups)
Migrate from Oracle Cloud Infrastructure Identity and
Access Management (IAM) Identity Domain
Use export and import features in Oracle Cloud Infrastructure
Console to migrate users and roles from one identity domain
to another. See Transferring Data in Oracle Cloud
Infrastructure documentation.
Migrate from Oracle Identity Cloud Service
Use export and import features in Oracle Identity Cloud
Service Console to migrate users and roles from one identity
domain to another. See Manage Oracle Identity Cloud Service
Users and Manage Oracle Identity Cloud Service Groups.
Migrate from Embedded WebLogic LDAP Server
Use the script
wls_ldap_csv_exporter
to export users and
groups to a CSV file that you can import on the target Oracle
Identity Cloud Service. See Export Users and Groups from
Embedded WebLogic LDAP Server.
Identity management configuration Use Oracle Cloud Infrastructure Console in your target
environment to reconfigure any user (or group) application
role assignments that you configured on the source,
reconfigure single sign-on (SSO), and so on.
Network configuration Set up your network requirements in the target environment,
as required.
Typical Workflow to Migrate Oracle Analytics Cloud
You use snapshots to migrate Oracle Analytics Cloud to another environment. Here's what you
need to do.
Task Description More Information
Understand how to
migrate using
snapshots
Understand what you can and can't migrate in
snapshots and any prerequisites.
About Oracle Analytics Cloud
Migration
Create the target
service
Use Oracle Cloud Infrastructure Console to
deploy a new service on Oracle Cloud
Infrastructure.
Create a Service with Oracle
Analytics Cloud
Migrate users and
groups
Use export and import features in Oracle
Cloud Infrastructure Console to migrate users
and roles from one identity domain to another.
The way you migrate users for Oracle
Analytics Cloud depends whether identity
domains are available in your cloud account.
If you're not sure, see About Setting Up Users
and Groups.
If your source system uses an embedded
WebLogic LDAP server for identity
management, use the
wls_ldap_csv_exporter
script to export
your users and groups to a CSV file.
Transferring Data (IAM Users)
Manage Oracle Identity Cloud
Service Users
Export Users and Groups from
Embedded WebLogic LDAP
Server
Take a snapshot on
the source
Capture the content you want to migrate on
the source system.
Take a Snapshot
Chapter 3
Migrate Oracle Analytics Cloud Using Snapshots
3-16

Task Description More Information
Export the snapshot Download the snapshot that you want to
migrate to your local file system or to a
storage bucket on Oracle Cloud Infrastructure.
Export Snapshots
Upload the snapshot
to the target
Sign in to the target system and upload the
snapshot.
Import Snapshots
Restore the snapshot
content
Select the newly uploaded snapshot in the list
of saved snapshots and restore the content in
the snapshot.
Restore from a Snapshot
Migrate data files Use the Data Migration utility to migrate data
files from one environment to another.
Only required when:
• You migrate to a different region.
• You migrate to Oracle Analytics Cloud on
Gen 2 from Oracle Analytics Cloud on
Gen 1 or Oracle Cloud Infrastructure
Classic.
• Restore process fails due to network
connectivity or storage access issues.
Migrate File-based Data
Reconfigure your virus
scanner
Record the virus scanner configuration in your
source environment and use it to configure
your virus scanner on the target.
Configure a Virus Scanner
Reconfigure your mail
server
Record the SMTP mail server configuration in
your source environment and use it to
configure your mail server on the target.
Set Up an Email Server to
Deliver Reports
(Optional) Migrate
other snapshots
Download individual snapshots that you want
to migrate and then upload them to your
target environment, as required.
Export Snapshots
Import Snapshots
Migrate identity
management
configuration
Use Oracle Cloud Infrastructure Console in
your target environment to reconfigure any
user (or group) application role assignments
that you configured on the source, reconfigure
single sign-on (SSO), and so on.
Migrate File-based Data
Users upload data files, such as spreadsheets, to Oracle Analytics Cloud to create datasets.
When you migrate to a new Oracle Analytics Cloud environment, you can take this file-based
data with you. Sometimes, network connectivity or storage access issues might prevent you
from migrating the data files in the snapshot. For such cases, Oracle Analytics Cloud offers a
CLI utility (command-line interface) that enables you to move your data files to the new
location. The snapshot CLI utility also moves any map-related plug-ins and extension files that
users might upload for their data visualizations.
Run the data migration CLI utility if you see the message
Restore succeeded with errors -
data restore failed
(or similar) when you try to restore a snapshot that contains data files.
This message occurs when:
• You migrate content from a different region.
• You migrate content from Oracle Analytics Cloud on Gen 1 or Oracle Cloud Infrastructure
Classic to Oracle Analytics Cloud on Gen 2.
• The restore process fails due to some other network connectivity or storage access issue.
Chapter 3
Migrate Oracle Analytics Cloud Using Snapshots
3-17

The CLI utility allows you to move data files directly from one environment to another in a
single step. Or if you prefer, you can download your file-based data to a ZIP file and then
upload the data files to your chosen environment in two separate steps.
1. Check your environment details.
• Verify that the source and target system both use Oracle Analytics Cloud 5.3 or later.
The CLI utility isn't available in earlier versions.
If you're not sure, ask your Oracle representative.
• Check that the source and target system are both up and running, and Oracle
Analytics Cloud is configured with valid storage credentials.
• Check your local environment. You need Java 1.8 or later to run the CLI utility.
• Make sure you can access the source environment and the target Oracle Analytics
Cloud from the local environment where you plan to run the CLI utility.
• Verify the name and location of the snapshot that you downloaded earlier containing
your file-based data. For example,
/tmp/20190307095216.bar
.
2. Download the CLI utility.
a. In your target Oracle Analytics Cloud, click Console and then click Snapshots.
b. Click the Page menu , select Migrate, then Download Data Migration Utility.
Follow the instructions to save the
migrate-oac-data.zip
file locally.
3. Unzip
migrate-oac-data.zip
.
The ZIP file contains three files:
• migrate-oac-data.jar
• config.properties
• readme
4. If you want to migrate data files stored in your source environment directly to the target in a
single step, configure the section
[MigrateData]
in config.properties.
[MigrateData]
# Migrate data files from a source Oracle Analytics Cloud environment
(OAC) to a target Oracle Analytics Cloud environment.
# Specify the source environment as Oracle Analytics Cloud.
SOURCE_ENVIRONMENT=OAC
# Source Oracle Analytics Cloud URL. For example: https://
sourcehost.com:443 or http://sourcehost.com:9704
SOURCE_URL=http(s)://<Source Oracle Analytics Cloud Host>:<Source
Port>
# Name of a user with Administrator permissions in the source
environment. For example: SourceAdmin
SOURCE_USERNAME=<Source Administrator User Name>
# Location of the source snapshot (.bar file). For example: /tmp/
20190307095216.bar
BAR_PATH=<Path to Source Snapshot>
# Target Oracle Analytics Cloud URL. For example: https://
targethost.com:443 or http://targethost.com:9704
TARGET_URL=http(s)://<Target Oracle Analytics Cloud Host>:<Target
Chapter 3
Migrate Oracle Analytics Cloud Using Snapshots
3-18

Port>
# Name of a user with Administrator permissions in the target
environment. For example: TargetAdmin
TARGET_USERNAME=<Target Administrator User Name>
5. If you want to first download data files from your source Oracle Analytics Cloud to your
local environment and subsequently upload the data files to the target Oracle Analytics
Cloud environment, configure sections
[DownloadDataFiles]
and
[UploadDataFiles]
in
config.properties.
[DownloadDataFiles]
#Download Data Files: Download data files from Oracle Analytics Cloud
storage to a local repository
# Specify the source environment as Oracle Analytics Cloud.
SOURCE_ENVIRONMENT=OAC
# Source Oracle Analytics Cloud URL. For example: https://
sourcehost.com:443 or http://sourcehost.com:9704
SOURCE_URL=http(s)://<Source Oracle Analytics Cloud Host>:<Source
Port>
# Name of a user with Administrator permissions in the source
environment. For example: SourceAdmin
SOURCE_USERNAME=<Source Administrator User Name>
# Location of the source snapshot (.bar file). For example: /tmp/
20190307095216.bar
BAR_PATH=<Path to Source Snapshot>
# Local data file directory. Make sure you have enough space to
download the data files to this directory. For example: /tmp/mydatafiledir
DATA_FRAGMENTS_DIRECTORY=<Data Files Directory>
# Data fragment size. Data files are downloaded in fragments. Default
fragment size is 500MB.
MAX_DATA_FRAGMENT_SIZE_IN_MB=500
[UploadDataFiles]
#Upload data files: Upload data files to the target Oracle Analytics
Cloud.
# Target Oracle Analytics Cloud URL. For example: https://
targethost.com:443 or http://targethost.com:9704
TARGET_URL=http(s)://<Target Oracle Analytics Cloud Host>:<Target
Port>
# Name of a user with Administrator permissions in the target
environment. For example: TargetAdmin
TARGET_USERNAME=<Target Administrator User Name>
# Local directory containing the data files you want to upload. For
example: /tmp/mydatafiledir
DATA_FRAGMENTS_DIRECTORY=<Data Files Directory>
# Location of the source snapshot (.bar file). For example: /tmp/
20190307095216.bar
BAR_PATH=<Path to Source Snapshot>
6. Run the
migrate-oac-data.jar
file in your local environment.
Chapter 3
Migrate Oracle Analytics Cloud Using Snapshots
3-19

Syntax:
migrate-oac-data.jar [-config configfile] [-d] [-help] [-m] [-u]
Where:
•
-config configfile
: Name of the config.properties file
•
-d
: Downloads data locally using information in config.properties
•
-help
: Displays help
•
-m
: Migrates data using source and target information in the config.properties
file
•
-u
: Uploads data using information in the config.properties file
For example, to migrate data files in a single step:
java -jar migrate-oac-data.jar -m -config config.properties
For example, to download data files locally:
java -jar migrate-oac-data.jar -d -config config.properties
For example, to upload data files:
java -jar migrate-oac-data.jar -u -config config.properties
7. Sign in to your target Oracle Analytics Cloud.
8. To expose the data files in Oracle Analytics Cloud, you must restore the snapshot that you
used to migrate the rest of your content for a second time. This time, you must select the
Custom restore option.
a. Open the Console, and click Manage Snapshots.
b. Select the snapshot containing your data files.
c. Select the Custom restore option, and then select the option File-based data.
Deselect all other options.
d. Click Restore.
9. Verify that your data files are available.
Chapter 3
Migrate Oracle Analytics Cloud Using Snapshots
3-20

Manage Snapshots Using REST APIs
You can use Oracle Analytics Cloud REST APIs to programmatically create, restore, and
manage your snapshots (BAR files) in Oracle Cloud Infrastructure (OCI) storage. For example,
you might create a script that takes regular backups (snapshots).
Note:
The Snapshots page in Oracle Analytics Cloud Console lists the snapshots that you
take using the Console. Snapshots that you take and register using the REST APIs
don't display in the Snapshots page.
Here are some common tasks using REST APIs.
Task Description REST API
Documentation
Understand
prerequisites
Understand and complete several prerequisite
tasks.
You must have administrator permissions in Oracle
Analytics Cloud to manage snapshots using REST
APIs (BI Service Administrator).
You also need access to Oracle Cloud
Infrastructure (OCI) Object Storage, and
permissions to create a bucket for storing the
snapshots. Specifically, you need the following
permissions on the storage bucket where the
snapshots are stored:
OBJECT_CREATE
and
OBJECT_OVERWRITE
. Plus, an API signing key that
allows you to make REST calls to OCI Object
Storage.
Prerequisites
Understand OAuth 2.0
token authentication
Authentication and authorization in Oracle
Analytics Cloud is managed by Oracle Identity
Cloud Service. To access the Oracle Analytics
Cloud REST APIs, you need an OAuth 2.0 access
token to use for authorization.
OAuth 2.0 Token
Authentication
Take a snapshot Capture content and settings in your system at a
point in time to a snapshot (BAR file), save the
snapshot in cloud storage, and register the
snapshot with your Oracle Analytics Cloud.
Create a snapshot
(type=CREATE)
Register an existing
snapshot
Register an existing snapshot that is stored in
cloud storage with your Oracle Analytics Cloud.
Create a snapshot
(type=REGISTER)
Restore from a snapshot Restore your system to a previously working state
using a snapshot in cloud storage.
Restore a snapshot
Delete a snapshot Delete unwanted snapshots from cloud storage. Delete snapshots
Get snapshot details Get details for a single snapshot or all snapshots in
cloud storage.
Get a snapshot
Get all snapshots
Get the status of a
snapshot work request
Monitor the status of REST work requests. Get a work request item
Chapter 3
Manage Snapshots Using REST APIs
3-21
4
Perform Common Configuration Tasks
This topic describes common configuration tasks performed by administrators managing
Oracle Analytics Cloud.
Topics:
• Typical Workflow to Perform Common Administration Tasks
• Configure a Virus Scanner
• Register Safe Domains
• Set Up Social Channels For Sharing Visualizations
• Set Up a Public Container to Share Visualizations
• Set Up an Email Server to Deliver Reports
• Enable and Customize Content Delivery Through Agents
• Send Email Reports and Track Deliveries
• Manage the Types of Devices that Deliver Content
• Manage Map Information For Analyses
• Switch to a Different Language
• Update the Cloud Storage Password
• Make Preview Features Available
Typical Workflow to Perform Common Administration Tasks
Here are the common tasks for Oracle Analytics Cloud administrators managing data
visualization and enterprise modeling services.
Task Description More Information
Manage what users see
and do
Configure what users see and do in Oracle
Analytics Cloud using the Application Role
page in the Console.
Manage What Users Can See
and Do
Back up and restore
content
Back up and restore the semantic model,
catalog content, and application roles
using a file called a snapshot.
Take Snapshots and Restore
Set up virus scanning Connect to your virus scanning server. Configure a Virus Scanner
Register safe domains Authorize access to safe domains. Register Safe Domains
Set up social channels for
content sharing
Enable users to share content on Twitter,
Slack, Oracle Cloud Storage, and Oracle
Content Management.
Set Up Social Channels For
Sharing Visualizations
Set Up a Public Container to
Share Visualizations
4-1
Task Description More Information
Set up email deliveries Connect to your email server. Set Up an Email Server to
Deliver Reports
Track the Reports You Distribute
By Email or Through Agents
Enable agents to deliver
content
Allow users to use agents to deliver their
content.
Enable and Customize Content
Delivery Through Agents
Suspend and Resume
Deliveries
Restore and Enable Delivery
Schedules
Manage the types of
devices that deliver
content
Configure devices for your organization. Manage the Types of Devices
that Deliver Content
Manage maps Manage map layers and background
maps.
Manage Map Information For
Analyses
Switch to a different
language
Understand how Oracle Analytics Cloud
supports different languages and how to
switch between them.
Switch to a Different Language
Update the cloud storage
password
Update the cloud storage password if the
credentials required to access the cloud
storage container changes or expires.
Update the Cloud Storage
Password
Configure a Virus Scanner
To keep Oracle Analytics virus-free, Oracle highly recommends that you set up the virus
scanning servers used by your organization, to scan any files that are uploaded to Oracle
Analytics. Once set up, all files are checked. This includes data files that users might upload
for analysis, and snapshots that you might upload to restore content or migrate content from
another environment.
Note:
Oracle supports virus scanners that use the Internet Content Adaptation Protocol
(ICAP) protocol to communicate.
1. In the Oracle Analytics Home page, click the Navigator, and then click Console.
2. Click Virus Scanner.
3. Enter the host and port of the virus scanning server.
For example,
my.virus.scanning.serverexample.com
.
4. Click Save.
5. To remove the current virus scanner configuration, click Delete.
Register Safe Domains
For security reasons, you’re not allowed to add external content to reports, embed your reports
in other applications, or connect to some data sources (such as Dropbox and Google Drive)
Chapter 4
Configure a Virus Scanner
4-2
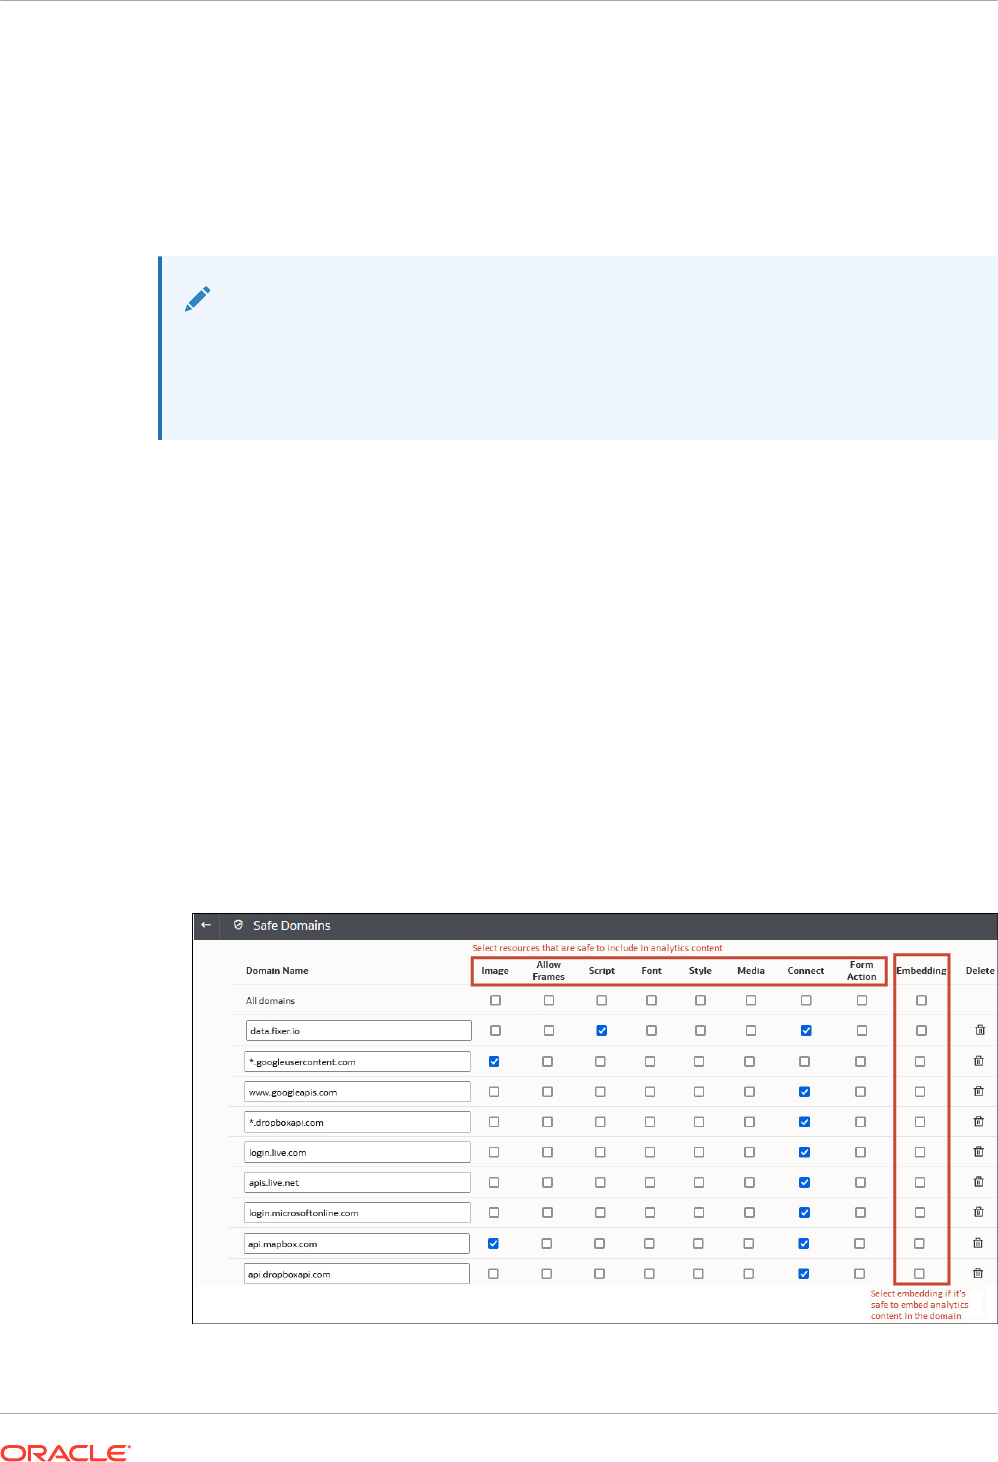
unless your administrator considers it safe to do so. Only administrators can register safe
domains.
After you've registered a domain as safe, users need to sign out and sign back in to access
content from that source.
Only authorized users may access the content. Users are prompted to sign in when they
access content on these safe domains, unless your service is set up with Single Sign On
(SSO).
Note:
There is a limit to the number of safe domains and individual settings that can be
included in browser requests. To avoid reaching or exceeding this limit, add only the
domains that you need and select only the options you know you require. Wherever
possible, take advantage of wildcards to avoid multiple entries.
1. In the Oracle Analytics Home page, click the Navigator, and then click Console.
2. Click Safe Domains.
3. Click Add Domain to register a safe domain.
4. Enter the name of the safe domain. Use formats such as:
• www.example.com
• *.example.com
• https:
5. Specify the types of resources to allow for each domain.
• Select the types of resources you want to allow, for example, images, scripts, and so
on.
• Deselect to block any resource types you don't consider safe.
6. If you want to allow users to embed their visualizations, reports, and dashboards in
external content located on the domain, select Embedding.
7. To remove a domain, select it and click the Delete icon.
Chapter 4
Register Safe Domains
4-3

Manage Safe Domains Using REST APIs
You can use Oracle Analytics Cloud REST APIs to programmatically view and manage safe
domains. For example, you might create a script that registers (or modifies) the same set of
safe domains in both your test and production Oracle Analytics Cloud environments.
• Typical Workflow for Using Safe Domain REST APIs
• Examples for Safe Domain REST APIs
Typical Workflow for Using Safe Domain REST APIs
Here are the common tasks to start using Oracle Analytics Cloud REST APIs to
programmatically view and manage safe domains. If you’re using safe domain REST APIs for
the first time, follow these tasks as a guide.
Task Description REST API
Documentation
Understand
prerequisites
Understand and complete several prerequisite
tasks.
You must have administrator permissions in Oracle
Analytics Cloud to manage safe domains using
REST APIs (BI Service Administrator).
Prerequisites
Understand OAuth 2.0
token authentication
Authentication and authorization in Oracle
Analytics Cloud is managed by Oracle Identity
Cloud Service. To access the Oracle Analytics
Cloud REST APIs, you need an OAuth 2.0 access
token to use for authorization.
OAuth 2.0 Token
Authentication
Get all safe domains Return a list of all the safe domains configured for
Oracle Analytics Cloud.
Get all safe domains
Register or update a
safe domain
Register a new safe domain or update an existing
configuration.
Create or update a safe
domain
Delete a safe domain Remove a safe domain. Create or update a safe
domain
Examples for Safe Domain REST APIs
REST API for Oracle Analytics Cloud includes several examples that explain how to use the
Safe Domain REST APIs.
• Get all safe domains - Example
• Create or update safe domain - Example
• Delete a safe domain - Example
Set Up Social Channels For Sharing Visualizations
Set up social channels, such as Slack, X, and LinkedIn to make it easy for content authors to
share their data visualizations with others.
Topics:
• About Sharing Content on Social Channels
• Enable Workbook Users to Share Visualizations in LinkedIn
Chapter 4
Set Up Social Channels For Sharing Visualizations
4-4

• Enable Workbook Users to Share Visualizations on Slack
• Enable Workbook Users to Share Visualizations in Microsoft Teams
• Enable Workbook Users to Share Visualizations on X (formerly Twitter)
About Sharing Content on Social Channels
Administrators can set up various social channels so that content authors can share their data
visualizations on social platforms such as LinkedIn, Slack, and X (formerly Twitter).
Once set up, social channels are listed on the Export dialog for visualizations. For example, if
you configure and activate Slack, users see an option to export their visualization to Slack
when they click the Export icon.
For some social channels, such as LinkedIn, you must also set up public web storage.
Social Channel Requires Public Web Storage
LinkedIn Yes
Public Web Store Yes
Slack No
Teams (Microsoft) No
X (formerly Twitter) - App No
X (formerly Twitter) - Web
Intent
Yes
Some social channels are displayed in inactive mode by default, for example, Public Web
Store, and Slack, and others are hidden by default. When you set up social channels, you can
set the status to one of the following:
Status
Description
Active Display the social media option on the Export dialog. For example, you
might display Slack or LinkedIn.
Chapter 4
Set Up Social Channels For Sharing Visualizations
4-5

Status Description
Inactive Display the social media option on the Export dialog, for example, Slack
or LinkedIn, but don't enable users to share content using it. When users
select an inactive option, they see a message that advises them to
contact their administrator.
Hidden Don't display the social media option on the Export dialog, whether it's
configured or not. For example, you might configure it ready for rollout
but keep it hidden until a future date.
Enable Workbook Users to Share Visualizations in LinkedIn
Administrators can set up a LinkedIn channel in Oracle Analytics, so that content authors can
share their data visualizations in the organization's LinkedIn feed.
Before you start, make sure that you have a public web storage container on Oracle Cloud that
Oracle Analytics can use to share visualizations on LinkedIn. See Set Up a Public Container to
Share Visualizations.
1. Obtain the client ID and client secret values for the LinkedIn app that you want to use to
share data visualizations.
a. Open LinkedIn Developer Portal, that is
linkedin.com/developers/apps
.
b. Click the app that you want to use.
c. On the Authentication page, obtain the Client ID and Client Secret values.
2. Configure the LinkedIn channel in Oracle Analytics.
a. In the Oracle Analytics Home page, click the Navigator, click Console, and then click
Social.
b. For Service, select LinkedIn.
c. Change Status to Active.
d. For Application Name, enter the name of the app that you set up in LinkedIn
Developer Portal.
e. For Client ID and Client Secret, enter the values that you obtained in LinkedIn
Developer Portal (Step 1).
f. Click Update.
g. Click Copy to Clipboard to copy the redirect URL for Oracle Analytics.
3. In LinkedIn Developer Portal, configure the redirect URL for Oracle Analytics.
a. Select the app that you want to use.
b. On the App Details tab, click Edit and paste the clipboard content in the Authorized
Redirect URLs field.
c. Click Save.
4. Verify you can share a visualization on the LinkedIn channel.
a. In Oracle Analytics, open a workbook.
b. On the Visualize or Narrate canvas, click the Export icon.
c. Click LinkedIn.
If you set up and activate the channel correctly, LinkedIn displays as an option on the
Export menu.
Chapter 4
Set Up Social Channels For Sharing Visualizations
4-6

Enable Workbook Users to Share Visualizations on Slack
Administrators can set up a Slack channel in Oracle Analytics, so that content authors can
share their data visualizations on their organization's Slack app.
1. Obtain the client ID and client secret values for the Slack app that you want to use to share
data visualizations.
a. Open the Your Apps page in Slack, that is,
https://api.slack.com/apps
.
b. Select the app that you want to use or create a new one.
c. On the Basic Information tab, navigate to the App Credential section and obtain the
Client ID and Client Secret values.
2. Configure the Slack app in Oracle Analytics.
a. In the Oracle Analytics Home page, click the Navigator, click Console, and then click
Social.
b. For Service, select Slack.
c. Change Status to Active.
d. For Application Name, enter the name of the app that you set up in Slack.
e. For Client ID and Client Secret, enter the values that you obtained in Slack (Step 1).
f. Click Update.
g. Click Copy to Clipboard to copy the redirect URL for Oracle Analytics.
3. In Slack, configure the callback URL for Oracle Analytics.
a. Open the Your Apps page in Slack.
b. Select the app that you want to use.
c. On the Basic Information tab, click OAuth and Permissions.
d. Click Add New Redirect URL, paste the clipboard content in the Redirect URL field,
and click Add.
e. Click Save URLs.
4. Verify you can share a visualization on the Slack channel.
a. In Oracle Analytics, open a workbook.
b. On the Visualize or Narrate canvas, click the Export icon.
c. Click Slack.
If you set up and activate the channel correctly, Slack displays as an option on the Export
menu.
Enable Workbook Users to Share Visualizations on X (formerly Twitter)
Administrators can set up an X (formerly Twitter) channel in Oracle Analytics, so that content
authors can share their data visualizations as a tweet on their organization's X feed.
You can set up content sharing through X in two ways:
• X App - Share content through a predefined X app, as described in this topic. Oracle
recommends this approach.
Chapter 4
Set Up Social Channels For Sharing Visualizations
4-7

• Web Intent - Share content on X through a public web link. For this mode of integration,
you must set up and configure public web storage. See Set Up a Public Container to Share
Visualizations.
To enable Oracle Analytics to share data visualization workbooks through your organization’s X
app:
1. Obtain the client ID and client secret values for the X app that you want to use to share
data visualizations.
a. Open X Application Manager, for example
developer.twitter.com
.
b. Click the app that you want to use for tweets.
c. On the Keys and Tokens tab, obtain the Consumer Key and Consumer Secret Key
values.
d. On the Permissions tab, select Read, write, and direct messages.
2. Configure the X channel in Oracle Analytics.
a. In the Oracle Analytics Home page, click the Navigator, click Console, and then click
Social.
b. For Service, select Twitter.
c. Change Status to Active.
d. For Application Name, enter the name of the app that you set up in X Application
Manager.
e. For Client ID and Client Secret, enter the Consumer Key and Consumer Secret
values that you obtained in X Application Manager (Step 1).
f. Click Update.
g. Click Copy to Clipboard to copy the redirect URL for Oracle Analytics.
3. In X Application Manager, configure the callback URL for Oracle Analytics.
a. In X Application Manager, click the app to use for tweets.
b. On the App Details tab, click Edit and paste the clipboard content in the Callback URL
field.
c. Click Save.
4. Verify you can share a visualization on the X channel.
a. In Oracle Analytics, open a workbook.
b. On the Visualize or Narrate canvas, click the Export icon.
c. Click Twitter.
If you set up and activate the channel correctly, Twitter displays as an option on the
Export menu.
Set Up a Public Container to Share Visualizations
Administrators can set up a public web storage container in Oracle Cloud so that content
authors can share their data visualizations with others.
1. Create the public container in Oracle Cloud.
a. In Oracle Cloud Infrastructure Console, navigate to Object Storage.
b. On the Object Storage tab, click Create Bucket, and create a container with a suitable
name, such as
publicanalytics
.
Chapter 4
Set Up a Public Container to Share Visualizations
4-8
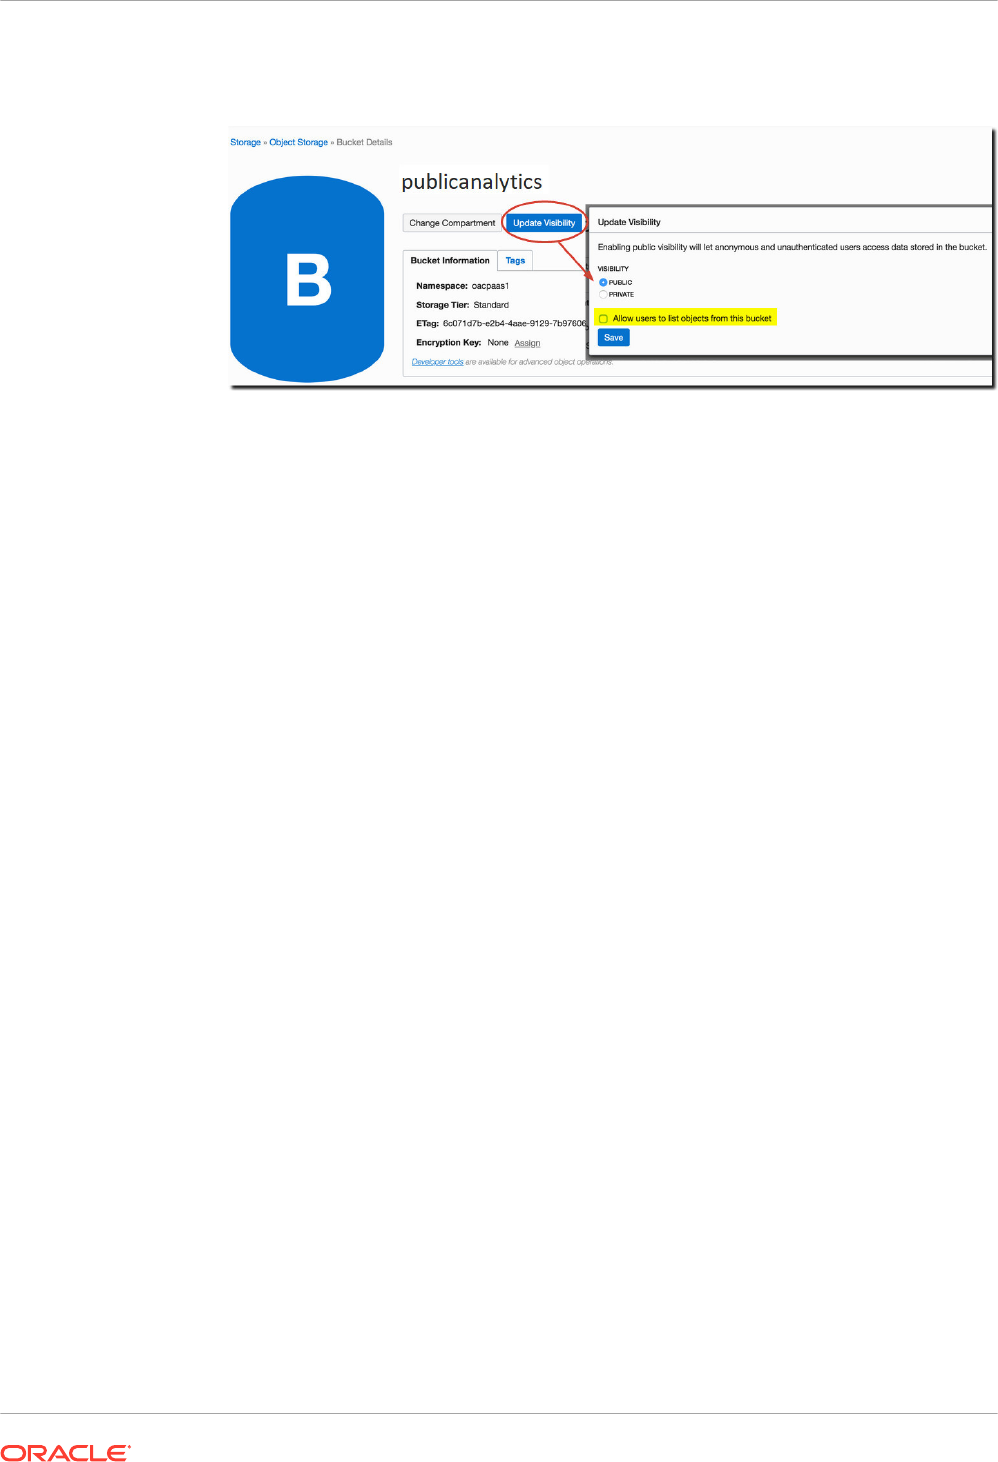
c. Select the bucket, and click Update Visibility.
d. Select Public, and verify that Allow users to list objects from this bucket isn't
selected.
e. Click Save.
2. Configure the public web store in Oracle Analytics.
a. In the Oracle Analytics Home page, click the Navigator, click Console, and then click
Social.
b. For Service, select Public Web Store.
c. To specify a public container for the first time or change the existing container, click
Edit.
d. Enter Storage Container URL.
Use the REST endpoint URL format:
https://swiftobjectstorage.region.oraclecloud.com/v1/object-storage-
namespace/public-bucket-name
For example:
https://swiftobjectstorage.us-ashburn-1.oraclecloud.com/v1/
oacpaas1/publicanalytics
See Oracle Cloud Infrastructure documentation, Ways to Access Object Storage.
e. For Storage User and Storage Password, enter the user name and password of a
user with read and write access to the public container.
f. Click Save.
If you decide to use a different public container in the future, links to content that
people have already shared through the existing public container continue to work but
they can’t be updated. Newly shared content is stored in the new location.
g. Change Status to Active.
After you set up and activate the channel, Public Web Storage displays as an option on the
Export menu.
Set Up an Email Server to Deliver Reports
Connect to your organization’s mail server, so analysts can email their reports and data
visualizations directly from Oracle Analytics. The SMTP mail server must be accessible from
the public internet.
1. In the Oracle Analytics Home page, click the Navigator, and then click Console.
2. Click Mail Settings.
Chapter 4
Set Up an Email Server to Deliver Reports
4-9
3. Enter the name of the SMTP Server you want to use to deliver emails.
For example,
mymail.example.com
.
The SMTP server must be accessible from the public internet. If your email server has a
public IP address, you can enter the public IP address here instead of the server name.
4. Enter the Port number.
Common SMTP ports include:
•
25
(Connection Security = None)
•
465
(Connection Security = SSL/TLS)
•
587
(Connection Security = STARTTLS)
5. Enter the name and email address that you want to see in the “From” field of emails
delivering reports (Display name of sender and E-mail address of sender).
For example,
Joe Brown
and
.
6. Click Test to verify the connection.
If you want to test the connection you must do so before you configure any security
settings.
Note:
You can click Delete at any time to clear all the mail server settings and start
again.
7. Optional: If the mail server requires authentication:
a. Select Authenticated.
b. Enter the Username and Password for a user with access to the mail server.
8. Optional: To set up a secure mail server:
a. Click Connection Security, and select the appropriate security protocol for your mail
server.
• SSL/TLS: Select if your mail server uses SSL or TLS. The port value defaults to
465.
• STARTTLS: STARTTLS is a way to take an existing insecure connection and
upgrade it to a secure connection using SSL or TLS. The port value defaults to
587.
In TLS Certificate, the Default Certificate is selected for you. The default certificate
allows encrypted mail server communication. In most cases, you don’t need to provide
a compatible certificate as most mail servers can use the default certificate, including
Office 365.
b. Optional: Upload a custom TLS certificate. In TLS Certificate, select Custom
Certificate , and then click Select to navigate to the certificate file (.pem).
If you haven’t configured a virus scanner, you're prompted to configure one now or
proceed without a virus scanner.
9. Click Save.
Allow some time for your changes to refresh through your system and Email menu options
to display.
Chapter 4
Set Up an Email Server to Deliver Reports
4-10
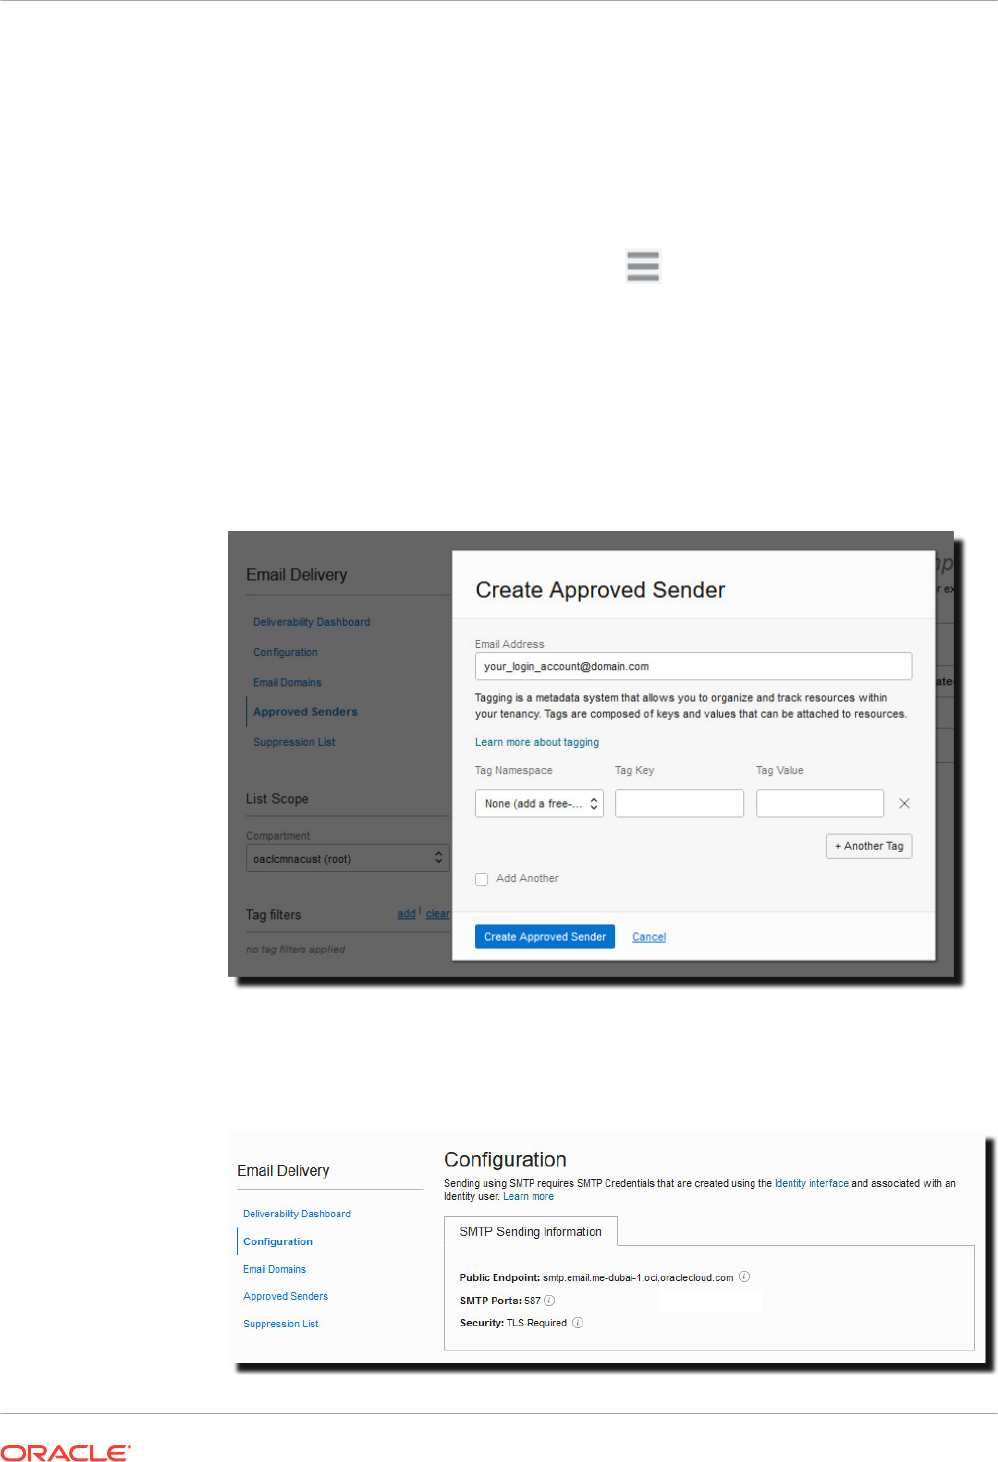
Use the SMTP Mail Server in Oracle Cloud Infrastructure for Email Delivery
You can use the SMTP mail server available with Oracle Cloud Infrastructure to send emails
from Oracle Analytics Cloud.
1. In Oracle Cloud Infrastructure Console, configure Email Delivery.
a. Sign-in to your Oracle Cloud account with permissions to configure Email Delivery.
b. In Oracle Cloud Infrastructure Console, click in the top left corner.
c. Click Developer Services. Under Application Integration, click Email Delivery.
d. Optional: Set up the email domain you plan to use.
This is the domain you plan to use for the approved sender email address, and can’t
be a public mailbox provider domain such as gmail.com or hotmail.com.
e. Click Approved Senders.
f. On the Create Approved Senders page, set up an approved sender for the From
email address that you want to use to send emails through the mail server.
Refer to Oracle Cloud Infrastructure documentation for details. See Managing
Approved Senders.
g. Click Configuration, then make a note of the Public Endpoint, Port (587), and that
Transport Layer Security (TLS) is used on the connection.
Chapter 4
Set Up an Email Server to Deliver Reports
4-11

Refer to Oracle Cloud Infrastructure documentation for details. See Configure the
SMTP connection.
h. If you've not already done so, click the Identity Interface link to navigate to your
Identity pages and then click Generate SMTP Credentials to generate SMTP
credentials for yourself or another user with permissions to manage email.
Enter a Description, such as Oracle Analytics Cloud credentials, and click Generate
SMTP Credentials.
Copy the Username and Password for your records.
Refer to Oracle Cloud Infrastructure documentation for details. See Generate SMTP
credentials for a user.
2. In Oracle Analytics Cloud, configure the SMTP settings for your mail server.
a. Click Console.
b. Click Mail Server, and configure SMTP settings for your mail server.
c. In SMTP Server, specify the name of your email server. For example,
smtp.email.me-
dubai-1.oci.oraclecloud.com
.
d. In Port, specify
587
.
e. In Display name of sender, specify the name you want to appear in the From field of
your emails. For example,
Oracle Analytics
.
f. In Email address of sender, specify the email address of the approved sender you
configured for email delivery. For example,
.
g. In Authenticated, select this option.
h. In Username, specify the username you recorded after generating SMTP credentials
for the mail server. For example,
ocid1.user.oc1.aaaaaaalgtwnjkell...
.
i. In Password, specify the password generated for this user.
j. In Connection Security, specify
STARTTLS
.
k. In TLS Certificate, specify
Default Certificate
.
l. Click Save.
Chapter 4
Set Up an Email Server to Deliver Reports
4-12

Allow some time for your changes to refresh through your system and Email menu options
to display.
3. To test your mail server settings, try to send a report by email or create an agent to deliver
the report.
See Send Email Reports Once, Weekly, or Daily or Create Agents to Deliver Content.
If you receive test emails delivered using the email account, you successfully configured your
mail server.
Enable and Customize Content Delivery Through Agents
You can use agents to deliver your content. This feature isn't enabled automatically. To display
the Create Agent link on the Classic home page, grant the View Delivers Full UX privilege to
the BI Content Author application role.
Note:
You also have to enable this feature if you import a snapshot taken from an early
update of Oracle Analytics Cloud that didn’t support the Delivers Full UX privilege.
If you need to, you can sets some limits on emails sent by agents. For example, you can set
limits for email size, email domains, and the number of recipients. By default, there aren't any
limits. Can also customize whether to send emails using TO or BCC, and how to encode MIME
email parameters.
1. Enable agents to deliver your content by email.
a. On the Classic Home page, click the user profile icon and then click Administration.
b. Click Manage Privileges.
c. Navigate to the Delivers section, and grant View Delivers Full UX to BI Content
Author.
Now, users with the BI Content Author application role can see the Create Agent link on
the Classic Home page.
2. Customize agent delivery.
a. In the Oracle Analytics Home page, click the Navigator, and then click Console.
b. Click System Settings.
c. Click Email Delivered by Agents.
d. Customize the way agents deliver email for your organization by setting a maximum
email size, a maximum number of recipients, restricting email domains, whether to use
BCC, how to encode MIME email parameters, and so on.
See Email Delivered by Agents Options.
Chapter 4
Enable and Customize Content Delivery Through Agents
4-13

Send Email Reports and Track Deliveries
Send email reports to anyone inside or outside the organization or use agents to send reports
to a range of other devices. Keep everyone up-to-date with regular daily or weekly reports.
Topics
• Send Email Reports Once, Weekly, or Daily
• Track the Reports You Distribute By Email or Through Agents
• View and Edit Recipients for Deliveries
• Suspend and Resume Deliveries
• Restore and Enable Delivery Schedules
• Change the Owner or Time Zone for Deliveries
• Generate and Download a Deliveries Report (CSV)
• Email Security Alert
Send Email Reports Once, Weekly, or Daily
Send Email reports to one or more recipients directly from the catalog. It’s easy to distribute
reports this way and quicker than downloading a report and mailing it from your email client. To
keep everyone up-to-date, schedule daily or weekly emails.
For information about email limits and how to optimize email delivery, see What are the limits
for email delivery?
1. On the Classic Home page, do one of the following:
• Navigate to the item you want to email, click Edit, and in the Results tab, click Email.
• Click Catalog, navigate to the item you want to email, click the More action menu, and
select Email.
2. Enter the email address for one or more recipients.
Separate multiple email addresses with a comma. For example:
.
3. Customize the Subject line.
4. Send the email Now or click Later to set a date and time in the future.
5. To email report updates on a daily or weekly basis, click Repeat and then select Daily or
Weekly.
You can check the status of email deliveries from the Console.
Email Security Alert
Content that you send by email isn’t encrypted. It's your responsibility to safeguard any
sensitive data that you send.
See Send Reports by Email and Track Deliveries.
Chapter 4
Send Email Reports and Track Deliveries
4-14

Track the Reports You Distribute By Email or Through Agents
Track the reports you’ve chosen to send to people by email from the Console. Quickly see
when reports were sent and which items are pending (scheduled to run in the future). Review,
change, or delete your deliveries (scheduled or completed) from the same page.
Any agents that you set up to deliver content are displayed in the Console too. This way, all
your delivery information is in one place.
You can filter the deliveries by their status to track deliveries most important to you. The
various status messages are explained here.
Delivery Status Description
Canceled Someone canceled the delivery.
Users can cancel any delivery that they own.
Completed Delivery ran successfully.
Disabled Users can temporarily disable any delivery or agent that they own through the
catalog.
For example, you might stop a job running on its defined schedule if you want to
edit the report or change who sees the report.
Failed Delivery ran as scheduled but it didn't complete successfully.
Click Show details... after the error icon ( ) to find out what went wrong so you
can fix it.
Not Scheduled No one has set up a schedule for the delivery or the scheduled run date is for a
date in the past (rather than a future date).
Running Delivery is in progress.
Suspended Administrators can temporarily suspend deliveries that other users set up.
For example, before you migrate from a test environment to a production
environment, your administrator might suspend deliveries in the test environment,
and resume them in the production environment.
Timed Out Delivery timed out because it took too long to complete.
Try Again Something went wrong. Try to run the delivery again.
Warning Delivery ran as scheduled but it wasn't 100% successful.
For example, the delivery specifies 10 recipients but only 9 of them received it
because 1 of the email addresses was incorrect.
Click Show details... after the warning icon ( ) to find out more.
To track deliveries from the Console:
1. Go to the Home Page, click Navigator, and then click Console.
2. Click Monitor Deliveries.
Deliveries are listed by run date, with the most recent delivery displayed first. Initially, you
see only the deliveries sent in the last 24 hours (Last Day). To see deliveries for the last
week or all deliveries, select Last 7 Days or All Times.
Click Show Scheduled Deliveries to show deliveries that are scheduled to run in the
future. For example, you might schedule a delivery to run tomorrow at 9am. If you look at
the Deliveries page the night before or at 8am, you'll see the delivery only when you select
Show Scheduled Deliveries as the delivery hasn't run yet.
3. Filter the list of deliveries by name, time, or status.
Chapter 4
Send Email Reports and Track Deliveries
4-15
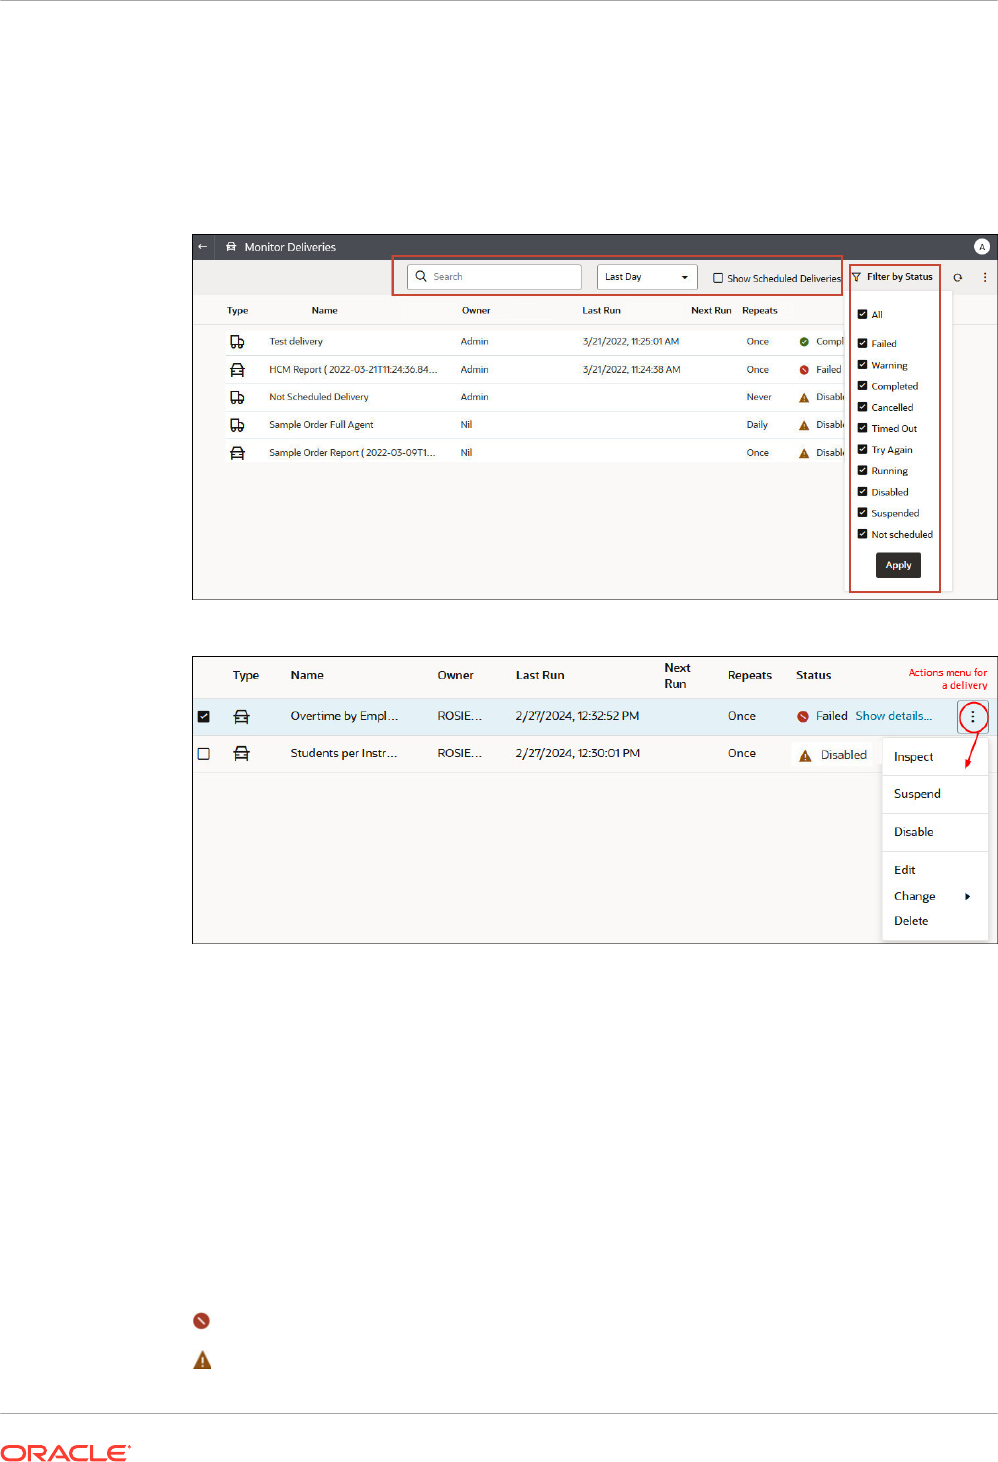
• Name: To filter by name, start typing the name of the delivery you’re looking for in the
search box, and then press Enter.
• Time: To filter by time, click the time filter. Select from Last Day, Last 7 Days, All
Times.
• Status: To filter by status, click Filter by Status. Select one or more from Failed,
Warning, Completed, Canceled, Timed Out, Try Again, Running, Disabled,
Suspended, Not Scheduled, and then click Apply.
4. Click Actions for a delivery to review or manage a single delivery.
5. To preview the content, click Actions for the delivery, and select View Report.
This option isn’t available if the delivery is generated by an agent.
6. To see details about a delivery, such as the date of last and next run, delivery frequency,
history, and so on, click Actions for the delivery and select Inspect.
Click History to view and search for historical job runs. Use the name, time, and status
filters to help you find the delivery you want.
7. To edit a delivery, click Actions for the delivery, and select Edit.
• Email deliveries — Update the email options.
• Agent deliveries — Edit the agent associated with the delivery.
8. To troubleshoot a delivery that fails or completes with a warning, click Show details....
Failed - Click Show details... to find out what went wrong so you can fix it.
Warning - Click Show details... to find out more.
Chapter 4
Send Email Reports and Track Deliveries
4-16
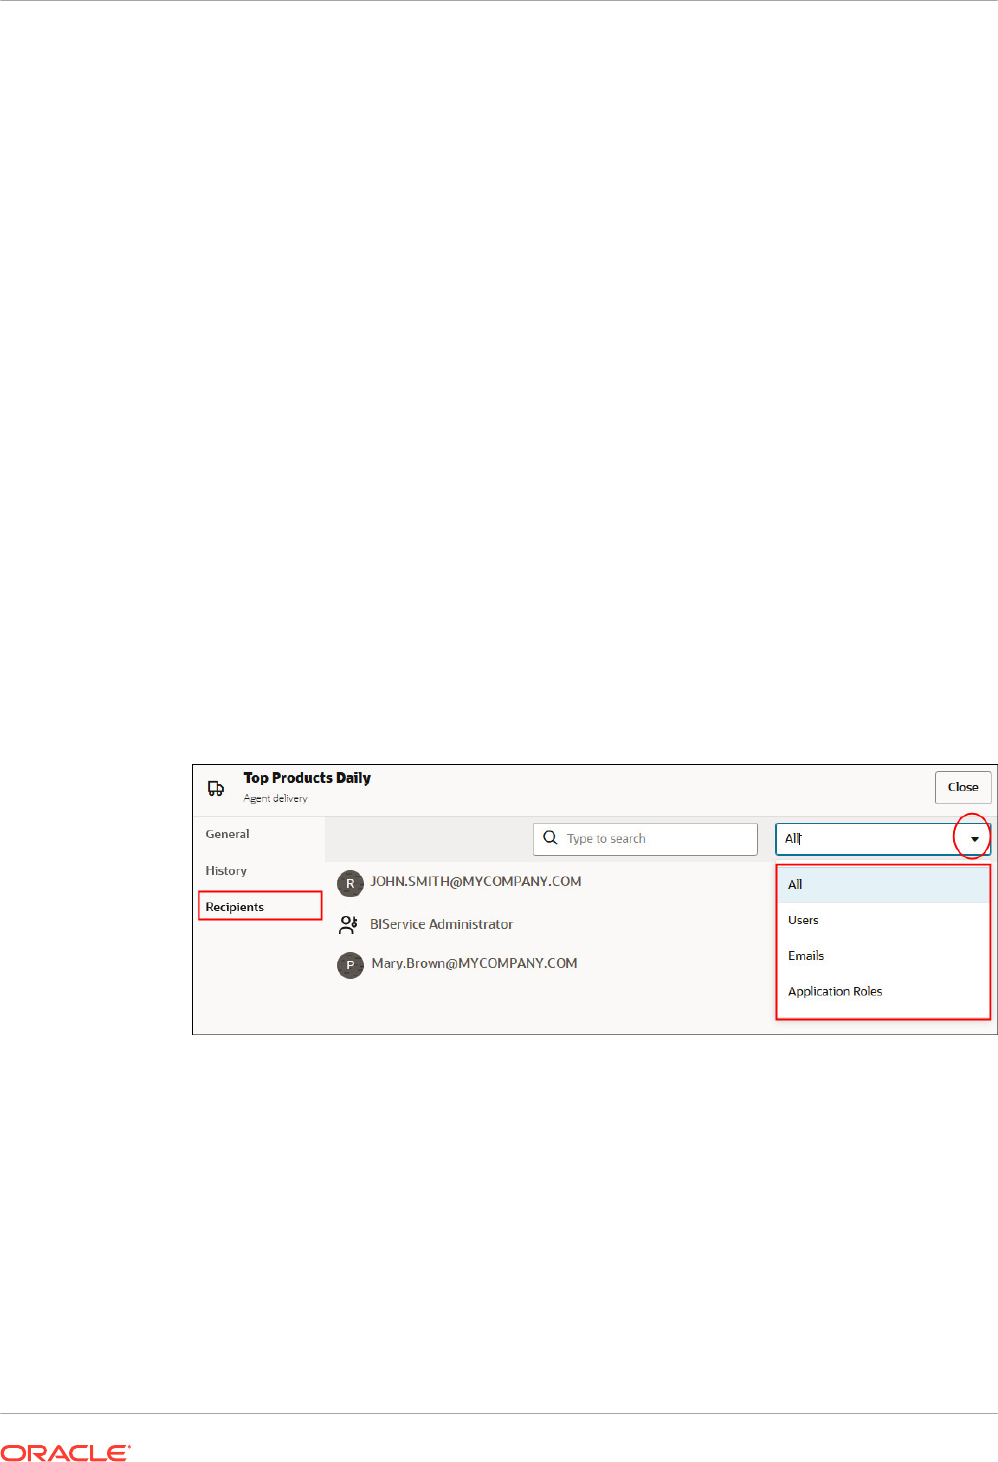
9. To disable a delivery, click Actions for the delivery, and select Disable.
If you want to enable the delivery later on, click Actions for the delivery, and select
Enable.
10. To delete a delivery and all future scheduled deliveries, select Delete, then OK to confirm.
11. To delete, resume, or suspend multiple deliveries, Ctrl-click to select them and then right-
click to select the action you want to perform (Delete, Resume, Suspend).
View and Edit Recipients for Deliveries
You can review and edit the recipients of all your deliveries and agents from the Monitor
Deliveries page. If you need to make recipient changes across multiple deliveries, the Monitor
Deliveries page offers a convenient way to do it.
1. In the Oracle Analytics Home page, click the Navigator, and then click Console.
2. Click Monitor Deliveries.
3. To view the current recipients for a delivery, click the Action menu for the delivery, and
select Inspect.
4. Click Recipients.
5. Review the current recipient list.
To filter the list, click the down arrow and select the type of recipient you want to view.
Either Users, Emails, or Application Roles. The Application Role filter doesn’t show you
the users assigned to each application role. If needed, administrators can obtain this
information from the Users and Roles page in the Console.
To search for a particulate recipient, start typing the name of the user, email address, or
application role in the search box.
6. To edit the recipients, click the Action menu for the delivery, and select Edit.
Chapter 4
Send Email Reports and Track Deliveries
4-17
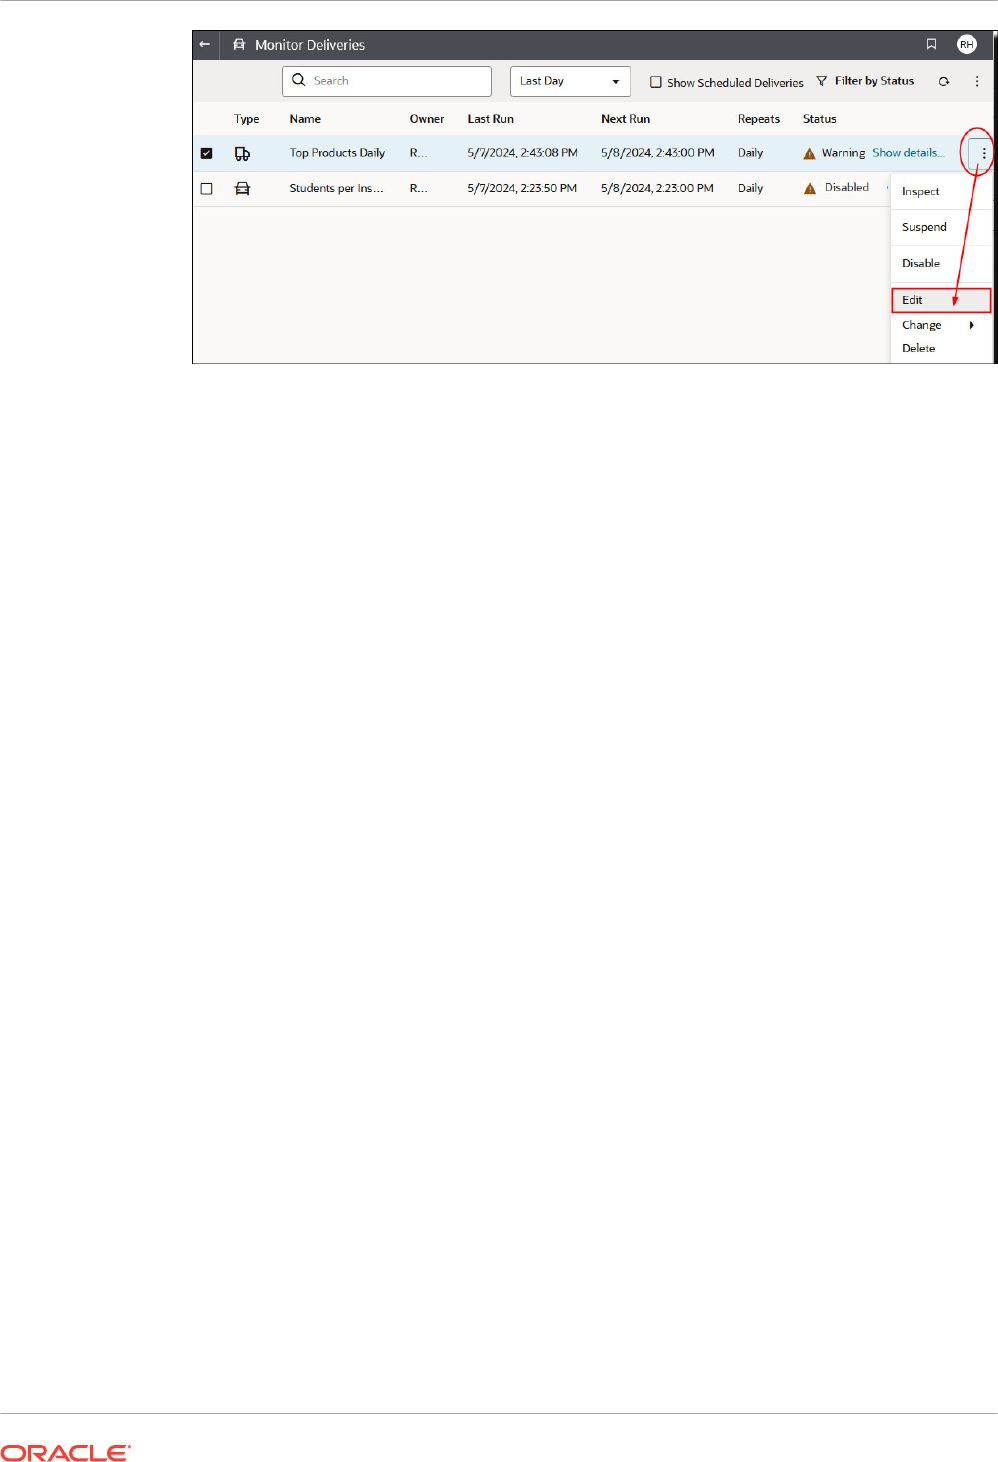
7. Modify the list of recipients for the agent or email delivery.
• For agents, click Recipients and modify the recipient list.
• For email deliveries, edit the email addresses in the To field.
Suspend and Resume Deliveries
Administrators can temporarily suspend any delivery, at any time.
1. In the Oracle Analytics Home page, click the Navigator, and then click Console.
2. Click Monitor Deliveries.
3. To access everyone’s deliveries in addition to your own, click the Action menu for the page,
and select Admin View.
4. To suspend a delivery, click the Action menu for the delivery and select Suspend.
To suspend multiple deliveries at once, select Shift + click or Ctrl + click to select all the
deliveries you want to suspend, then right-click and select Suspend.
5. To resume a delivery, click the Action menu for the delivery and select Resume.
6. To resume or suspend multiple deliveries, Ctrl-click to select them, and then right-click to
select the action you want to perform (Resume or Suspend).
Restore and Enable Delivery Schedules
When you restore content from a snapshot or migrate content from a different environment,
delivery schedules defined for agents, analyses, and dashboards in the snapshot aren’t
restored or activated right away. When you’re ready to restore deliveries on your system, you
can decide whether to enable or disable delivery schedules on your system. This is useful as
you might not want to immediately start delivering content.
For example, if you're restoring a production environment, you probably want to restart
deliveries as soon as possible. Whereas in a test environment, you might prefer to disable
deliveries after restoration and activate them at a later date.
1. In the Oracle Analytics Home page, click the Navigator, and then click Console.
2. Click Monitor Deliveries.
3. To restore deliveries, click the Action menu for the page and select Restore Deliveries.
4. Select whether to restore and activate deliveries or restore deliveries only. Select one of
the following:
Chapter 4
Send Email Reports and Track Deliveries
4-18

• Maintain Delivery Schedule Status
All delivery schedules maintain their status (enabled or disabled).
– Existing delivery schedules remain unchanged.
– New delivery schedules created during the restore process inherit the schedule
status that’s defined in the corresponding agent, analysis or dashboard.
For example, this option is useful when you restore deliveries in a production
environment where you want deliveries to be active immediately.
• Disable Delivery Schedules for New Deliveries
Delivery schedules that are created during the restore process for agents, analyses,
and dashboards are disabled. Existing delivery schedules remain unchanged.
For example, this option is useful when you restore deliveries in a test environment
where you don’t need to activate deliveries immediately.
• Disable All Delivery Schedules And Delete All History (Not recommended)
All delivery schedules are disabled during the restore process and any delivery history
is deleted.
– Existing delivery schedules are disabled.
– New delivery schedules created for agents, analyses, and dashboards during the
restore process are disabled.
– Historical delivery details no longer available.
This option is not recommended. If you do select this option, you must manually
enable delivery schedules for all agents, analyses, and dashboards.
5. Click Restore.
6. To activate a delivery, click the Action menu for the delivery, and select Enable.
To activate multiple deliveries at once, select Shift + click or Ctrl + click to select all the
deliveries you want to activate, then right-click and select Enable.
If necessary, click Edit to redefine the delivery schedule.
Change the Owner or Time Zone for Deliveries
If you're an administrator, you can change the owner or time zone for one or more deliveries.
You can make yourself the new owner or select a different user. This is useful when the original
owner changes, leaves your organization, or after migration from a different environment. The
change time zone option also comes in handy if you need to change the time zone for multiple
deliveries, and this is especially useful when you migrate deliveries from a different
environment with a different time zone.
For example, you might migrate deliveries from an on-premises Oracle Analytics Server
environment where the time zone is correctly set to your local US time to an environment with
a different time zone. If you migrate to Oracle Analytics Cloud where the time zone changes to
UTC, your deliveries arrive too early. In this scenario, you need an easy way to update the time
zone for all your deliveries.
1. In the Oracle Analytics Home page, click the Navigator, and then click Console.
2. Click Monitor Deliveries.
Chapter 4
Send Email Reports and Track Deliveries
4-19
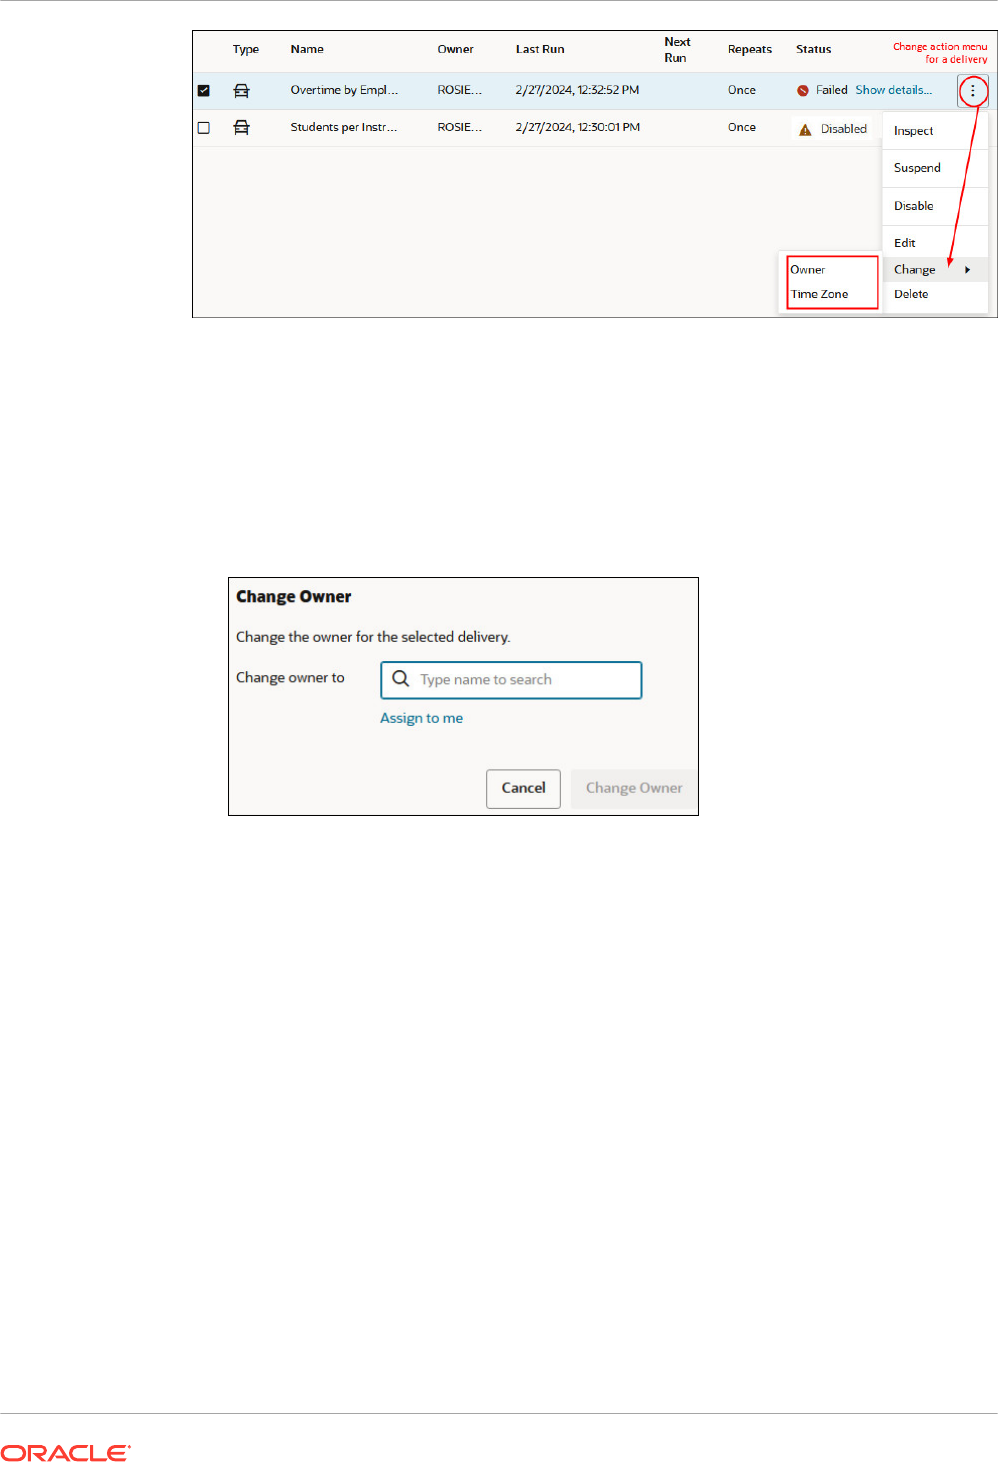
The Change menu is available only to administrators. If you don't have the required
permissions, ask your administrator to make the changes for you.
3. To change the owner of a delivery, click the Action menu for the delivery, select Change,
and then Owner.
To change multiple deliveries at once, select Shift + click or Ctrl + click to select all the
deliveries you want, then right-click and select Change, then Owner.
a. Start typing the name of the new owner to find the user. Use * as a wildcard.
Alternatively, click Assign to Me to make yourself the new owner.
b. Click Change Owner.
c. If the current owner and the RunAs user for a delivery are the same, the new owner
becomes the new RunAs user. Click OK to acknowledge and allow changes to the
RunAs user, where required.
When the RunAs user changes, take care to review the new RunAs user’s data and
object security to ensure the required access levels are applied.
4. To change the time zone of a delivery, click the Action menu for the delivery, select
Change, and then Time Zone.
To change multiple deliveries at once, select Shift + click or Ctrl + click to select all the
deliveries you want, then right-click and select Change, then Time Zone.
a. Select the new time zone for the deliveries you selected.
b. To only change a specific time zone, click Change only selected deliveries with a
specific time zone and then select the time zone you want to change.
Don't select the checkbox if you want all deliveries to use the new time zone.
Chapter 4
Send Email Reports and Track Deliveries
4-20
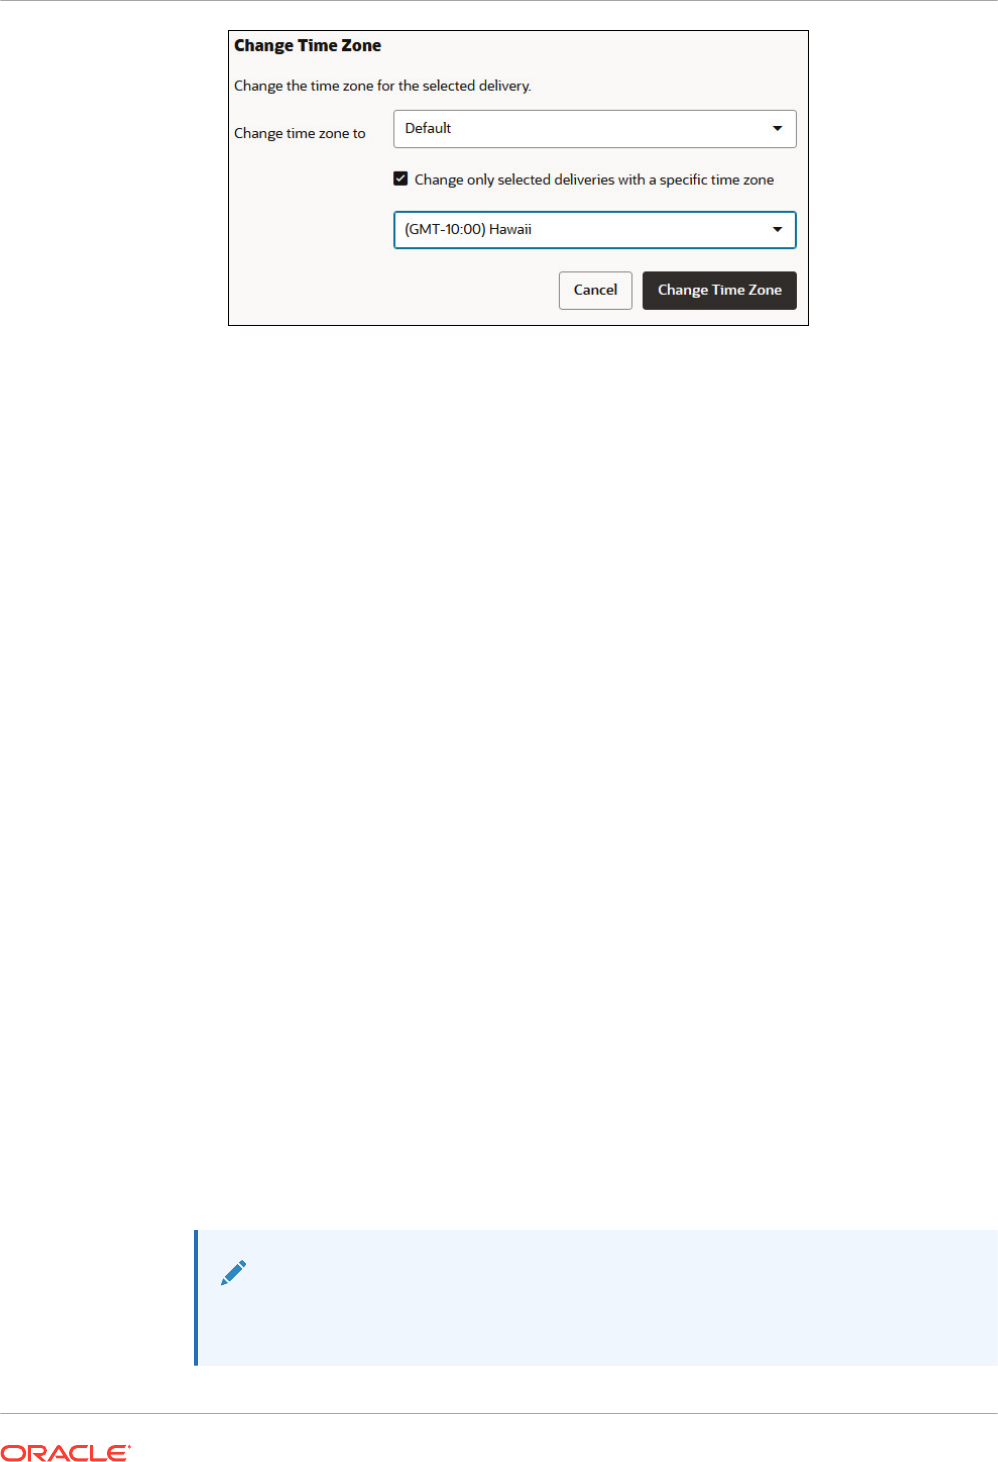
c. Click Change Time Zone.
Generate and Download a Deliveries Report (CSV)
If you're an administrator, you can generate a report that contains details about your deliveries
and download the report in CSV format for analysis. You can customize the report so it only
contains information you want to see. For example, if you're interested in active deliveries,
there's an option to exclude deliveries that are disabled or suspended from the report. You can
also control the detail that's included and whether to include everyone's deliveries or just your
own.
Delivery reports can include the following information:
• Name - Name of the agent delivering the report.
• Agent Path - Location of the agent delivering the report.
• Content Data - Name of the report being delivered.
• Content Type - Type of content in the report.
• Owner - User who created the delivery.
• Repeats - Delivery frequency. For example, once, daily, weekly, and so on.
• Run As User - User running the report.
• User Recipients - Users receiving the report.
• Email Recipients - Email addresses of users receiving the report.
• Application Role Recipients - Application roles receiving the report, that is, users
assigned to these application roles receive the report.
• Disabled - Specifies whether the delivery is disabled: TRUE or FALSE
• Suspended - Specifies whether the delivery is suspended: TRUE or FALSE
1. In the Oracle Analytics Home page, click the Navigator, and then click Console.
2. Click Monitor Deliveries.
3. Click the Action menu for the page, and select Export Deliveries Report.
Note:
To include everyone's deliveries in the report rather than only deliveries that you
own, click Admin View before you click Export Deliveries Report.
Chapter 4
Send Email Reports and Track Deliveries
4-21
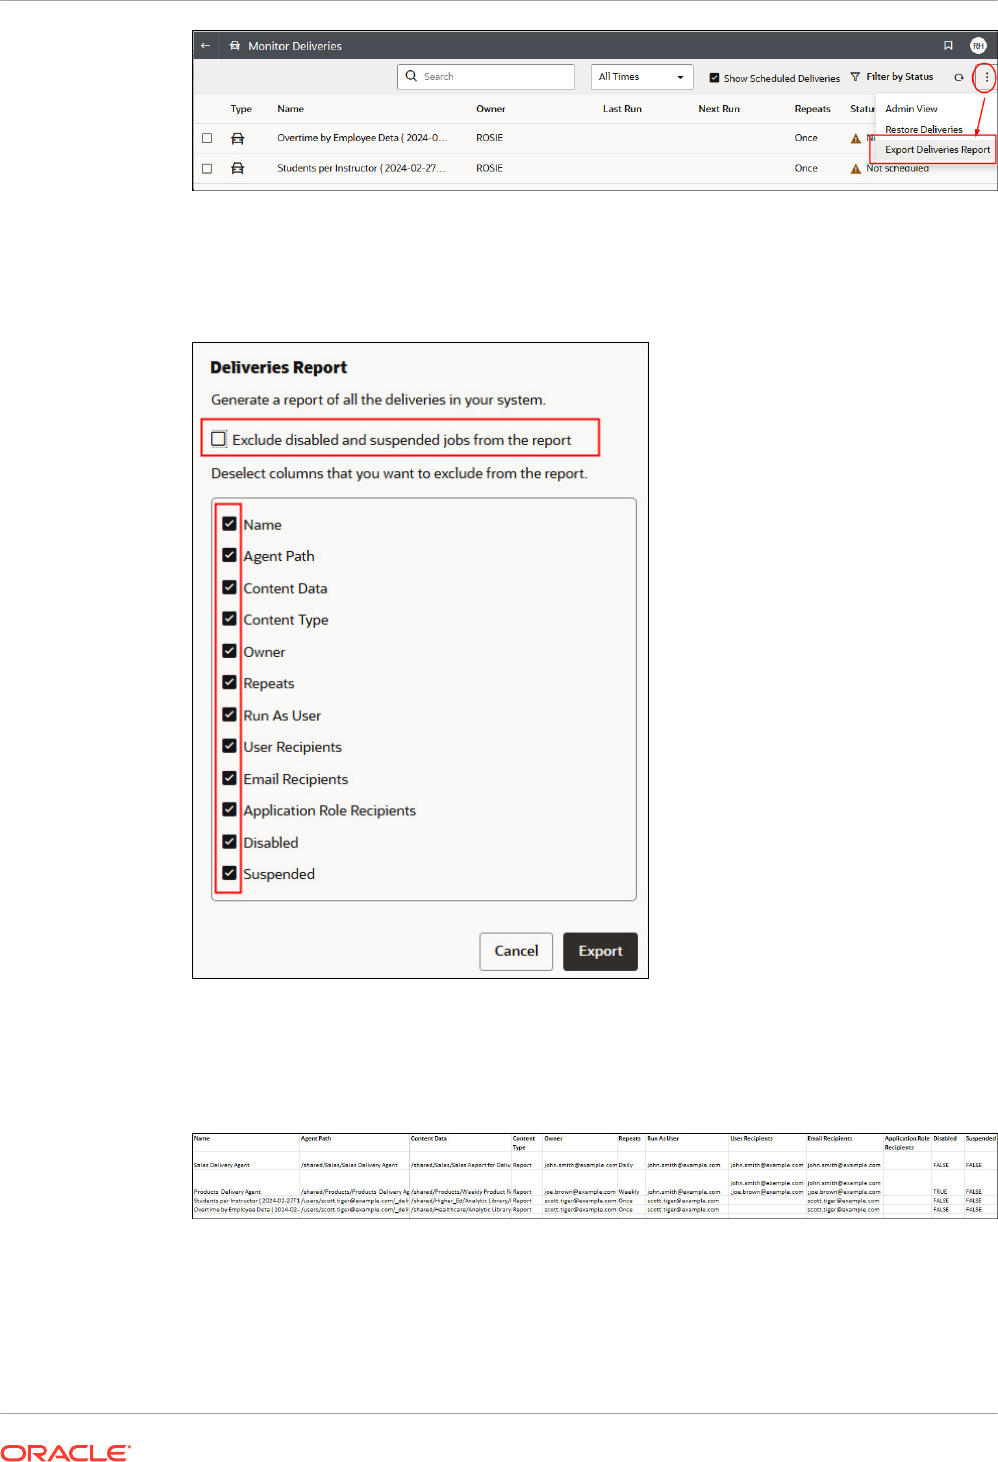
4. Customize the report.
• Select Exclude disabled and suspended jobs from the report if you want the report
to contain only jobs that are active.
• Deselect information to exclude it from the report.
5. To generate the report and download the CSV file to your local file system, click Export.
6. Navigate to your download folder and open the report in your favorite editor.
Look for a CSV file with the name:
DeliveriesReport<timestamp>
. For example,
DeliveriesReport20240620100144854.csv
.
Chapter 4
Send Email Reports and Track Deliveries
4-22

Manage the Types of Devices that Deliver Content
Oracle Analytics Cloud can deliver content to a wide range of devices. You can add more
devices for your organization, if users want to receive content on a device that’s not on the list.
You can’t edit or delete default devices, such as AT&T Wireless.
1. On the Classic Home page, click the user profile icon and then click Administration.
2. Click Manage Device Types.
3. To define a new type of device:
a. Click Create New Device Type.
b. Enter information about the device, and click OK.
4. To edit a device that you added:
a. Click Edit.
b. Make your changes, and click OK.
5. To delete a device that you added:
a. Click Delete.
b. Click OK to confirm.
Manage Map Information For Analyses
This chapter describes how you set up map information for dashboards and analyses, so that
users can visualize and interact with data through maps.
Topics:
• Set Up Maps For Dashboards and Analyses
• Edit Background Maps For Dashboards and Analyses
Set Up Maps For Dashboards and Analyses
As the administrator, you define how data columns that you've modeled are displayed on
maps. You configure the map data, then users can analyze the data in map views.
Map views allow users to display data on maps in different formats and to interact with data. As
the administrator, you must configure the metadata that defines the mapping between business
intelligence data and spatial data.
Spatial features such as shape definitions are managed by database administrators for your
instance. If a shape geometry definition doesn’t exist for a particular column value, then the
shape can't be shown on the map and might affect user interactions on the map.
1. On the Classic Home page, click the user profile icon, Administration, and then click
Manage Map Data.
2. On the Layers tab, click Import Layers from the toolbar.
Chapter 4
Manage the Types of Devices that Deliver Content
4-23
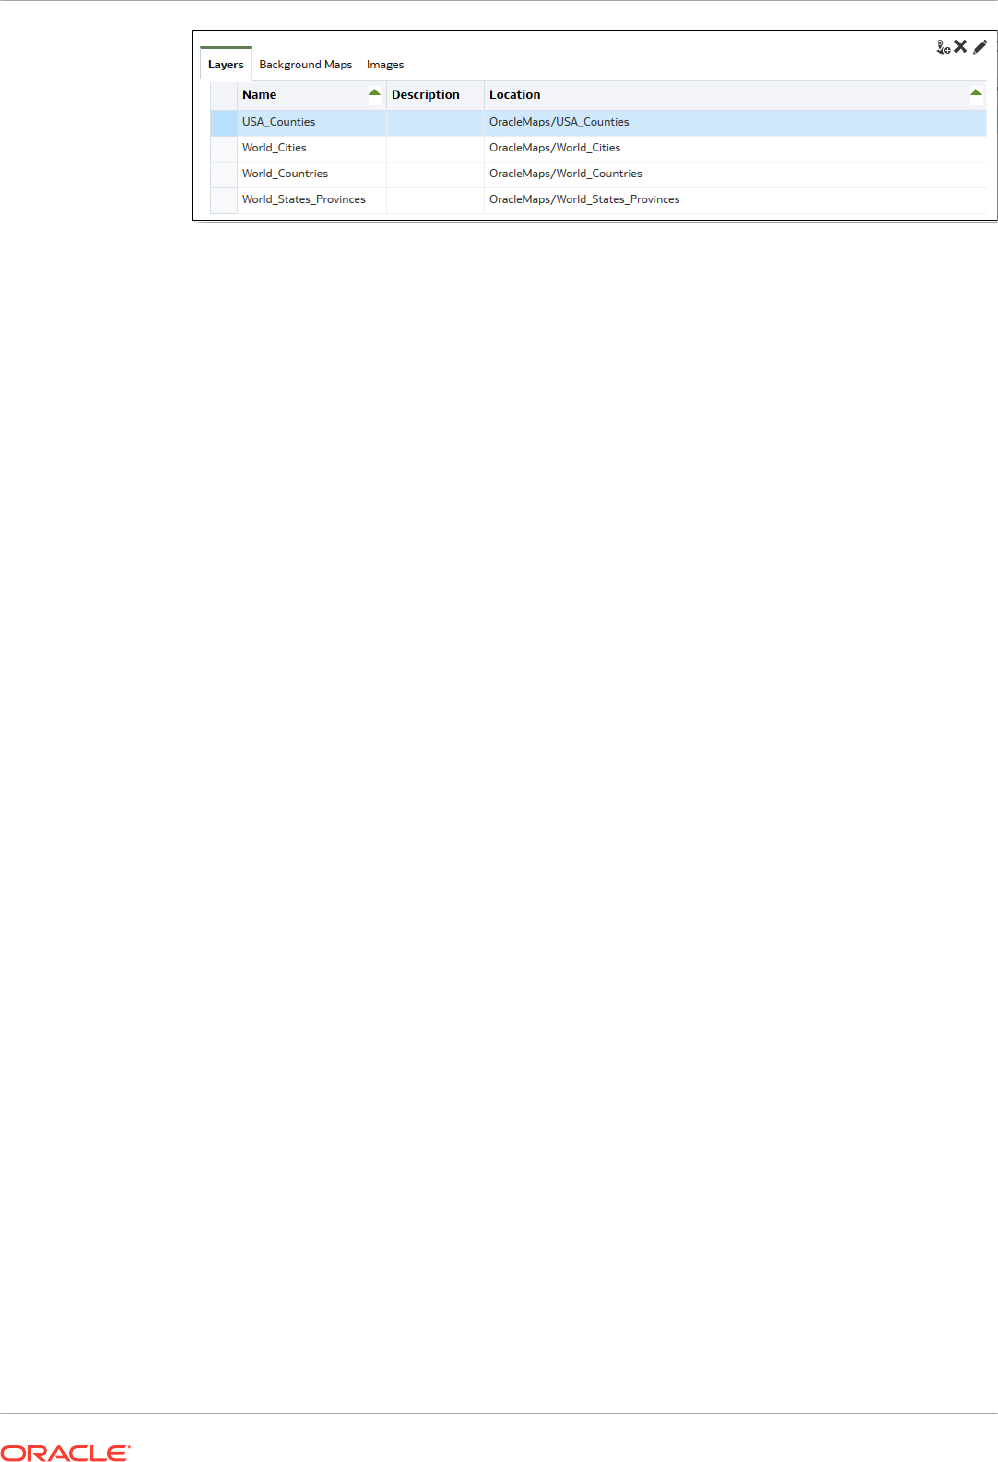
3. In the Import Layers dialog, select the layers you want to use and click OK.
4. Back on the Layers tab, select a layer and click the Edit Layers button.
5. In the Edit Layer dialog, associate layers with columns so that users can display data in the
map view.
a. In Name, specify the layer name to display to users who work with map views.
b. In Location, specify which background map the layer originates from. Click Location
to select a different layer.
c. In Description, specify information to help users when they hover over the layer name
in the Map Formats area.
d. In Layer Key, specifiy the column of spatial data that you can associate with data.
Each column value corresponds to a "shape" that originates from the background map.
For example, a MY_CITIES layer might have a layer key called CITY. The default
value is a "best guess". Select the appropriate column from the list.
There are various reasons why a country such as Mexico might be drawn as a white
area on a map:
• The column has a null value for the country of Mexico, but a shape exists for
Mexico in the spatial column.
• The column has a value for the country of Mexico, but no shape exists for Mexico
in the spatial column.
• The column has a value for the country of Mexico and the shape exists for Mexico
in the spatial column, but the names are mismatched. The data columns might
have the value MEX and the spatial column might have MXC.
e. In BI Key Delimiter, Review the single ASCII character (such as a comma or
underscore) to function as a delimiter for combining the data columns that form a key.
This value is available only when multiple columns are specified for one key.
f. In Geometry Type, specify whether the layer is a polygon, point, or line geometry
layer. The type that you select affects the formatting that users can apply to the layer.
g. In BI Key Columns Area, secifies the columns of data that you want to associate with
the layer. You can have multiple columns associated with a single layer. You can select
multiple columns from one subject area or from multiple subject areas. The columns
and delimiter that you select must exactly match the name of the Layer Key value.
Suppose the Layer Key value is STATE_CITY. You must select the STATE and CITY BI
data columns and specify the underscore character in the BI Key Delimiter field.
Use the various options in this area:
• Add — Displays the list of available subject areas. Select a subject area and
select all the data columns that you want to associate with the layer.
• Delete — Deletes the selected key column.
• Edit — Lets you edit the data columns associated with a layer.
Chapter 4
Manage Map Information For Analyses
4-24
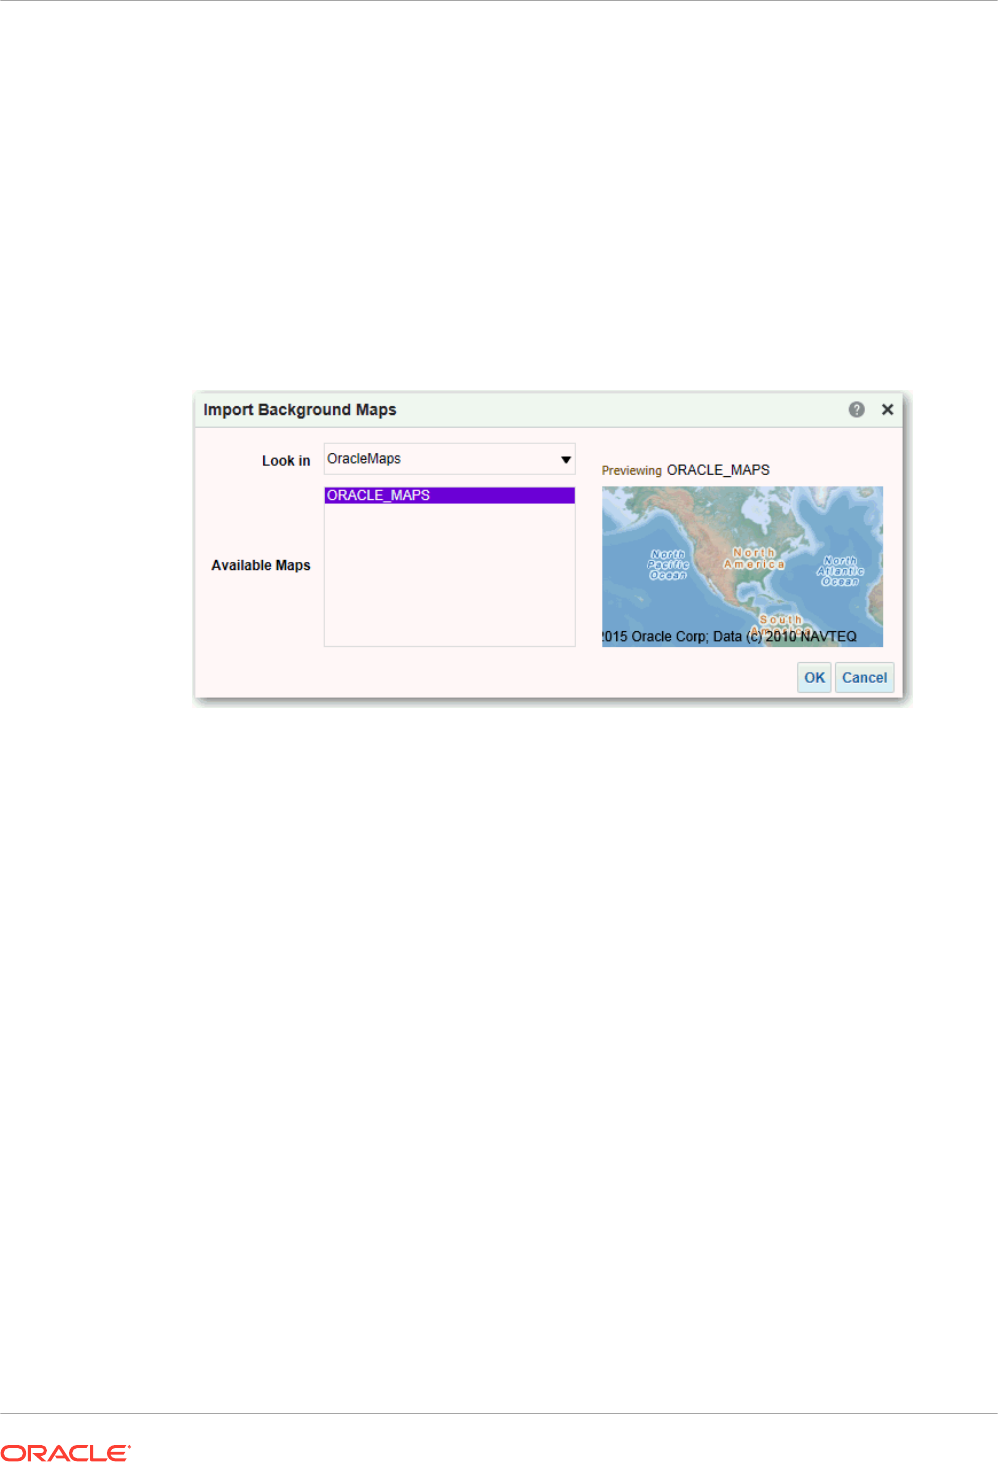
When a content designer creates a map view, a default main map is selected as the
basis for that map view. If at least one data column from the analysis is associated with
a layer that's associated with a main map, then that main map is selected by default.
h. In Show Qualified Names, specifies whether to display the fully qualified name of the
column in the BI Key Columns Area or simply the column name.
6. Click OK to close the dialog.
7. Click the Background Maps tab, then click the Import Background Maps button.
8. In the Import Background Maps dialog, select the connection in the Look in field and the
main maps to use, then click OK.
The connection that you select for the main map can be different from the connection for
the layers or images.
9. See Editing Background Maps for the steps required to prepare the background maps.
After you've added background maps and map layers, you can use the information to create a
static image for a map. The static image is displayed to content designers and users who work
with map views.
Edit Background Maps For Dashboards and Analyses
You edit background maps to ensure that users have a seamless experience with map views in
dashboards and analyses.
A background map is a non-interactive map that serves as a base for the map view. It might
display a satellite image or a map with roads. The background map specifies the order of
layers on the map view.
The ordering of map layers is very important. You must pay close attention to ensure that users
have a seamless experience while navigating on the map (that is, drilling and zooming). In the
Edit Background Map dialog, you assign each layer a minimum and maximum zoom range.
Given that the map zoom slider can slide only from bottom to top vertically, the layers with
lower minimum zoom levels are placed at the bottom of the slider. Ensure that the layer grid on
the Interactive BI Layers section of the dialog follows a similar pattern, so that you place layers
with lower minimum zoom levels at the bottom of the list.
Layer ordering becomes irrelevant when the zoom ranges of layers don’t intersect on the
scale. Ordering becomes very important when layers have a common minimum and maximum
zoom range. Use care to ensure that detailed layers aren’t hidden by the aggregated layers
during drilling or zooming operations.
Chapter 4
Manage Map Information For Analyses
4-25
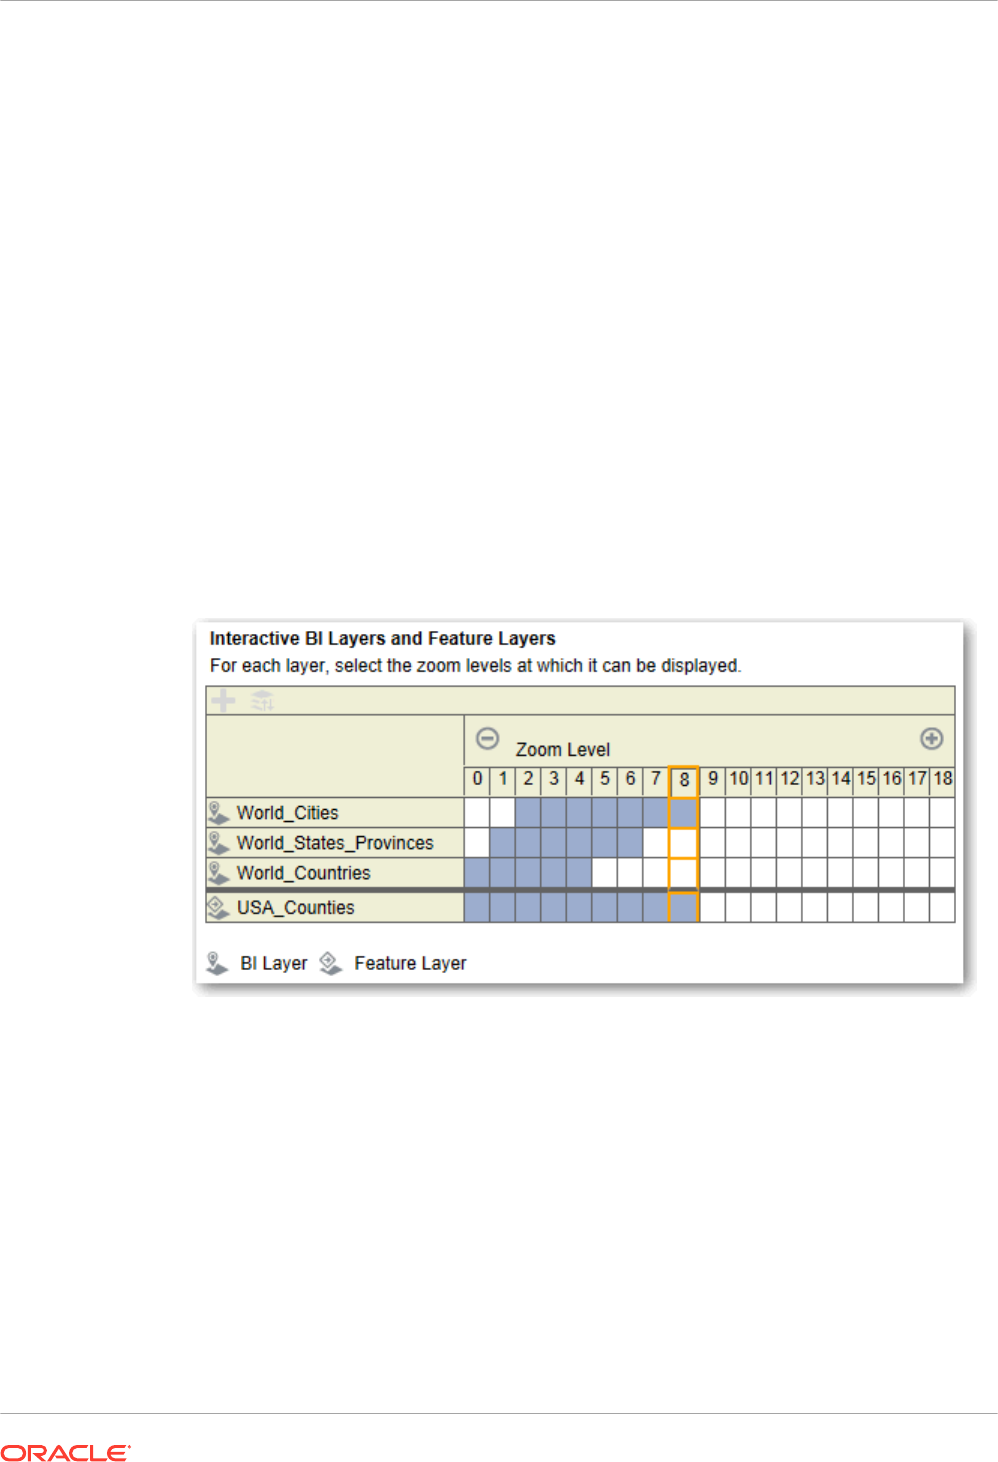
1. On the Classic Home page, click the user profile icon, Administration, and then click
Manage Map Data.
2. Click the Background Maps tab, select a map, then click the Edit Background Map
button to display the Edit Background Map dialog.
3. Specify the name and description of the map, which is displayed as a tooltip for the map
when selecting a map from the list, when editing the map view.
4. The Location field displays the location of the background map in the data source. Click
the Location button to change to a different map. If you select a background map that
includes a different number of zoom levels, then the zoom levels are automatically
adjusted for the layers that are associated with the map by scaling their ranges.
5. Click the Add Layers button to display a list of the layers that have been imported on the
Layers tab, then select the layers to add to the map. This button is unavailable when all
layers from the Layers tab have been added to the background map.
When you add a layer that’s part of the map definition, the layer displays at its default
zoom levels. If the layer isn't part of the map definition, then specify the zoom levels
yourself.
The layers are listed from bottom to top, in terms of how they’re applied to the map. A
sample order is Countries, States, Cities. The lower level layers generally have the lower
zoom levels. For example, if you have a States layer and a Cities layer, then include lower
zoom levels for State than City.
6. Click the Sort Layers By Zoom Level button to list the layers in ascending or descending
order based on visibility on the map. This button is unavailable when layers are listed in the
proper order.
The sort order that’s specified here doesn't affect the order in which layers are applied on
the map. Instead, the sorting order affects the zoom levels. For example, the States layer
might have zoom levels 1 through 3 and the Cities layer has zoom levels 4 through 9. The
lower layers have the lower zoom level numbers. The zoom levels that you specify
correspond to the tick marks on the zoom slider on the map.
You can include both layers that have been associated with a column by using the Edit
Layer dialog and layers that haven't been associated. Ensure that BI layers are ordered
higher than non-BI layers. If a non-BI layer is ordered higher than any BI layers, then the
non-BI layer is displayed on top of the lower BI layers on the map, which prevents the BI
layers from being interactive.
Chapter 4
Manage Map Information For Analyses
4-26

7. Click the Turn On Layer Visibility or Turn Off Layer Visibility button to control the
visibility of layers on the map. Use the buttons to indicate whether the layer is visible in the
Preview map in this dialog only. The layer is still visible on a map view. You can modify the
zoom levels for a layer with a visibility turned off.
8. Click a cell under a zoom level for a layer to affect the zoom level:
• If you click a blue cell that’s between other blue cells, then you see a popup menu with
Clear Before and Clear After buttons, which allow you to change the zoom level in
either direction. For example, if you click the cell for zoom level 4 and click the eraser
on the right, then all cells to the right are cleared for that zoom level.
• If you click a blue cell that at the end of a line of blue cells, then the cell turns white to
indicate that it's no longer part of that zoom level.
• If you click a white cell, then you increase the zoom level on either side of the existing
blue cells. For example, suppose cells 4 through 6 are colored blue to reflect the zoom
level. If you click in cell 2, then the zoom level becomes 2 through 6.
If you don’t set any zoom levels for a layer, then that layer doesn't display on the map.
9. Click the action icon beside the layer name to display a menu from which you can make
various selections:
• Delete — Removes the layer from this background map. The layer continues to be
available on the Layers tab and can be added to this area again.
• Move Up or Move Down — Moves the layer up or down so you can specify the order
in which layers are applied to the map.
• Reset to Default Visibility — Resets the current visibility range for this layer as
defined in the underlying map definition. If this layer isn't natively associated with the
map, then this option is disabled for that layer.
10. Use the yellow border that surrounds the column of boxes for a zoom level to determine
which zoom level is currently displayed in the map area.
11. Use the panning and zooming controls to specify how the map is displayed to users. If you
hover over the zoom slider, then you see tooltips that specify the names of the layers that
are currently associated with that zoom level.
12. Click OK.
Switch to a Different Language
Oracle Analytics supports a range of languages.
• What languages does Oracle Analytics support?
• What's translated?
• What isn't translated?
• How do I select my language?
• How do I find documentation in my language?
What languages does Oracle Analytics support?
Oracle Analytics supports 28 languages:
Arabic, Chinese (Simplified), Chinese (Traditional), Croatian, Czech, Danish, Dutch, English,
Finnish, French, French (Canada), German, Greek, Hebrew, Hungarian, Italian, Japanese,
Chapter 4
Switch to a Different Language
4-27

Korean, Norwegian (Bokmål), Polish. Portuguese. Portuguese (Brazil), Romanian, Russian,
Slovak, Slovenian, Spanish, Swedish, Thai, Turkish.
What's translated?
• User Interface: Oracle Analytics translates text in menus, buttons, messages, and other
elements of the user interface.
• Auto-generated text: Some auto-generated text in content that you create is translated
too. For example, automatically generated titles and filters displayed in visualizations,
analyses, dashboards, pixel-perfect reports, and so on.
• User guides: Several user guides are translated.
What isn't translated?
A few features are available only in English.
• Analyses, dashboards, and pixel-perfect reports:
– User-defined titles and text in your workbooks, unless you choose to translate them.
See Localize Catalog Captions.
– Column names coming from your data sources, unless you set up column name
translation in your semantic model.
• Data visualization workbooks:
– User-defined titles and text in your workbooks.
– Column names coming from your data sources, such as "Revenue". Unless your
workbook is based on a subject area and you set up column name translation in your
semantic model.
– Text generated for Language Narrative visualizations is only available in English or
French. Oracle Analytics maps French locales (fr and fr-CA) to the French language,
and maps all other locales to English.
– Default names for your workbooks. If English is your selected language, the default
name for workbooks is Untitled. If you use a different language such as Italian, the
default name when you save a workbook is the equivalent of Untitled in Italian.
However, after you save a workbook, the name is fixed in that language. Workbook
names don't change if you sign-in with a different language.
• Datasets:
– Column names in Microsoft Excel spreadsheets that you upload.
– Column names from your data sources.
How do I select my language?
Several options are available:
• Select your language in your browser settings.
Refer to the documentation for your browser.
• (Classic pages only) Select your language in the My Account preferences tab, available
from the Classic Home page.
See Set Your Preferences.
Chapter 4
Switch to a Different Language
4-28
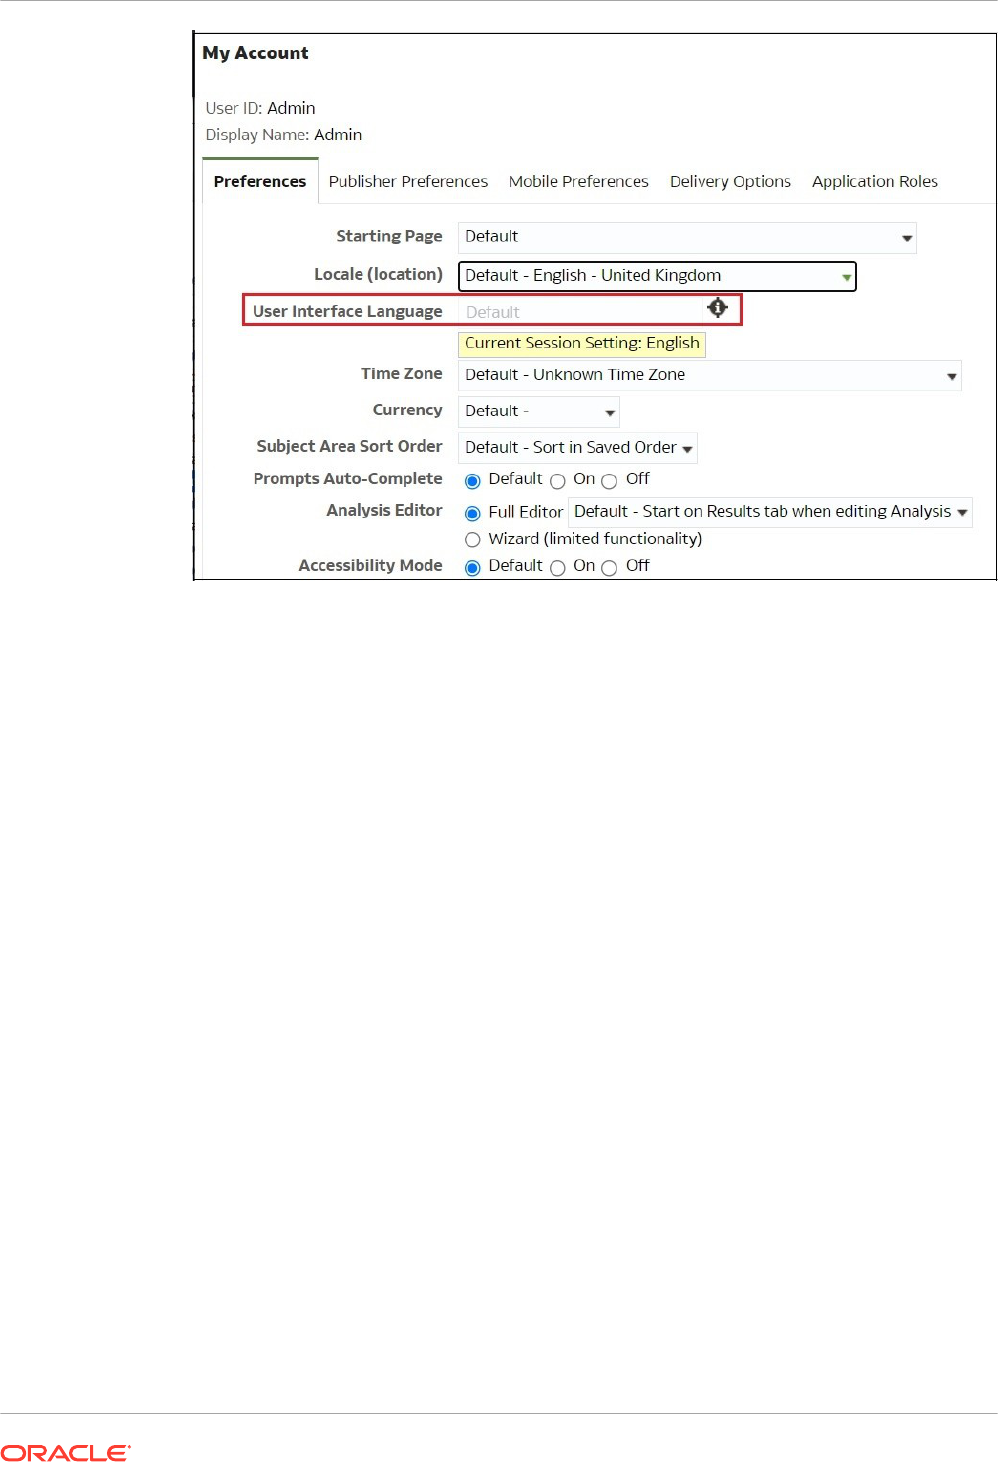
How do I find documentation in my language?
In most cases, when you click Help in Oracle Analytics, user assistance is displayed in the
same language as the user interface. For example, if you're working in French, the Help is
displayed in French.
Several Oracle Analytics user guides are translated into the same 28 languages as the user
interface. To find books translated in your language, navigate to your Oracle Analytics product
on Oracle Help Center, select the Books tab and then select your language.
Chapter 4
Switch to a Different Language
4-29
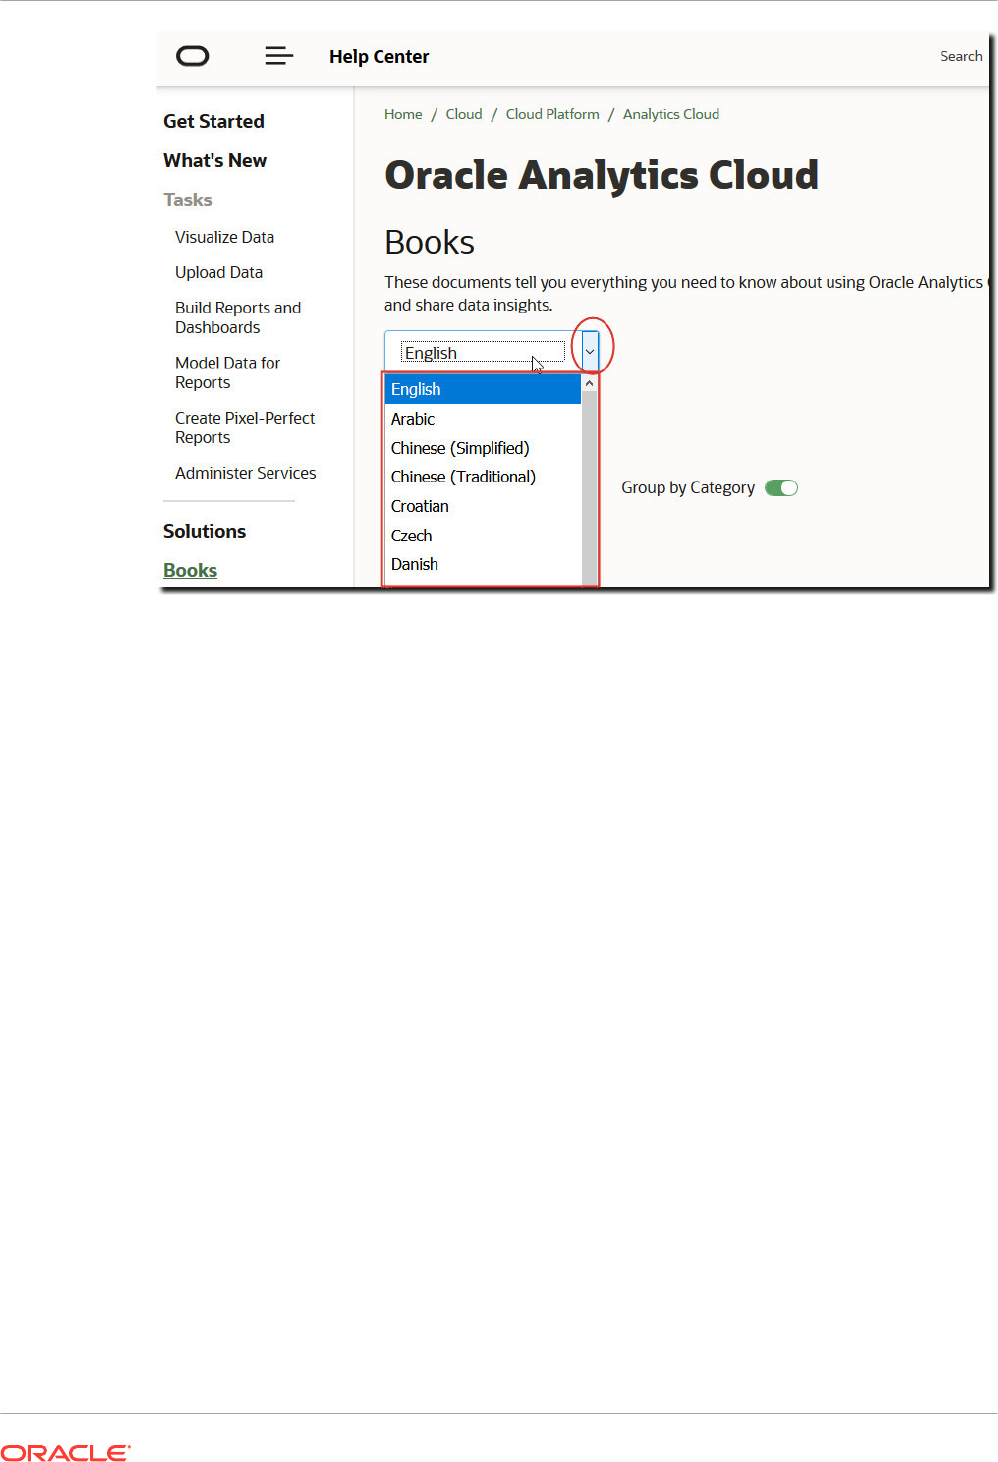
Update the Cloud Storage Password
Oracle Analytics Cloud stores analytics datasets and backups in cloud storage. If the
credentials required to access the cloud storage container change or expire, users might see
the message "
Failed to connect to the storage service. Please check the user and
password are correct"
. If this happens, administrators can update the storage password.
The way you do this depends whether your Oracle Analytics Cloud service is managed by
Oracle or by you (customer managed).
Topics:
• Update the Cloud Storage Password for an Oracle-Managed Service
• Update the Cloud Storage Password for a Customer-Managed Service
Update the Cloud Storage Password for an Oracle-Managed Service
If your Oracle Analytics Cloud is managed by Oracle, you can update the cloud storage
password from the Console.
1. Click Console.
2. Click Connections.
3. Click Update Cloud Storage Password.
4. Enter the Storage Password.
5. Click Save.
Chapter 4
Update the Cloud Storage Password
4-30

Update the Cloud Storage Password for a Customer-Managed Service
If your Oracle Analytics Cloud is a customer-managed service, you must sign in to Oracle
Cloud Infrastructure Console to update cloud storage credentials and restart the service.
Contact your service administrator if you don’t have the required permissions.
See Manage Credentials in Administering Oracle Analytics Cloud - Classic.
Make Preview Features Available
Preview features allow your organization to explore and try new features before they're
available as standard features. Preview features are either disabled by default (Systems
Settings page) or clearly marked as preview. Administrators can go to the Console (System
Settings) to switch on individual preview features for others to use.
To find out about features disabled by default on the Systems Settings page, see Preview
Options.
1. In the Oracle Analytics Home page, click the Navigator, and then click Console.
2. Click System Settings.
3. Click Preview.
4. Enable preview options if you want to make these features available to your organization.
5. If required, click Apply.
Wait up to 10 minutes for the change to take effect. After you enable a preview feature, users
must sign out and sign in to use it.
Chapter 4
Make Preview Features Available
4-31
5
Manage Content and Monitor Usage
This topic describes tasks performed by administrators monitoring Oracle Analytics Cloud and
managing content.
Topics:
• Typical Workflow to Manage Content and Monitor Usage
• Manage How Content Is Indexed and Searched
• Delete Unused Datasets
• Migrate Content from Oracle BI Enterprise Edition 12c
• Monitor Users and Activity Logs
• Run Test SQL Queries
• Manage Content
Typical Workflow to Manage Content and Monitor Usage
Here are the common tasks for Oracle Analytics Cloud administrators managing content and
usage.
Task Description More Information
Back up and restore
content
Back up and restore the semantic model,
catalog content, and application roles
using a file called a snapshot.
Take Snapshots and Restore
Manage how content is
indexed and searched
Set up how content is indexed and crawled
so users always find the latest information
when they search.
Manage How Content Is
Indexed and Searched
Free up storage space Delete data sources on behalf of other
users to free up storage space.
Delete Unused Datasets
Migrate from Oracle
Business Intelligence
Enterprise Edition 12c
Migrate reporting dashboards and
analyses, semantic models, and
application roles.
Migrate Content from Oracle BI
Enterprise Edition 12c
Upload semantic models
from Oracle Analytics
Server
Upload and edit semantic models from
Oracle Analytics Server
Upload Semantic Models from
Oracle Analytics Server
Edit a Semantic Model in the
Cloud
Manage user session
information
Monitor who is signed in and troubleshoot
issues with analyses by analyzing the SQL
queries and logs.
Monitor Users and Activity Logs
5-1

Manage How Content Is Indexed and Searched
Administrators can set up how data sources and catalog content are indexed and crawled so
that users find the latest content when they search or create visualizations from the search bar
on the Home page.
Topics
• Configure Search Indexing
• Schedule Regular Content Crawls
• Monitor Search Crawl Jobs
• Certify a Dataset to Enable Users to Search It from the Home Page
Configure Search Indexing
The catalog and semantic models are crawled and indexed so users can quickly find content
when they search or visualize data from the search bar on the Home page.
The Data Model pane on the Search Index page controls which subject areas are indexed.
The indexing of an uploaded file-based dataset is controlled on its Inspect dialog. See Index
File-Based Datasets.
1. In the Oracle Analytics Home page, click the Navigator, and then click Console.
2. Click Search Index.
3. To ensure users find the most recent information when they search for subject area
columns, in the Data Model pane, select Enable Data Model Crawl and use the Select
Data Models to Index and Crawl Status columns to browse for and specify which subject
areas and dimensions you want to index. Select only the items needed to create useful
search results. Indexing all items yields too many similar search results.
• Choose Index Metadata Only to index dimension and measure names only. This is
the default setting.
• Choose Index to index dimension names, measure names, and values. Indexing
values provides additional functionality for users who visualize data values from the
search bar on the Home page. Be aware that selecting this option can be costly
because it indexes values for all of the columns in all subject areas of the semantic
model.
4. To ensure that users find the most recent information when they use the Home page to
search for catalog content (workbooks, analyses, dashboards, and reports), in the Catalog
pane and specify what to index. In most cases you shouldn't have to modify the settings in
this tab.
• Confirm that the Index User Folders field is selected. Oracle recommends that you
don't deselect this option. If deselected then no folders in the catalog are indexed and
the Home page search returns very limited and possibly no results.
• Use the Catalog Object (Shared Folders) list to browse for and specify which folders,
subfolders, and items you want to index or not index. Select only the items needed to
create useful search results. Indexing all items yields too many similar search results.
• Oracle recommends that you don't set the Crawl Status field to Don't Index as a way
of hiding an item from users. Users won't see the item in search results or on the
Home page, but are still able to access the item. Instead, use permissions to apply the
proper security to the item.
Chapter 5
Manage How Content Is Indexed and Searched
5-2

Schedule Regular Content Crawls
The administrator selects which folders to crawl and schedules when and how often to crawl
the content.
1. In the Oracle Analytics Home page, click the Navigator, and then click Console.
2. Click Search Index.
3. Select Data Model or Catalog.
4. Use the Schedule options to specify when and how often to run the crawl.
The index updates automatically as users add or modify content in the catalog.
• Catalog crawl frequency: By default, a catalog crawl runs once a month. The
minimum number of days you can specify between catalog crawls is 7 days.
• Data model crawl frequency: By default, a data model (that is, semantic model) crawl
runs once a day.
Normally you don't need to change the defaults. However, in some cases you might want
to schedule a crawl as needed (for example, after importing a BAR file or if automatic
indexing didn't run).
5. For Languages, select all the languages you want to create indexes for.
Crawl results are added to the index in the languages that you specify. For example, if your
company's headquarters are in the United States, and you have offices in Italy, then you
can choose English and italiano to create indexes in both English and Italian.
6. Click the Save icon to save your changes.
Monitor Search Crawl Jobs
Administrators can check the last time content was indexed and monitor the status of crawl
jobs. You can stop any crawl job that is running, cancel the next scheduled crawl before it
starts, or rerun a failed crawl.
If users report search issues, check the status of crawls to ensure that they're current. After a
crawl is completed, users might have to wait a few minutes before they can locate the latest
content.
1. In the Oracle Analytics Home page, click the Navigator, and then click Console.
2. Click Search Index.
3. Click Monitor Crawls.
The Crawl Job Status page shows information about the past, current, and the next
scheduled crawl. In the Progress column, XSA indicates a dataset.
4. Look at the Status column to find out when the content was last crawled and when the
next crawl is due.
5. Click Cancel to stop a crawl job that is Running or Scheduled.
6. To rerun a crawl with the status of Terminated or that displays progress totals of zero:
a. Click the Configure Crawls link.
b. In the Data Model tab, deselect and then reselect the Enable Data Model Crawl
checkbox.
c. Click Save.
Chapter 5
Manage How Content Is Indexed and Searched
5-3

d. Click the Monitor Crawls link and locate the scheduled job. The revised crawl runs in
a few minutes time.
Certify a Dataset to Enable Users to Search It from the Home Page
You certify a dataset uploaded by a user so that other users can search it from the home page
using the search bar.
As an administrator, you use certification to control how much compute time is consumed by
indexing datasets, which can affect system performance.
1. From the Home page, click Navigator, click Data, then click Datasets.
2. Hover over the dataset you’d like to certify, click Options
, then click Inspect.
If you can't see Options, expand the size of your browser or scroll to the right-hand side of
your device screen.
3. On the General tab, click Certify.
4. On the Search tab, click Index Dataset for Searching, and select the level of indexing.
5. Use the other options on the Search tab to specify the language and indexing frequency.
Delete Unused Datasets
Your service comes with a fixed storage quota for data files. From time to time, administrators
might need to delete datasets on behalf of other users to free up storage space and enable the
service to function properly. For example, a user uploads data files and then their account is
disabled when they leave the company.
1. Click the Page menu on the Home page, and select Dataset Management.
2. To free up some space, click the Options menu for a user with files you want to delete.
Chapter 5
Delete Unused Datasets
5-4
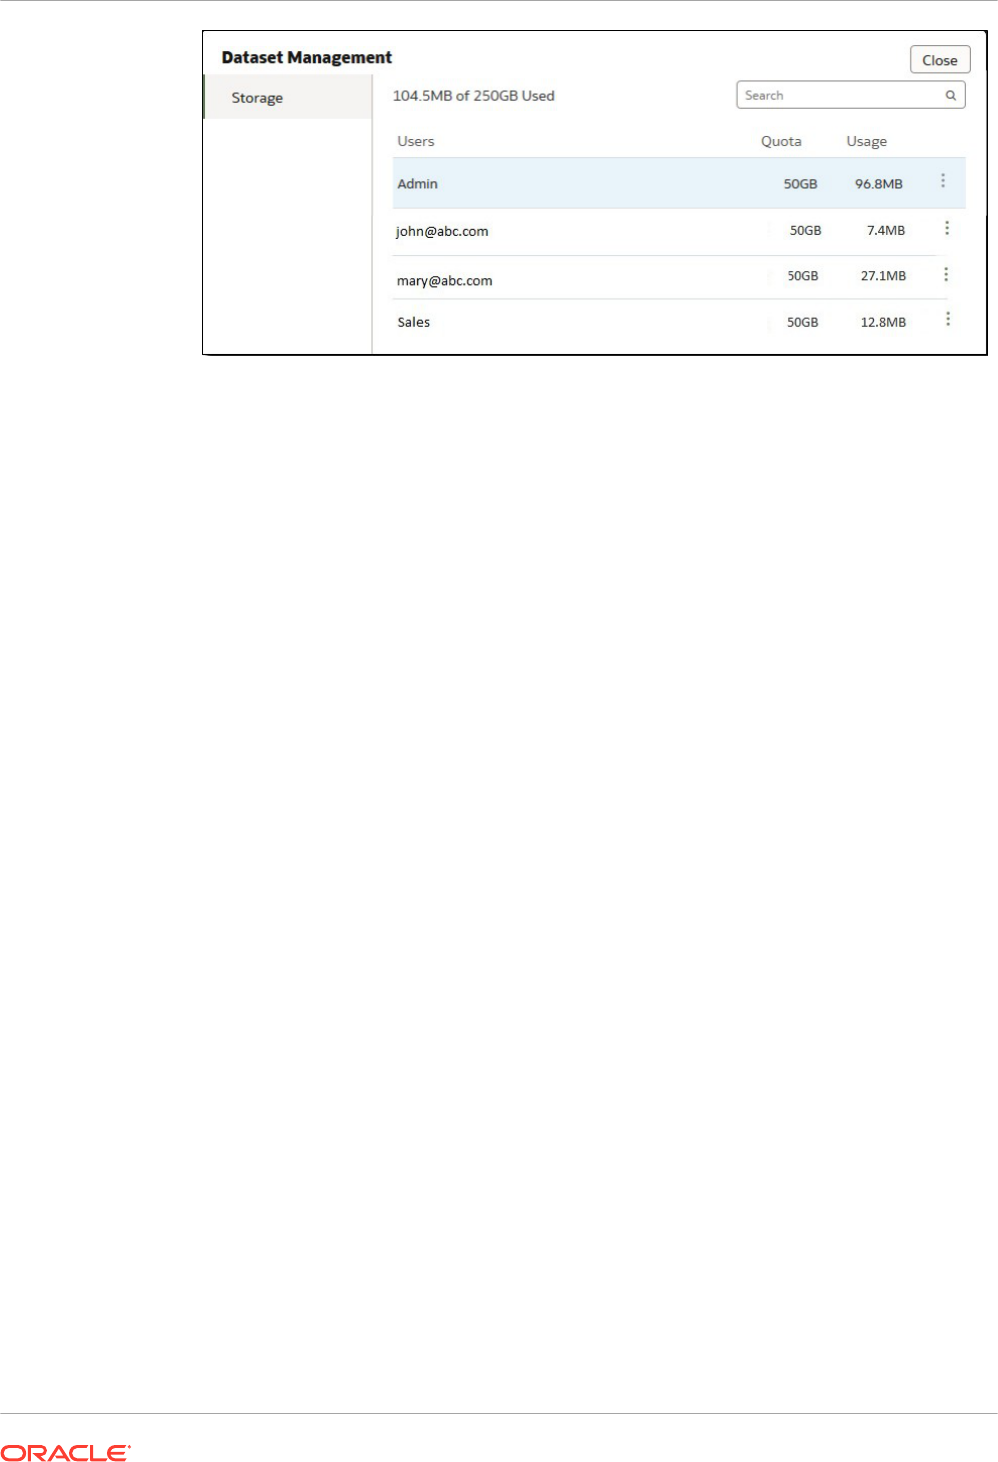
3. Select one of the following options:
• Delete Private to delete non-shared (private) data files.
• Delete All to delete all data files.
Migrate Content from Oracle BI Enterprise Edition 12c
You migrate semantic models, dashboards, analyses, and application roles from Oracle BI
Enterprise Edition 12c using a BAR file.
To understand the entire migration process, read the migration guide Migrating Oracle
Business Intelligence Enterprise Edition to Oracle Analytics Cloud.
You can find instructions on how to use the WLST command
exportarchive
to capture the
content you want to migrate in a BAR file in this guide. See Export Content from Oracle BI EE
12c.
Migrate Content to Other Catalogs
Administrators can copy catalog content from one environment to another using the catalog
archive and unarchive options. Archiving saves your content to a
.catalog
file on your local file
system. Unarchiving uploads content from catalog files to another catalog location.
Topics
• Save Content to a Catalog Archive
• Upload Content from a Catalog Archive
• Track the Progress of Your Catalog Unarchive Tasks
Save Content to a Catalog Archive
Administrators can copy or move content you create in one environment to another
environment using the catalog archive/unarchive feature. Archiving saves one or more objects
or folders that contain multiple objects to a
.catalog
file on your local file system.
You can upload the
.catalog
file at a different location.
1. On the Classic Home page, click Catalog.
2. Select one or more folders or objects to copy or move to another catalog.
Chapter 5
Migrate Content from Oracle BI Enterprise Edition 12c
5-5

To select multiple items, press and hold the
Ctrl
key, and click the folders or objects you
want to copy.
3. In the Tasks pane beneath the Folders pane, click Archive.
4. Select Keep Permissions to save the permission settings, if any.
If you don’t select this option, permissions are excluded. This can be useful if you're
migrating content from a test environment and none of the permissions you assigned to
test users are required in the production system. When you unarchive, the content inherits
permissions from the parent folder on the target system.
5. Select Keep Timestamps to save information such as time created, last modified, and last
accessed.
When you unarchive, timestamp information is retained and you can choose to only
overwrite items that are older than those in the catalog archive.
If you don’t select Keep Timestamps, the original age of content isn’t saved or considered
when you unarchive the content.
6. Click OK.
7. Select Save File.
If you want to, change the name of the catalog file.
8. Select a folder and click Save.
Upload Content from a Catalog Archive
Administrators can upload content from Oracle Analytics and Oracle BI Enterprise Edition
11.1.1.9.0 or later. Select the custom catalog folder where you want the content to go, and , if
you have BI Consumer permissions, you'll see an Unarchive option. Point to a catalog archive,
any valid .catalog file, to copy its content to this folder.
1. On the Classic Home page, click Catalog.
2. Navigate to a custom folder where you want to unarchive the content of your file.
3. In Unarchive, click Browse to select the archive file.
4. In Replace, select an option:
• None: Never overwrite existing content. This is the default setting.
• All: Overwrite existing content, except for content marked Read-Only.
• Old: Overwrite existing content if it’s older than the content in the file.
• Force: Overwrite all content, even newer content and content marked Read-Only.
5. In ACL, select how to apply Access Control List permissions.
• Create: Preserves objects' permissions as they were in the original, creating and
mapping users and application roles as necessary. If the user or role is not available,
objects inherit their owner from the new parent folder, which is similar to the Inherit
option.
• Inherit: Inherit objects' permissions from its new parent folder. (Default)
• Preserve: Preserve objects' permissions as they were in the original, mapping users
and application roles as necessary.
6. Click OK.
Chapter 5
Migrate Content to Other Catalogs
5-6
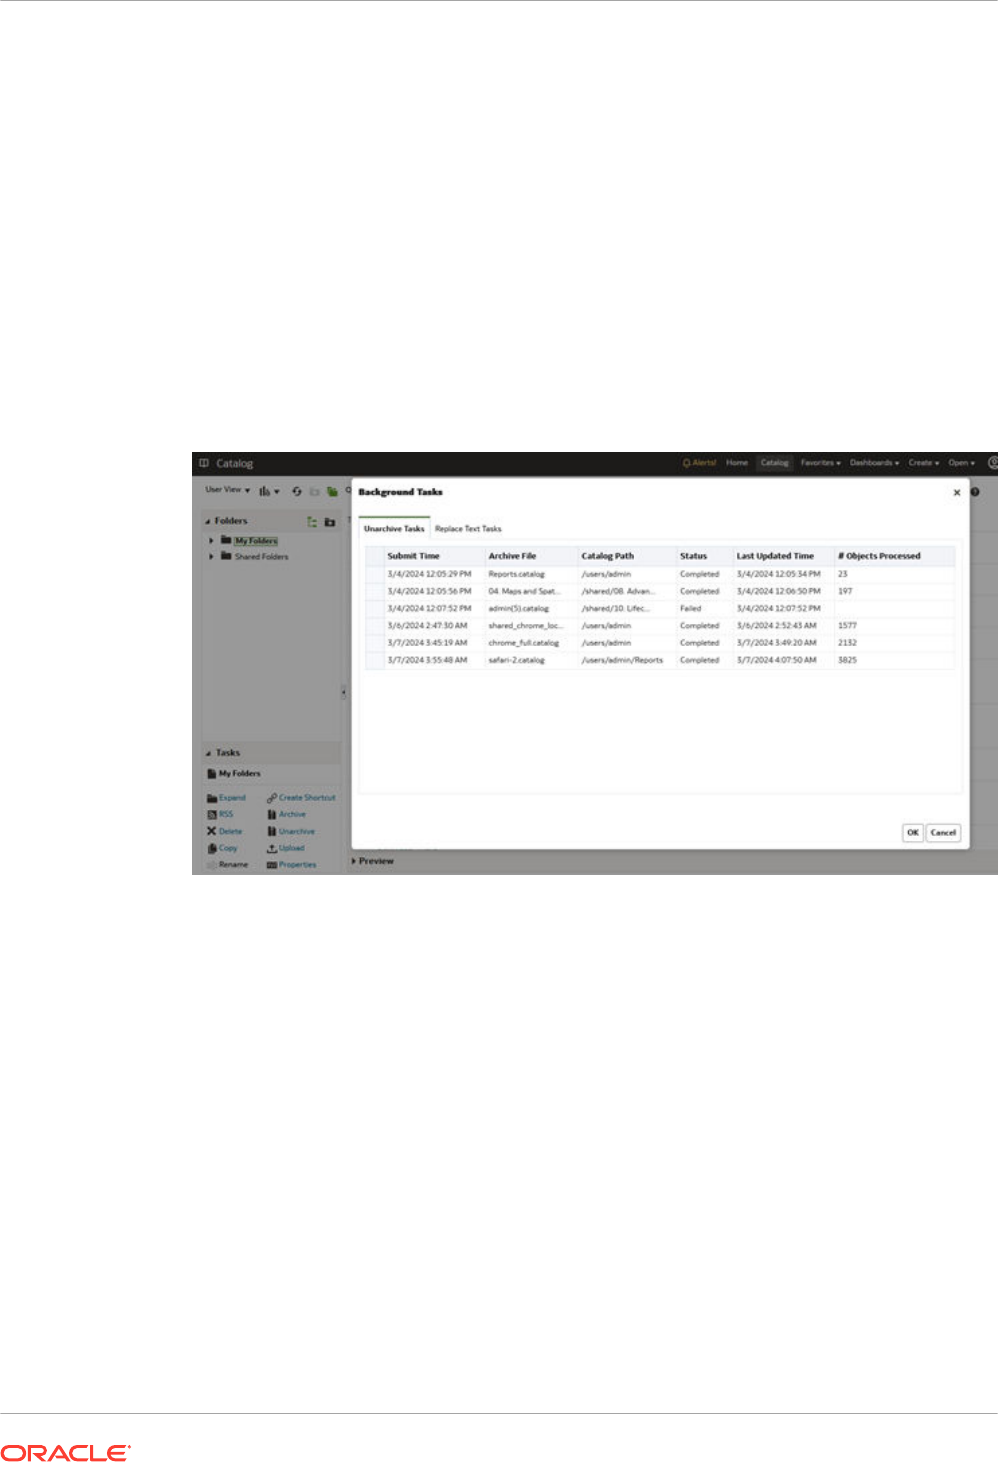
For reports to work, all the required tables and data must be available to Oracle Analytics.
Load the data or connect to the data if it’s stored in an Oracle Cloud database.
Track the Progress of Your Catalog Unarchive Tasks
Administrators can track the progress and current status of any catalog unarchive operations
that you initiate from the Unarchive Tasks tab.
Large catalogs might take some time to process. Check the information on this tab to find out
when your task starts or completes, and troubleshoot any errors that might occur.
1. Navigate to the Classic Home page.
2. Click My Profile, and select Background Tasks.
3. Click Unarchive Tasks.
If the tab doesn't display, clear the browser cache.
4. Check the status to see whether your unarchive operation is complete, still in progress, not
started yet (submitted), or failed for some reason.
Monitor Users and Activity Logs
You can see information about any users who are currently signed in and troubleshoot report
queries from the Manage Session page.
Topics:
• Monitor Users Who Are Signed In
• Analyze SQL Queries and Logs
Chapter 5
Monitor Users and Activity Logs
5-7

Monitor Users Who Are Signed In
You can see how many users are signed in to your service and view detailed information about
each user from the Manage Session page.
• User ID: Name that the user entered when they signed in.
• Browser Info: Information about the browser used to sign in.
• Logged On: Time when the user signed in.
• Last Access: Time stamp for the last activity for this user. This can be any kind of activity,
such as switching from one page to another.
1. In the Oracle Analytics Home page, click the Navigator, and then click Console.
2. Click Session and Query Cache.
3. Locate the Sessions sections.
The Sessions section at the top of the page shows how many users are currently signed in
(Total Number of Sessions) and detailed information about these users.
4. To monitor a particular user, select Filter Cursors by Session.
Information for this user displays in the Cursor Cache table.
Click Clear Filter to show information for all users.
5. To change how messages are logged for a particular user, select a Log Level from the list.
By default, logging is disabled.
Analyze SQL Queries and Logs
Administrators can examine the underlying SQL query requests that are run as people use the
service.
1. In the Home page, click the Navigator, and then click Console.
2. Click Sessions and Query Cache.
3. Locate the Cursor Cache section, and review the query information recorded there. See
Query Information Recorded in the Cursor Cache Table.
4. Optional: Click Close All Cursors to remove information in the Cursor Cache table.
5. Optional: Click Cancel Running Requests to cancel all requests that are running for
analyses.
Query Information Recorded in the Cursor Cache Table
Administrators can examine the underlying SQL query requests that are run as people use the
service.
These options apply only to analyses and dashboards. They don't apply to data visualizations.
Field
Description
ID A unique internal identifier that is assigned to each entry.
User The name of the user who ran the analysis and last placed it into the cache.
Refs The number of references to this entry since it was placed into the cache.
Chapter 5
Monitor Users and Activity Logs
5-8

Field Description
Status The status of the analysis that is using this cache entry:
•
Starting — The analysis is starting to run.
•
Waiting on Parent — A view in the analysis is waiting for data to be returned
for the query.
•
Running — The analysis is currently running.
•
Finished — The analysis has finished.
•
Queued — The system is waiting for a thread to become available so the
analysis can be processed.
•
Canceling — The application is in the process of canceling the analysis.
•
Error — An error occurred during the processing or running of the analysis.
Look in the Statement column for information about the error.
Time The time taken to process and run the analysis, displayed in one-second
increments. A value of 0s (zero seconds) indicates that the analysis took under
1 second to complete.
Action Links that you can click to affect the analysis:
•
Cancel — Terminates the analysis. Is displayed for in-progress analyses. The
user running the analysis receives an informational message indicating that the
analysis was canceled by an administrator.
•
Close — Clears the cache entry associated with this analysis. Is displayed for
completed analyses.
•
View Log — Displays the log of a query run for this analysis.
•
Diagnostic — Displays an HTML page of diagnostic information that you can
share with Oracle Customer Support.
Last Accessed The time stamp of the last time the cache entry for this analysis was used to satisfy
an analysis.
Statement The logical SQL statement that was issued for the analysis; or if the analysis
resulted in an error, information about the nature of the error.
Information Usage tracking information (for example, what analysis contained the query).
Records The number of records in the result set that have been seen (for example, 50+ to
indicate that 50 records have been seen but there are additional records to be
fetched or 75 to indicate that 75 records have been seen and there are no more
records to be fetched).
Run Test SQL Queries
Administrators can enter a SQL statement directly to underlying data sources. This feature is
useful for testing and debugging.
1. In the Oracle Analytics Home page, click the Navigator, and then click Console.
2. Click Issue SQL.
3. Enter the SQL statement. For example:
SELECT
XSA('weblogic'.'SalesTargets')."Columns"."E1 Sales Rep Name" s_1
FROM XSA('weblogic'.'SalesTargets')
4. Change the Logging Level if required.
5. Select Use Oracle Analytics Presentation Services Cache.
6. Click Issue SQL.
Chapter 5
Run Test SQL Queries
5-9

Manage Content
Administrators can manage Oracle Analytics content from the Console. For example, if an
employee leaves an organization, you might assign ownership of their workbooks and machine
learning models to a different employee.
Topics
• Overview of Content Management
• Change Ownership of Content
• Change Ownership of Content in a User's Private Folder
• Frequently Asked Questions About Content Management
Overview of Content Management
Oracle Analytics enables you to view and manage Oracle Analytics content. For example, if an
employee leaves an organization, you can reassign their workbooks and machine learning
models to a different employee.
As an administrator, you can use the Content Management page to view, manage, and change
ownership for all content types.
From the Actions menu for each item, you can also use the Open in Classic Catalog option
to display the catalog folder where the item is stored so that you can make other configuration
changes. For example, to change an item's properties or permissions, hover over over the
item, click Actions at the far right-hand side, and click Open in Classic Catalog. Note: You
need to own the item to see the Open in Classic Catalog option.
About Content Ownership
As an administrator, you can change ownership to:
• Yourself, as administrator.
• A different user.
• Every user with a specific application role (some restrictions apply, see Frequently Asked
Questions About Content Management).
If you own content, you have these privileges:
Chapter 5
Manage Content
5-10

• If you own an object with an Object ID prefixed with /@Catalog/, you can review the
properties of that object and change permissions even if you have no other permissions on
it.
• If you own an object with an Object ID prefixed with /@default/, you always have full
permissions on that object.
Change Ownership of Content
You can change the ownership of Oracle Analytics content from the Console. For example, if
an employee leaves your organization, you can reassign their workbooks and machine
learning models to different employees so that they can use them.
Changing ownership enables you to reuse analytics content if the original content author is no
longer in your organization. You can also quickly provide analytics users with access to
analytics content.
Depending on the object, you can assign ownership to yourself, another user, or a role:
• If you select an object with an object ID that starts with /@default/, you can assign it to
another user.
• If you select an object with an object ID that starts with /@Catalog/, you can assign it to
another user or to an application role.
• If you want to assign multiple objects to an application role, make sure you select only
objects with object IDs starting with /@Catalog/.
To change ownership of content in a user's private folder, see Change Ownership of Content in
a User's Private Folder.
1. In the Oracle Analytics Home page, click the Navigator, and then click Console.
2. Click Content to display the Content Management page.
3. Locate the items whose ownership you'd like to reassign:
• To locate all objects belonging to a user, click Filters, then enter the user's username
in the Owner field. You can further refine the selection using the Object Type options.
• Use the Object Type options to restrict the list to specific types (click Filters to
display).
• Use the Search box to locate text in the Name field. For example, enter 'cluster' to
display objects with cluster in the name.
Chapter 5
Manage Content
5-11
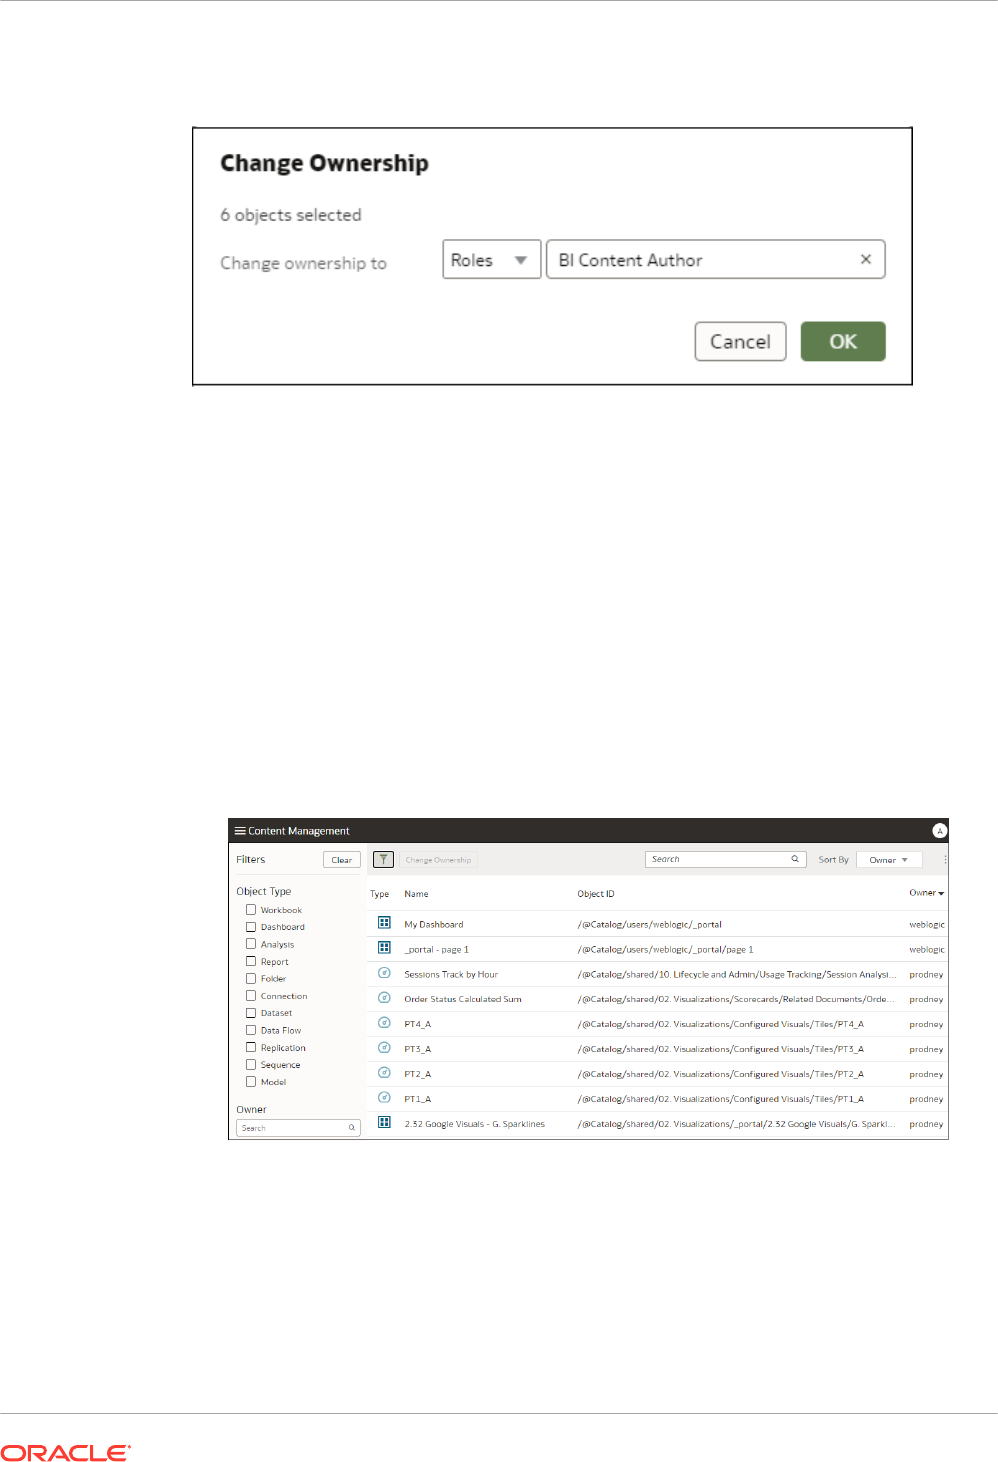
4. Click to select an item or use Ctrl and click to select multiple items.
5. Click Change Ownership.
6. Use the Change ownership to options to specify a new owner (or owners) for the objects.
7. Click OK.
Change Ownership of Content in a User's Private Folder
You can transfer ownership of content that users save in private folders. For example, if an
employee leaves your organization, you might move their private workbooks and machine
learning models from the
\User Folders\<User>\
folder to a different folder so that other users
can edit and deploy them.
1. In Console, change the ownership of the private objects to the administrator:
a. In the Oracle Analytics Home page, click the Navigator, and then click Console.
b. Click Content to display the Content Management page.
c. Click Filters, and then enter the name of the user in the Owner field.
You see all content owned by that user. Private objects are prefixed with /@Catalog/
users/<username>/ in the Object ID). For example, private content owned by
someone with the username "john.smith" is prefixed with /@Catalog/users/john.smith/.
d. Select one or more private objects owned by the user.
e. Click Change Ownership to display the Change Ownership dialog.
Chapter 5
Manage Content
5-12
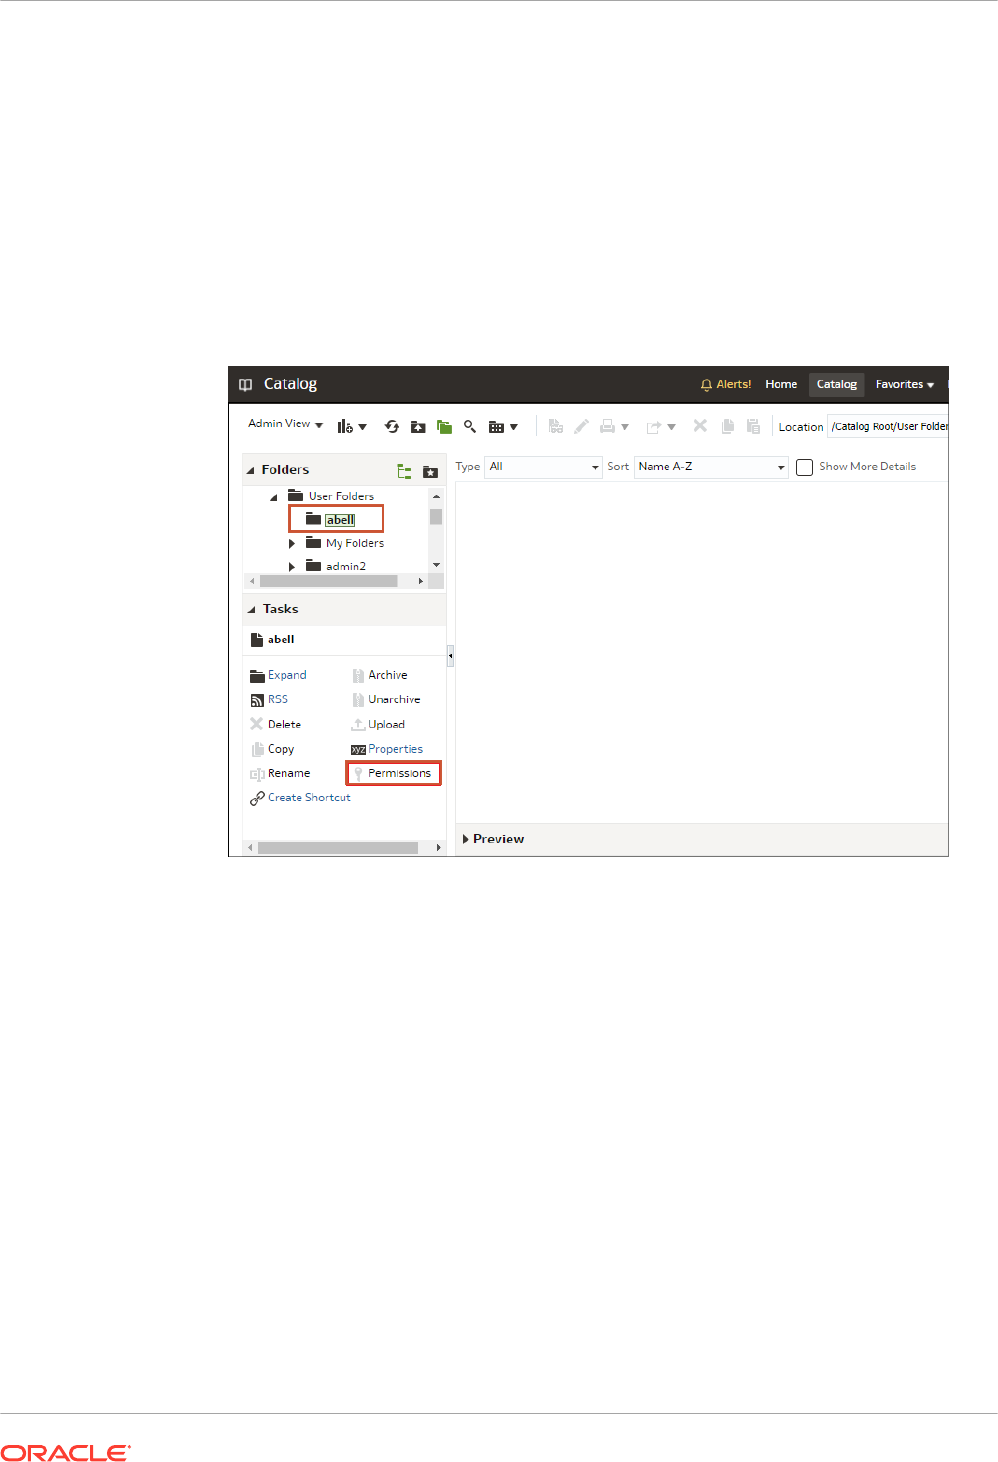
f. Under Change ownership to, click Users, and enter your username or Admin, then
click OK.
2. In the Catalog, change the permissions for the private objects and move them to a new
folder:
a. Click Navigator, then click Home, and from the Page Menu select Open Classic
Home.
b. Click Catalog, then click Admin View in the top left-hand corner.
c. Under User Folders, click My Folders, then select the user's private folder.
d. In the Tasks panel, click Permissions, and assign control of the folder and its
contents to the a different user.
e. Move the content from the user's private folder to a different folder that other users can
access.
In the source folder, select the objects you want to move, then click Copy. Then, in the
target folder, click Paste.
For example, you might move workbooks and machine learning models from the \User
Folders\USER1\ to \User Folders\USER2\, or to a shared folder that multiple users can
access.
Frequently Asked Questions About Content Management
Find the answers to common questions about content management in Oracle Analytics.
What restrictions apply when reassigning ownership to roles?
• You can assign objects with an object ID prefixed with
/@Catalog/
to users or roles.
• You can assign objects with an object ID prefixed with
/@default/
to users only.
If you want to reassign multiple items to a role, then first deselect items with an object ID
prefixed with
/@default/
).
Chapter 5
Manage Content
5-13
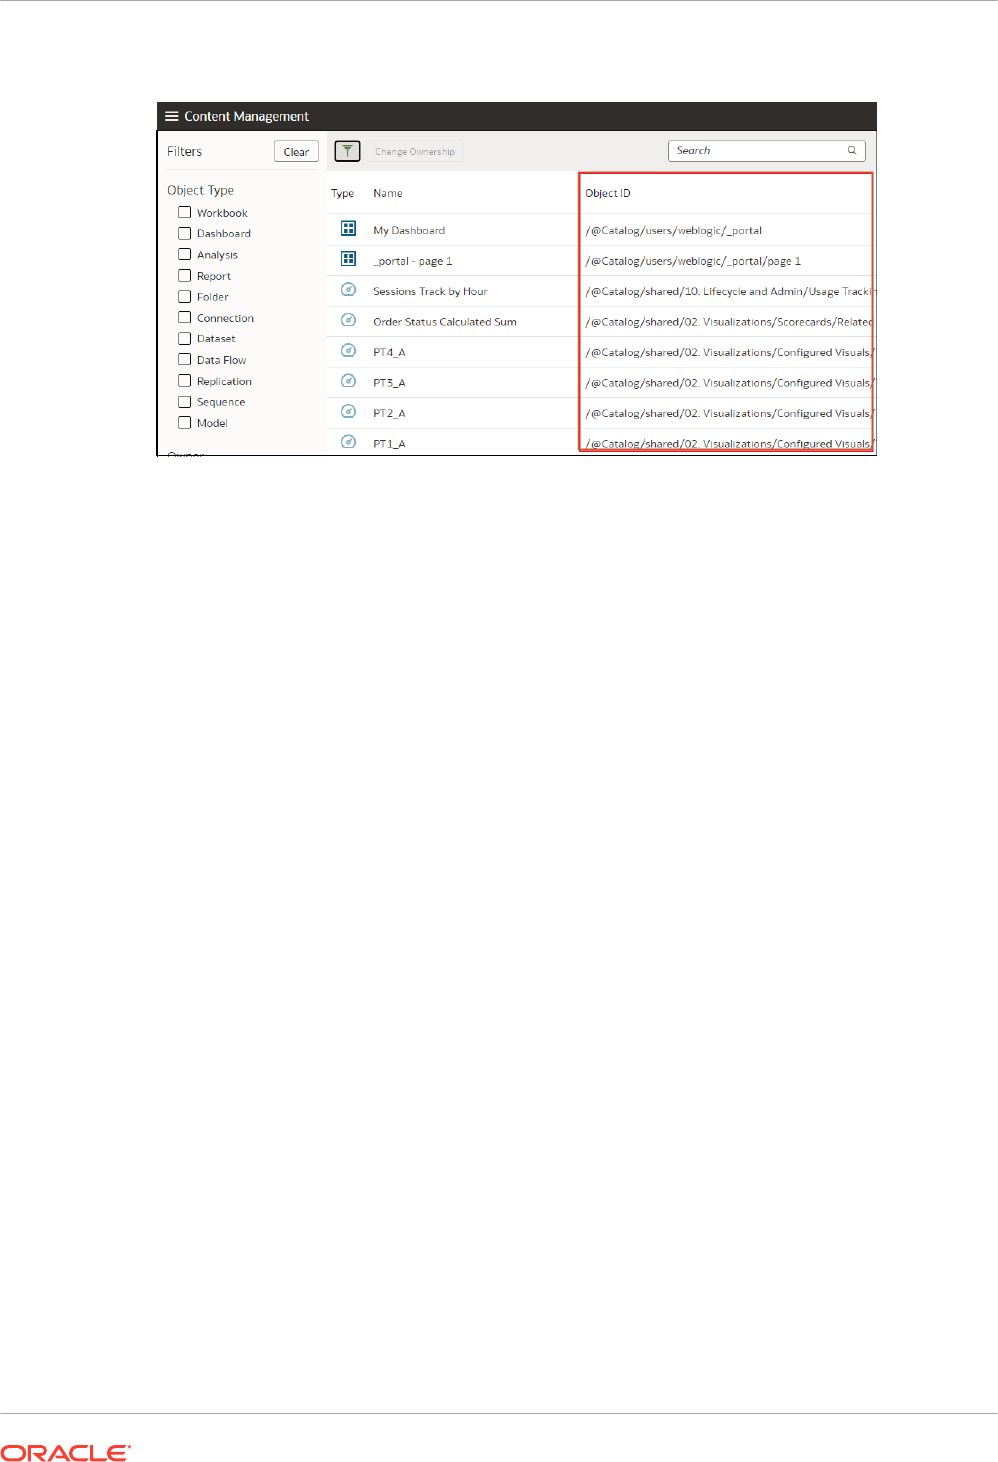
To see how object IDs are prefixed, look at the Object ID column on the content management
page.
What does
@default
prefix or
@Catalog
prefix mean in an object ID?
A
@Catalog
prefix indicates a workbook, connection, dataset, data flow, replication, sequence,
or model. A
@default
prefix indicates an analysis, dashboard, report, or folder.
Chapter 5
Manage Content
5-14

6
Manage Publishing Options
This topic describes tasks performed by administrators managing pixel-perfect publishing.
Topics:
• About Administering Pixel-Perfect Reporting
• Configure System Maintenance Properties
• Set Up Delivery Destinations
• Define Runtime Configurations
• Secure Reports
• Audit Data of Publisher Catalog Objects
• Add Translations For the Catalog and Reports
About Administering Pixel-Perfect Reporting
Administrator configures the components required for pixel-perfect reporting.
Administrators with BI Service Administrator role can use the Manage Publisher option in the
Classic Administration page to set up and configure several components before users start
building pixel-perfect reports.
Roles Required to Perform Pixel-Perfect Reporting Tasks
Understand the application roles required for performing the pixel-perfect reporting tasks.
Application Role Tasks
BI Service Administrator Set up data source connections to retrieve data for reporting from:
• JDBC Connection
• JNDI Connection
• OLAP Connection
• Web Service Connection
• HTTP Connection
• Content Server
You can also use the following data sources:
• Oracle BI Analysis
• Oracle BI Server subject area
6-1

Application Role Tasks
BI Service Administrator
Configure the connections to delivery servers:
• Printer
• Fax
• Email
• HTTP
• FTP
• Content Server
• CUPS (Common UNIX Printing System ) Server
• Oracle Content and Experience Server
BI Service Administrator
Configure the scheduler processors
BI Service Administrator Configure system runtime properties that do the following:
• Control the processing for different output types
• Enable digital signature
• Tune for scalability and performance
• Define font mappings
BI Service Administrator Configure server properties such as caching specifications, database
failover properties, and database fetch size.
BI Content Author Fetch and structure the data to use in reports.
BI Consumer • View reports
• Schedule report jobs
• Manage report jobs
BI Content Author • Create report definitions
• Design layouts
Navigate to the Administration Pages for Pixel-Perfect Reporting
Administrators set the options for Publisher reports through the administration pages for pixel-
perfect reporting.
1. Sign in to Oracle Analytics Cloud.
2. Click the Page menu on the Home page, and select Open Classic Home.
3. Click Administration.
4. Click Manage Publisher .
5. On the Publisher Administration page, select the required option.
Configure System Maintenance Properties
This topic describes how to configure the Publisher properties.
Topics:
• About Scheduler Configuration
• Set Report Viewer Properties
• Clear Report Objects from the Server Cache
• Clear the Subject Area Metadata Cache
• Enable Diagnostics
Chapter 6
Configure System Maintenance Properties
6-2

• Purge Job Diagnostic Logs
• Purge Job History
• Upload and Manage Configuration-Specific Files
Set Server Caching Specifications
Administrator can configure caching at the server level so that when Publisher processes a
report, the data and the report document are stored in cache.
Report designers can set a report property to configure report-specific caching of datasets.
1. In the Server Configuration page, set the following properties:
• Cache Expiration — Enter the expiration period for the cache in minutes. The default
is 30.
• Cache Size Limit — Enter the maximum number of cached items to maintain
regardless of the size of these items. The default is 1000.
• Maximum Cached Report Definitions — Enter the maximum number of report
definitions to maintain in cache. The default is 50.
2. To manually purge this cache, on the Manage Cache tab, click Clear Object Cache .
Set Retry Properties For Database Failover
Administrator can configure the number of retries to connect to a data source.
If Publisher fails to connect to a data source through the defined JDBC or JNDI connection,
Publisher switches to the backup database.
The following properties control the number of retries that are attempted before switching to
the backup connection for the database.
• Number of Retries
Default value is 6. Enter the number of times to attempt to make a connection before
switching to the backup database.
• Retry Interval (seconds)
Default value is 10 seconds. Enter the number of seconds to wait before retrying the
connection.
Understand the Scheduler
This topic describes the configuration and diagnostics of the scheduler.
Topics:
• About Scheduler Configuration
• Review Scheduler Diagnostics
About Scheduler Configuration
You can review the configuration of the scheduler in the System Maintenance page.
Chapter 6
Configure System Maintenance Properties
6-3

The compute size (OCPUs) you have selected for your service determines the report
processing limits for generating pixel-perfect reports. You can't edit the settings in the
Scheduler Configuration tab. See What Sizing Options Are Available to You?
Review Scheduler Diagnostics
The Scheduler diagnostics page provides the runtime status of the scheduler.
The Diagnostics page displays how many scheduled report requests have been received by
the JMS queues, how many of them have failed and how many are still running. The JMS
status can be viewed at the cluster-instance level enabling you to decide whether to add more
instances to scale up by one or more of these JMS processors.
For example, if there're too many requests queued up for the e-mail processor in one instance,
you can consider adding another instance and enabling it to handle e-mail processing.
Similarly, if there're very large reports being processed and showing in the Report Process
queue in running status, then you can add another instance to scale up the Report Process
capability.
Also, the Scheduler Diagnostics page reflects the status of each component to show if any
component is down. You can see the connection string or JNDI name to the database, which
cluster instance associates to which managed server instance, Toplink connection pool
configuration, and so on.
If an instance shows a failed status, then you can recover the instance and with the failover
mechanism of the JMS set up in the cluster, no jobs submitted are lost. When the server
instance is brought back, it is immediately available in the cluster for service. The instance
removal and addition reflects dynamically on the diagnostic page.
When an instance is added to the cluster, the Scheduler Diagnostics page immediately
recognizes the new instance and displays the status of the new instances and all the threads
running on that instance. This provides a powerful monitoring capability to the administrator to
trace and resolve issues in any instance or any component of the scheduler.
The Scheduler Diagnostics page provides information on the following components:
• JMS
• Cluster
• Database
• Scheduler Engine
The JMS section provides information on the following:
• JMS Cluster Config: This section provides configuration information for JMS setup:
– Provider type (Weblogic / ActiveMQ)
– WebLogic version
– WebLogic JNDI Factory
– JNDI URL for JMS
– Queue names
– Temporary directory
• JMS Runtime: This provides runtime status of all JMS queues and topics.
The Cluster section provides details on the cluster instance. Use this information to understand
the load on each processor.
Chapter 6
Configure System Maintenance Properties
6-4

The Database section provides information on these components.
• Database Config — Connection type, JNDI Name, or connection string
• Toplink Config — Connection pooling, logging level
• Database Schema
The Quartz section provides information on these components, as shown in the figure below.
• Quartz Configuration
• Quartz Initialization
Set Report Viewer Properties
On the System Maintenance page, the administrator can set the report viewer properties on
the Report Viewer Configuration tab.
If Show Apply Button is set to True, reports with parameter options display the Apply button
in the report viewer. If you change the parameter values, click Apply to render the report with
the new values.
If Show Apply Button is set to False, the report viewer doesn't display the Apply button. If
you enter a new parameter value, Publisher automatically renders the report after the new
value is selected or entered.
You set this property at the report level to override the system setting.
Clear Report Objects from the Server Cache
Use the Manage Cache page to clear the server cache.
The server cache stores report definitions, report data, and report output documents. If you
need to manually purge this cache (for example, after patching) use the Manage Cache page.
To clear the report objects from the server cache:
1. From the Administration page, select Manage Cache.
2. On the Manage Cache page, click Clear Object Cache.
Clear the Subject Area Metadata Cache
You can clear the subject area metadata cache.
BI subject area metadata such as the dimension and measure names are cached at the server
to quickly open the report in report designer. You can manually clear this cache if the BI subject
area is updated through a binary semantic model (.rpd) file.
To clear the subject area metadata cache:
1. From the Administration page, select Manage Cache.
2. On the Manage Cache page, in the Clearing Subject Area Metadata Cache section, click
Clear Metadata Cache.
Chapter 6
Configure System Maintenance Properties
6-5

Purge Job Diagnostic Logs
You can purge old diagnostic logs to increase the available space on your system.
The retention period of job diagnostic logs is set to 30 days, by default. If you frequently enable
diagnostic logs, these diagnostic logs might consume space in the database, and you might
need to periodically free the space consumed by the old diagnostic logs. You can manually
purge the job diagnostic logs older than the retention period .
To purge the job diagnostic logs:
1. On the Administration page, under System Maintenance, select Manage Job Diagnostics
Log.
2. Click Purge log beyond retention period.
Purge Job History
Use the Manage Job Diagnostics Log page to purge old job history.
The retention period of a job history is set to 180 days, by default. You can manually purge the
history of jobs that are older than the retention period. When you purge old job history, the
saved output, saved XML, job delivery info, and the job status details of the old jobs are
deleted.
To purge old job history:
1. On the Administration page, under System Maintenance, select Manage Job Diagnostics
Log.
2. Click Purge scheduler metadata.
Upload and Manage Configuration-Specific Files
Use Upload Center to upload and manage the configuration-specific files for font, digital
signature, ICC profile, SSH private key, SSL certificate, and JDBC client certificate.
To upload and manage the configuration-specific files:
1. On the Administration page, under System Maintenance, select Upload Center.
2. Click Browse and select the file you want to upload.
3. Select the configuration file type.
4. If you want to overwrite an existing file with the new file, select Overwrite.
5. Click Upload.
6. To manage the uploaded files, use the Filter By Type field to filter the files in the table.
Enable Diagnostics
Administrators and BI Authors can enable the diagnostics logs.
You can enable and download diagnostics for scheduled jobs and online reports.
Chapter 6
Configure System Maintenance Properties
6-6

Enable Diagnostics For Scheduler Jobs
You can enable diagnostics for a scheduler job in the Schedule Report Job page, and
download the diagnostic logs from Report Job History.
You must have BI Administrator or BI Data Model Developer privileges to access the
Diagnostics tab in the Schedule Report Job page. Perform the following steps to enable
diagnostics.
To enable and download diagnostics for a scheduler job:
1. From the New menu, select Report Job.
2. Select the report to schedule, and click the Diagnostics tab.
3. Select and enable the required diagnostics.
• Select Enable SQL Explain Plan to generate a diagnostic log with Explain plan/SQL
monitor report information.
• Select Enable Data Engine Diagnostic to generate a data processor log.
• Select Enable Report Processor Diagnostic to generate FO (Formatting Options)
and server related log information.
• Select Enable Consolidated Job Diagnostic to generate the entire log, which
includes scheduler log, data processor log, FO and server log details.
4. Submit the report.
5. After the report job runs, in the Report Job History page, select your report to view the
details.
6. Under Output & Delivery, click Diagnostic Log to download the job diagnostic log and
view the details.
Use the Manage Job Diagnostics Log page to purge the old job diagnostic logs.
Enable Diagnostics For Online Reports
In the Report Viewer, you can enable diagnostics for online reports.
Administrators and BI Authors can enable diagnostics before running the online report, and
then download the diagnostic logs after the report finishes. Diagnostics are disabled by default.
If you enable diagnostics for an online report with interactive output, you can:
• Download the following diagnostic logs in a .zip file:
– SQL logs
– Data engine logs
– Report Processor logs
• View the following details in the diagnostic logs:
– Exceptions
– Memory guard limits
– SQL query
To enable diagnostics and download the diagnostic logs for an online report:
1. If the report is running, click Cancel to stop the reporting process.
Chapter 6
Configure System Maintenance Properties
6-7

2. Click Actions in the Report Viewer.
3. Select Enable Diagnostics from the Online Diagnostics option.
4. Submit the report.
5. To download the diagnostic logs after the report runs:
a. Click Actions in the Report Viewer.
b. Select Download Diagnostics from the Online Diagnostics option.
Set Up Delivery Destinations
This topic describes the setup required to deliver reports. It also describes how to set up the
HTTP notification server.
Note:
The email, FTP, printer, fax, and content management hosts must be accessible from
the public internet.
Topics:
• Configure Delivery Options
• Understand Printer and Fax Server Configuration
• Add a Printer
• Add a Fax Server
• Add an Email Server
• Add an HTTP or HTTPS Server
• Add an FTP or SFTP Server
• Add a Content Server
• Add an Object Storage
• Add a Common UNIX Printing System (CUPS) Server
• Add an Oracle Content and Experience Server
Configure Delivery Options
You can define the SSL certicate file and set the general properties for e-mail deliveries and
notifications.
1. From the Administration page, select Delivery Configuration.
2. If you want to use a self-signed certificate, select a file from SSL Certificate File.
3. Enter the From address to appear on e-mail report deliveries. The default value is
4. Enter the From address to appear on notifications deliveries. The default value is
5. Enter the subject text for notification e-mails when the report status is Success, Warning,
Failed, or Skipped.
Chapter 6
Set Up Delivery Destinations
6-8

6. In the Allowed Email Recipient Domains field, enter the domains you want to allow email
delivery. Separate the email domains by a comma. By default, * allows all domains.
Note that if you want to ignore email delivery restrictions for a report delivery, select the
Ignore Email domain Restrictions property of that report.
7. Select Email Output as URL, if you want the jobs to email the URL to access the job
output instead of attaching the job output to the email.
The email recipient can view the job output only after logging in with the valid credentials
required to access the Publisher report. The recipient must have access to Publisher. If the
output of a private job is sent to a user without administrator access, the job succeeds and
the recipient receives the email with the URL, but the recipient can't view the job output.
8. Select Use System Proxy Settings if the Delivery Manager must look up the proxy server
settings from the Java runtime environment.
• Printer, Fax, WebDAV, HTTP and CUPS servers use proxy settings for HTTP protocol
when SSL is not used. When SSL is used, the HTTPS proxy setting is used.
• FTP and SFTP use proxy settings for FTP.
• Contents servers and email servers don't support connection over a proxy, regardless
of this setting.
You can override the proxy settings per delivery server, using proxy configuration fields on
the individual server setup page. If a proxy server and ports are configured for a delivery
server, the Delivery Manager uses the proxy server and port configured for the server
instead of the one defined in the Java Runtime environment. In Cloud installations, Use
System Proxy Settings is always selected, and cannot be turned off or overridden by
individual server settings.
If Publisher encounters an issue connecting to the email server, it attempts to send the email
again for three times, with a 30-second interval between each attempt.
Understand Printer and Fax Server Configuration
Understand your printer type before you set up the printer or fax server.
Regardless of the operating system, the printer destination can be any IPP server. The IPP
server can be the printer itself, but if the printer doesn't natively support IPP, you can set up a
print server that does support IPP (such as CUPS), and then connect to the print server to the
printer.
To send a fax, you must set up Common Unix Printing Service (CUPS) and the fax4CUPS
extension. For information on setting up CUPS or Windows IPP print servers and how to
connect network printers to them, refer to the CUPS or Windows IPP software vendor
documentation.
PDF is a popular output format for business reports. However, some reports require printing
directly from the report server. For example, paychecks and invoices are usually printed as
scheduled batch jobs. Some printers with PostScript Level 3 compliant Raster Image
Processing can natively support PDF documents, but there're still many printers in business
use that only support PostScript Level 2 that can't print PDF documents directly.
To print PDF documents directly, if your printer or print server doesn't support printing PDF:
• Select a filter - PDF to PostScript or PDF to PCL.
• Configure a custom, or third-party filter.
A filter enables you to call a conversion utility to convert the PDF to a file format supported by
your specific printer type. You can use the PDF to PCL conversion only for font selection
Chapter 6
Set Up Delivery Destinations
6-9

requirements for check printing. For generic printing requirements, use the PDF to PostScript
level 2 filter.
Selection of PDF to PCL filter automatically populates the Filter Command field. You can
embed PCL commands into RTF templates to invoke the PCL commands at a specific position
on the PCL page; for example, to use a font installed on the printer for routing and account
numbers on a check.
You can also call a custom filter using operating system commands.
To specify a custom filter, pass the native OS command string with the two placeholders for the
input and output filename, {infile} and {outfile}.
This is useful especially if you're trying to call IPP printers directly or IPP printers on Microsoft
Internet Information Service (IIS). Unlike CUPS, those print servers don't translate the print file
to a format the printer can understand. With the filter functionality, you can call any of the native
OS commands to transform the document to the format that the target printer can understand.
For example, to transform a PDF document to a PostScript format, enter the following PDF to
PS command in the Filter Command field:
pdftops {infile} {outfile}
To call an HP LaserJet printer setup on a Microsoft IIS from Linux, you can set Ghostscript as a
filter to transform the PDF document into the format that the HP LaserJet can understand. To
do this, enter the following Ghostscript command in the Filter Command field:
gs -q -dNOPAUSE -dBATCH -sDEVICE=laserjet -sOutputFile={outfile} {infile}
For fax servers, you can use the filter to transform the file to Tag Image File Format (TIFF).
Add a Printer
You can set up a printer to print reports.
The printer server must be accessible from the public internet.
1. From the Administration page, under Delivery, select Printer, and then click Add Server.
2. Enter the server name and URI of the printer.
3. Optional: If your printer or print server doesn't support printing PDF, enter a filter to call a
conversion utility to convert the PDF to a file format supported by your specific printer type.
• PDF to PostScript
• PDF to PCL
Use the PDF to PCL filter only if you have a requirement to select fonts for printing check
using embedded PCL command. For generic printing requirements, use the PDF to
PostScript filter.
4. Optional: Enter the user name, password, authentication type (None, Basic, Digest), and
encryption Type (None, SSL).
5. Optional: Enter the host, port, user name, password, and authentication type (None, Basic,
Digest) of the proxy server.
6. Optional: In the Access Control section, deselect Public.
7. From the Available Roles list, select one or more roles you want to provide access to the
delivery channel, and click Move to add them to the Allowed Roles list.
Chapter 6
Set Up Delivery Destinations
6-10

8. Click Apply.
Add a Fax Server
You must set up Common Unix Printing Service (CUPS) and the fax4CUPS extension, if you
want to send fax.
The fax server must be accessible from the public internet.
1. From the Administration page, under Delivery, select Fax, and then click Add Server.
2. Enter the server name and the URI (Uniform Resource Identifier) of the fax server.
3. Optional: If your fax server doesn't support printing PDF, enter a filter to call a conversion
utility to convert the PDF to a file format supported by your specific fax server.
4. Optional: Enter the user name, password, authentication type (None, Basic, Digest), and
encryption Type (None, SSL) of the fax server.
5. Optional: Enter the host, port, user name, password, and authentication type (None, Basic,
Digest) of the proxy server.
6. Optional: In the Access Control section, deselect Public.
7. From the Available Roles list, select one or more roles you want to provide access to the
delivery channel, and click Move to add them to the Allowed Roles list.
8. Click Apply.
Add an Email Server
You can add an email server to deliver reports by email.
The mail server must be accessible from the public internet.
1. From the Administration page, under Delivery, select Email, and then click Add Server.
2. Enter the Server Name and Host of the email server.
3. Optional: Select a Secure Connection method to use for connections with the email
server.
Use TLS when the server supports the protocol; SSL is accepted in the response.
4. Optional: Enter the port number, user name, and password.
5. In the Access Control section, deselect Public.
6. From the Available Roles list, select one or more roles you want to provide access to the
delivery channel, and click Move to add them to the Allowed Roles list.
7. Click Test Connection.
8. Click Apply.
Deliver Reports Using Email Delivery Service on Oracle Cloud Infrastructure
You can use the Email Delivery service on Oracle Cloud Infrastructure to deliver reports.
If you don't have access to Oracle Cloud Infrastructure Console, ask your Oracle Cloud
Infrastructure administrator to provide you access.
1. In Oracle Cloud Infrastructure Console, configure Email delivery.
a. Sign-in to your Oracle Cloud account with permissions to configure Email Delivery.
Chapter 6
Set Up Delivery Destinations
6-11
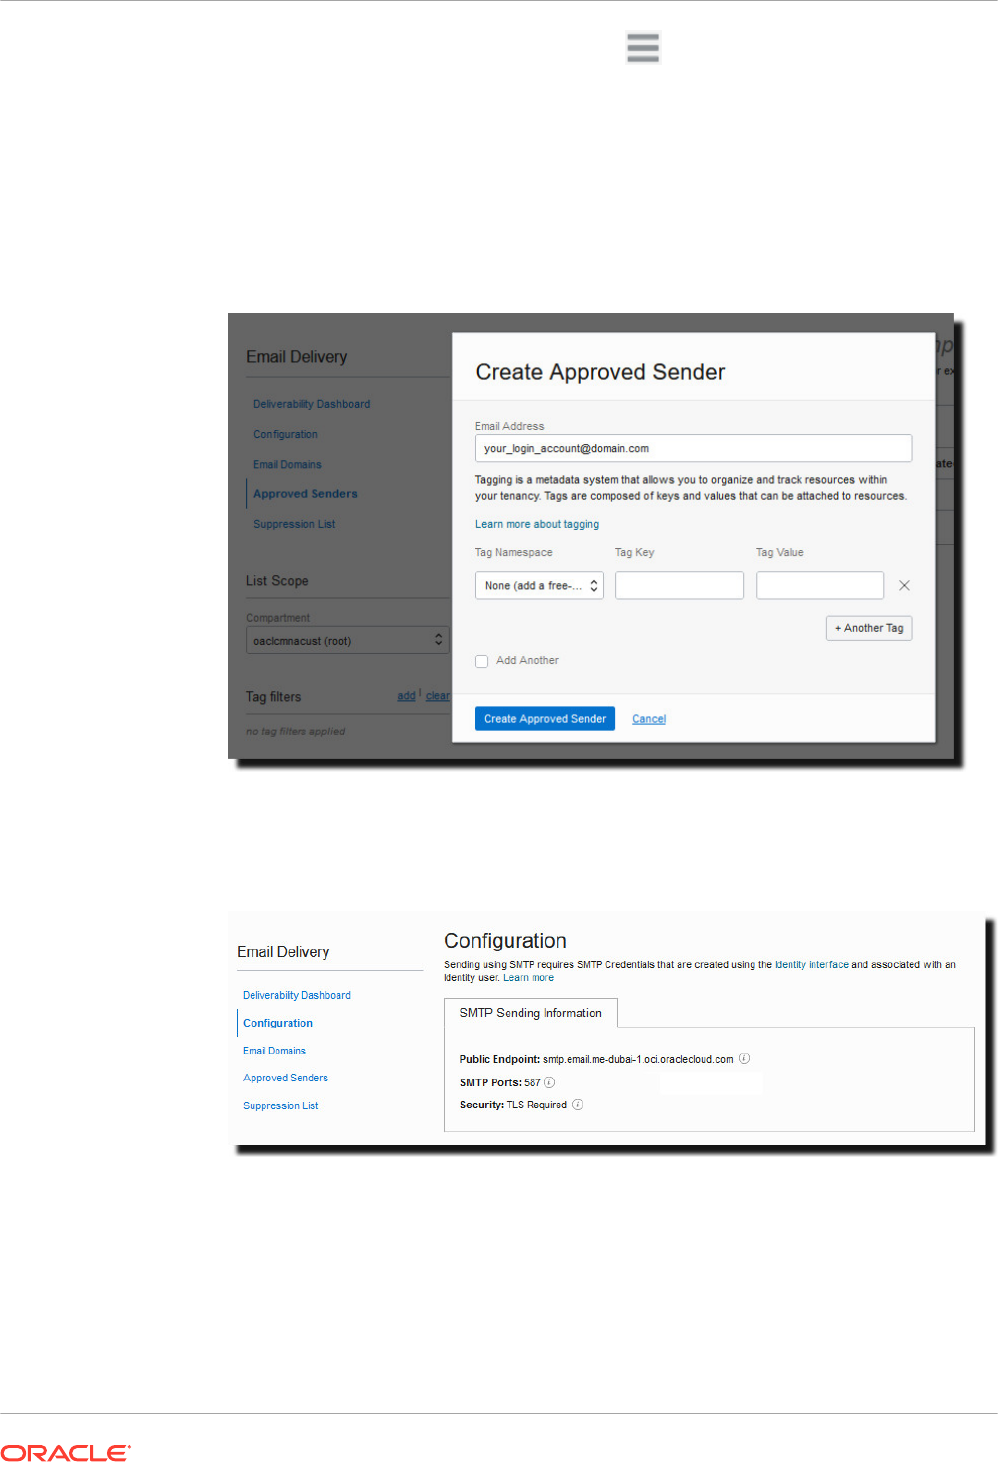
b. In Oracle Cloud Infrastructure Console, click in the top left corner.
c. Click Developer Services. Under Application Integration, click Email Delivery.
d. Optional: Set up the email domain you plan to use.
This is the domain you plan to use for the approved sender email address, and can’t
be a public mailbox provider domain such as gmail.com or hotmail.com.
e. Click Approved Senders.
f. On the Create Approved Senders page, set up an approved sender for the From
email address that you want to use to send emails through the mail server.
Refer to Oracle Cloud Infrastructure documentation for details. See Managing
Approved Senders.
g. Click Configuration, then make a note of the Public Endpoint, Port (587), and that
Transport Layer Security (TLS) is used on the connection.
Refer to Oracle Cloud Infrastructure documentation for details. See Configure the
SMTP connection.
h. If you've not already done so, click the Identity Interface link to navigate to your
Identity pages and then click Generate SMTP Credentials to generate SMTP
credentials for yourself or another user with permissions to manage email.
Enter a Description, such as Oracle Analytics Cloud credentials, and click Generate
SMTP Credentials.
Chapter 6
Set Up Delivery Destinations
6-12
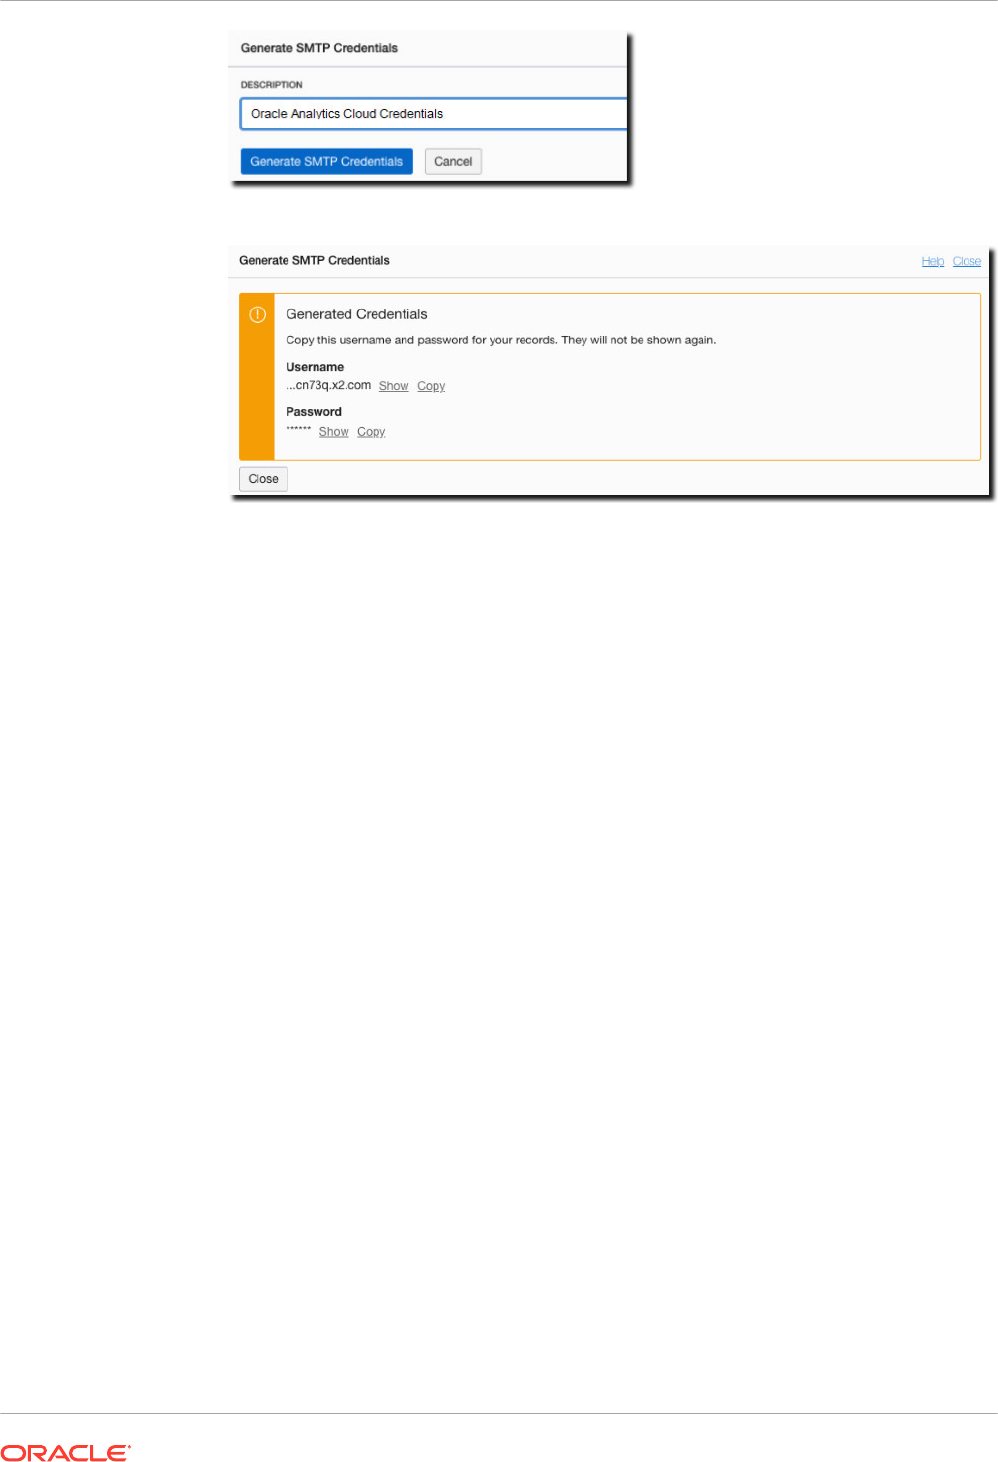
Copy the Username and Password for your records.
Refer to Oracle Cloud Infrastructure documentation for details. See Generate SMTP
credentials for a user.
2. In Oracle Analytics Cloud, add a connection to the email server.
a. From the Administration page, under Delivery, select Email, and then click Add
Server.
b. Enter the name of the email server (Email Delivery service hostname).
c. Enter the port number and SMTP credentials (user name and password).
d. Select the secure connection method.
e. In the Access Control section, deselect Public.
f. From the Available Roles list, select one or more roles you want to provide access to
the delivery channel, and click Move to add them to the Allowed Roles list.
g. Click Test Connection.
h. Click Apply.
3. Set up delivery notification.
a. From the Administration page, under Delivery, select Delivery Configuration.
b. Enter values for Email From Address and Delivery Notification Email From
Address.
c. Optional: Enter values for Success Notification Subject, Warning Notification
Subject, Failure Notification Subject, and Skipped Notification Subject.
The completed jobs use the appropriate notification subject depending on the status of
the job.
d. Deselect Use System Proxy Settings.
4. Configure the bursting jobs to deliver reports using the email server.
Update bursting queries to specify Email as the delivery channel in
DEL_CHANNEL
and
provide the "From" address in
PARAMETER3
.
5. Test report delivery.
Chapter 6
Set Up Delivery Destinations
6-13

a. Schedule a job to email a report using the email server.
b. In the Job History Details page, check the status of the job.
Add an HTTP or HTTPS Server
The administrator can add an HTTP or HTTPS sever to send a notification request to after the
report completes.
You can register an application URL or postprocess HTTP or HTTPS URL as an HTTP server.
The HTTP notification sent by Publisher posts a form data for Job ID, report URL and Job
Status to the HTTP Server URL page.
1. From the Administration page, under Delivery, select HTTP, and then click Add Server.
2. Enter the server name and the URL of the server.
3. Optional: Enter the host, port, user name, password, authentication type (None, Basic,
Digest), and and encryption type (None, SSL) of the server.
4. Optional: If the notification is to be sent through a proxy server, enter the user name,
password,and the authentication type (None, Basic, Digest).
5. In the Access Control section, deselect Public.
6. From the Available Roles list, select one or more roles you want to provide access to the
delivery channel, and click Move to add them to the Allowed Roles list.
7. Click Apply.
Add an FTP or SFTP Server
You can add an FTP server or SFTP server as a delivery channel for Publisher.
If the destination file name supplied to the scheduler contains non-ascii characters, UTF-8
encoding is used to specify the file name to the destination FTP server. Your FTP server must
support UTF-8 encoding or the job delivery will fail with "Delivery Failed" error message.
The FTP server or SFTP server must be accessible from the public internet.
Publisher doesn't support FTP over TLS / SSL (FTPS). You can't use FTP over TLS or SSL for
delivery. Use SFTP for secure file transfer.
1. From the Administration page, under Delivery, select FTP, and then click Add Server.
2. Enter the server name, host name, and port number for the FTP or SFTP server.
The default port for FTP is 21. The default port for Secure FTP (SFTP) is 22.
3. To enable Secure FTP (SFTP), select Use Secure FTP.
4. If the FTP server is behind a firewall, select Use Passive Mode .
5. Select Create files with Part extension when copy is in process to create a file on the
FTP server with a .part extension while the file is transferring.
When the file transfer is complete, the file is renamed without the .part extension. If the file
transfer doesn't complete, the file with the .part extension remains on the server.
6. Optional: Enter the security information.
a. If your server is password protected, enter the User name and Password.
b. Select the Authentication Type: Private Key or Password
Chapter 6
Set Up Delivery Destinations
6-14

c. Depending on the authentication type selection, select the private key file or specify
the private password.
If you selected Private Key as the authentication type, make sure you upload the SSH
Private Key file in the Upload Center.
7. Optional: Enter the host, port, user name, password, and authentication type (None, Basic,
Digest) of the proxy server.
8. Optional: To deliver PGP encrypted documents to the FTP server:
a. From the PGP Key list, select the PGP keys you uploaded in Security Center.
This step updates the filter command in the Filter Command field.
b. To sign the encrypted document, select Sign Output.
This step adds a
-s
parameter to the existing filter command in the Filter Command
field.
c. If you want to deliver PGP encrypted document in ASCII armored format, select ASCII
Armored Output.
This step adds a
-a
parameter to the existing filter command in the Filter Command
field.
9. In the Access Control section, deselect Public.
10. From the Available Roles list, select one or more roles you want to provide access to the
delivery channel, and click Move to add them to the Allowed Roles list.
11. Click Test Connection.
If the connection test is successful, the Host Key Fingerprint field is populated. You can't
save the server configuration if theHost Key Fingerprint field isn't populated.
When Publisher delivers jobs to the SFTP server, the Host Key Fingerprint value saved
with the server configuration is compared with the fingerprint of the host key returned by
the SFTP server. If the SFTP server host key's fingerprint doesn't match the fingerprint
saved in the server connection configuration, the connection will be rejected.
12. Click Apply.
SSH Options For SFTP
Secure File Transfer Protocol (SFTP) is based on the Secure Shell technology (SSH).
Publisher supports the following SSH options for SFTP delivery.
Chapter 6
Set Up Delivery Destinations
6-15

Key Exchange Method
(Diffie-Hellman)
Server Public Key Encryption (Cipher
Suites)
Message
Authentication
Code (MAC)
• diffie-hellman-group14-
sha1
• diffie-hellman-group-
exchange-sha256
• diffie-hellman-group-
exchange-sha1
• diffie-hellman-group1-
sha1
• diffie-hellman-group14-
sha256
• diffie-hellman-group16-
sha512
• diffie-hellman-group18-
sha512
• ssh-rsa (up to 2048
bit)
• ssh-dss (1024 bit)
• rsa-sha2-256
• rsa-sha2-512
• aes128-ctr
• aes192-ctr
• aes256-ctr
• aes128-cbc
• 3des-cbc
• blowfish-cbc
• hmac-sha1
• hmac-
sha2-256
• hmac-
sha2-512
The following algorithms are available only when Publisher is running on a JVM on which the
Java Cryptography Extension (JCE) unlimited strength jurisdiction policy files are installed:
• diffie-hellman-group-exchange-sha256
• diffie-hellman-group14-sha256
• diffie-hellman-group16-sha512
• diffie-hellman-group18-sha512
• rsa-sha2-256
• rsa-sha2-512
• aes192-ctr
• aes256-ctr
• hmac-sha2-256
• hmac-sha2-512
Add a Content Server
You can deliver documents to Oracle WebCenter Content.
The content server must be accessible from the public internet.
When you use a content server as a delivery destination:
• At runtime, the report consumer can tag the report with Security Group and Account
metadata (if applicable) to ensure that the appropriate access rights are applied to the
document when delivered.
• For documents that require specific custom metadata fields (such as invoice number,
customer name, order date), the report author can map the custom metadata fields defined
in Content Profile Rule Sets to data fields in the data model.
Publisher communicates with Oracle WebCenter Content Server using the Remote Intradoc
Client (RIDC). The connection protocols therefore follow the standards required by the RIDC.
The protocols supported are:
Chapter 6
Set Up Delivery Destinations
6-16

• Intradoc: The Intradoc protocol communicates to the Content Server over the over the
Intradoc socket port (typically 4444). This protocol requires a trusted connection between
the client and Content Server and will not perform any password validation. Clients that
use this protocol are expected to perform any required authentication themselves before
making RIDC calls. The Intradoc communication can also be configured to run over SSL.
• HTTP and HTTPS: The HTTP protocol connection requires valid user name and password
authentication credentials for each request. You supply the credentials to use for requests
in the Publisher Administration page.
• JAX-WS: The JAX-WS protocol is supported only in Oracle WebCenter Content 11g with a
properly configured Content Server instance and the RIDC client installed. JAX-WS is not
supported outside this environment.
To set up a content server as a delivery destination:
1. From the Administration page, under Delivery, select Content Server, and then click Add
Server.
2. Enter the Server Name, for example: contentserver01.
3. Enter the connection URI for your content server. The URI can take any of the following
supported protocols:
• HTTP/HTTPS — Specifies the URL to the Content Server CGI path.
For example:
– http://localhost:16200/cs/idcplg
– https://localhost:16200/cs/idcplg
• Intradoc — The Intradoc protocol communicates to the content server over the
Intradoc socket port (typically 4444). The IDC protocol also supports communication
over SSL. For example:
– idc://host:4444
– idcs://host:4443
• JAX-WS — Uses the JAX-WS protocol to connect to the content server.
For example:
– http://wlsserver:16200/idcnativews
4. Optional: Enter the user name and password of the content server.
5. Optional: To enable the inclusion of custom metadata with your report documents delivered
to the content server, select Enable Custom Metadata.
6. Optional: To deliver PGP encrypted documents to the content server:
a. From the PGP Key list, select the PGP keys you uploaded in Security Center.
This step updates the filter command in the Filter Command field.
b. To sign the encrypted document, select Sign Output.
This step adds a
-s
parameter to the existing filter command in the Filter Command
field.
c. If you want to deliver PGP encrypted document in ASCII armored format, select ASCII
Armored Output.
This step adds a
-a
parameter to the existing filter command in the Filter Command
field.
7. In the Access Control section, deselect Public.
Chapter 6
Set Up Delivery Destinations
6-17

8. From the Available Roles list, select one or more roles you want to provide access to the
delivery channel, and click Move to add them to the Allowed Roles list.
9. Click Test Connection.
10. Click Apply.
Add an Object Storage
You can use one or more Object Storages to deliver and store reports.
You can configure an Object Storage as a delivery channel, and schedule jobs to deliver
reports to the Object Storage.
Make sure you have the permissions to access a compartment in Oracle Cloud Infrastructure
Object Storage where you can create a bucket to organize your reports.
Even if you have administrator access to the Object Storage, you should have the permissions
to configure the connection and to deliver reports to Object storage. An administrator in your
organization must set up the permissions in Oracle Cloud Infrastructure using IAM policies to
enable you to deliver files from Publisher to Object Storages. See Getting Started with Policies
and Policy Reference.
• Permissions required for tenancy:
–
COMPARTMENT_INSPECT
–
OBJECTSTORAGE_NAMESPACE_READ
• Permissions required for compartment mangement:
–
BUCKET_READ
–
BUCKET_INSPECT
–
OBJECT_READ OBJECT_OVERWRITE
–
OBJECT_CREATE
–
OBJECT_DELETE
–
OBJECT_INSPECT
1. Use the Oracle Cloud Infrastructure console to create a Bucket in the Object Storage, and
then set up the API key for authentication.
Make sure you gather the user details, tenancy details, and the Public Key Fingerprint
value of the SSH key so that you can configure the Object Storage in Publisher. See the
Oracle Cloud Infrastructure documentation for detailed steps.
2. In Publisher, upload the private key file for the Object Storage to the server, and add the
Object Storage as a delivery channel.
a. On the Administration page, under System Maintenance, select Upload Center,
choose the private key file, select SSH Private Key as the File Type, and then click
Upload.
b. From the Administration page, under Delivery, select Object Storage, and then click
Add Server.
i. In the Server Name field, type a name for the server. For example,
objectstorage1.
ii. In the URI field, type the URL of the Object Storage. For example,
https://
objectstorage.us-ashburn-1.oraclecloud.com
.
Chapter 6
Set Up Delivery Destinations
6-18

iii. In the Tenancy OCID and User OCID fields, provide the credentials for accessing
the Object Storage.
iv. Copy the public key fingerprint value of the Object Storage from the Oracle Cloud
Infrastructure console, and paste it in the Public Key Fingerprint field.
v. Specify the private key file and enter the private key password.
vi. Specify the compartment provisioned for your tenancy and the Bucket associated
with your compartment where you want to deliver the reports.
vii. In the Access Control section, deselect Public.
viii. From the Available Roles list, select one or more roles you want to provide
access to the delivery channel, and click Move to add them to the Allowed Roles
list.
ix. Click Test Connection.
x. Click Apply.
Example 6-1 Policy Configuration
Sample policy configuration to allow group g to inspect the compartments in tenancy:
Allow group <g> to inspect compartments in tenancy
Sample policy configuration to allow group g to manage the Object Storage in tenancy:
Allow group <g> to manage objectstorage-namespaces in tenancy
Sample policy configuration to allow group g to manage compartment c and perform the
requested operations in the compartment:
Allow group <g> to manage object-family in compartment <c> where any {
request.operation=‘ListBuckets’,
request.operation=‘ListObjects’,
request.operation=‘PutObject’,
request.operation=‘GetObject’,
request.operation=‘CreateMultipartUpload’,
request.operation=‘UploadPart’,
request.operation=‘CommitMultipartUpload’,
request.operation=‘AbortMultipartUpload’,
request.operation=‘ListMultipartUploads’,
request.operation=‘ListMultipartUploadParts’,
request.operation=‘HeadObject’,
request.operation=‘DeleteObject’}
Add a Common UNIX Printing System (CUPS) Server
You add CUPS servers from the Administration page.
You can configure Common Unix Printing Service (CUPS) for sending fax and to enable
printing using a printer that doesn’t natively support IPP.
To add a CUPS server:
1. From the Administration page, select CUPS to display the list of servers that have been
added.
2. Select Add Server.
3. Enter the Server Name and Host and Port for the CUPS server.
Chapter 6
Set Up Delivery Destinations
6-19

Add an Oracle Content and Experience Server
You can deliver reports to an Oracle Content and Experience server to enable easy access
and share reports on the cloud.
To add an Oracle Content and Experience server:
1. From the Administration page, under Delivery, select Content and Experience, and then
click Add Server.
2. In the Server Name field, type the name of the server through which you want to deliver
the reports to the cloud-based content hub.
3. In the URI field, type the URI of the Oracle Content and Experience server. For example,
https://host.oraclecloud.com.
4. In the Username and Password fields, provide the credentials for accessing the Oracle
Content and Experience server.
5. In the Access Control section, deselect Public.
6. From the Available Roles list, select one or more roles you want to provide access to the
delivery channel, and click Move to add them to the Allowed Roles list.
7. Click Test Connection.
8. Click Apply.
Define Runtime Configurations
This topic describes processing properties for PDF document security, FO processing, PDF
accessibility, and specific properties for each output type.
Topics:
• Set Runtime Properties
• PDF Output Properties
• PDF Digital Signature Properties
• PDF Accessibility Properties
• PDF/A Output Properties
• PDF/X Output Properties
• DOCX Output Properties
• RTF Output Properties
• PPTX Output Properties
• HTML Output Properties
• FO Processing Properties
• RTF Template Properties
• XPT Template Properties
• PDF Template Properties
• Excel Template Properties
• CSV Output Properties
Chapter 6
Define Runtime Configurations
6-20

• Excel Output Properties
• EText Output Properties
• All Outputs Properties
• Memory Guard Properties
• Data Model Properties
• Report Delivery Properties
• Define Font Mappings
• Define Currency Formats
Set Runtime Properties
The Runtime Configuration page enables you to set runtime properties at the server level.
These same properties can also be set at the report level, from the report editor's Properties
dialog. If different values are set for a property at each level, then report level takes
precedence.
PDF Output Properties
Generate the type of PDF files you want by setting the PDF output properties.
Property Name Description Default
Compress PDF output Specify "true" or "false" to control compression of
the output PDF file.
true
Hide PDF viewer's menu
bars
Specify "true" to hide the viewer application's menu
bar when the document is active. The menu bar
option is only effective when using the Export
button, which displays the output in a standalone
Acrobat Reader application outside of the browser.
false
Hide PDF viewer's tool
bars
Specify "true" to hide the viewer application's
toolbar when the document is active.
false
Replace smart quotes Specify "false" if you don't want curly quotes
replaced with straight quotes in the PDF output.
true
Disable opacity and
gradient shading for DVT
chart
Specify "true" if you don't want opacity and gradient
shading for the PDF output. This reduces the size
of the PostScript file.
false
Enable PDF Security Specify "true” if you want to encrypt the PDF
output. You can then also specify the following
properties:
• Open document password
• Modify permissions password
• Encryption Level
false
Chapter 6
Define Runtime Configurations
6-21

Property Name Description Default
Open document
password
This password is required for opening the
document. It enables users to open the document
only. This property is enabled only when "Enable
PDF Security" is set to "true".
When you set the Encryption level to Low, Medium,
or High, the password must contain only Latin-1
characters and shouldn't be more than 32 bytes
long.
When you set the Encryption level to Highest, if
your password exceeds 127 bytes, only the first
127 bytes of the password are used for
authentication.
N/A
Modify permissions
password
This password enables users to override the
security setting. This property is effective only
when "Enable PDF Security" is set to "true".
When you set the Encryption level to Low, Medium,
or High, the password must contain only Latin-1
characters and shouldn't be more than 32 bytes
long.
When you set the Encryption level to Highest, if
your password exceeds 127 bytes, only the first
127 bytes of the password are used for
authentication.
If you set a password in the
pdf-open-password
property without setting a password in the
pdf-
permissions-password
property, or if you set the
same password in both the
pdf-open-password
and
pdf-permissions-password
properties, the
user gets full access to the document and its
features, and permission settings such as "Disable
printing" are bypassed or ignored.
N/A
Encryption level Specify the encryption level for the output PDF file.
The possible values are:
• 0: Low (40-bit RC4, Acrobat 3.0 or later)
• 1: Medium (128-bit RC4, Acrobat 5.0 or later)
• 2: High (128-bit AES, Acrobat 7.0 or later)
• 3: Highest (256-bit AES, Acrobat X (10) or
later)
This property is effective only when "Enable PDF
Security" is set to "true". When Encryption level is
set to 0, you can also set the following properties:
• Disable printing
• Disable document modification
• Disable context copying, extraction, and
accessibility
• Disable adding or changing comments and
form fields
When Encryption level is set to 1 or higher, the
following properties are available:
• Enable text access for screen readers
• Enable copying of text, images, and other
content
• Allowed change level
• Allowed printing level
2 - high
Chapter 6
Define Runtime Configurations
6-22

Property Name Description Default
Disable document
modification
Permission available when "Encryption level" is set
to 0. When set to "true", the PDF file cannot be
edited.
false
Disable printing Permission available when "Encryption level" is set
to 0. When set to "true", printing is disabled for the
PDF file.
false
Disable adding or
changing comments and
form fields
Permission available when "Encryption level" is set
to 0. When set to "true", the ability to add or
change comments and form fields is disabled.
false
Disable context copying,
extraction, and
accessibility
Permission available when "Encryption level" is set
to 0. When set to "true", the context copying,
extraction, and accessibility features are disabled.
false
Enable text access for
screen readers
Permission available when "Encryption level" is set
to 1 or higher. When set to "true", text access for
screen reader devices is enabled.
true
Enable copying of text,
images, and other
content
Permission available when "Encryption level" is set
to 1 or higher. When set to "true", copying of text,
images, and other content is enabled.
false
Allowed change level Permission available when "Encryption level" is set
to 1 or higher. Valid Values are:
• 0: none
• 1: Allows inserting, deleting, and rotating
pages
• 2: Allows filling in form fields and signing
• 3: Allows commenting, filling in form fields, and
signing
• 4: Allows all changes except extracting pages
0
Allowed printing level Permission available when "Encryption level" is set
to 1 or higher. Valid values are:
• 0: None
• 1: Low resolution (150 dpi)
• 2: High resolution
0
Use only one shared
resources object for all
pages
The default mode of Publisher creates one shared
resources object for all pages in a PDF file. This
mode has the advantage of creating an overall
smaller file size. However, the disadvantages are
the following:
• Viewing may take longer for a large file with
many SVG objects
• If you choose to break up the file by using
Adobe Acrobat to extract or delete portions,
then the edited PDF files are larger because
the single shared resource object (that
contains all of the SVG objects for the entire
file) is included with each extracted portion.
Setting this property to "false" creates a resource
object for each page. The file size is larger, but the
PDF viewing is faster and the PDF can be broken
up into smaller files more easily.
true
Chapter 6
Define Runtime Configurations
6-23

Property Name Description Default
PDF Navigation Panel
Initial View
Controls the navigation panel view presented when
a user first opens a PDF report. The following
options are supported:
• Panels Collapsed - displays the PDF
document with the navigation panel collapsed.
• Bookmarks Open (default) - displays the
bookmark links for easy navigation.
• Pages Open - displays a clickable thumbnail
view of each page of the PDF.
Bookmarks Open
PDF Digital Signature Properties
You set the properties to enable a digital signature for PDF reports and to define the placement
of the signature in the output PDF report.
At the instance level or at the report level, you can set the properties to enable a digital
signature for PDF reports. You must first register at least one digital signature, so you can
select the one to you use in your instance or reports. To implement the digital signature for a
report based on a PDF layout template or an RTF layout template, set the Enable Digital
Signature property on the report to "true."
You also must set the appropriate properties to place the digital signature in the desired
location on your output report. Your choices for placement of the digital signature depend on
the template type. The choices are as follows:
• (PDF only) Place the digital signature in a specific field by setting the Existing signature
field name property.
• (RTF and PDF) Place the digital signature in a general location of the page (top left, top
center, or top right) by setting the Signature field location property.
• (RTF and PDF) Place the digital signature in a specific location designated by x and y
coordinates by setting the Signature field x coordinate and Signature field y coordinate
properties.
If you choose this option, you can also set Signature field width and Signature field
height to define the size of the field in your document.
Property Name Description Default
Enable Digital Signature Set this to "true" to enable a digital signature for
PDF reports.
false
Digital signature name Select a registered digital signature file. N/A
Existing signature field
name
This property applies to PDF layout templates only.
If the report is based on a PDF template, then you
can enter a field from the PDF template in which to
place the digital signature.
N/A
Chapter 6
Define Runtime Configurations
6-24

Property Name Description Default
Signature field location This property can apply to RTF or PDF layout
templates. This property provides a list that
contains the following values: Top Left, Top Center,
Top Right. Choose one of these general locations
and Publisher inserts the digital signature to the
output document, sized and positioned
appropriately. If you choose to set this property, do
not enter X and Y coordinates or width and height
properties.
N/A
Signature field X
coordinate
This property can apply to RTF or PDF layout
templates. Using the left edge of the document as
the zero point of the X axis, enter the position in
points that you want the digital signature to be
placed from the left. For example, if you want the
digital signature to be placed horizontally in the
middle of an 8.5 inch by 11 inch document (that is,
612 points in width and 792 points in height), enter
306.
0
Signature field Y
coordinate
This property can apply to RTF or PDF layout
templates. Using the bottom edge of the document
as the zero point of the Y axis, enter the position in
points that you want the digital signature to be
placed from the bottom. For example, if you want
the digital signature to be placed vertically in the
middle of an 8.5 inch by 11 inch document (that is,
612 points in width and 792 points in height), enter
396.
0
Signature field width Enter in points (72 points equal one inch) the
desired width of the inserted digital signature field.
This applies only if you're also setting the
Signature field x coordinate and Signature field
Y coordinate properties.
0
Signature field height Enter in points (72 points equal one inch) the
desired height of the inserted digital signature field.
This applies only if you're also setting the
Signature field x coordinate and Signature field
Y coordinate properties.
0
PDF Accessibility Properties
Set the properties described in the table below to configure PDF accessibility.
Property Name Description Default
Make PDF output accessible Set to “true” to make the PDF outputs
accessible. Accessible PDF output contains
the document title and PDF tags.
False
Use PDF/UA format for
accessible PDF output
Set to “true” to use the PDF/UA format for the
accessible PDF outputs.
False
PDF/A Output Properties
Set the properties described in the table below to configure PDF/A output.
Chapter 6
Define Runtime Configurations
6-25

Property Name Description Default
PDF/A version Set the PDF/A version. PDF/A-1B
PDF/A ICC Profile Data The name of the ICC profile data file, for example:
CoatedFOGRA27.icc
The ICC (International Color Consortium) profile is
a binary file describing the color characteristics of
the environment where this PDF/A file is intended
to be displayed.
The ICC profile that you select must have a major
version below 4.
To use a specific profile data file other than the
default settings in the JVM, obtain the file and
place it under
<bi publisher repository>/
Admin/Configuration
. When you set this
property, you must also set a value for PDF/A ICC
Profile Info (
pdfa-icc-profile-info
).
Default profile data
provided by JVM
PDF/A ICC Profile Info ICC profile information (required when pdfa-icc-
profile-data is specified)
sRGB IEC61966-2.1
PDF/A file identifier One or more valid file identifiers set in the
xmpMM:Identifier field of the metadata dictionary.
To specify more than one identifier, separate values
with a comma (,).
Automatically generated
file identifier
PDF/A document ID Valid document ID. The value is set in the
xmpMM:DocumentID field of the metadata
dictionary.
None
PDF/A version ID Valid version ID. The value is set in the
xmpMM:VersionID field of the metadata dictionary.
None
PDF/A rendition class Valid rendition class. The value is set in the
xmpMM:RenditionClass field of the metadata
dictionary.
None
PDF/X Output Properties
Configure PDF/X output by setting the properties described below. The values that you set for
these properties will depend on the printing device.
Note the following restrictions on other PDF properties:
•
pdf-version
— Value above 1.4 is not allowed for PDF/X-1a output.
•
pdf-security
— Must be set to False.
•
pdf-encryption-level
— Must be set to 0.
•
pdf-font-embedding
— Must be set to true.
Chapter 6
Define Runtime Configurations
6-26

Property Name Description Default
PDF/X ICC Profile Data (Required) The name of the ICC profile data file, for
example: CoatedFOGRA27.icc.
The ICC (International Color Consortium) profile is
a binary file describing the color characteristics of
the intended output device. For production
environments, the color profile may be provided by
your print vendor or by the printing company that
prints the generated PDF/X file. The file must be
placed under
<bi publisher repository>/
Admin/Configuration
.
Profile data is also available from Adobe support or
colormanagement.org.
None
PDF/X output condition
identifier
(Required) The name of one of the standard
printing conditions registered with ICC
(International Color Consortium). The value that
you enter for this property is a valid "Reference
name," for example: FOGRA43.
Choose the appropriate value for the intended
printing environment. This name is often used to
guide automatic processing of the file by the
consumer of the PDF/X document, or to inform the
default settings in interactive applications.
None
PDF/X output condition A string describing the intended printing condition
in a form that will be meaningful to a human
operator at the site receiving the exchanged file.
The value is set in OutputCondition field of
OutputIntents dictionary.
None
PDF/X registry name A registry name. Set this property when the
pdfx-
output-condition-identifier
is set to a
characterization name registered in a registry other
than the ICC registry.
http://www.color.org
PDF/X version The PDF/X version set in GTS_PDFXVersion and
GTS_PDFXConformance fields of Info dictionary.
PDF/X-1a:2003 is the only value currently
supported.
PDF/X-1a:2003
DOCX Output Properties
The table below describes the properties that control DOCX output files.
Property Name Description Default
Enable change tracking Set to "true" to enable change tracking in the output
document.
false
Protect document for
tracked changes
Set to "true" to protect the document for tracked
changes.
false
Chapter 6
Define Runtime Configurations
6-27

Property Name Description Default
Default font Use this property to define the font style and size in
the output when no other font has been defined.
This is particularly useful to control the sizing of
empty table cells in generated reports. Enter the
font name and size in the following format
<FontName>:<size> for example: Arial:12. Note
that the font you choose must be available to the
processing engine at runtime.
Arial:12
Open password Use this property to specify the password that
report users must provide to open any DOCX
report.
NA
RTF Output Properties
Configure RTF output files by setting the properties described in the table below.
Property Name Description Default
Enable change tracking Set to "true" to enable change tracking in the output
RTF document.
false
Protect document for
tracked changes
Set to "true" to protect the document for tracked
changes.
false
Default font Use this property to define the font style and size in
RTF output when no other font has been defined.
This is particularly useful to control the sizing of
empty table cells in generated reports. Enter the
font name and size in the following format
<FontName>:<size> for example: Arial:12. Note
that the font you choose must be available to the
processing engine at runtime. See Define Font
Mappings for information about installing fonts and
for the list of predefined fonts.
Arial:12
Enable widow orphan Set to "true" to ensure that the document includes
no “hanging paragraphs”. Suppose the last para in
a page contains an orphaned line and the
remaining lines of the paragraph continue on the
next page. With this setting enabled, the starting
line of the paragraph moves to the next page to
keep all the lines of the paragraph together for
improved readability.
false
PPTX Output Properties
The table below describes the properties that control PPTX output files.
Property Name
Description Default
Open password Use this property to specify the password that
report users must provide to open any PPTX
report.
NA
Chapter 6
Define Runtime Configurations
6-28

HTML Output Properties
The table below describes the properties that control HTML output files.
Property Name Description Default
Show header Set to "false" to suppress the template header in
HTML output.
true
Show footer Set to "false" to suppress the template footer in
HTML output.
true
Replace smart quotes Set to "false" if you don't want curly quotes
replaced with straight quotes in the HTML output.
true
Character set Specify the output HTML character set. UTF-8
Make HTML output
accessible
Set to "true" to make the HTML output accessible. false
Use percentage width for
table columns
Set to "true" to display table columns according to a
percentage value of the total width of the table
rather than as a value in points. This property is
especially useful if the browser display tables with
extremely wide columns. Setting this property to
true improves the readability of the tables.
true
View Paginated When you set this property to true, HTML output
will render in the report viewer with pagination
features. These features include:
• Generated table of contents
• Navigation links at the top and bottom of the
page
• Ability to skip to a specific page within the
HTML document
• Search for strings within the HTML document
using the browser's search capability
• Zoom in and out on the HTML document using
the browser's zoom capability
Note that these features are supported for online
viewing through the report viewer only.
false
Reduce Padding in
Table-cell
When you set this property to true, cells in HTML
tables are displayed without padding, which
maximizes the page space available for text.
false
Embed images and
charts in HTML for
offline viewing
When you set this property to false, charts and
images are embedded in the HTML output, which
is suitable for viewing offline.
true
Use SVG for charts When you set this property to true, charts display
as a SVG (Scalable Vector Graphic) to provide a
higher resolution in the HTML output. When you
set this property to false, charts display as a raster
image.
true
Keep original table width When you set this property to true, if a column in a
table is deleted, the original width of the table is
maintained.
true
Enable horizontal
scrollbar automatically
for html table
When you set this property to true, a horizontal
scroll bar is added to a table that doesn't fit within
the current size of the browser window.
false
Chapter 6
Define Runtime Configurations
6-29

Property Name Description Default
Enable html table
column size auto adjust
When you set this property to true, the column
widths in a table are automatically adjusted to the
size of the browser window.
false
Set zero height for empty
paragraph
When you set this property to true and the output is
HTML, the height of an empty paragraph (that is, a
paragraph without text) is set to zero points.
true
FO Processing Properties
The table below describes the properties that control FO processing.
Property Name Description Default
Use BI Publisher's XSLT
processor
Controls the use of parser. If set to "false", uses the
non packaged XDK parser. If set to "true", uses the
11g parser packaged in Publisher. If set to "12c",
uses the 12c parser packaged in Publisher.
You can set this property at the server level or at
the report level.
If the data size is more than 2GB, set to "12c".
If you set this property to "12c" at report level,
ensure that you set the Set ACCESS_MODE to
FORWARD_READ on XSLT processor property
to '"false" at the server level and '"true" at the report
level.
true
Enable scalable feature
of XSLT processor
Controls the scalable feature of the XDO parser.
The property "Use BI Publisher's XSLT processor"
must be set to "true" or "12c" for this property to be
effective.
The value of this property should be "true" at both
server level and report level. If you set to "false",
FO processor uses memory (heap) instead of disk,
and might cause out-of-memory issues.
false
Enable XSLT runtime
optimization
When set to "true", the overall performance of the
FO processor is increased and the size of the
temporary FO files generated in the temp directory
is significantly decreased. Note that for small
reports (for example 1-2 pages) the increase in
performance isn't as marked. To further enhance
performance when you set this property to true, set
the Extract attribute sets property to "false".
true
Enable XPath
Optimization
When set to "true", the XML data file is analyzed for
element frequency. The information is then used to
optimize XPath in XSL.
false
Pages cached during
processing
This property is enabled only when you specify a
Temporary Directory (under General properties).
During table of contents generation, the FO
Processor caches the pages until the number of
pages exceeds the value specified for this property.
It then writes the pages to a file in the Temporary
Directory.
50
Chapter 6
Define Runtime Configurations
6-30

Property Name Description Default
Bidi language digit
substitution type
Valid values are "None" and "National". When set
to "None", Eastern European numbers are used.
When set to "National", Hindi format (Arabic-Indic
digits) is used. This setting is effective only when
the locale is Arabic, otherwise it's ignored.
National
Disable variable header
support
When set to true, prevents variable header support.
Variable header support automatically extends the
size of the header to accommodate the contents.
false
Disable external
references
When set to true, disallows importing of secondary
files such as subtemplates or other XML
documents during XSL processing and XML
parsing. This increases the security of the system.
Set this to "false" if the report or template calls
external files.
true
FO Parsing Buffer Size Specifies the size of the buffer for the FO
Processor. When the buffer is full, the elements
from the buffer are rendered in the report. Reports
with large tables or pivot tables that require
complex formatting and calculations may require a
larger buffer to properly render those objects in the
report. Increase the size of the buffer at the report
level for these reports. Note that increasing this
value affects the memory consumption of the
system.
1000000
FO extended
linebreaking
When set to true, punctuation, hyphenation, and
international text are handled properly when line
breaking is necessary.
true
Enable XSLT runtime
optimization for sub-
template
Provides an option to perform XSL import in
FOProcessor before passing only one XSL to XDK
for further processing. This allows xslt-optimization
to be applied to the entire main XSL template
which already includes all its subtemplates.
The default is true. If you call the FOProcessor
directly, the default is false.
true
Report Timezone Valid values: User or JVM.
When set to User, Publisher uses the User-level
Report Time Zone setting for reports. The User
Report Time Zone is set in the user's Account
Settings.
When set to JVM, Publisher uses the server JVM
timezone setting for all users' reports. All reports
therefore display the same time regardless of
individual user settings. This setting can be
overridden at the report level.
User
Set ACCESS_MODE to
FORWARD_READ on
XSLT processor
If you set the Use BI Publisher's XSLT processor
property to "12c" at report level, ensure that the Set
ACCESS_MODE to FORWARD_READ on XSLT
processor property is set to "false" at the server
level and "true" at the report level.
false
PDF Bidi Unicode
Version
Specifies the Unicode version (3.0 or 4.1) used to
display the BIDI strings in the PDF output.
4.1
Chapter 6
Define Runtime Configurations
6-31

RTF Template Properties
Configure RTF templates by setting the properties described in the table below.
Property Name Description Default
Extract attribute sets The RTF processor automatically extracts attribute
sets within the generated XSL-FO. The extracted
sets are placed in an extra FO block, which can be
referenced. This improves processing performance
and reduces file size. Valid values are:
• Enable - extract attribute sets for all templates
and subtemplates
• Auto - extract attribute sets for templates, but
not subtemplates
• Disable - do not extract attribute sets
Auto
Enable XPath rewriting When converting an RTF template to XSL-FO, the
RTF processor automatically rewrites the XML tag
names to represent the full XPath notations. Set
this property to "false" to disable this feature.
true
Characters used for
checkbox
The default PDF output font doesn't include a glyph
to represent a checkbox. If the template contains a
checkbox, use this property to specify a Unicode
font for the representation of checkboxes in the
PDF output. You must specify the Unicode font
number for the "checked" state and the Unicode
font number for the "unchecked" state using the
following syntax:
fontname;<unicode font
number for true value's glyph
>;<unicode font number for false
value's glyph>
The font that you specify must be available for
generating the PDF output at runtime.
Example: Go Noto Current Jp;9745;9744
Go Noto Current
Jp;9745;9744
Barcode encoder Select the barcode encoder for generating the
barcodes in reports. Oracle recommends that you
use the Libre encoder.
Libre
XPT Template Properties
Configure XPT templates by setting the properties described in the table below.
Property Name Description Default
XPT Scalable Mode for Offline
Reports
When you set this property to true, the
scheduled reports that use the XPT template
and include a large amount of data run
without memory issues. The first 100,000
rows of data in the report are stored in
memory and the remaining rows are stored in
the file system.
When you set this property to false, the
scheduled reports that use XPT template are
processed in-memory. Set this property to
false for reports that contain less data.
False
Chapter 6
Define Runtime Configurations
6-32

Property Name Description Default
XPT Scalable Mode for Online
Static Output
When you set this property to true, the online
reports that use the XPT template and include
a large amount of data run without memory
issues. The first 100,000 rows of data in the
report are stored in memory and the
remaining rows are stored in the file system.
When you set this property to false, the online
reports that use XPT template are processed
in-memory. Set this property to false for
reports that contain less data.
False
Enable Asynchronous Mode
for Interactive Output
When you set this property to true, interactive
reports that use the XPT template make
asynchronous calls to Oracle WebLogic
Server.
When you set this property to false, interactive
reports that use the XPT template make
synchronous calls to Oracle WebLogic Server.
Oracle WebLogic Server limits the number of
synchronous calls. Any calls that are stuck
expire in 600 seconds.
True
PDF Template Properties
Generate the types of PDF files you want by setting available PDF template properties.
Property Name Description Default
Remove PDF fields from
output
Specify "true" to remove PDF fields from the
output. When PDF fields are removed, data
entered in the fields cannot be extracted.
false
Set all fields as read only
in output
By default, all fields in the output PDF of a PDF
template is read only. If you want to set all fields to
be updatable, set this property to "false".
true
Maintain each field's
read only setting
Set this property to "true" if you want to maintain
the "Read Only" setting of each field as defined in
the PDF template. This property overrides the
settings of "Set all fields as read only in output."
false
Excel Template Properties
Configure Excel templates by setting the properties described in the table below.
Property Name
Description Default
Enable Scalable Mode When set to true, large reports that use Excel
template run without out of memory issues.
Data overflows automatically into multiple
sheets if a group of data in a sheet exceeds
65000 rows. This overcomes the Microsoft
Excel limitation of 65000 rows per sheet.
When set to false, large reports that use Excel
template can cause out of memory issues.
false
Chapter 6
Define Runtime Configurations
6-33

CSV Output Properties
The table below describes the properties that control comma-delimited value output.
Property Name Description Default
CSV delimiter Specifies the character used to delimit the
data in comma-separated value output. Other
options are: Semicolon (;), Tab (\t) and Pipe
(|).
Comma (,)
Remove leading and trailing
white space
Specify "True" to remove leading and trailing
white space between data elements and the
delimiter.
false
Add UTF-8 BOM Signature Specify "False" to remove the UTF-8 BOM
signature from the output.
true
EText Output Properties
The table below describes the properties that control EText output files.
Property Name Description Default
Add UTF-8 BOM Signature When set to true, the Etext output is in UTF-8
Unicode with BOM format.
false
Enable bigdecimal When set to true, you enable high-precision
numeric calculation of the Etext output.
false
Excel Output Properties
You can set specific properties to control Excel output.
Property Name Description Default
Show grid lines Set to true to show the Excel table grid lines
in the report output.
false
Page break as a new sheet Set to "True" if you want a page break
specified in the report template to generate a
new sheet in the Excel workbook.
true
Minimum column width Set the coulmn width in points. When the
column width is less than the specified
minimum and it contains no data, the column
is merged with the preceding column. The
valid range for this property is 0.5 to 20 points.
3 (in points, 0.04 inch)
Minimum row height Set the row height in points. When the row
height is less than the specified minimum and
it contains no data, the row is removed. The
valid range for this property is 0.001 to 5
points.
1 (in points, 0.01 inch)
Chapter 6
Define Runtime Configurations
6-34

Property Name Description Default
Keep values in same column Set this property to True to minimize column
merging. Column width is set based on
column contents using the values supplied in
the Table Auto Layout property. Output may
not appear as neatly laid out as when using
the original layout algorithm.
False
Table Auto Layout Specify a conversion ratio in points and a
maximum length in points, for example
6.5,150. See example.
For this property to take effect, the property
"Keep values in same column" must be set to
True.
This property expands the table column width
to fit the contents. The column width is
expanded based on the character count and
conversion ratio up to the maximum
specification.
Example: Assume a report with two columns
of Excel data -- Column 1 contains a text
string that's 18 characters and Column 2 is 30
characters long. When the value of this
property is set to 6.5,150, the following
calculations are performed:
Column 1 is 18 characters:
Apply the calculation: 18 * 6.5pts = 117 pts
The column in the Excel output will be 117 pts
wide.
Column 2 is 30 characters:
Apply the calculation: 30 * 6.5 pts = 195 pts
Because 195 pts is greater than the specified
maximum of 150, Column 2 will be 150 pts
wide in the Excel output.
N/A
Maximum allowable nested
table row count
Specify the maximum allowable row count for
a nested table. Allowed values are 15000 to
999,999.
During report processing, nested inner table
rows cannot be flushed to the XLSX writer,
therefore they stay in-memory, increasing
memory consumption. Set this limit to avoid
out-of-memory exceptions. When this limit is
reached for the size of the inner table,
generation is terminated. The incomplete
XLSX output file is returned.
20,000
Open password Use this property to specify the password that
report users must provide to open any XLSX
output file.
Configuration name:
xlsx-open-password
NA
Enable row split Set to "true" to avoid stretching a row to a
large height, and allow the row to be split into
multiple rows.
True
Chapter 6
Define Runtime Configurations
6-35

All Outputs Properties
The properties in the table below apply to all outputs.
Property Name Description Default
Use 11.1.1.5 compatibility
mode
Reserved. Don't update unless instructed by
Oracle.
False
Ignore case for catalog object
path
Specifies whether to ignore the case of the
catalog object path while locating a catalog
object.
False
Allow fallback to seeded
report
Specifies whether to fallback on or to skip
execution of the corresponding seeded report
(pre-defined report) when you don’t have
permission to run the custom report. When
set to true and the user doesn’t have
permission to run the custom report, the
corresponding seeded report executes. When
set to false, you get an error when the custom
report execution fails.
True
Webservice optimization When set to true, Publisher caches the report
definition and avoids multiple requests to the
catalog when the same report runs multiple
times within a short interval of time. Caching
helps to improve the system performance.
True
Memory Guard Properties
The Runtime Configuration page lists the default values of the memory guard properties.
The values of the memory guard properties depend on the compute shape used for your
instance. See What Sizing Options are Available to You?.
Property Description Default Value
Maximum report data size for
online reports
Limits the data size for online reports. 300MB
Maximum report data size for
offline (scheduled) reports
Limits the data size for scheduled reports. 500MB
Maximum report data size for
bursting reports
Limits the data size for bursting reports. Maximum report data
size for offline
(scheduled) reports
Free memory threshold Ensures a minimum available free memory
space.
500MB
Maximum report data size
under the free memory
threshold
Limits the data size of a report when the Free
memory threshold property is set to a positive
value.
free_memory_threshold/
10
Minimum time span between
garbage collection runs
Ensures a minimum time gap in seconds
between any two subsequent garbage
collection runs.
300 (seconds)
Chapter 6
Define Runtime Configurations
6-36

Property Description Default Value
Maximum wait time for free
memory to come back above
the threshold value
Limits the time in seconds for a run-report
request to wait for the free JVM memory to
exceed the threshold value. This property
value takes effect only if you specify a positive
value for the Free memory threshold property.
If free memory is still below the threshold
value after the specified wait time, the run-
report request is rejected.
30 (seconds)
Timeout for online reports Specifies the timeout value in seconds for
processing an online report (includes the time
for data extraction and report generation).
535 (seconds)
Maximum rows for CSV
output
Limits the rows for reports in CSV format. 1000000
Data Model Properties
The Runtime Configuration page lists the values of the data model properties. The values of
the data model properties depend on the compute shape used for your instance.
Property Description Default
Maximum data size limit for
data generation
Limits the size of XML data that can be
generated by executing a data model.
500MB
Maximum sample data size
limit
Limits the size of a sample data file that can
be uploaded from the data model editor.
1MB
Enable Data Model scalable
mode
Prevents out of memory conditions. When set
to true, the data engine takes advantage of
the disk space while processing data.
True
Enable Auto DB fetch size
mode
Avoids out of memory conditions, but can
significantly increase the processing time.
This setting is recommended only for
frequently processing complex queries of
hundreds of columns. When set to true, the
database fetch size is set at runtime
according to the total number of columns and
the total number of query columns in the
dataset. Ignores the DB fetch size setting.
This property overrides the data model-level
database fetch size properties.
True
DB fetch size Limits the database fetch size for a data
model. This property value takes effect only
when Enable Auto DB fetch size mode is
set to False.
20 (rows)
SQL Query Timeout Specifies the timeout value for SQL queries
for scheduled reports.
This value is based on the compute size of
the instance. The value for online reports is
500 seconds and is the same for all
implementations. You can't modify the value
for online reports.
600 seconds
Chapter 6
Define Runtime Configurations
6-37

Property Description Default
Enable Data Model diagnostic Writes the dataset details, memory, and SQL
processing time information to the log file
when set to true. Oracle recommends setting
this property to true only for debugging
purposes. If you enable this property, the
processing time is increased.
False
Enable SQL Session Trace Writes a SQL session trace log to the
database when set to true for every SQL
query that's processed. A database
administrator can examine the log.
False
Enable SQL Pruning Reduces the processing time and the memory
usage, if you enable this property. Applies
only to the Oracle Database queries that use
Standard SQL. If your query returns many
columns but only a subset are used by your
report template, SQL pruning returns only
those columns required by the template. SQL
pruning is not applicable for PDF, Excel, and
E-text template types.
False
Enable Data Chunking Enables XML data chunking for individual
data models, reports, and report jobs, if you
set this property to true.
If you set this property to true, specify an
appropriate value for the Data Chunk Size
property to process large and long-running
reports.
False
Data Chunk Size Specifies the data size for each data chunk.
Applies only when the Enable Data
Chunking property is set to true.
300MB
DV Data Row Limit Limits the number of rows that can be
retrieved from a dataset.
2000000
Trim Leading and Trailing
Spaces From Parameter
Value
Trims the leading and trailing spaces from the
parameter values of data models.
True
Exclude Line Feed And
Carriage Return for LOB
Excludes carriage returns and line feeds in
the data, if you set this property to true.
False
Enable SSL for webservice,
HTTP Datasource
Supports SSL connection for webservice and
HTTP data source, and automatically imports
the self-signed SSL certificate from the
server, if you set this property to true. If the
certificate isn't self-signed, use Upload Center
to upload the SSL certificate, and use the
uploaded SSL certificate to configure the
connection.
False
Report Delivery Properties
The properties in the table below apply to report delivery.
Chapter 6
Define Runtime Configurations
6-38

Property Name Description Default
Enable FTP/SFTP delivery
retry
If a delivery through an FTP or SFTP delivery
channel fails, Publisher makes another
attempt to deliver, 10 seconds after the first
attempt fails.
This setting affects all FTP and SFTP delivery
requests, and can't be configured for
individual servers.
True
Define Font Mappings
Map base fonts in RTF or PDF templates to target fonts to be used in the published document.
You can specify font mapping at the site or report level. Font mapping is performed only for
PDF output and PowerPoint output.
There're two types of font mappings:
• RTF Templates — for mapping fonts from RTF templates and XSL-FO templates to PDF
and PowerPoint output fonts
• PDF Templates — for mapping fonts from PDF templates to different PDF output fonts.
Use Upload Center to upload custom fonts. See Upload and Manage Configuration-Specific
Files.
Make Fonts Available For Publishing
A set of Type1 fonts and a set of TrueType fonts are available for publishing. You can select
any of the fonts in these sets as a target font with no additional setup required.
The predefined fonts are located in <oracle_home>/oracle_common/internal/fonts.
To map to another font, place the font in this directory to make it available for publishing at
runtime. If the environment is clustered, then you must place the font on every server.
Set Font Mapping at the Site Level or Report Level
A font mapping can be defined at the site level or the report level.
• To set a mapping at the site level, select the Font Mappings link from the Administration
page.
• To set a mapping at the report level, view the Properties for the report, then select the Font
Mappings tab. These settings apply to the selected report only.
The report-level settings take precedence over the site-level settings.
Create a Font Map
Provide the base font and target font.
1. From the Administration page, under Runtime Configuration, select Font Mappings.
2. Under RTF Templates or PDF Templates, click Add Font Mapping.
3. Provide the details for the base font.
• Base Font: Enter the font family to map to a new font. Example: Arial
Chapter 6
Define Runtime Configurations
6-39

• Style: Normal or Italic (Not applicable to PDF Template font mappings)
• Weight: Normal or Bold (Not applicable to PDF Template font mappings)
4. Provide the details of the target font.
• Target Font Type: Type 1 or TrueType
• Target Font: Select a target font.
If you selected TrueType, you can enter a specific numbered font in the collection.
Enter the TrueType Collection (TTC) Number of the desired font.
Predefined Fonts
The following Type1 fonts are built-in to Adobe Acrobat and by default the mappings for these
fonts are available for publishing.
You can select any of these fonts as a target font with no additional setup required.
The Type1 fonts are listed in the table below.
Font Family Style Weight Font Name
serif normal normal Time-Roman
serif normal bold Times-Bold
serif italic normal Times-Italic
serif italic bold Times-BoldItalic
sans-serif normal normal Helvetica
sans-serif normal bold Helvetica-Bold
sans-serif italic normal Helvetica-Oblique
sans-serif italic bold Helvetica-BoldOblique
monospace normal normal Courier
monospace normal bold Courier-Bold
monospace italic normal Courier-Oblique
monospace italic bold Courier-BoldOblique
Courier normal normal Courier
Courier normal bold Courier-Bold
Courier italic normal Courier-Oblique
Courier italic bold Courier-BoldOblique
Helvetica normal normal Helvetica
Helvetica normal bold Helvetica-Bold
Helvetica italic normal Helvetica-Oblique
Helvetica italic bold Helvetica-BoldOblique
Times normal normal Times
Times normal bold Times-Bold
Times italic normal Times-Italic
Times italic bold Times-BoldItalic
Symbol normal normal Symbol
ZapfDingbats normal normal ZapfDingbats
Chapter 6
Define Runtime Configurations
6-40

The TrueType fonts are listed in the table below. All TrueType fonts are subset and embedded
into PDF.
Font Family Name Style Weight Actual Font Actual Font Type
Andale Duospace
WT
normal normal ADUO.ttf TrueType (Latin1
only, Fixed width)
Andale Duospace
WT
bold bold ADUOB.ttf TrueType (Latin1
only, Fixed width)
Andale Duospace
WT J
normal normal ADUOJ.ttf TrueType
(Japanese flavor,
Fixed width)
Andale Duospace
WT J
bold bold ADUOJB.ttf TrueType
(Japanese flavor,
Fixed width)
Andale Duospace
WT K
normal normal ADUOK.ttf TrueType (Korean
flavor, Fixed width)
Andale Duospace
WT K
bold bold ADUOKB.ttf TrueType (Korean
flavor, Fixed width)
Andale Duospace
WT SC
normal normal ADUOSC.ttf TrueType
(Simplified Chinese
flavor, Fixed width)
Andale Duospace
WT SC
bold bold ADUOSCB.ttf TrueType
(Simplified Chinese
flavor, Fixed width)
Andale Duospace
WT TC
normal normal ADUOTC.ttf TrueType
(Traditional
Chinese flavor,
Fixed width)
Andale Duospace
WT TC
bold bold ADUOTCB.ttf TrueType
(Traditional
Chinese flavor,
Fixed width)
Go Noto Current Jp normal normal GoNotoCurrentJp.tt
f
TrueType
(Japanese flavor)
Go Noto Current Kr normal normal GoNotoCurrentKr.tt
f
TrueType (Korean
flavor)
Go Noto Current Sc normal normal GoNotoCurrentSc.tt
f
TrueType
(Simplified Chinese
flavor)
Go Noto Current Tc normal normal GoNotoCurrentTc.tt
f
TrueType
(Traditional
Chinese flavor)
Open-Source Fonts Replace Licensed Monotype Fonts
In Oracle Analytics Cloud, Oracle has replaced Monotype fonts with open-source fonts in PDF
reports in Oracle Analytics Publisher, analyses, and dashboards.
The Go Noto font is the default fallback font for PDF reports in Oracle Analytics Publisher,
analyses, and dashboards. Test the open-source fonts in your reports and correct the
formatting in the report templates.
Chapter 6
Define Runtime Configurations
6-41

What do I need to know about fonts in reports?
The following table lists the replacement for Monotype fonts in Oracle Analytics Cloud.
Monotype Fonts Replacement Fonts
Monotype Albany fonts Google Noto fonts
Monotype Barcode fonts Libre Barcode fonts
Oracle Analytics Cloud reports use the Go Noto font as the fallback font for PDF reports to
support non-English languages and some special characters of English and Western European
languages. The system uses the fallback font when the default PDF fonts (such as Helvetica,
Times Roman, and Courier) or user-provided fonts can’t render the characters included in the
data while generating the PDF output.
Use Libre Barcode fonts to generate barcodes.
What can I do now about fonts in my reports?
Oracle recommends that you review all your critical reports and edit the layout to format the
reports as required. The impact of replacing the licensed Monotype fonts with the open-source
fonts in analyses reports and dashboards is expected to be minimal because these reports
don’t include pixel-perfect layouts.
The Google Noto fonts and the Monotype Albany fonts are similar; however, there are a few
minor differences in the height, width, and weight for characters in some non-English
languages. In some cases, these differences might impact the pixel-perfect PDF output. You
might have to edit the layout template of these reports to use the Google Noto fonts.
Go Noto font is the default fallback font for analyses, dashboards, and Publisher reports.
Monotype Barcode Fonts Replacement Fonts
128R00.ttf LibreBarcode128-Regular.ttf
B39R00.ttf LibreBarcode39Extended-Regular.ttf
UPCR00.ttf LibreBarcodeEAN13Text-Regular.ttf
Define Currency Formats
Currency formats defined in the Administration Runtime Configuration page are applied at the
system level. Currency formats can also be applied at the report level.
The report-level settings take precedence over the system-level settings here.
Understand Currency Formats
The Currency Formats tab enables you to map a number format mask to a specific currency so
that your reports can display multiple currencies with their own corresponding formatting.
Currency formatting is only supported for RTF and XSL-FO templates.
To apply currency formats in the RTF template, use the format-currency function.
To add a currency format:
1. Click the Add icon.
2. Enter the ISO currency code, for example: USD, JPY, EUR, GBP, INR.
Chapter 6
Define Runtime Configurations
6-42
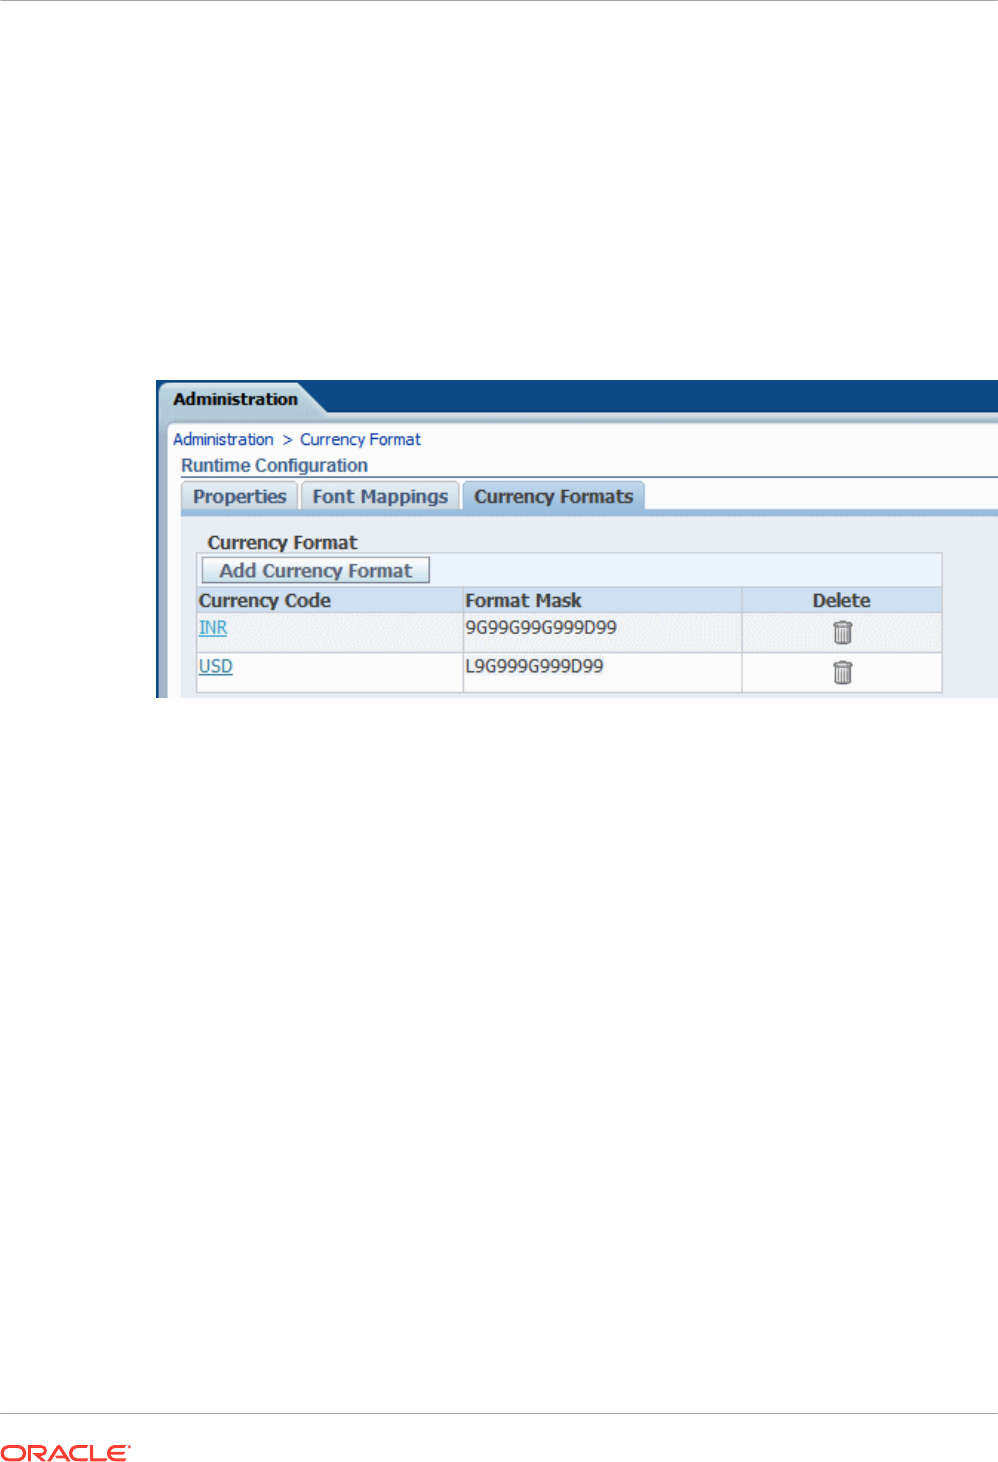
3. Enter the format mask to apply for this currency.
The Format Mask must be in the Oracle number format. The Oracle number format uses
the components "9", "0", "D", and "G" to compose the format, for example: 9G999D00
where
9 represents a displayed number only if present in data
G represents the group separator
D represents the decimal separator
0 represents an explicitly displayed number regardless of incoming data
The figure below shows sample currency formats.
Secure Reports
This topic describes how to secure pixel-perfect reporting.
Topics:
• Use Digital Signatures in PDF Reports
• Use PGP Keys for Encrypted Report Delivery
• Encrypt PDF Documents
Use Digital Signatures in PDF Reports
You can apply a digital signature to a PDF report.
Digital signatures enable you to verify the authenticity of the documents you send and receive.
You can upload your digital signature file to a secure location, and at runtime sign the PDF
report with the digital signature. The digital signature verifies the signer's identity and ensures
that the document hasn't been altered after it was signed.
For additional information, refer to the Verisign and Adobe websites.
Chapter 6
Secure Reports
6-43

Prerequisites and Limitations of Digital Signatures
When you use digital signatures with PDF reports in Publisher, you must be aware of a few
limitations.
A digital signature is obtained from a public certificate authority or from a private/internal
certificate authority (if for internal use only).
Keep the following limitations in mind:
• Only the reports scheduled in Publisher can include the digital signature.
• You can register multiple digital signatures and enable a digital signature at the instance
level. At the report level, you can choose the digital signature you want to apply for the
report. Multiple templates assigned to the same report share the digital signature
properties.
Obtain Digital Certificates
You can obtain a digital certificate either by purchasing one or by using the self-sign method.
• To obtain a digital certificate, perform one of the following:
– Purchase a certificate from an authority, verify and trust the authenticity of the
certificate, and then use Microsoft Internet Explorer to create a PFX file based on the
certificate you purchased.
– Create a self-signed certificate using a software program such as Adobe Acrobat,
Adobe Reader, OpenSSL, or OSDT as part of a PFX file, and then use the PFX file to
sign PDF documents by registering it with Publisher. Bear in mind that anyone can
create a self-signed certificate, so use care when verifying and trusting such a
certificate.
Create PFX Files
If you obtained a digital certificate from a certificate authority, you can create a PFX file using
that certificate.
You don't need to create a PFX file if a self-signed certificate PFX file already exists.
To create a PFX file with Microsoft Internet Explorer:
1. Ensure that your digital certificate is saved on your computer.
2. Open Microsoft Internet Explorer.
3. From the Tools menu, click Internet Options and then click the Content tab.
4. Click Certificates.
5. In the Certificates dialog, click the tab that contains your digital certificate and then click the
certificate.
6. Click Export.
7. Follow the steps in the Certificate Export Wizard. For assistance, refer to the
documentation provided with Microsoft Internet Explorer.
8. When prompted, select Use DER encoded binary X.509 as your export file format.
9. When prompted, save your certificate as part of a PFX file to an accessible location on
your computer.
Chapter 6
Secure Reports
6-44

After you create your PFX file, you can use it to sign PDF documents.
Apply a Digital Signature
You can set up and sign your PDF reports with a digital signature.
You can upload and register multiple digital signatures, set one as the default signature for the
instance, and choose a digital signature you want to apply for a report.
1. Upload the digital signature files in Upload Center.
2. Register the digital signature in the Publisher Administration page and specify the roles
that are authorized to sign reports.
3. If you have registered multiple digital signatures, set one as the default signature for the
instance.
a. In the Administration page, navigate to Security Center, and click Digital Signature.
b. In the Digital Signature tab, select the digital signature file you want to set as default,
and click Set as Default.
c. In the Runtime Configuration page, set the Enable Digital Signature property to true.
4. To configure a digital signature for a report, select the report and set the digital signature
properties.
a. In the Report Properties dialog, select the Formatting tab.
b. Set the Enable Digital Signature property to true for the report.
c. Select the digital signature for the report.
d. Specify the display field name and location.
5. Log in as a user with an authorized role and submit the report through the Publisher
scheduler, choosing the PDF report. When the report completes, it's signed with your
digital signature in the specified location of the report.
Register Your Digital Signature and Assign Authorized Roles
Register a digital signature and assign roles that can have the authority to sign documents with
this digital signature.
You must upload the digital signature file in Upload Center.
1. On the Administration tab, under Security Center, click Digital Signature.
2. Select the digital signature file you uploaded in Upload Center and enter the password for
the digital signature.
3. Enable the Roles that must have the authority to sign documents with this digital signature.
Use the shuttle buttons to move Available Roles to the Allowed Roles list.
4. Click Apply.
Specify the Signature Display Field or Location
You must specify the location for the digital signature to appear in the completed document.
The methods available depend on whether the template type is PDF or RTF.
If the template is PDF, use one of the following options:
• Specify a template field in a PDF template for the digital signature.
• Specify the location for the digital signature in the report properties.
Chapter 6
Secure Reports
6-45

If the template is RTF, specify the location for the digital signature in the report properties.
Specify a Template Field in a PDF Template for the Digital Signature
Include a field in the PDF template for digital signatures.
Report authors can add a new field or configure an existing field in the PDF template for the
digital signature. See Add or Designate a Field for a Digital Signature.
Specify the Location For the Digital Signature in the Report
You can specify the location for the digital signature in the report.
When you specify a location in the document to place the digital signature, you can either
specify a general location (Top Left, Top Center, or Top Right) or you can specify x and y
coordinates in the document.
You can also specify the height and width of the field for the digital signature by using runtime
properties. You don't need to alter the template to include a digital signature.
1. In the catalog, navigate to the report.
2. Click the Edit link for the report to open the report for editing.
3. Click Properties and then click the Formatting tab.
4. Scroll to the PDF Digital Signature group of properties.
5. Set Enable Digital Signature to True.
6. Specify the location in the document where you want the digital signature to appear by
setting the appropriate properties as follows (note that the signature is inserted on the first
page of the document only):
• Existing signature field name — Doesn't apply to this method.
• Signature field location — Provides a list containing the following values:
Top Left, Top Center, Top Right
Select one of these general locations and Publisher places the digital signature in the
output document sized and positioned appropriately.
If you set this property, then don't enter X and Y coordinates or width and height
properties.
• Signature field X coordinate — Using the left edge of the document as the zero point
of the X axis, enter the position in points to place the digital signature from the left.
For example, to place the digital signature horizontally in the middle of an 8.5 inch by
11 inch document (that is, 612 points in width and 792 points in height), enter 306.
• Signature field Y coordinate — Using the bottom edge of the document as the zero
point of the Y axis, enter the position in points to place digital signature from the
bottom.
For example, to place the digital signature vertically in the middle of an 8.5 inch by 11
inch document (that is, 612 points in width and 792 points in height), enter 396.
• Signature field width — Enter in points the desired width of the inserted digital
signature field. This applies only if you're setting the X and Y coordinates.
• Signature field height — Enter in points the desired height of the inserted digital
signature field. This applies only if you're setting the X and Y coordinates.
Chapter 6
Secure Reports
6-46

Run and Sign Reports with a Digital Signature
If you've been assigned a role that's been granted the digital signature privilege, you can sign a
generated report with a signature, if the report has been configured to include signatures. You
can sign only scheduled reports with signatures.
To sign reports with a digital signature:
1. Log in as a user with a role granted digital signature privileges.
2. In the catalog, navigate to the report that has been enabled for digital signature, and click
Schedule.
3. Complete the fields on the Schedule Report Job page, select PDF output, and then submit
the job.
The completed PDF displays the digital signature.
Use PGP Keys for Encrypted Report Delivery
You can deliver PGP encrypted reports through FTP server or Content server.
You can configure the FTP server and Content server delivery channels to use the PGP public
keys to deliver PGP encrypted files in binary or ASCII format.
Use Security Center to upload and download the PGP keys. The "BI Publisher Public Key" file
is verifying the signature on signed files. If you configure a delivery channel to send signed
documents, download the "BI Publisher Public Key" file (either in binary or ASCII format), and
import the keys in the destination PGP system used to verify signature and decrypt the files
delivered by Publisher.
Manage PGP Keys
You can upload and delete your PGP keys.
1. From the Administration page, under Security Center, select PGP Keys.
2. To upload PGP keys to keystore, click Choose File, select the PGP key file, and then click
Upload.
3. To delete the PGP keys you uploaded, in the PGP Keys table, click the delete icon
corresponding to the PGP keys.
4. To download the PGP public keys for signature verification, click the download icon
corresponding to the public key file.
Encrypt PDF Documents
You can encrypt PDF documents to prevent unauthorized access to the file content.
The security level you set in the Encryption level PDF output property specifies the encryption
algorithm used for the PDF document encryption. Define encryption for PDF documents at the
server level or at the report level. See PDF Output Properties.
Publisher supports AES-256 encryption for:
• PDF documents generated from RTF and XPT templates using the FOProcessor or
PDFGenerator utilities.
Chapter 6
Secure Reports
6-47

• PDF documents generated from PDF templates (PDF forms) using the FormProcessor
utility. Publisher doesn’t support encrypted form input.
• PDF documents without password protection that are printed using either PDF to
PostScript or PDF to PCL print filter. You can’t send an encrypted PDF document to a
CUPS printer or an IPP printer without a filter.
Publisher uses the AES implementation of JCE (Java Cryptography Extension) for encrypting
and decrypting documents. If you want to use the AES 256-bit encryption for PDF documents,
you need the JCE Unlimited Strength Jurisdiction Policy installed on the JVM that runs the
container that has the Publisher installation, but this policy isn't required for the AES 128-bit
encryption.
Publisher doesn't support encrypted input.
PDF Document Encryption Algorithms
Publisher uses an encryption algorithm based on the PDF document security setting.
Security Level Encryption Scheme PDF Version Acrobat Version
Low RC4 (40bit) 1.1 3.0
Medium RC4 (128bit) 1.4 5.0
High AES (128bit) 1.5 7.0
Highest AES (256bit) 1.7 (extension level 5) X
Audit Data of Publisher Catalog Objects
An administrator can enable or disable viewing of the audit data of Publisher catalog objects,
configure a connection to the audit data, and create reports to view the audit data.
Topics:
• About Audit Data of Publisher Catalog Objects
• Enable or Disable Viewing of Publisher Audit Data
• Specify the Data Source Connection For Publisher Audit Data
• View Publisher Audit Data
About Audit Data of Publisher Catalog Objects
You can use the sample reports to view the audit data of Publisher catalog objects.
You can find out the time of access and who accessed the Publisher catalog objects such as
reports, data models, sub-templates, style templates, and folders.
Audit data helps you track:
• Report start, process, end, and download
• Report job pause, resume, and cancellation
• Publisher resource creation, modification, copy, and deletion
• Publisher resource access
Chapter 6
Audit Data of Publisher Catalog Objects
6-48

Note:
User session data (User Login and User Logout events) isn't included in the audit
data. Only the reporting activities performed in the host:port/ui/xmlpserver Publisher
interface pages are included in the audit data. The reporting activities performed in
the host:port/ui/analytics interface pages aren't included in the audit data.
Enable or Disable Viewing of Publisher Audit Data
Administrators can enable or disable viewing the audit data of publishing activities.
1. Navigate to the Server Configuration page.
2. To enable viewing of audit data, select Enable Monitor and Audit and set Audit Level to
Medium.
3. To disable viewing of audit data, deselect Enable Monitor and Audit.
Specify the Data Source Connection For Publisher Audit Data
Configure a data source connection for the audit data.
1. In the Administration page, click JNDI Connection.
2. Click Add Data Source.
3. In the Data Source Name field, enter AuditViewDB.
4. In the JNDI Name field, enter jdbc/AuditViewDataSource.
5. Click Test Connection to confirm the connection to the audit data source.
6. Define security for this data source connection. Move the required roles from the Available
Roles list to the Allowed Roles list. Only users assigned the roles on the Allowed Roles
list can create or view reports from this data source.
7. Click Apply.
View Publisher Audit Data
You can download and use the sample reports for viewing the audited information.
Make sure you select Enable Monitor and Audit in the Server Configuration page to log audit
data, and then configure the JNDI connection to the AuditViewDB data source to view the audit
data.
The sample reports use the JNDI connection to fetch data from the data source for auditing.
The report layout and data model are pre-designed in the sample reports. You can customize
the report layout, but don't change the data model in the sample reports. The sample reports
are configured to run as a scheduled job because the size of auditing data can be large. If you
want to view an audit report online, select the Run Report Online property and make sure you
don't select the Auto Run property of the report.
1. Download the sample audit reports from the Oracle Analytics Publisher Downloads page.
2. Upload the sample audit reports to a shared folder in the catalog.
3. Schedule the sample audit reports you want to view.
a. Navigate to the sample audit report in the catalog.
Chapter 6
Audit Data of Publisher Catalog Objects
6-49

b. Click Schedule.
c. In the General tab, specify the dates for the Date From and Date To parameters.
d. In the Output tab, make sure the output format is PDF.
You can add delivery destinations if required.
4. After the scheduled job completes, view the report in the Report Job History page.
Add Translations For the Catalog and Reports
This topic describes how to export and import translation files both for the catalog and for
individual report layouts.
Topics:
• About Translation in Publisher
• Export and Import a Catalog Translation File
• Translate Templates
• Use a Localized Template
About Translation in Publisher
Publisher supports two types of translation: Catalog Translation and Template (or layout)
Translation.
Catalog translation enables the extraction of translatable strings from all objects contained in a
selected catalog folder into a single translation file; this file can then be translated and
uploaded back to Publisher and assigned the appropriate language code.
Catalog translation extracts not only translatable strings from the report layouts, but also the
user interface strings that are displayed to users, such as catalog object descriptions, report
parameter names, and data display names.
Users viewing the catalog see the item translations appropriate for the UI Language they
selected in their My Account preferences. Users see report translations appropriate for the
Report Locale that they selected in their My Account preferences.
Template translation enables the extraction of the translatable strings from a single RTF-based
template (including sub templates and style templates) or a single Publisher layout template
(.xpt file). Use this option when you only need the final report documents translated. For
example, your enterprise requires translated invoices to send to German and Japanese
customers.
Limitations of Catalog Translation
If you have XLIFF file translations for specific reports and then you import a catalog translation
file for the folder in which the existing translations reside, you overwrite the existing XLIFF files.
Export and Import a Catalog Translation File
Importing the translated file to the catalog and exporting the XLIFF files from the catalog can
only be performed by an Administrator.
Chapter 6
Add Translations For the Catalog and Reports
6-50
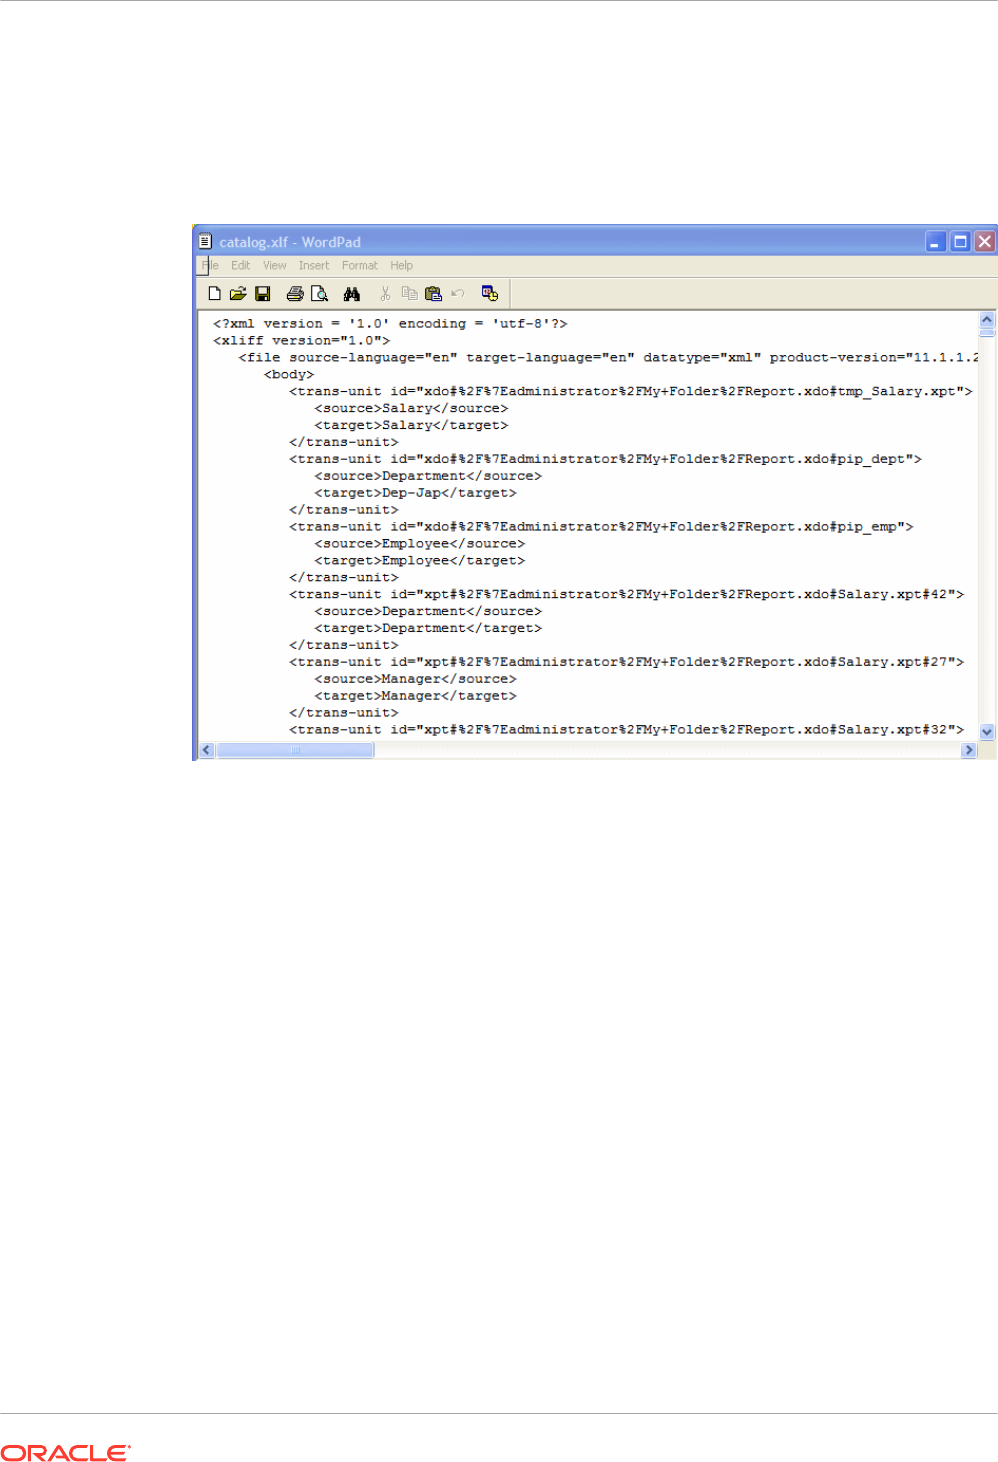
1. Select the folder in the catalog, click the Translation toolbar button, and then click Export
XLIFF.
2. Save the XLIFF file to a local directory.
3. Open the Translation file (catalog.xlf) and apply translations to the Boilerplate text, as
shown in the following figure.
4. After the file is translated, upload the XLIFF file to the Publisher server: Click the
Translation toolbar button, then click Import XLIFF. Upload the translated XLIFF to the
server.
5. To test the translation, select My Account from Signed In As in the global header.
6. On the General tab of the My Account dialog, change the Report Locale and the UI
Language preferences to the appropriate language and click OK.
7. View the objects in the translated folder.
Translate Templates
You can translate the RTF and Publisher (.xpt) templates from the Properties page.
Template translation includes:
• RTF templates
• RTF sub templates
• Style templates
• Publisher templates (.xpt)
To access the Properties page, click the Properties link for the layout in the Report Editor, as
shown below.
Chapter 6
Add Translations For the Catalog and Reports
6-51
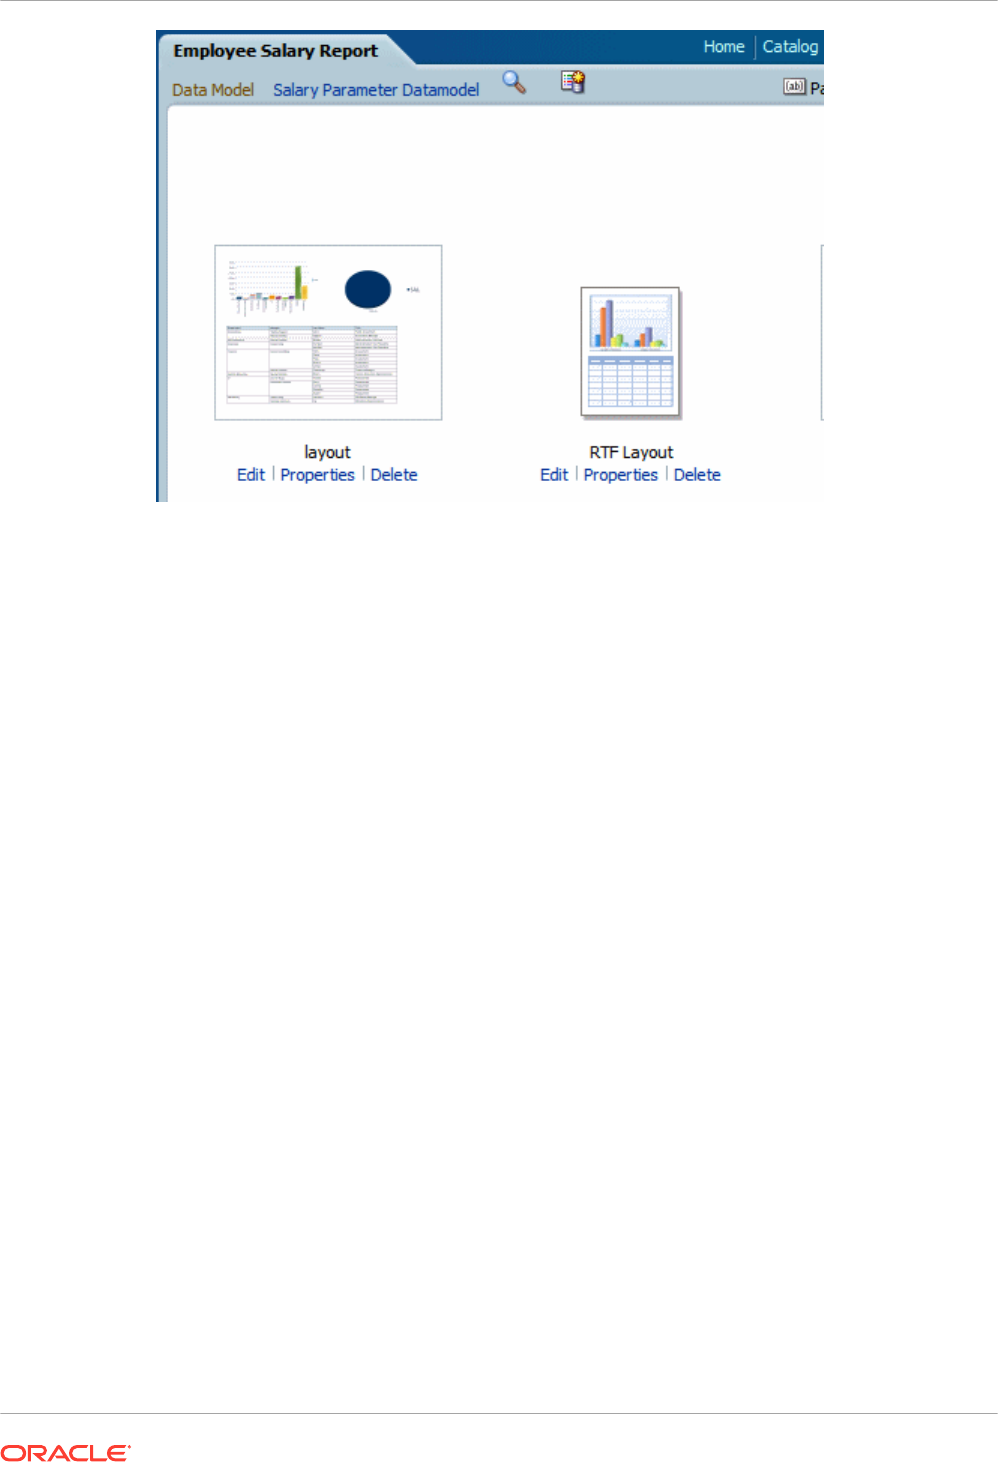
From the Properties page you can generate an XLIFF file for a single template. Click Extract
Translation to generate the XLIFF file.
Generate the XLIFF File from the Layout Properties Page
Generate the XLIFF file for report layout templates, style templates, and sub templates.
1. To generate the XLIFF file for report layout templates, perform these steps.
a. Navigate to the report in the catalog and click Edit to open it for editing.
b. From the thumbnail view of the report layouts, click the Properties link of the layout
(RTF or XPT) to open the Layout Properties page.
c. In the Translations region, click Extract Translation.
Publisher extracts the translatable strings from the template and exports them to an
XLIFF (.xlf file).
d. Save the XLIFF to a local directory.
2. To generate the XLIFF file for style templates and sub templates, perform these steps.
a. Navigate to the style template or sub template in the catalog and click Edit to open the
Template Manager.
b. In the Translations region, click Extract Translation.
Publisher extracts the translatable strings from the template and exports them to an
XLIFF (.xlf file).
c. Save the XLIFF to a local directory.
Translate the XLIFF File
When you download a XLIFF file, it can be sent to a translation provider, or using a text editor,
you can enter the translation for each string.
Chapter 6
Add Translations For the Catalog and Reports
6-52

A "translatable string" is any text in the template intended for display in the published report,
such as table headers and field labels. Text supplied at runtime from the data is not
translatable, nor is any text that you supply in the Microsoft Word form fields.
You can translate the template XLIFF file into as many languages as desired and then
associate these translations to the original template.
Upload the Translated XLIFF File to Publisher
You can run the Template Manager to upload the translated XLIFF file to Publisher.
1. Navigate to the report, sub template, or style template in the catalog and click Edit to open
it for editing.
For reports only:
From the thumbnail view of the report layouts, click the Properties link of the layout to
open the Template Manager.
2. In the Translations region, click the Upload toolbar button.
3. In the Upload Translation File dialog, locate the file in the local directory and select the
Locale for this translation.
4. Click OK to upload the file and view it in the Translations table.
Use a Localized Template
You can create localized templates for reports.
If you need to design a different layout for the reports that you present for different
localizations, then you can create new RTF file designed and translated for the locale and
upload this file to the Template Manager.
The localized template option is not supported for XPT templates.
Design the Localized Template File
Use the same tools that you used to create the base template file, translating the strings and
customizing the layout as desired for the locale.
Upload the Localized Template to Publisher
Upload localized template files in rtf format to Publisher.
1. Navigate to the report, subtemplate, or style template in the catalog and click Edit to open
it for editing.
For reports only:
From the thumbnail view of the report layouts, click the Properties link of the layout to
open the Template Manager.
2. In the Templates region, click the Upload toolbar button.
3. In the Upload Template File dialog, locate the file in the local directory, select rtf as the
Template Type and select the Locale for this template file.
4. Click OK to upload the file and view it in the Templates table.
Chapter 6
Add Translations For the Catalog and Reports
6-53

7
Customize and Configure Advanced Options
This topic describes advanced customization and configuration tasks performed by
administrators managing Oracle Analytics Cloud.
Topics:
• Typical Workflow For Advanced Customization and Configuration
• Apply Custom Logos and Dashboard Styles
• Localize the User Interface for Data Visualization
• Localize Custom Captions
• Enable Custom Java Script for Actions
• Deploy Write-back
• Add Custom Knowledge for Data Enrichment
• Track Usage
• Manage Query Caching
• Configure Advanced Options
Typical Workflow For Advanced Customization and Configuration
Here are some more advanced customization and configuration tasks for Oracle Analytics
Cloud administrators.
Task Description More Information
Change the default
reporting page and
dashboard styles
Change the default logo, page style, and
dashboard style.
Apply Custom Logos and
Dashboard Styles
Localize reporting
dashboards and analyses
Localize the names of workbook and
catalog objects (known as captions) into
different languages.
Localize Custom Captions
Set up custom JavaScript
for actions
Enable users to invoke browser scripts
from analyses and dashboards.
Enable Custom Java Script for
Actions
Set up write-back Enable users to update data from analyses
and dashboards.
Deploy Write-back
Add custom knowledge
for data enrichment
Add custom knowledge reference files (in
CSV format) to augment system
knowledge.
Add Custom Knowledge for
Data Enrichment
Track usage Track the user-level queries to the content
in Oracle Analytics Cloud.
Track Usage
Manage caching Manage how queries are cached in Oracle
Analytics Cloud.
Manage Query Caching
Configure advanced
options
Set more advanced, service-level options
for analyses and dashboards.
Configure Advanced Options
7-1

Apply Custom Logos and Dashboard Styles
Administrators use themes to apply custom logos and dashboard styles.
Topics:
• About Custom Logo and Dashboard Styles
• Change the Default Style for Analyses and Dashboards
• Manage Themes
• Customize Links on the Classic Home Page
About Custom Logo and Dashboard Styles
As an administrator you can customize your reporting environment by creating a theme that
displays custom logo, branding text, page style and so on.
When working with themes, note the following:
• You can create multiple themes, but only one theme can be active at one time.
• If you deactivate a theme, you revert to the default Oracle theme, unless you select a
different one.
• Themes are applied on pages with analyses and dashboards, but not to visualization
workbooks.
• You create themes in the Manage Themes area of the Administration page.
• When you activate a theme, you apply it to the browser session of the currently signed-in
administrator and to the browser sessions of end-users as they sign in.
• If Oracle Analytics is running on multiple instances, then duplicate and activate them for
each instance.
Change the Default Style for Analyses and Dashboards
Administrators create themes to change the default logo, colors, and heading styles for
analyzes and dashboards.
1. In the Classic Home page, click the user profile icon and then click Administration.
2. Click Manage Themes.
3. To apply an existing dashboard style, select one from the Theme list, click Active, then
click Save.
4. To create a new dashboard style, in the Theme list, click New Theme to display the New
Theme dialog.
5. In Theme Name, the name that you specify here is displayed in the Style list on the
Dashboard Properties dialog.
6. In Logo, specify the page logo that you want displayed in the top left hand corner. To
replace the default Oracle logo, click Select Logo and navigate to and select a different
logo in PNG, JPG, or JPEG format. Logos can't exceed 136 pixels in width by 28 pixels in
height.
Chapter 7
Apply Custom Logos and Dashboard Styles
7-2
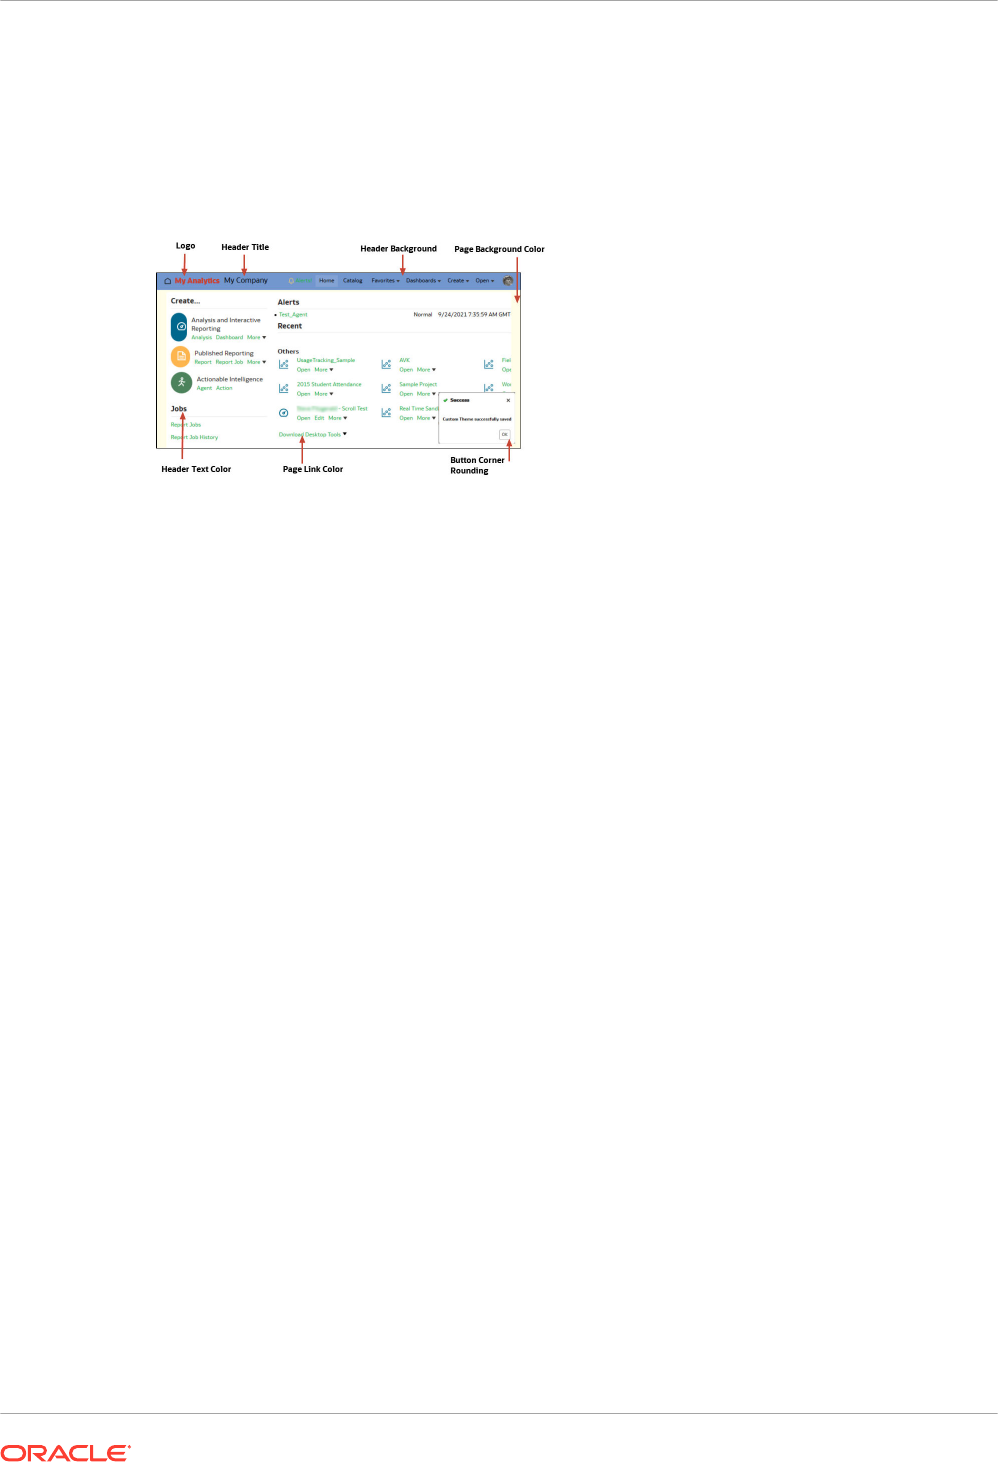
7. In Header Title, specify the branding information that you want displayed in the top left
hand corner next to the logo.
8. In Active, click to apply the currently displayed theme when you click Save. If you click
Active, then click Back without saving changes, the new theme isn’t applied.
This diagram shows you what theme options affect different areas of the reporting
environment.
Manage Themes
Administrators manage themes to change the default logo, colors, and heading styles for
reporting pages, dashboards, and analyses.
1. In the Classic Home page, click the user profile icon and then click Administration.
2. Click Manage Themes.
3. Optional: To apply a previously created theme, select the theme you want from the Theme
list, click Active, then click Save, then click Back.
4. Optional: To revert to the default Oracle theme, clear the Active option, click Save, then
click Back.
5. Optional: To remove a theme completely, select the theme you want to remove, click
Delete, then click Back.
Customize Links on the Classic Home Page
You can configure the Classic home page to display custom links. For example, you might add
a link to a website showing the local weather, or a link to the Oracle Analytics home page to
enable business analysts to navigate from the Classic home page to workbooks and
visualizations.
In this example, links are added for "My Weather" and "Analytics Cloud Home".
Chapter 7
Apply Custom Logos and Dashboard Styles
7-3
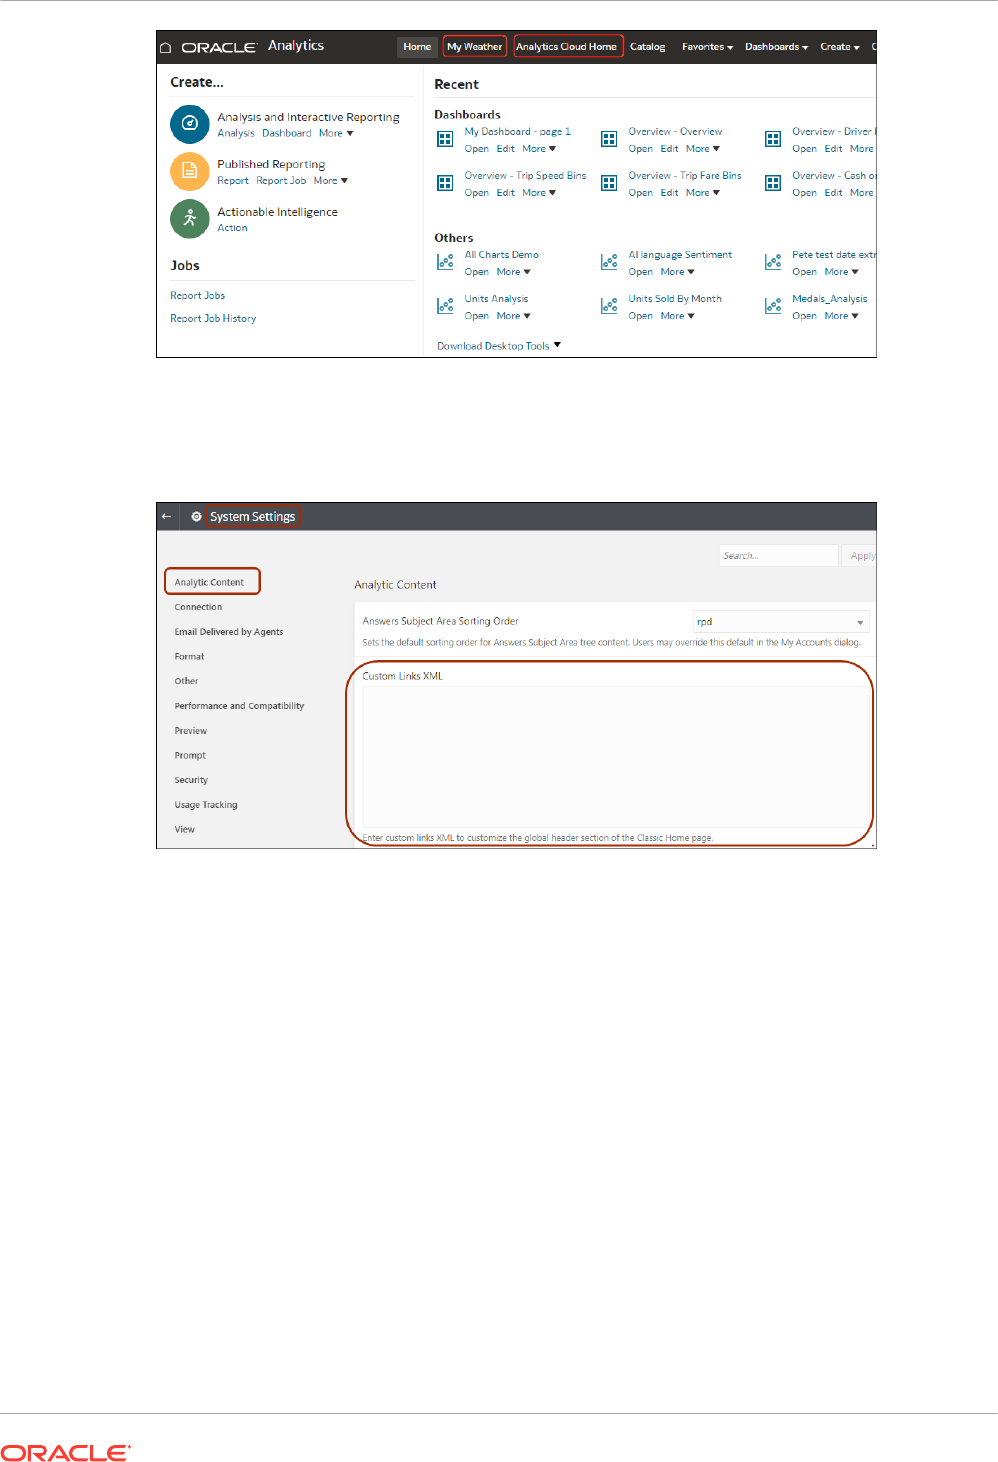
To add custom links, add XML code to the Custom Links XML system setting. To access the
System Settings page, go to the Oracle Analytics home page, click Navigator, then Console,
then System Settings, then Analytic Content).
You can use XML code to specify links and attributes, including the following:
• The text for the link (either a static string or a message name to use for localization).
• A target URL.
• Whether the target link opens in the current page or opens in a new tab or window.
• The relative ordering of links in the header.
• An optional icon to use with the link.
This example displays two custom links to the left of the Catalog link in the global header of
the Classic home page.
<?xml version="1.0" encoding="utf-8"?>
<customLinks xmlns="com.siebel.analytics.web/customlinks/v1">
<link id="1" name="My Weather" description="Local weather site"
src="https://www.example.com/weather" target="blank" >
<locations>
<location name="header" insertBefore="catalog"/>
</locations>
</link>
Chapter 7
Apply Custom Logos and Dashboard Styles
7-4
<link id="1" name="Analytics Cloud Home" description="OAC Viz Home Page"
src="https://<OAC example URL>.analytics.ocp.oraclecloud.com/ui/dv/?
pageid=home" target="blank" >
<locations>
<location name="header" insertBefore="catalog"/>
</locations>
</link>
</customLinks>
Note:
To obtain the link for Oracle Analytics home page, log into Oracle Analytics, copy the
URL, and paste it into the
src="<target link>"
element (as shown in the example
XML code).
This table describes the elements and attributes that you can specify for custom links.
Element or Attribute Optional? Data Type Description
link: accessibility
Optional Boolean Specifies that in accessibility mode, the link is available
only when the accessibility attribute is set to true.
Values are true and false, and false is the default.
In previous updates, the
vpat
attribute served the
same purpose as the accessibility attribute. The
vpat
attribute has been deprecated.
link: description
Optional String Specifies the description of the link (not translated).
link: iconSmall
Optional String Specifies the file name of an icon to display with the
link in the global header. The display of icons is
controlled by the fmap syntax.
link: id
Required String Use as a unique ID that specifies the position of the
link. You can include IDs for custom links to position
them relative to default links.
link: name
Required String Specifies the name of the link that isn't translated.
link: privilege
Optional String Specifies the name of privileges that a user must be
granted to see the link. The privileges are indicated as
an expression, as shown in the following example:
privileges.Access['Global
Answers']&&
privileges.Access['Global Delivers']
link: src
Required String Specifies the URL for the link.
link: target
Optional String Specifies the browser window in which to open the link.
The values are:
self: Opens in same window in which Oracle Analytics
is running.
blank: Opens in a new window.
any-name: Opens in a window with the specified
name.
Chapter 7
Apply Custom Logos and Dashboard Styles
7-5
Element or Attribute Optional? Data Type Description
location: insertBefore
Optional String Specifies the ID of an existing link to the left of which
you want to add the custom link. For example, to add a
custom link to the left of the Catalog link, specifiy
<location name="header"
insertBefore="catalog"/>
.
Valid IDs:
•
admin
•
catalog
•
dashboard
•
favorites
•
help
•
home
•
logout
•
new
•
open
•
user
If you make a mistake and specify an invalid ID, the
link is inserted in a default location.
location: name
Required String Use this attribute if you include the locations parent
element. The values are:
header: Specifies to include the link in the global
header.
locations
Optional Not Applicable Use as the parent element for specifying the locations
of the links to add. If you don’t specify a location, then
by default links are included before the Help link in the
global header and at the end of the Get Started
section.
Localize the User Interface for Data Visualization
You can localize the user interface display language and regional data formats for Data
Visualization.
The order of precedence for language and locale settings apply applies as follows:
• Browser language preference (browser settings).
• User setting for language or locale overrides the browser language preference.
• URL query parameter for language or locale overrides the user setting.
• Embedding parameter for language or locale overrides the URL query parameter.
When you localize the user interface display language or local-based regional data formats for
Data Visualization it doesn't include workbook custom captions. You localize workbook custom
captions separately. See Localize Data Visualization Workbook Captions.
Topics:
• Localize Data Visualization User Interface Display Language
• Localize Data Visualization Regional Data Formats
• Workbook Data Format Changes When You Select a Different Locale
Chapter 7
Localize the User Interface for Data Visualization
7-6

Localize Data Visualization User Interface Display Language
You can change the language for displaying Data Visualization user interface strings.
1. From the Home page, click the user profile icon.
2. Click Profile, and click the My Profile tab.
3. Click Language and select the language to use for the user interface.
The language that you select takes precedence over the browser language.
4. Sign out of Oracle Analytics Cloud and then sign back in again to display the language that
you selected.
Localize Data Visualization Regional Data Formats
You can select a locale to display region-specific date and number formatting in Data
Visualization workbooks.
1. From the Home page, click the user profile icon.
2. Click Profile, and click the My Profile tab.
3. Click Locale and select a locale.
The locale that you select takes precedence over the browser locale.
4. Sign out of Oracle Analytics Cloud and then sign back in again to display the language that
you selected.
Workbook Data Format Changes When You Select a Different Locale
When you select a different locale, data formatting changes can occur in various workbook
areas.
• General workbook areas affected:
– date or time formats (timestamp uses a combination of date or time formatting)
For example, mm/dd/yy (USA) versus dd/mm/yy (EU regions).
– number formats (variations in the decimal and thousands separator )
For example, 15.000.00, or 15,000.00
• Workbook presentation mode areas affected:
– visualizations (data display, tooltips, titles)
– filter controls (data display and data entry)
– parameter controls (data display and data entry)
• Workbook edit mode areas affected:
– parameter dialog value display or entry
– conditional format dialog
– visualization properties
– any other workbook edit surfaces that expose dates, time, number
Chapter 7
Localize the User Interface for Data Visualization
7-7

Localize Custom Captions
You can localize custom captions for Classic catalog objects and for Data Visualization
workbook captions.
Topics:
• Localize Data Visualization Workbook Captions
• Localize Catalog Captions
Localize Data Visualization Workbook Captions
You can localize the names of custom Data Visualization workbook captions. For example, you
might localize a customized workbook name into Spanish and French.
See What languages does Oracle Analytics support?
To localize the names of Data Visualization workbook captions, you export captions for the
Data Visualization workbook to a file, translate the captions, and then upload the translated
captions back into the workbook. You must upload your translations to the same Oracle
Analytics environment that you exported the captions from.
If you want to migrate caption localizations to a different Oracle Analytics environment, you can
export your workbook captions to a snapshot and then import the snapshot on the target
environment. Caption translations are included in the snapshot.
Topics:
• Export Workbook Captions
• Localize Workbook Captions
• Import Localized Workbook Captions
Export Workbook Captions
You can export workbook captions so that they can be translated.
1. On the Home page, click the Navigator, and then click Console.
2. Click Translations.
3. Click the Export tab.
4. Expand Shared Folders, select the folder containing the Data Visualization workbook
caption files to localize, for example, \Shared Folders\OAC_DV_SampleWorkbook.
5. Click Export to download and save the exported
captions.zip
file, containing the .JS files
that you want to localize, to the browser's download folder.
Localize Workbook Captions
After you have exported your Data Visualization workbook captions, you deliver the
captions.zip file containing language-specific JS caption files for each supported language, to
the localization team. For example, if you're localizing the French captions file, the file that you
Chapter 7
Localize Custom Captions
7-8
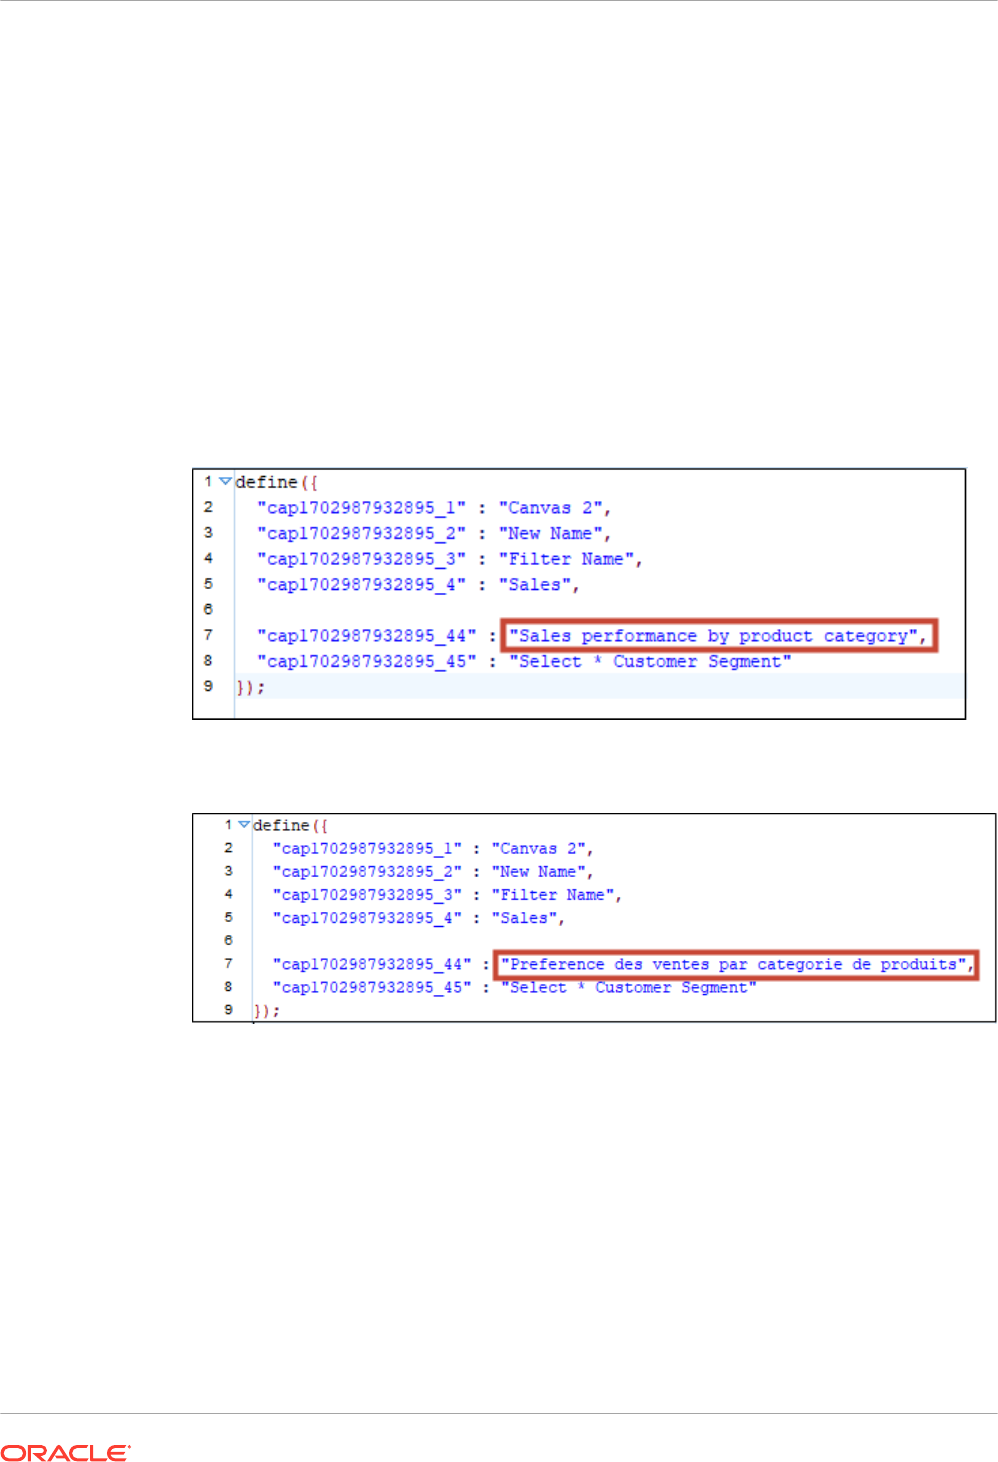
update might be named @/Shared/DataVizWorkbookFolderNameExample/
WorkbookNameExample/NLS/fr/captions.js.
You and the localization team are responsible for resolving any errors in the translated text
strings. Consider that the contents of the workbook are updated whenever objects are added,
deleted, or modified.
1. Browse to the workbook captions ZIP file that you exported, and extract the language-
specific JS file that you want to update.
2. Open the extracted language-specific JS file for editing.
3. Enter translated names into the appropriate caption elements to replace the existing text
strings.
For example, if you created a visualization title caption in
Canvas 2
named
Sales
performance by product category
, you edit and replace the English text with the French
translation which is
Performance des ventes par categorie de produits
.
The French
captions.js
file before translation:
The French
captions.js
file after translation:
4. Save the updated language-specific JS file and then add it to the exported translated
captions ZIP file.
5. Optional: You can also use this method to import localized Classic catalog caption .XML
files. You can add translated .XML files under the top level directory of the exported
translated captions ZIP file. and zip them up together for import.
For example:
• ar/_shared_Common_captions.xml
• cs/_shared_Common_captions.xml
• ...
• zh-TW/_shared_Common_captions.xml
Chapter 7
Localize Custom Captions
7-9

Import Localized Workbook Captions
After you've localized your Data Visualization workbook captions in the required language, you
deploy the language by uploading the translated ZIP file to the same Oracle Analytics
environment that you exported the workbook captions from.
1. In the Oracle Analytics Home page, click the Navigator, and then click Console.
2. Click Translations and click the Import tab.
3. Click Select a file or drop it here, and browse for, or drag and drop the ZIP file containing
the translated JS file that you want to import.
4. Click Import.
Oracle Analytics displays translated language-specific text strings in a browser that's suitably
configured to use the correct captions file for the required language.
Localize Catalog Captions
You can localize the names of classic reporting objects that users create in the catalog. Classic
object names are also known as captions. Workbook custom captions aren't changed when
you localize classic object names.
See What languages does Oracle Analytics support?.
To localize captions for classic content, you export the captions from the catalog to a file,
translate the captions, and then upload the localized captions back into the catalog. You must
upload your translations to the same Oracle Analytics environment that you exported the
captions from.
For example, your company's browser setting use Argentinian Spanish rather than Spain
Spanish, you can set the language to Argentinian Spanish to override the current language
setting.
If you want to migrate caption localizations to a different Oracle Analytics environment, you can
export your catalog to a snapshot and then import the snapshot on the target environment.
Caption translations are included in the snapshot.
Export Captions from the Catalog
The following procedure describes how to export text strings in the catalog.
1. In the Classic Home page, click the user profile icon and then click Administration.
2. In the Manage Catalog Captions area, click Export Captions.
3. Click Browse to display the Catalog browser, select the folder that contains the files you
want to localize, and then click OK.
For example, you might select \Shared Folders\Sample Report.
4. In the Export Captions dialog, click OK to download and save the XML file in a local area.
For example, if you select the file \Shared Folders\Sample Report, you’ll save a file
locally named _shared_Sample Report_captions.xml.
Chapter 7
Localize Custom Captions
7-10
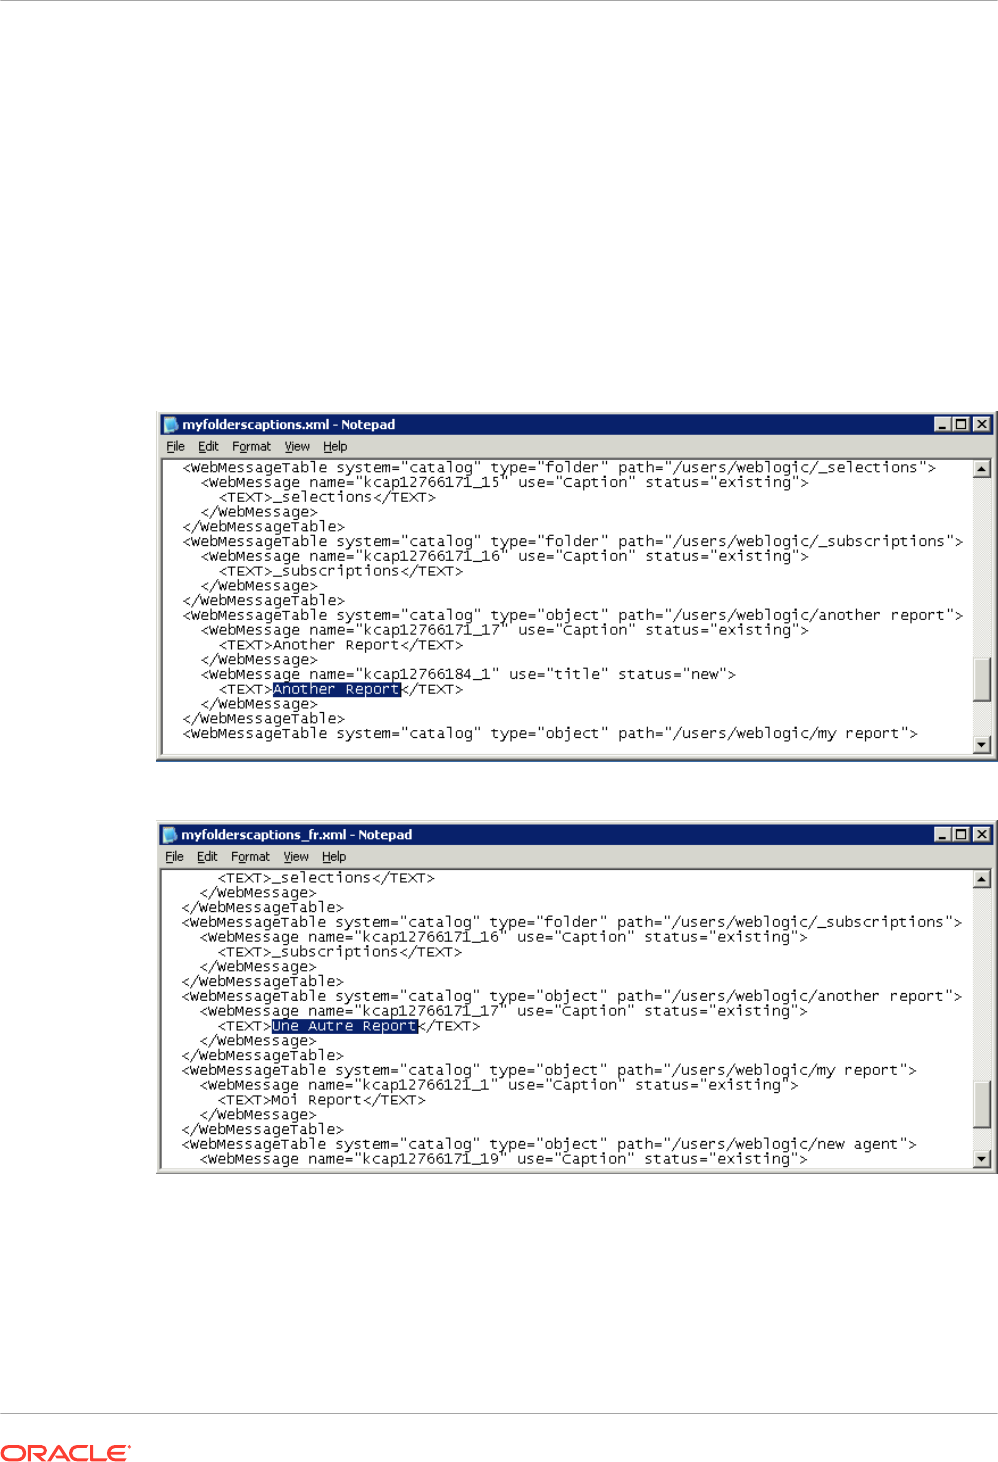
Localize Your Captions
After you have exported your captions in an XML file, deliver the XML file to the localization
team. For example, if you selected the Custom folder to download, you’ll deliver a file named
_shared_Custom_captions.xml.
You and the localization team are responsible for resolving any errors in the translated text
strings. Consider that the contents of the catalog are updated whenever objects are added,
deleted, or modified.
The first illustration shows an extract from an exported caption XML file before translation. The
file is named myfoldercaptions.xml. The second illustration shows an extract from the file
after translation. The file is named myfoldercaptions_fr.xml.
Upload Localized Captions to the Catalog
After you've localized your captions in the required languages, you deploy the languages by
uploading the translated XML files to the same Oracle Analytics environment that you exported
the captions from. Use this procedure for each language.
Chapter 7
Localize Custom Captions
7-11

1. In the Classic Home page, click the user profile icon and then click Administration.
2. In the Manage Catalog Captions area, click Import Captions.
3. Click Browse, then navigate to and select the localized XML file, and click OK.
4. Use the Select language option to select the language to which you’ve localized, then
click OK.
Imported XML files are copied to the MsgDb folder under the selected language.
Enable Custom Java Script for Actions
Users working with analyses and dashboards can add action links that invoke custom
JavaScript accessible through a web server. To enable this feature, administrators specify the
URL of the web server in System Settings and register the web server as a safe domain.
1. Develop your scripts in JavaScript, store them in a web server, and make a note of the
URL pointing to the JavaScript (*.JS) file containing the custom scripts.
For example, you might develop a currency conversion script named
mycurrencyconversion
that you store in
myscripts.js
, and the URL might be:
http://
example.com:8080/mycustomscripts/myscripts.js
.
2. Specify the URL of your web server in System Settings:
a. Click Console, then click System Settings.
b. In URL for Browser Script Actions, enter the URL that you noted in Step 1.
c. If prompted to, click Apply.
3. Register the web server as a safe domain:
a. Click Console, then click Safe Domains.
b. Add an entry for the domain in the URL you specified in Step 2.
For example, you might add:
example.com:8080
.
c. For options, select Script and Connect.
4. Test your configuration:
a. In Classic Home, open or create an analysis.
b. Display the Column Properties for a column, click Interaction, then Add Action Link.
c. Click Create New Action, then Invoke a Browser Script.
d. Under Function Name enter the name of a script in your JavaScript (*.JS) file.
For example,
USERSCRIPT.mycurrencyconversion
.
e. Save the details, and open the analysis.
f. Click the column to which you added the action, then click the action.
Validate and Block Queries in Analyses Using Custom JavaScript
You can develop validation scripts in JavaScript to validate analysis criteria and column
formulas, and block invalid queries.
• Block Queries in Analyses
• Develop JavaScript to Block Analyses Based on Criteria
Chapter 7
Enable Custom Java Script for Actions
7-12

• Develop JavaScript to Block Analyses Based on Formula
• Validation Helper Functions
Block Queries in Analyses
Users working with analyses can invoke custom JavaScript to validate analysis criteria and
column formulas. The validation allows for queries to be blocked when editing an analysis. The
custom JavaScript must be accessible through a web server. To enable this feature,
administrators specify the URL of the web server in system settings and register the web
server as a safe domain.
1. Develop your custom validation scripts in JavaScript, store them in a web server, and
make a note of the URL pointing to the JavaScript (*.JS) file containing the custom scripts.
For example, you might develop a blocking script that you store in
myblocking.js
, and the
URL might be:
http://example.com:8080/mycustomscripts/myblocking.js
.
2. Specify the URL of your web server in system settings:
a. Click Console, then click System Settings.
b. In URL for Blocking Queries in Analyses, enter the URL that you noted in Step 1.
3. Register the web server as a safe domain:
a. Click Console, then click Safe Domains.
b. Add an entry for the domain in the URL you specified in Step 2.
For example, you might add:
example.com:8080
.
c. For options, select Script and Connect.
4. Test your validation scripts:
a. Open an analysis.
b. Run the analysis with both valid and invalid criteria.
c. Verify that queries are blocked as expected.
Develop JavaScript to Block Analyses Based on Criteria
Whenever a user tries to run an analysis, Oracle Analytics invokes the function
validateAnalysisCriteria
. You can customize
validateAnalysisCriteria
to validate and
block queries based on your own specific criteria. If the function returns
true
, the query runs. If
the function returns
false
or displays a message, the query is blocked.
For example, the following is sample code for a JavaScript program called
myblocking.js
.
// This is a blocking function. It ensures that users select what
// the designer wants them to.
function validateAnalysisCriteria(analysisXml)
{
// Create the helper object
var tValidator = new CriteriaValidator(analysisXml);
// Validation Logic
if (tValidator.getSubjectArea() != "Sample Sales")
return "Try Sample Sales?";
if (!
tValidator.dependentColumnExists("Markets","Region","Markets","District"))
Chapter 7
Validate and Block Queries in Analyses Using Custom JavaScript
7-13

{
// If validation script notifies user, then return false
alert("Region and District are well suited, do you think?");
return false;
}
if (!tValidator.dependentColumnExists("Sales
Measures","","Periods","Year"))
return "You selected a measure so pick Year!";
if (!tValidator.filterExists("Sales Measures","Dollars"))
return "Maybe filter on Dollars?";
if (!tValidator.dependentFilterExists("Markets","Market","Markets"))
return "Since you are showing specific Markets, filter the markets.";
var n = tValidator.filterCount("Markets","Region");
if ((n <= 0) || (n > 3))
return "Select 3 or fewer specific Regions";
return true;
}
If the function returns anything other than
false
, the criteria is considered to be valid and the
analysis runs. The function is also use to validate criteria for preview and save operations.
Develop JavaScript to Block Analyses Based on Formula
Whenever a user tries to enter or modify a column formula, Oracle Analytics invokes the
function
validateAnalysisFormula
to verify the operation. You can customize
validateAnalysisFormula
to validate and block formulas based on your own specific criteria.
If the function returns
true
, the formula is accepted. If validation fails the function returns
false
, the formula is rejected and your custom message displays.
To display a message and allow users to continue, your function must return
true
. To block the
query, your function must return
false
or display a message. You can use a JavaScript string
and regular expression techniques in your function to investigate and validate the formula.
Helper functions are available so the query blocking function can check for filters, columns,
and so on. See Validation Helper Functions.
For example, the following code shows how to block a query if a user enters an unacceptable
formula.
// This is a formula blocking function. It makes sure the user doesn't enter
an unacceptable formula.
function validateAnalysisFormula(sFormula, sAggRule)
{
// don't allow the use of concat || in our formulas
var concatRe = /\|\|/gi;
var nConcat = sFormula.search(concatRe);
if (nConcat >= 0)
return "You used concatenation (character position " + nConcat + ").
That isn't allowed.";
// no case statements
var caseRe = /CASE.+END/gi;
if (sFormula.search(caseRe) >= 0)
return "Don't use a case statement.";
// Check for a function syntax: aggrule(formula) aggrule shouldn't contain
a '.'
var castRe = /^\s*\w+\s*\(.+\)\s*$/gi;
Chapter 7
Validate and Block Queries in Analyses Using Custom JavaScript
7-14
if (sFormula.search(castRe) >= 0)
return "Don't use a function syntax such as RANK() or SUM().";
return true;
}
Validation Helper Functions
Several validation helper functions are available in a JavaScript file for you to use.
Validation Helper Function Description
CriteriaValidator.getSubjectArea()
Returns the name of the subject area referenced by the analysis. It
generally is used in a switch statement within the function before
doing other validation. If the analysis is a set-based criteria, then it
returns
null.
CriteriaValidator.tableExists(sTable)
Returns
true
if the specified folder (table) has been added to the
analysis by the content designer, and
false
if the folder wasn't
added.
CriteriaValidator.columnExists(sTable,
sColumn)
Returns
true
if the specified column has been added to the
analysis by the content designer, and
false
if the column wasn't
added.
CriteriaValidator.dependentColumnExists(sC
heckTable, sCheckColumn, sDependentTable,
sDependentColumn)
Checks to ensure that the
dependentColumn
exists if the
checkColumn
is present. It returns
true
if either the checkColumn
isn't present, or the
checkColumn
and the dependent column are
present. If
checkColumn
and
dependentColumn
are
null
, then
the folders are validated. If any column from
checkTable
is
present, then a column from
dependentTable
must be present.
CriteriaValidator.filterExists(sFilterTabl
e, sFilterColumn)
Returns
true
if a filter exists on the specified column, and
false
if
no filter is present.
CriteriaValidator.dependentFilterExists(sC
heckTable, sCheckColumn, sFilterTable,
sFilterColumn)
Checks to ensure that the
dependentFilter
exists if the
checkColumn
is present in the projection list. It returns
true
if
either the
checkColumn
isn't present, or the
checkColumn
and the
dependent filter are present.
CriteriaValidator.filterCount(sFilterTable
, sFilterColumn)
Returns the number of filter values that are specified for the given
logical column. If the filter value is "
equals
," "
null
," "
notNull
", or
"
in
", then it returns the number of values chosen. If the column
isn't used in a filter, then it returns zero. If the column is prompted
with no default, then it returns -1. For all other filter operators (such
as "
greater than
," "
begins with
," and so on) it returns
999
,
because the number of values can't be determined.
Deploy Write-back
Write-back enables users to update data from analyses.
Topics:
• About Write-back for Administrators
• Enable Write-back in Analyses and Dashboards
• Write-Back Limitations
• Create Write-Back Template Files
Chapter 7
Deploy Write-back
7-15

About Write-back for Administrators
Write-back enables users to update your data directly from dashboards and analyses.
Users with the Write Back to Database privilege see write-back fields as editable fields in
analyses. The values they enter are saved to the database. Users without the Write Back to
Database privilege, see write-back fields as read-only fields.
If a user types a value in an editable field and clicks the write-back button, then the application
runs the
insert
or
update
SQL command defined in a write-back template. If the command
succeeds, the analysis is updated with the new value. If there's an error either reading the
template or running the SQL command, an error message is displayed.
The
insert
command runs when a record doesn't yet exist and the user enters new data into
the table. In this case, the user typed in a table record where the original value was null. The
update
command runs when a user modifies existing data. To display a record that doesn't yet
exist in the physical table, you can create another similar table. Use this similar table to display
placeholder records that a user can modify.
Note:
When you create write-back templates, you must include both an
insert
command
and an
update
command, even if they're not both used. For example, if you're only
performing an
insert
, you must include an empty
update
statement
<update></
update>
, as in this XML code:
Here's a sample write-back XML file that contains two
insert
commands and two empty
update
statements. To find out more about how to create and structure write-back XML files,
see Create Write-Back Template Files.
<?xml version="1.0" encoding="utf-8" ?>
<WebMessageTables xmlns:xsi="http://www.w3.org/2001/XMLSchema-instance"
xmlns="oracle.bi.presentation/writebackschemas/v1">
<WebMessageTable lang="en-us" system="WriteBack" table="Messages">
<WebMessage name="SetQuotaUseID">
<XML>
<writeBack connectionPool="Supplier">
<insert>INSERT INTO regiontypequota
VALUES(@{c5f6e60e1d6eb1098},@{c5d7e483445037d9e},'@{c3a93e65731210ed1}','@{c6b
8735ea60ff3011}',@{c0432jkl53eb92cd8})</insert>
<update></update>
</writeBack>
</XML>
</WebMessage>
<WebMessage name="SetForecastUseID">
<XML>
<writeBack connectionPool="Supplier">
<insert>INSERT INTO regiontypeforecast
VALUES(@{c83ebf607f3cb8320},@{cb7e2046a0fba2204},'@{c5a93e65d31f10e0}','@{c5a9
3e65d31f10e0}',@{c7322jkl93ev92cd8})</insert>
<update></update>
</writeBack>
Chapter 7
Deploy Write-back
7-16

</XML>
</WebMessage>
</WebMessageTable>
</WebMessageTables>
Enable Write-back in Analyses and Dashboards
Administrators can enable users to edit the data in analyses and dashboards.
1. Set up your semantic model.
Note:
Follow these steps if you use Model Administration Tool to develop semantic
models. If you use Semantic Modeler, see
Enable Write Back On Columns .
a. In Model Administration Tool, open your semantic model (.rpd file).
b. In the Physical layer, double-click the physical table that contains the column for which
you want to enable write-back.
c. On the General tab of the Physical Table dialog, ensure that Cacheable isn't selected.
Deselecting this option ensures that Presentation Services users can see updates
immediately.
d. In the Business Model and Mapping layer, double-click the corresponding logical
column.
e. In the Logical Column dialog, select Writeable, then click OK.
f. In the Presentation layer, double-click the column that corresponds to the logical
column for which you enabled write-back.
g. In the Presentation Column dialog, click Permissions.
h. Select the Read/Write permission for the appropriate users and application roles.
i. Save your changes.
2. Create an XML document with your write-back template (or templates). See Create Write-
Back Template Files.
Your XML document can contain multiple templates. This example shows an XML
document that contains two templates (
SetQuotaUseID
and
SetForecastUseID
).
<?xml version="1.0" encoding="utf-8" ?>
<WebMessageTables xmlns:xsi="http://www.w3.org/2001/XMLSchema-instance"
xmlns="oracle.bi.presentation/writebackschemas/v1">
<WebMessageTable lang="en-us" system="WriteBack" table="Messages">
<WebMessage name="SetQuotaUseID">
<XML>
<writeBack connectionPool="Supplier">
<insert>INSERT INTO regiontypequota
VALUES(@{c5f6e60e1d6eb1098},@{c5d7e483445037d9e},'@{c3a93e65731210ed1}','@{
c6b8735ea60ff3011}',@{c0432jkl53eb92cd8})</insert>
<update>UPDATE regiontypequota SET
Dollars=@{c0432jkl53eb92cd8} WHERE YR=@{c5f6e60e1d6eb1098} AND
Chapter 7
Deploy Write-back
7-17

Quarter=@{c5d7e483445037d9e} AND Region='@{c3a93e65731210ed1}' AND
ItemType='@{c6b8735ea60ff3011}'</update>
</writeBack>
</XML>
</WebMessage>
<WebMessage name="SetForecastUseID">
<XML>
<writeBack connectionPool="Supplier">
<insert>INSERT INTO regiontypeforecast
VALUES(@{c83ebf607f3cb8320},@{cb7e2046a0fba2204},'@{c5a93e65d31f10e01}','@{
c5a93e65d31f10e0}',@{c7322jkl93ev92cd8})</insert>
<update>UPDATE regiontypeforecast SET
Dollars=@{c7322jkl93ev92cd8} WHERE YR=@{c83ebf607f3cb8320} AND
Quarter=@{cb7e2046a0fba2204} AND Region='@{c5a93e65d31f10e01}' AND
ItemType='@{c5a93e65d31f10e0}'</update>
</writeBack>
</XML>
</WebMessage>
</WebMessageTable>
</WebMessageTables>
Note: You must include an
<insert>
element and an
<update>
element, even if both
aren't used. For example, if you're only performing an
insert
, you must include the empty
update
statement
<update></update>
.
3. Copy the XML document containing your write-back templates to the clipboard.
4. Apply your write-back template in Oracle Analytics:
a. Click Console, then click System Settings.
b. In Writeback Template XML, paste the write-back template that you copied in Step 3.
5. Grant permissions to use the write-back code:
a. Navigate to Classic home, then click Administration.
b. Under Security, click Manage Privileges, and navigate to Write Back.
c. Grant Write Back to Database to Authenticated User.
d. Grant Manage Write Back to BI Service Administrator.
6. To enable write-back in columns:
a. In the analysis editor, display the Column Properties of the column on which you want
to enable write-back.
b. In the Column Properties dialog, click the Write Back tab.
If the column has been enabled for write-back in the semantic model, then the Enable
Write Back box is available.
c. Select the Enable Write Back option.
d. Specify the value of other options if you want to change the default.
e. Save your changes.
The column is enabled for write-back in any analysis that includes this column.
7. To enable write-back in table views:
a. In the analysis editor, open the table view for editing.
Chapter 7
Deploy Write-back
7-18

b. Click View Properties.
c. In the Table Properties dialog, click the Write Back tab.
d. Select the Enable Write Back option.
e. Select the Template Name box, specify the value of "WebMessage name=" in the
write-back template that you specified in Step 2.
For example, the Template Name for the example template in Step 2 is
'SetQuotaUseID'.
f. Save your changes.
Write-Back Limitations
Users can write back to any data source that allows the execution of SQL queries from Oracle
Analytics .
As you configure for write back, keep the following limitations in mind:
• Numeric columns must contain numbers only. They mustn't contain any data formatting
characters such as dollar signs ($), pound signs or hash signs (#), percent signs (%), and
so on.
• Text columns must contain string data only.
• If a logged-on user is already viewing a dashboard that contains an analysis where data
has been modified using write back, the data isn't automatically refreshed in the
dashboard. To see the updated data, the user must manually refresh the dashboard.
• You can use the template mechanism only with table views and only for single-value data.
The template mechanism isn't supported for pivot table views or any other type of view, for
multiple-value data, or for drop down columns with single-value data.
• All values in write-back columns are editable. When displayed in non printer friendly
context, editable fields are displayed as if the user has the Write Back to Database
privilege. However, when a logical column is mapped to a physical column that can
change, the logical column returns values for multiple level intersections. This scenario
might cause problems.
• Any field in an analysis can be flagged as a write-back field, even if it's not derived from
the write-back table that you created. However you can't successfully run the write-back
operation if the table isn't write-back enabled. The responsibility for correctly tagging fields
lies with the content designer.
• A template can contain SQL statements other than
insert
and
update
. The write-back
function passes these statements to the database. However, Oracle doesn't support or
recommend the use of any statements other than
insert
or
update
.
• Oracle Analytics performs only minimal validation of data input. If the field is numeric and
the user enters text data, then Oracle Analytics detects that and prevents the invalid data
from going to the database. However, it doesn't detect other forms of invalid data input
(values out of range, mixed text and numeric, and so on). When the user clicks the write-
back button and an insert or update is run, invalid data results in an error message from
the database. The user can then correct the faulty input. Content designers can include
text in the write-back analysis to aid the user, for example, "Entering mixed alphanumeric
values into a numeric data field isn't allowed."
• The template mechanism isn't suitable for entering arbitrary new records. In other words,
don't use it as a data input tool.
Chapter 7
Deploy Write-back
7-19

• When creating a table for write back, ensure that at least one column doesn't include write-
back capability but does include values that are unique for each row and are non-null.
• Write-back analyses don't support drill-down. Because drilling down modifies the table
structure, the write-back template doesn't work.
Caution:
The template mechanism takes user input and writes it directly to the database.
The security of the physical database is your own responsibility. For optimum
security, store write-back database tables in a unique database instance.
Create Write-Back Template Files
A write-back template file is an XML-formatted file that contains one or more write-back
templates.
A write-back template consists of a
WebMessage
element that specifies the name of the
template, the connection pool, and the SQL statements that are needed to insert and update
records in the write-back tables and columns that you've created. When content designers
enable a table view for write back, they must specify the name of the write-back template to
use to insert and update the records in the table view.
Requirements for a Write-Back Template
A write-back template must meet the following requirements:
•
WebMessage
: You must specify a name for the write-back template using the
name
attribute
in the WebMessage element.
For write back to work correctly, when enabling a table view for write back, a content
designer must specify the name of the write-back template to be used to insert and update
the records in the view.
This example shows a write-back template called
SetQuotaUseID
.
<WebMessage name="SetQuotaUseID">
•
connectionPool
: To meet security requirements, you must specify the connection pool
along with the SQL commands to insert and update records. These SQL commands
reference the values that are passed in the write-back schema to generate the SQL
statements to modify the database table.
•
VALUES
: Column values can be referenced either by column ID or column position. The use
of column ID is preferred.
Surround string and date values with single quotes. Single quotes aren't required on
numerical values.
– Column ID - Each column ID is alphanumeric and randomly generated. You can find
column IDs in the XML definition of the analysis that's available in the Advanced tab of
the analysis editor. For example, column ID values such as:
@{c5f6e60e1d6eb1098}
,
@{c3a93e65731210ed1}
,
'@{c6b8735ea60ff3011}'
When you use column IDs, write-back continues to work even when the order of
columns change.
Chapter 7
Deploy Write-back
7-20
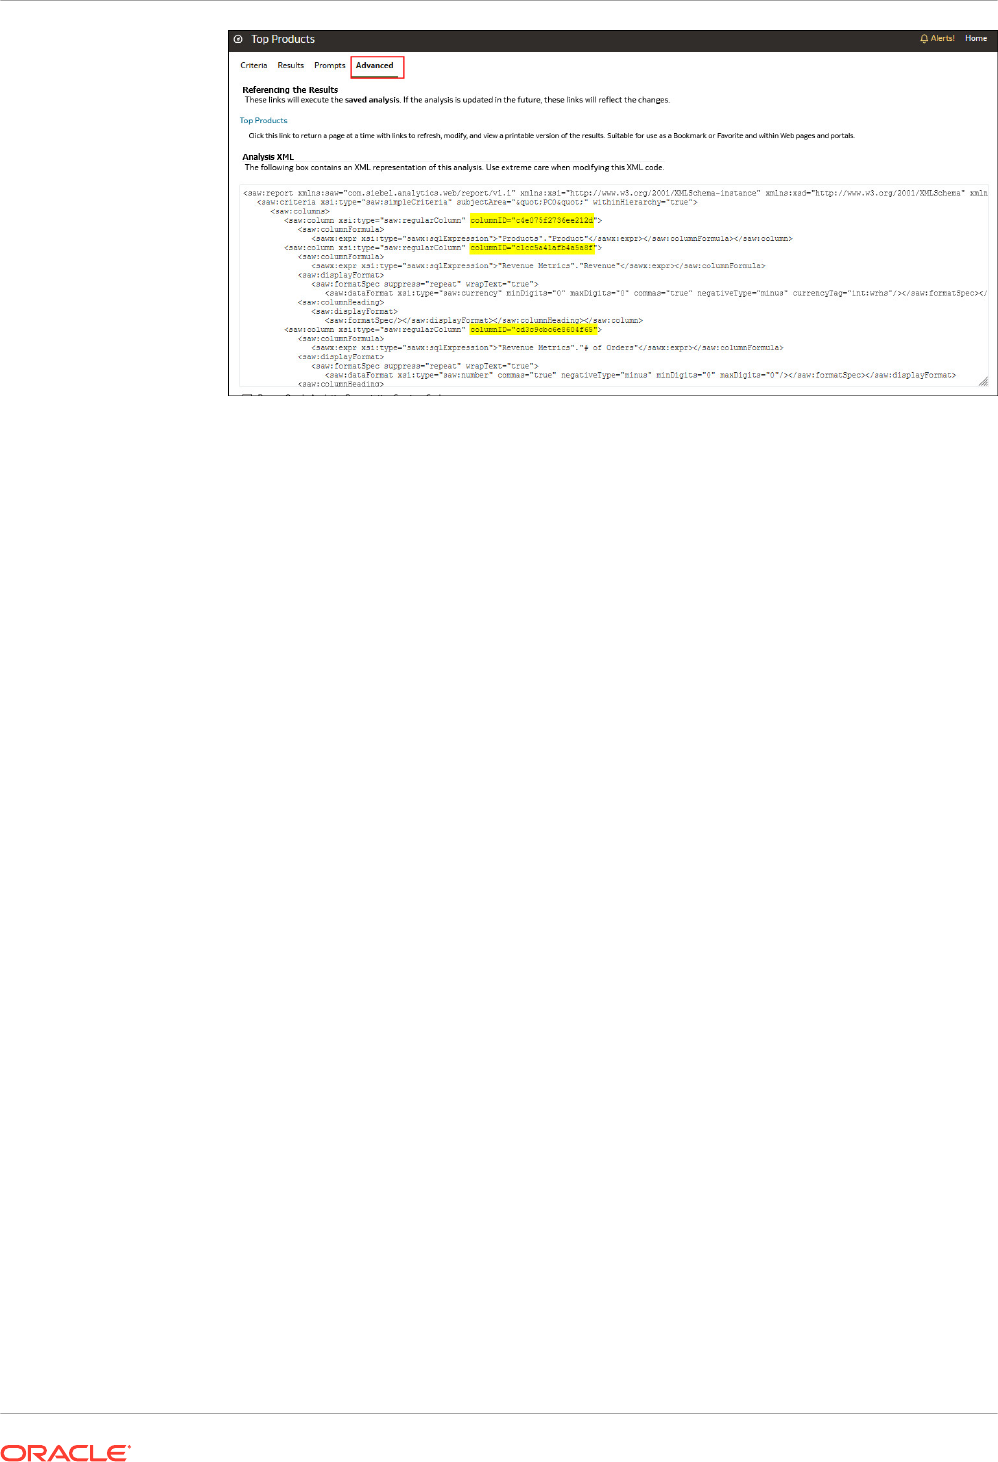
– Column position - Column positions start numbering with 1. For example, column
position values such as:
@1
,
@3
,
'@5'
If the order of columns changes, write back no longer works and this is the reason why
column IDs are preferred.
• You must include both an
<insert>
and an
<update>
element in the template. If you don't
want to include SQL commands within the elements, then you must insert a blank space
between the opening and closing tags. For example, you must enter the element as:
<insert> </insert>
Rather than:
<insert></insert>
If you omit the blank space, then you see a write-back error message such as "The system
can't read the Write Back Template 'my_template'".
• If a parameter's data type isn't an integer or real number, then add single quotation marks
around it. If the database doesn't do Commits automatically, then add the optional
postUpdate
node after the
insert
and
update
nodes to force the commit. The
postUpdate
node typically follows this example:
<postUpdate>COMMIT</postUpdate>
Example Write-Back Template File Using Column ID Syntax
A write-back template file that references values by column ID might resemble this example:
<?xml version="1.0" encoding="utf-8" ?>
<WebMessageTables xmlns:sawm="com.siebel.analytics.web/message/v1">
<WebMessageTable lang="en-us" system="WriteBack" table="Messages">
<WebMessage name="SetQuotaUseID">
<XML>
<writeBack connectionPool="Supplier">
<insert>INSERT INTO regiontypequota
VALUES(@{c5f6e60e1d6eb1098},@{c5d7e483445037d9e},'@{c3a93e65731210ed1}','@{c6b
8735ea60ff3011}',@{c0432jkl53eb92cd8})</insert>
<update>UPDATE regiontypequota SET Dollars=@{c0432jkl53eb92cd8}
Chapter 7
Deploy Write-back
7-21

WHERE YR=@{c5f6e60e1d6eb1098} AND Quarter=@{c5d7e483445037d9e} AND
Region='@{c3a93e65731210ed1}' AND ItemType='@{c6b8735ea60ff3011}'</update>
</writeBack>
</XML>
</WebMessage>
</WebMessageTable>
</WebMessageTables>
Example Write-Back Template File Using Column Position Syntax
A write-back template file that references values by column position might resemble this
example:
<?xml version="1.0" encoding="utf-8" ?>
<WebMessageTables xmlns:sawm="com.siebel.analytics.web/message/v1">
<WebMessageTable lang="en-us" system="WriteBack" table="Messages">
<WebMessage name="SetQuota">
<XML>
<writeBack connectionPool="Supplier">
<insert>INSERT INTO regiontypequota VALUES(@1,@2,'@3','@4',@5)</
insert>
<update>UPDATE regiontypequota SET Dollars=@5 WHERE YR=@1 AND
Quarter=@2 AND Region='@3' AND ItemType='@4'</update>
</writeBack>
</XML>
</WebMessage>
</WebMessageTable>
</WebMessageTables>
Add Custom Knowledge for Data Enrichment
Add custom knowledge to Oracle Analytics to augment the system knowledge. For example,
you might add a custom knowledge reference that classifies prescription medication into USP
drug categories Analgesics or Opioid.
Tutorial
Custom knowledge enables the Oracle Analytics semantic profiler to identify more business-
specific semantic types and make more relevant and governed enrichment recommendations.
Before you start, download your custom knowledge reference files (in CSV format) and make
them available locally for upload. The maximum file size you can upload is 250 MB. You can
also create your own custom knowledge reference files in CSV or XLSX format. See Custom
Knowledge Recommendations.
1. In the Oracle Analytics Home page, click the Navigator, and then click Console.
2. Click Reference Knowledge.
3. Under Custom Knowledge, click Add Custom Knowledge.
4. In the Open dialog, navigate to and select your custom knowledge CSV file, then click
Open.
5. In the Create Custom Knowledge from dialog, specify a name, verify the upload options,
then click OK.
Chapter 7
Add Custom Knowledge for Data Enrichment
7-22
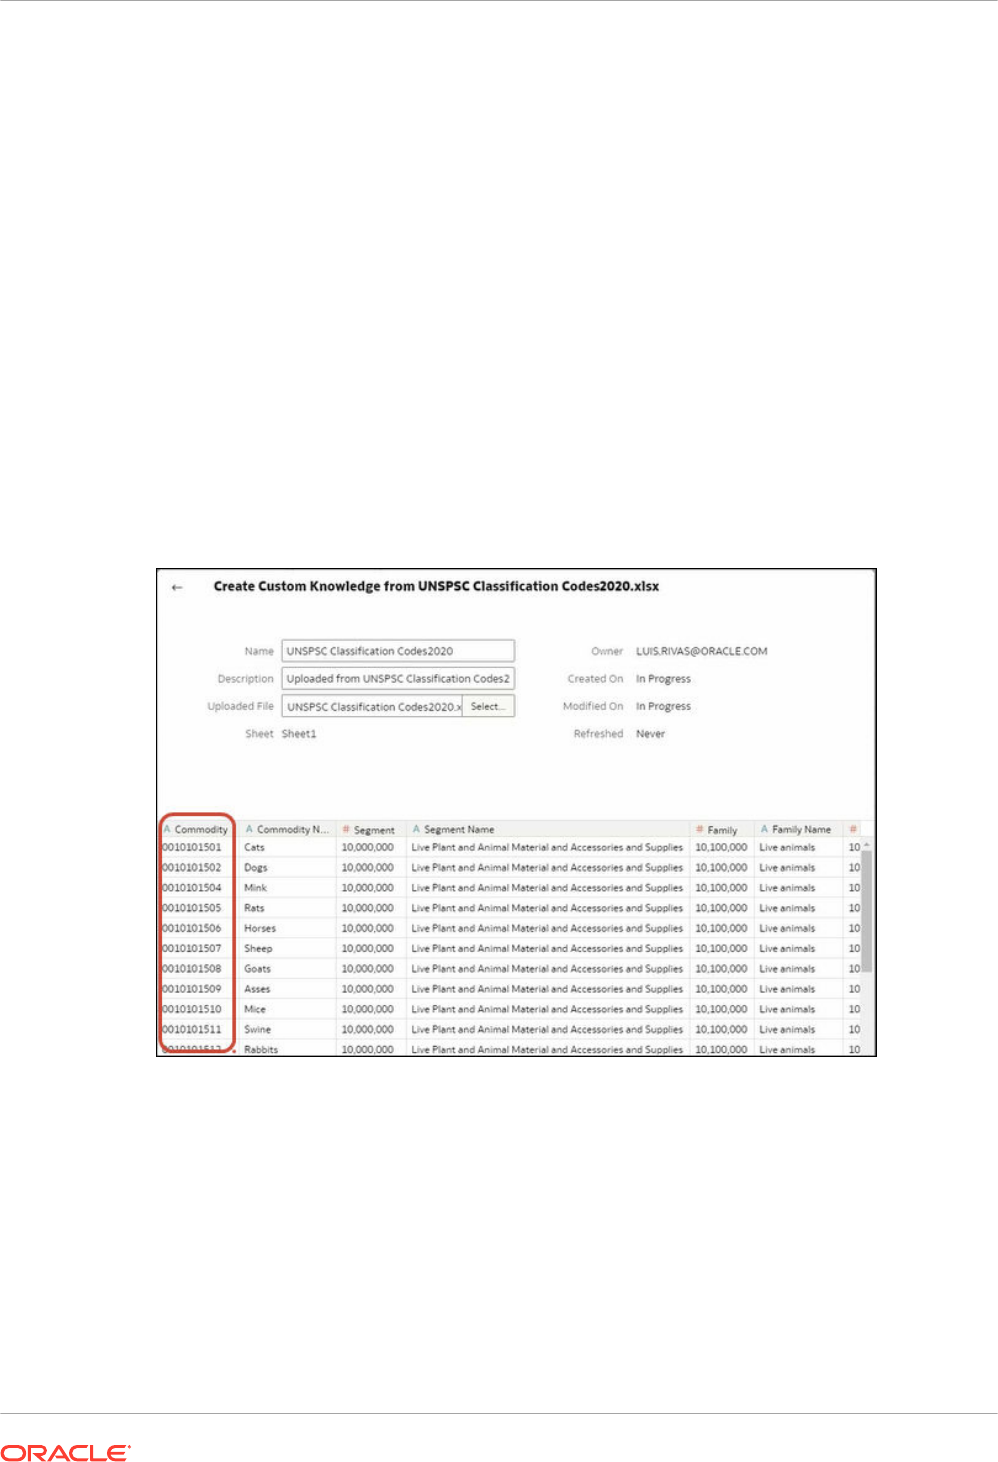
The Custom Knowledge page lists the new file with the Include option selected. When
content authors enrich datasets, Oracle Analytics presents enrichment recommendations
based on this data.
Working with Digit-only Keys
When you add Custom Knowledge to Oracle Analytics, you might want to profile digit-only or
numeric keys without removing leading zeros, which is how Oracle Analytics usually ingests
numbers. For example, you might want Oracle Analytics to ingest the UNSPSC classification
code 0010101501 as 0010101501 (that is, retaining "00" at the start of the code) rather than
10101501. By retaining the full key in Reference Knowledge, workbook designers can access
recommendations to enrich their data, which in this example provides UNSPSC data such as
name, family, and class.
Tips on Adding Digit-only Keys
In the source file, define the key column as text and make it the first column. You don't have to
change the format of the other columns in the file.
For example, in the UNSPSC classification codes dataset the Commodity column holds the
key identifier for each row. The Commodity keys are numbers with leading zeros. Oracle
Analytics treats the values in the Commodity column as an attribute.
When workbook designers add data based on this custom knowledge, the enrichment
recommendations are appropriate for the data. In this example, enrichment recommendations
for UNSPSC classification codes in the Commodity column enable you to enrich your
visualization with commodity data such as name, family, and class.
Chapter 7
Add Custom Knowledge for Data Enrichment
7-23
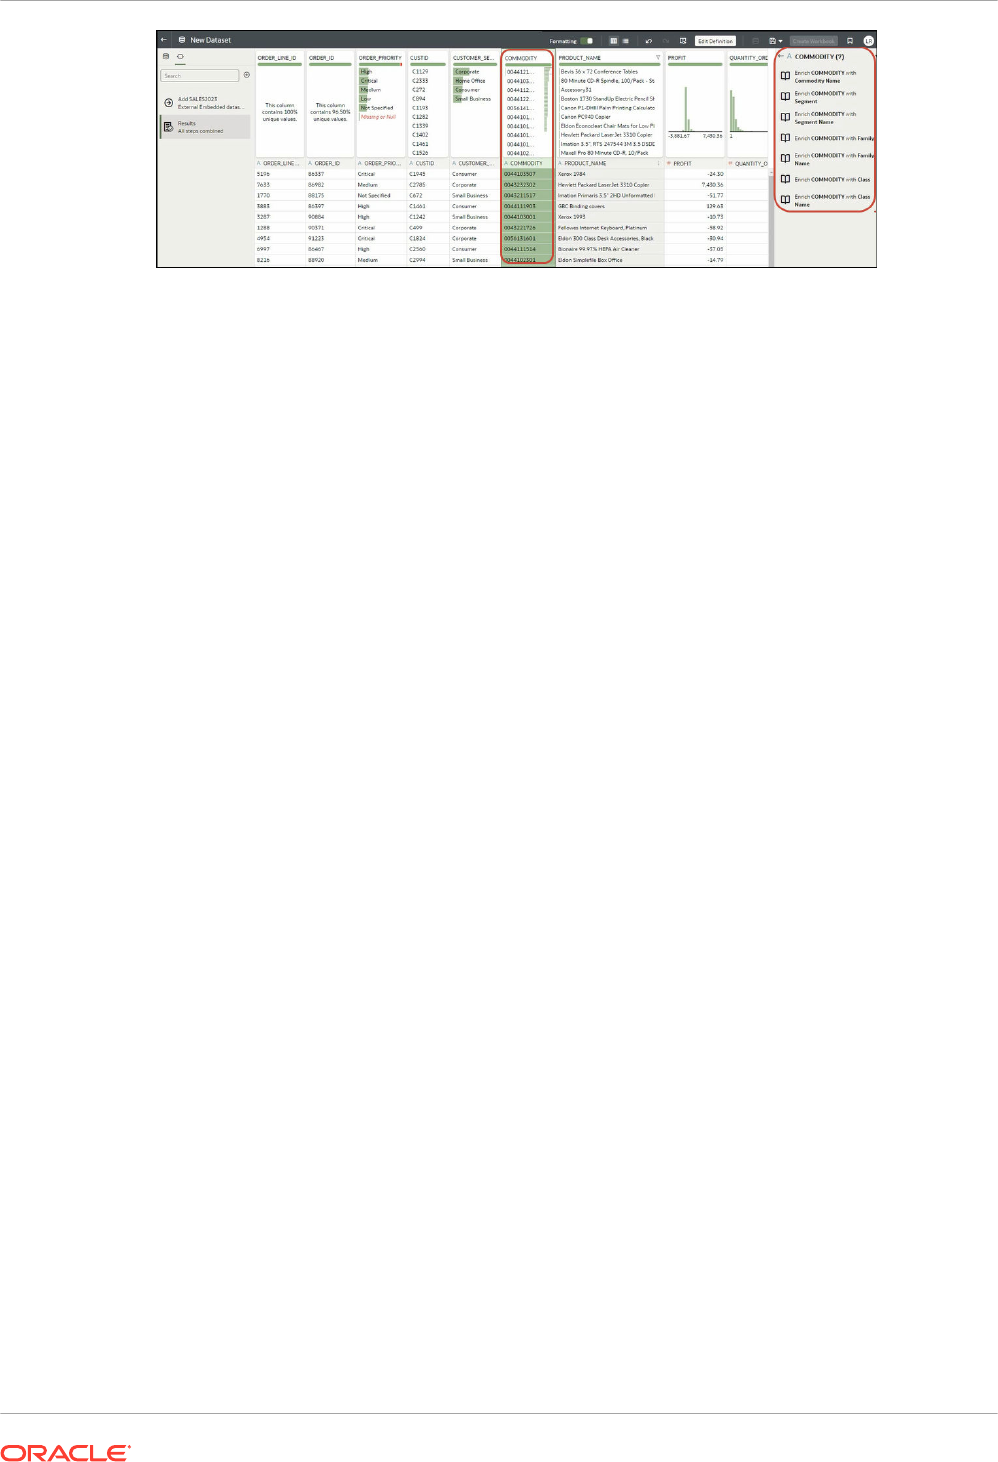
Track Usage
Usage tracking enables administrators to track user-level queries to content.
Tracking usage is helpful way to determine which user queries are creating performance
bottlenecks, based on query frequency and response time. Administrators set up the criteria to
track user queries and generate usage reports that can be used in a variety of ways such as
database optimization, aggregation strategies, or billing users or departments based on the
resources that they consume.
Topics:
• About Tracking Usage
• Understand the Usage Tracking Tables
• Typical Workflow for Tracking Usage
• Specify the Usage Tracking Database
• Set Usage Tracking Parameters
• Analyze Usage Tracking Data
About Tracking Usage
You can configure usage tracking in services that offer enterprise modeling features. Usage
information is tracked at the detailed user query level so you can answer questions such as:
• How are users engaging with Oracle Analytics Cloud?
• Where are they spending or not spending their time?
• How long do users spend in each session, between sessions, and between queries?
• How are queries within sessions, across sessions, and across users related to each other?
• Are users drilling up and down in analyses?
• What queries are running when issues are reported?
The usage statistics that you gather can help you to monitor system usage and performance
so you can better understand and predict user behavior. You can increase your efficiency and
reduce errors if you know in advance how your system is likely to be used.
When you enable usage tracking, the system collects data records for every query that is run
and writes them all to database tables. Both logical and physical queries are tracked and
logged in separate tables, along with various performance measures such as the time taken to
run the query and number of rows searched while processing a user query.
Chapter 7
Track Usage
7-24

Prerequisites for Usage Tracking
If you want to track usage, verify you meet the following prerequisites:
• You currently use Semantic Modeler or Model Administration Tool to manage your
semantic model.
To configure usage tracking, you must add the usage tracking database details to your
semantic model using either Semantic Modeler or Model Administration Tool.
• You have appropriate access permissions on the database where you want to store usage
information.
You must have the credentials for a user who has permissions to create the usage tracking
tables on the database schema and write usage data to the tables.
• The database supports usage tracking: Oracle Database or Oracle Autonomous Data
Warehouse
• You have created a data connection to your usage tracking database with the following
settings. See Connect to Data.
– System Connection - Select the System Connection check box.
When you select the System Connection check box, the connection becomes
available in Semantic Modeler. Similarly in Model Administration Tool, the System
Connection option enables you to select Use Data Connection and enter the
connection's Object ID instead of manually entering the connection details in the Data
Source Name field. See Specify the Usage Tracking Database.
– User Name and Password - The User Name must match the name of the schema in
the database that you want to use for usage tracking. For example, if the schema you
want to use is called UT_Schema the User Name must be UT_Schema.
Note:
If you use Model Administration Tool, you can also define database connections
for semantic models and the usage tracking database using the Console. See
Connect to Data in an Oracle Cloud Database. If you use the Console, you can
select Use Console Connection and enter the connection's Name while
specifying the usage tracking database in Model Administration Tool, instead of
entering the connection details in the Data Source Name field.
If you want to use Oracle Autonomous Data Warehouse as the usage tracking database,
complete these additional tasks before you specify the usage tracking database in your
semantic model:
• Download the Oracle Autonomous Data Warehouse wallet. See Download Client
Credentials (Wallets) in Using Oracle Autonomous Database Serverless.
• Upload the Oracle Autonomous Data Warehouse wallet to Oracle Analytics Cloud. See
Secure Database Connections with SSL.
• Create a self-service connection to Oracle Autonomous Data Warehouse and ensure that
you select the System Connection check box. See Connect to Oracle Autonomous Data
Warehouse.
Chapter 7
Track Usage
7-25

About the Usage Tracking Database
The system stores usage tracking details in a database that you specify. The database can be
an Oracle Database or Oracle Autonomous Data Warehouse. You specify the database and
connection pool details in your semantic model using Semantic Modeler or Model
Administration Tool.
See Specify the Usage Tracking Database.
About Usage Tracking Parameters
After specifying the database where you want to store usage tracking information, you must set
various usage tracking parameters through the Console (System Settings page).
Parameters required to configure usage tracking:
• Enable usage tracking
• Connection pool name
• Physical and logical query logging table names
• Maximum number of query rows in the usage tracking tables
After you set these parameters and apply the changes, Oracle Analytics:
• Creates the physical and logical query logging tables in the database specified in the
semantic model. The table names are based on the names that you provide in the physical
and logical query logging table name parameters.
• Starts to log usage tracking data in these tables.
See Set Usage Tracking Parameters.
About Analyzing Usage Data
You can use the system to create useful usage reports from the tracking data added to the
physical and logical query logging tables.
You can connect to the database, create a dataset from the tables, and create reports and
visualizations to help you understand your users' queries and take appropriate action to
improve performance.
Understand the Usage Tracking Tables
The system stores usage tracking data in three database tables.
The usage tracking process creates these tables with table names that you specify through
settings in the Systems Settings page.
• Usage Tracking Logical Query Logging Table
• Usage Tracking Physical Query Logging Table
• Usage Tracking Initialization Block Table
See Set Usage Tracking Parameters.
Chapter 7
Track Usage
7-26
Usage Tracking Logical Query Logging Table
The following table describes each column in the database table that tracks logical queries.
Where appropriate, the data type such as variable character field (varchar and varchar2) and
length is specified. As you review the descriptions in this table, you might assume that certain
time-related columns can be added or subtracted to equal exact values. For example, you
might assume that
TOTAL_TIME_SEC
is equal to
END_TS
minus
START_TS
. The columns don't
provide such exact values because:
• Various processes run in parallel and their speed depends on the load and on database
performance. Server-based operations might be either light or intensive.
• If all connections are full, then the query enters a queue and waits to be processed. The
timing depends on the load and the configuration.
User, Session, and ID-related Columns
Column Description
ID
In the Logical Query table, this column indicates the unique row identifier.
In the Physical Query table, this column is denoted by the name
LOGICAL_QUERY_ID
.
NODE_ID
Contains
<hostname>:obis1
. For example,
examplehost:obis1
(for a
single instance).
PRESENTATION_NAME
Indicates the name of the Catalog. Default is Null and data type is
Varchar(128).
IMPERSONATOR_USER_NAME
Specifies the user name of the impersonated user. If the request isn't run
as an impersonated user, then the value is None. Default is None and the
data type is Varchar(128).
USER_NAME
Specifies the name of the user who submitted the query.
ECID
Indicates the system-generated execution context ID. Data type is
Varchar2(1024).
TENANT_ID
Specifies the name of the tenant of the user who ran the initialization
block. Data type is Varchar2(128).
SERVICE_NAME
Specifies the name of the service. Data type is Varchar2(128).
SESSION_ID
Indicates the ID of the session. Data type is Number(10).
HASH_ID
Indicates the
HASH
value for the logical query. Data type is Varchar2(128).
Query Origin-related Columns
Chapter 7
Track Usage
7-27

Column Description
QUERY_SRC_CD
The source of the request.
Note that the requestor can set QUERY_SRC_CD to any string value to
identify itself.
Possible values include:
• Report - If the source is an analysis or any export operation.
• Drill - If the source is a change in dimension caused by drilling up or
down.
• ValuePrompt - If the source is the Value drop-down list in a filter
dialog or a dashboard prompt.
• VisualAnalyzer - If the source is a workbook to visualize data.
• DisplayValueMap or MemberBrowserDisplayValues or
MemberBrowserPath - If the source is a value related to the display
of an analysis.
• SOAP - If the source is a call from web services such as DataSetSvc.
• Seed - If the source is an agent that seeds the cache of the analytics
server.
• Null - If the source is the Admininistration Tool physical table or
column row count, or view data.
SAW_DASHBOARD
Indicates the path name of the dashboard. If the query wasn't submitted
through a dashboard, then the value is NULL.
SAW_DASHBOARD_PG
Indicates the page name in the dashboard. If the request isn't a
dashboard request, then the value is NULL. Default is Null and the data
type is Varchar(150).
SAW_SRC_PATH
Specifies the path name in the Catalog for the analysis.
Query Details-related Columns
Column Description
ERROR_TEXT
Contains the error message from the back-end
database. This column is applicable only if the
SUCCESS_FLAG
is set to a value other than 0
(zero). Multiple messages are concatenated and
aren't parsed by the system. Default is Null and
data type is Varchar(250).
QUERY_BLOB
Contains the entire logical SQL statement without
any truncation. The
QUERY_BLOB
column is a
character string of type Long.
QUERY_KEY
Contains an MD5 hash key generated by the
system from the logical SQL statement. Default is
Null and the data type is Varchar(128).
Chapter 7
Track Usage
7-28

Column Description
QUERY_TEXT
Indicates the SQL statement that was submitted for
the query. The data type is Varchar(1024).
You can change the length of this column (using
the ALTER TABLE command), but note that the text
written into this column is always truncated to the
size that is defined in the physical layer. The
semantic model administrator mustn't set the length
of this column to a value greater than the maximum
query length that's supported by the back-end
physical database. For example, Oracle Databases
enable a maximum Varchar of 4000, but Oracle
Databases truncate to 4000 bytes, not 4000
characters. If you use a multibyte character set, the
actual maximum string size has a varying number
of characters, depending on the character set and
characters used.
REPOSITORY_NAME
Specifies the name of the semantic model that the
query accesses.
SUBJECT_AREA_NAME
Contains the name of the business model being
accessed.
SUCCESS_FLG
Indicates the completion status of the query, as
defined in the following list:
• 0 - The query completed successfully with no
errors.
• 1 - The query timed out.
• 2 - The query failed because row limits were
exceeded.
• 3 - The query failed due to some other reason.
Execution Timing-related Columns
Column Description
COMPILE_TIME_SEC
Contains the time in seconds required to compile
the query. The number for
COMPILE_TIME_SEC
is
included in
TOTAL_TIME_SEC
.
END_DT
Indicates the date the logical query completed.
END_HOUR_MIN
Indicates the hour and minute the logical query
completed.
END_TS
Indicates the date and time the logical query
completed. The start and end timestamps also
reflect any time that the query spent waiting for
resources to become available. If the user
submitting the query navigates away from the page
before the query finishes, then the final fetch never
happens and a timeout value of 3600 is recorded.
However, if the user navigates back to the page
before the timeout, then the fetch completes at that
time, which is recorded as the
end_ts
time.
START_DT
Indicates the date that the logical query was
submitted.
START_HOUR_MIN
Indicates the hour and minute that the logical query
was submitted.
Chapter 7
Track Usage
7-29

Column Description
START_TS
Indicates the date and time that the logical query
was submitted.
TOTAL_TIME_SEC
Indicates the time in seconds that the system spent
working on the query while the client waited for
responses to its analyses.
TOTAL_TIME_SEC
includes the time for
COMPILE_TIME_SEC
.
RESP_TIME_SEC
Indicates the time taken for query response. Data
type is Number(10).
Execution Details-related Columns
Column Description
CUM_DB_TIME_SEC
Contains the cumulative time of all queries sent to
the database. Queries run in parallel, so the
cumulative query time is equal to or greater than
the total time connected to the database. For
example, suppose a logical request spawns 4
physical SQL statements sent to the database, and
the query time for 3 of the queries is 10 seconds,
and for one query is 15 seconds,
CUM_DB_TIME_SEC
displays 45 seconds because
the queries run in parallel.
CUM_NUM_DB_ROW
Contains the total number of rows returned by the
back-end databases.
NUM_DB_QUERY
Indicates the number of queries that were
submitted to the back-end databases to satisfy the
logical query request. For successful queries
(SuccessFlag = 0), this number is 1 or greater.
ROW_COUNT
Indicates the number of rows returned to the query
client. When a large amount of data is returned
from a query, this column isn't populated until the
user displays all the data.
TOTAL_TEMP_KB
Specifies the total KB received for a query. Data
type is Number(10).
Cache-related Columns
Column Description
CACHE_IND_FLG
Holds Y to indicate a cache hit for the query; N to
indicate a cache miss. Default is N.
NUM_CACHE_HITS
Indicates the number of times that the cache result
returned for the query.
NUM_CACHE_HITS
is a 32-bit
integer (or a 10-digit integer). Default is Null.
NUM_CACHE_INSERTED
Indicates the number of times that the query
generated a cache entry. Default is Null.
NUM_CACHE_INSERTED
is a 32-bit integer (or a 10-
digit integer).
Chapter 7
Track Usage
7-30
Usage Tracking Physical Query Logging Table
The following table describes the database table that tracks physical queries. This database
table records the physical SQL information for the logical queries stored in the logical query
logging table. The physical query table has a foreign key relationship to the logical query table.
User, Session, and ID-related Columns
Column Description
ID
Specifies the unique row identifier.
LOGICAL_QUERY_ID
Refers to the logical query in the logical query logging table. Data type is
Varchar2(50).
HASH_ID
Indicates the
HASH
value for the logical query. Data type is Varchar2(128).
PHYSICAL_HASH_ID
Indicates the
HASH
value for the physical query. Data type is
Varchar2(128).
Query Details-related Columns
Column Description
QUERY_BLOB
Contains the entire physical SQL statement without
any truncation. The
QUERY_BLOB
column is a
character string of type long.
QUERY_TEXT
Contains the SQL statement submitted for the
query. Data type is Varchar(1024).
Execution Timing-related Columns
Column Description
END_DT
Indicates the date the physical query completed.
END_HOUR_MIN
Indicates the hour and minute the physical query
completed.
END_TS
Indicates the date and time the physical query
completed. The start and end timestamps also
reflect any time that the query spent waiting for
resources to become available.
TIME_SEC
Indicates the physical query execution time.
START_DT
Indicates the date the physical query was
submitted.
START_HOUR_MIN
Indicates the hour and minute the physical query
was submitted.
START_TS
Indicates the date and time the physical query was
submitted.
Execution Details-related Columns
Column
Description
ROW_COUNT
Contains the number of rows returned to the query
client.
Chapter 7
Track Usage
7-31
Usage Tracking Initialization Block Table
The following table describes the database table that tracks information about the initialization
blocks.
Note:
Currently the initialization block usage tracking tables include only session
initialization blocks and don't include the semantic model initialization blocks.
User, Session, and ID-related Columns
Column Description
USER_NAME
The name of the user who ran the initialization block. The data type is
Varchar2(128).
TENANT_ID
The name of the tenant of the user who ran the initialization block. The
data type is Varchar2(128).
SERVICE_NAME
The name of the service. The data type is Varchar2(128).
ECID
The system-generated execution context ID. The data type is
Varchar2(1024).
SESSION_ID
The ID of the session. The data type is Number(10).
Query Details-related Columns
Column Description
REPOSITORY_NAME
The name of the semantic model that the query
accesses. The data type is Varchar2(128).
BLOCK_NAME
The name of the initialization block that was run.
The data type is Varchar2(128).
Execution Timing-related Columns
Column Description
START_TS
The date and time that the initialization block
started.
END_TS
The date and time that the initialization block
finished. The start and end timestamps also reflect
the time that the query spent waiting for resources
to become available.
DURATION
The length of time it took to run the initialization
block. The data type is Number(13,3).
Execution Details-related Columns
Column
Description
NOTES
Notes about the initialization block and its running.
The data type is Varchar2(1024).
Chapter 7
Track Usage
7-32
Typical Workflow for Tracking Usage
Here are the tasks to track the user-level queries to Oracle Analytics Cloud.
Task Description More Information
Decide where to store your usage
tracking data
Understand which database types you
can use for usage tracking.
About the Usage Tracking Database
Set up a connection to the usage
tracking database
Create a data connection (or a Console
connection) to the database where you
want to store usage tracking
information.
Prerequisites for Usage Tracking
Specify the usage tracking database Define the usage tracking database in
your semantic model.
Specify the Usage Tracking Database
Specify usage tracking parameters Enable usage tracking for your system,
and then specify connection details and
table names for the usage tracking
database.
Set Usage Tracking Parameters
Analyze the usage tracking data Create usage reports from usage
tracking data.
Analyze Usage Tracking Data
Specify the Usage Tracking Database
Before you can track usage of reports, dashboards, and data visualization workbooks on your
system, you must specify the database where you want to store the usage tracking data in
your semantic model.
The database you specify must have at least one schema defined. The system creates usage
tracking tables in the schema whose name matches the user name you specify in the database
connection details. For example, if the name of a schema in the usage tracking database is
“UT_Schema”, you must specify "UT_Schema" in the User Name field for the connection. The
usage tracking-tables are created in the schema named “UT_Schema”.
You must configure the database and connection pool details in the physical layer of your
semantic model. Use Semantic Modeler or the Model Administration Tool to configure the
usage tracking database.
• Specify the Usage Tracking Database Using Semantic Modeler
• Specify the Usage Tracking Database Using Model Administration Tool
If you want to use Oracle Autonomous Data Warehouse as the usage tracking database, you
must complete some additional Oracle Autonomous Data Warehouse-related tasks before you
specify the usage tracking database. See Prerequisites for Usage Tracking.
Specify the Usage Tracking Database Using Semantic Modeler
Use Semantic Modeler to configure your usage tracking database if you currently use
Semantic Modeler to develop semantic models.
1. If you haven't done so already, create a data connection to your usage tracking database
with the System Connection option selected.
The database type must be either Oracle Database or Oracle Autonomous Data
Warehouse and the User Name used to connect to the database must match the name of
Chapter 7
Track Usage
7-33

the schema where you want the user tracking tables to be stored. See Prerequisites for
Usage Tracking.
2. On the Home page, click Navigator and then click Semantic Models. In the Semantic
Models page, click a semantic model to open it.
3. Create a database object for the usage tracking database.
a. Click Physical Layer.
b. In the Physical Layer pane, click Create and then click Create Database.
c. In Name, enter a name for the database of your semantic model (for example,
UsageTracking) and click OK.
4. Add a connection pool to connect to the usage tracking database.
a. In the database tab, click Connection Pools.
b. Click Add Source.
c. Double-click the Name field, and enter a name for the connection pool. For example,
UTConnectionPool.
d. Double-click the Connection field, and select the data connection you want to use
from the list. For example MyUTDatabase.
Note:
• System connection - Semantic models can only use data connections
with the System connection option selected. See About Connections
for Semantic Models.
• User Name and Password - The User Name specified in the data
connection must match the name of a schema in the database that you
want to use for usage tracking. For example, if the schema you want to
use is called UT_Schema, the User Name must be UT_Schema. See
Prerequisites for Usage Tracking.
e. Click Open Detail. In the Connection Pool pane, verify that the Require fully qualified
table names check box isn't selected.
5. Validate your changes. See Run the Advanced Consistency Check Before Deploying a
Semantic Model.
6. Save your changes.
Specify the Usage Tracking Database Using Model Administration Tool
Use Model Administration Tool to configure your usage tracking database if you currently use
Model Administration Tool to develop semantic models.
You don't need to make any updates to your semantic model if you want to track usage in an
existing database or connection pool. You can skip these steps. You can use the existing
database, connection pool, and tables as part of the usage tracking system configuration.
Usage tracking won't delete the existing tables and create new tables with the same name if
the table schema matches between the old and new tables.
1. In Model Administration Tool, open the semantic model in the cloud.
From the File menu, select Open, In the Cloud, and the enter connection information for
your instance.
Chapter 7
Track Usage
7-34

2. Specify the usage tracking database:
a. In the Physical layer of the semantic model, right-click and select New Database.
b. In the Database dialog, provide a name for the database of your semantic model; for
example SQLDB_UsageTracking, specify the database type, for example Oracle
12c, and click OK.
c. Right-click the newly created database, select New Object, and then select
Connection Pool.
d. In the Connection Pool dialog, enter connection pool details and specify values for:
• Call interface: Select Default (Oracle Call Interface (OCI)).
• Require fully qualified table names: Ensure that this check box isn't selected.
• Data Source Name**: Specify the data source to which you want this connection
pool to connect and send physical queries. For example:
(DESCRIPTION =(ADDRESS
= (PROTOCOL = TCP)(HOST = <DB Host>)(PORT = <DB port>))(CONNECT_DATA
=(SERVER = DEDICATED)(SERVICE_NAME = <Servicename>)))
• User name and Password: Enter a user name that matches the name of a
schema available in the usage tracking database.
**As an alternative to providing the Data Source Name, you can refer to an existing
database connection “by name” in the Connection Pool dialog.
• Data connections - To use the connection details for a database defined through
the Data tab as your usage tracking database, select Use Data Connection and
enter the connection's Object ID instead of manually entering the connection
details in the Data Source Name field. Ensure that the data connection you want
to use was created with the System Connection option selected. See Connect to
a Data Source Using a Data Connection.
• Console connections - If you use Model Administration Tool, you might define
database connections for semantic models using the Console. To use the
connection details for a database that you defined through the Console as your
usage tracking database, select the Use Console Connection check box and
enter the name of the database connection in the Connection Name field. See
Connect to a Data Source Using a Console Connection.
For example:
Chapter 7
Track Usage
7-35
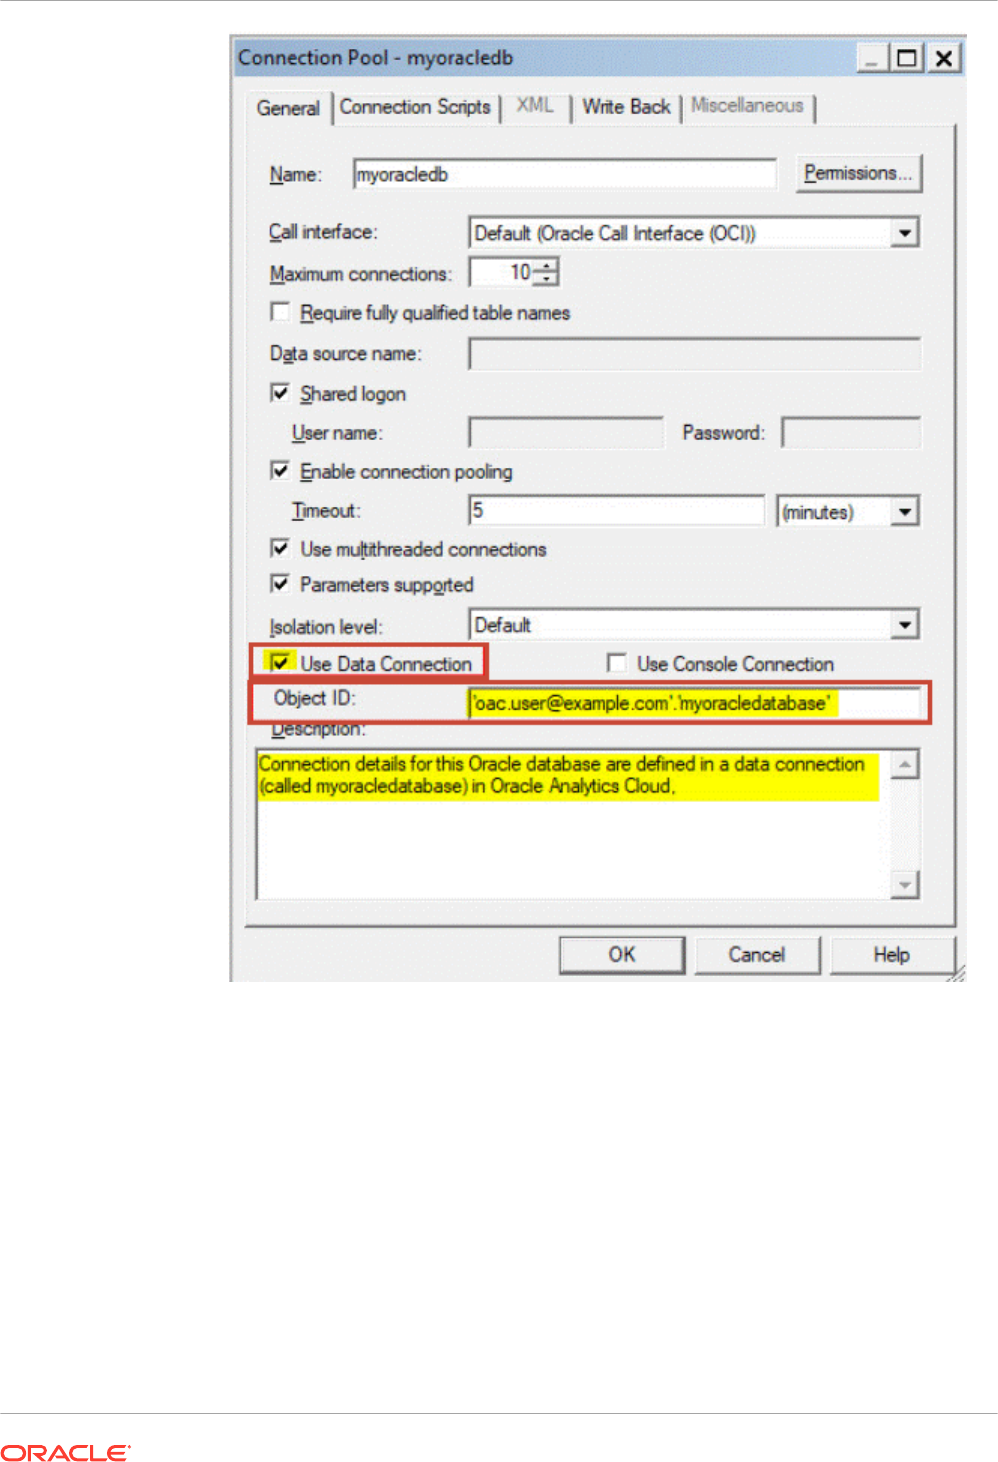
3. Validate your changes by clicking Tools, Show Consistency Checker, and then Check
All Objects.
4. Optional: Save changes locally by clicking File, and then Save.
5. Upload the semantic model .rpd file that you edited, by clicking File, Cloud, and then
Publish.
Set Usage Tracking Parameters
To start recording usage information, you must specify connection details for the database you
want to use and names for the database tables used to track usage. You set these parameters
through the Console (System Settings page).
1. Sign in to your service.
Chapter 7
Track Usage
7-36

2. Click Console.
3. Click System Settings.
4. Click Usage Tracking.
5. Enable usage tracking for your system. Ensure Enable Usage Tracking is switched on.
6. Set the following properties:
• Usage Tracking Connection Pool
Name of the connection pool that you created for your usage tracking database in the
format,
<database name>.<connection pool name>
. For example,
UsageTracking.UTConnectionPool
.
• Usage Tracking Initialization Block Table
Name of the database table you want to use to store information about initialization
blocks in the format,
<database name>.<catalog name>.<schema name>.<table
name>
or
<database name>.<schema name>.<table name>
. For example,
UsageTracking.UT_Schema.InitBlockInfo
.
• Usage Tracking Physical Query Logging Table
Name of the database table you want to use to store physical query details in the
format,
<database name>.<catalog name>.<schema name>.<table name>
or
<database name>.<schema name>.<table name>
. For example,
UsageTracking.UT_Schema.PhysicalQueries
.
• Usage Tracking Logical Query Logging Table
Name of the database table you want to use to store logical query details in the format,
<database name>.<catalog name>.<schema name>.<table name>
or
<database
name>.<schema name>.<table name>
. For example,
UsageTracking.UT_Schema.LogicalQueries
.
• Usage Tracking Max Rows
Maximum number of rows that you want in the usage tracking tables. Minimum value is
1, maximum is 100,000, and 0 means unlimited. If the row count exceeds the
maximum number of rows, then the usage tracking process deletes the excess rows
based on the oldest timestamp.
7. Click Apply.
Oracle Analytics creates the usage tracking tables and starts to log user queries.
Analyze Usage Tracking Data
Create usage reports to understand the user queries and take appropriate action.
Follow these examples:
• Analyze Usage Tracking Data by Creating a Dataset
• Analyze Usage Tracking Data Using a Subject Area in the Semantic Model
Analyze Usage Tracking Data by Creating a Dataset
Create usage reports by creating datasets with data from the physical and logical query
logging tables to understand the user queries.
1. On the Home page, click the Page Menu and select Open Classic Home. Create and run
an analysis.
Chapter 7
Track Usage
7-37

The system populates the query in the usage tracking tables in the usage tracking
database.
2. On the Home page, click Create, and click Dataset.
3. In Create Dataset, click the connection to the usage tracking database, and select the
schema specified in the Physical Query and Logical Query Logging table names in System
Settings. For example, the schema name provided in
<database name>.<schema
name>.<table name>
for the Physical Query and Logical Query Logging table names.
This is the database connection you created to set up usage tracking. See Prerequisites
for Usage Tracking.
4. In Add Dataset, search for the usage tracking physical query logging table, add all the
columns, name the dataset (for example, Physical Queries), and then click Add. Similarly,
search for the usage tracking logical query logging table, add all the columns, name the
dataset (for example, Logical Queries), and then click Add.
5. On the dataset Results page, click Create Workbook. Add both the datasets to the
workbook: for example, the Physical Queries and Logical Queries datasets. Name the
workbook (for example, Usage Tracking).
6. In the Prepare tab of the workbook, click Data Diagram, and create joins between the
datasets using a column such as the ID column.
7. In Visualize, drag data to create visualizations based on your requirement.
Refer to the usage tracking table descriptions in "Understand Usage Tracking Tables" to
select applicable columns. For example, you can create a visualization to show how many
queries took how much time.
Analyze Usage Tracking Data Using a Subject Area in the Semantic Model
Create usage reports using a subject area in the semantic model to understand the user
queries.
You must import metadata to ensure that physical and metadata are synchronized. Don't
customize by adding new columns in the usage tracking tables to avoid schema mismatch
issues.
1. On the Home page, click the Page Menu and select Open Classic Home. Create and run
an analysis.
The system populates the query in the usage tracking tables in the usage tracking
database.
2. Import the semantic model that has the Usage Tracking tables updated with the query
results. See Import the Deployed Model to Create a Semantic Model.
3. On the Home page, click Data, and then under Datasets, select the subject area that
corresponds to the usage tracking tables to create a workbook.
4. On the New Workbook page, in Visualize, drag data to create visualizations based on your
requirement.
Refer to the usage tracking table descriptions in "Understand Usage Tracking Tables" to
select applicable columns. For example, you can create a visualization to show how many
queries took how much time.
Chapter 7
Track Usage
7-38

Manage Query Caching
Oracle Analytics Cloud maintains a local cache of query results sets in the query cache.
Topics:
• About the Query Cache
• Enable or Disable Query Caching
• Monitor and Manage the Cache
• Strategies For Using the Cache
About the Query Cache
The query cache enables Oracle Analytics Cloud to satisfy many subsequent query requests
without accessing back-end data sources and this increases query performance. However, the
query cache entries might get stale as updates occur on the back-end data sources.
Advantages of Caching
The fastest way to process a query is to skip the bulk of the processing and use a
precomputed answer.
With query caching, Oracle Analytics Cloud stores the precomputed results of queries in a
local cache. If another query can use those results, then all database processing for that query
is eliminated. This can result in dramatic improvements in the average query response time.
In addition to improving performance, being able to answer a query from a local cache
conserves network resources and processing time on the database server. Network resources
are conserved because intermediate results aren't returned to Oracle Analytics Cloud. Not
running the query on the database frees the database server to do other work. If the database
uses a charge back system, then running less queries might also cut costs in the budget.
Another benefit of using the cache to answer a query is savings in processing time on Oracle
Analytics Cloud, especially if the query results are retrieved from multiple databases.
Depending on the query, there might be considerable join and sort processing in the server. If
the query is already calculated, then this processing is avoided, freeing server resources for
other tasks.
To summarize, query caching can dramatically improve query performance and reduce
network traffic, database processing, and processing overhead.
Costs of Caching
Query caching has many obvious benefits, but also certain costs.
• Potential for cached results being stale
• Administrative costs of managing the cache
With cache management, the benefits typically far outweigh the costs.
Administrative Tasks Associated with Caching
Some administrative tasks are associated with caching. You must set the cache persistence
time for each physical table appropriately, knowing how often data in that table is updated.
Chapter 7
Manage Query Caching
7-39

When the frequency of the update varies, you must keep track of when changes occur and
purge the cache manually when necessary.
Keep the Cache Up To Date
If the cache entries aren't purged when the data in the underlying databases changes, then
queries can potentially return results that are out of date.
You must evaluate whether this is acceptable. It might be acceptable to allow the cache to
contain some stale data. You must decide what level of stale data is acceptable and then
configure (and follow) a set of rules to reflect those levels.
For example, suppose an application analyzes corporate data from a large conglomerate, and
you're performing yearly summaries of the different divisions in the company. New data doesn't
materially affect the queries because the new data affects only next year's summaries. In this
case, the trade-offs for deciding whether to purge the cache might favor leaving the entries in
the cache.
Suppose, however, that the databases are updated three times a day and you're performing
queries on the current day's activities. In this case, you must purge the cache much more
often, or perhaps consider not using the cache at all.
Another scenario is that you rebuild the dataset from the beginning at periodic intervals (for
example, once per week). In this example, you can purge the entire cache as part of the
process of rebuilding the dataset, ensuring that you never have stale data in the cache.
Whatever your situation, you must evaluate what is acceptable for noncurrent information
returned to the users.
Cache Sharing Across Users
If shared logon is enabled for a particular connection pool, then the cache can be shared
across users and doesn't need to be seeded for each user.
If shared logon isn't enabled and a user-specific database login is used, then each user
generates their own cache entry.
Enable or Disable Query Caching
In Oracle Analytics Cloud, the query cache is enabled by default. You can enable or disable
query caching on the System Settings page.
1. Click Console.
2. Click System Settings.
3. Click Performance and Compatibility .
4. Set Cache Enable on or off.
• On — Data query caching is enabled.
• Off — Caching is disabled.
5. Click Apply.
Wait a few moments for the changes to refresh through the system.
Chapter 7
Manage Query Caching
7-40

Monitor and Manage the Cache
To manage the changes in the underlying databases and to monitor cache entries, you must
develop a cache management strategy.
You need a process to invalidate cache entries when the data in the underlying tables that
compose the cache entry changes, and a process to monitor, identify, and remove any
undesirable cache entries.
This section contains the following topics:
• Choose a Cache Management Strategy
• How Semantic Model Changes Affect the Query Cache
Choose a Cache Management Strategy
The choice of a cache management strategy depends on the volatility of the data in the
underlying databases and the predictability of the changes that cause this volatility.
It also depends on the number and types of queries that comprise your cache and the usage
those queries receive. This section provides an overview of the various approaches to cache
management.
Disable Caching For the System
You can disable caching for the entire system to stop all new cache entries and stop any new
queries from using the existing cache. Disabling caching lets you enable it at a later time
without losing any entries that are stored in the cache.
Temporarily disabling caching is a useful strategy in situations where you might suspect having
stale cache entries, but want to verify if they're actually stale before purging those entries or
the entire cache. If you find that the data stored in the cache is still relevant, or after you have
safely purged problem entries, then you can safely enable the cache. If necessary, purge the
entire cache or the cache that's associated with a particular business model before enabling
the cache again.
Cache and Cache Persistence Timing For Specified Physical Tables
You can set a cacheable attribute for each physical table, enabling you to specify whether
queries for that table are added to the cache to answer future queries.
If you enable caching for a table, then any query involving the table is added to the cache. All
tables are cacheable by default, but some tables mightn't be good candidates to include in the
cache unless you set up suitable cache persistence settings. For example, suppose that you've
a table that stores stock ticker data that's updated every minute. You can specify that you want
to purge the entries for that table every 59 seconds.
You can also use cache persistence settings to specify how long the entries for this table are
stored in the query cache. This is useful for data sources that are updated frequently.
1. In Model Administration Tool, in the Physical layer, double-click the physical table.
If you use Semantic Modeler, see What Are a Physical Table's General Properties?.
2. In the Physical Table properties dialog, in the General tab, make one of the following
selections:
• To enable caching, select Cacheable.
Chapter 7
Manage Query Caching
7-41

• To prevent a table from being cached, deselect Cacheable.
3. To set a cache expiration time, specify a Cache persistence time and specify a unit of
measure (days, hours, minutes, or seconds). If you don't want cache entries to
automatically expire, select Cache never expires.
4. Click OK.
How Semantic Model Changes Affect the Query Cache
When you modify semantic models using Semantic Modeler or Model Administration Tool, the
changes can have implications for entries that are stored in the cache. For example, if you
change the definition of a physical object or a dynamic semantic model variable, cache entries
that reference that object or variable might no longer be valid. These changes might result in
the need to purge the cache. There are two scenarios to be aware of: when you modify your
existing semantic model, and when you create (or upload) a new semantic model.
Changes to the Semantic Model
When you modify a semantic model or upload a different .rpd file, any changes that you make
that affect cache entries automatically result in a purge of all cache entries that reference the
changed objects. The purge occurs when you upload the changes. For example, if you delete
a physical table from a semantic model, then all cache entries that reference that table are
purged upon check in. Any changes made to a semantic model in the Logical layer purge all
cache entries for that semantic model.
Changes to Global Semantic Model Variables
The values of global semantic model variables are refreshed by data that's returned from
queries. When you define a global semantic model variable, you create an initialization block or
use a preexisting one that contains a SQL query. You also configure a schedule to run the
query and periodically refresh the value of the variable.
If the value of a global semantic model variable changes, then any cache entry which uses this
variable in a column becomes stale, and a new cache entry is generated when data in that
entry is needed again. The old cache entry isn't removed immediately, but remains until it is
cleaned through the usual caching mechanism.
Strategies For Using the Cache
One of the main advantages of query caching is to improve apparent query performance.
Query caching might be valuable to seed the cache during off hours by running queries and
caching their results. A good seeding strategy requires that you know when cache hits occur.
If you want to seed the cache for all users, you might seed the cache with the following query:
SELECT User, SRs
After seeding the cache using
SELECT User, SRs
, the following queries are cache hits:
SELECT User, SRs WHERE user = valueof(nq_SESSION.USER) (and the user was USER1)
SELECT User, SRs WHERE user = valueof(nq_SESSION.USER) (and the user was USER2)
SELECT User, SRs WHERE user = valueof(nq_SESSION.USER) (and the user was USER3)
This section contains the following topics:
• About Cache Hits
• Run a Suite of Queries to Populate the Cache
Chapter 7
Manage Query Caching
7-42

• Use Agents to Seed the Query Cache
• Use Model Administration Tool to Automatically Purge the Cache for Specific Tables
About Cache Hits
When caching is enabled, each query is evaluated to determine whether it qualifies for a cache
hit.
A cache hit means that Oracle Analytics Cloud was able to use cache to answer the query and
didn't go to the database at all. Oracle Analytics Cloud can use the query cache to answer
queries at the same or higher level of aggregation.
Many factors determine whether cache is hit. The table below describes these factors.
Factor or Rule Description
A subset of columns in the
SELECT
list must
match
All of the columns in the
SELECT
list of a new query have to exist in the
cached query to qualify for a cache hit, or they must be able to be
calculated from the columns in the query.
This rule describes the minimum requirement to hit the cache, but
meeting this rule doesn't guarantee a cache hit. The other rules listed in
this table also apply.
Columns in the
SELECT
list can be composed of
expressions on the columns of the cached
queries
Oracle Analytics Cloud can calculate expressions on cached results to
answer the new query, but all the columns must be in the cached result.
For example, the query:
SELECT product, month, averageprice FROM sales WHERE
year = 2000
hits cache on the query:
SELECT product, month, dollars, unitsales FROM sales
WHERE year = 2000
because
averageprice
can be computed from
dollars
and
unitsales
(
averageprice = dollars/unitsales
).
Chapter 7
Manage Query Caching
7-43
Factor or Rule Description
WHERE
clause must be semantically the same or
a logical subset
For the query to qualify as a cache hit, the
WHERE
clause constraints must
be either equivalent to the cached results, or a subset of the cached
results.
A
WHERE
clause that's a logical subset of a cached query qualifies for a
cache hit if the subset meets one of the following criterion:
• A subset of
IN
list values. Queries requesting fewer elements of an
IN
list cached query qualify for a cache hit. For example, the
following query:
SELECT employeename, region
FROM employee, geography
WHERE region in ('EAST', 'WEST')
qualifies as a hit on the following cached query:
SELECT employeename, region
FROM employee, geography
WHERE region in ('NORTH', 'SOUTH', 'EAST', 'WEST')
• It contains fewer (but identical)
OR
constraints than the cached result.
• It contains a logical subset of a literal comparison. For example, the
following predicate:
WHERE revenue < 1000
qualifies as a cache hit on a comparable query with the predicate:
WHERE revenue < 5000
• There is no
WHERE
clause. If a query with no
WHERE
clause is cached,
then queries that satisfy all other cache hit rules qualify as cache hits
regardless of their
WHERE
clause.
In addition columns that are used on the
WHERE
clause must be on the
projection list. For example, the following query:
SELECT employeename
FROM employee, geography
WHERE region in ('EAST', 'WEST')
Doesn't result in a cache hit for the seeding query in the previous list
because REGION isn't on the projection list.
Dimension-only queries must be an exact match
If a query is dimension only, meaning that no fact or measure is included
in the query, then only an exact match of the projection columns of the
cached query hits the cache. This behavior prevents false positives when
there are multiple logical sources for a dimension table.
Chapter 7
Manage Query Caching
7-44
Factor or Rule Description
Queries with special functions must be an exact
match
Other queries that contain special functions such as time series functions
(
AGO
,
TODATE
, and
PERIODROLLING
), limit and offset functions (
OFFSET
and
FETCH
), relationship functions (
ISANCESTOR
,
ISLEAF
,
ISROOT
, and
ISSIBLING
), external aggregation functions, and generally filter metrics
must also be an exact match with the projection columns in the cached
query. In these cases, the filter must also be an exact match. For filter
metrics, if the filter metric can be rewritten as a
WHERE
clause, then the
subset cache might be leveraged.
Set of logical tables must match To qualify as a cache hit, all incoming queries must have the same set of
logical tables as the cache entry. This rule avoids false cache hits. For
example,
SELECT * FROM product
doesn't match
SELECT * FROM
product, sales
.
Session variable values must match, including
security session variables
If the logical SQL or physical SQL statement refers to any session
variable, then the session variable values must match. Otherwise, the
cache isn't hit.
In addition, the value of session variables that are security sensitive must
match the security session variable values that are defined in the
semantic model, even though the logical SQL statement itself doesn't
reference session variables. See Ensure Correct Cache Results When
Using Row-Level Database Security.
Equivalent join conditions The resultant joined logical table of a new query request has to be the
same as (or a subset of) the cached results to qualify for a cache hit.
DISTINCT
attribute must be the same If a cached query eliminates duplicate records with
DISTINCT
processing
(for example,
SELECT DISTINCT
...), then requests for the cached
columns must also include the
DISTINCT
processing; a request for the
same column without the
DISTINCT
processing is a cache miss.
Queries must contain compatible aggregation
levels
Queries that request an aggregated level of information can use cached
results at a lower level of aggregation. For example, the following query
requests the quantity sold at the supplier and region and city level:
SELECT supplier, region, city, qtysold
FROM suppliercity
The following query requests the quantity sold at the city level:
SELECT city, qtysold
FROM suppliercity
The second query results in a cache hit on the first query.
Limited additional aggregation For example, if a query with the column
qtysold
is cached, then a
request for
RANK(qtysold)
results in a cache miss. Additionally, a query
that requests
qtysold
at the country level can get a cache hit from a
query that requests
qtysold
at the country, region level.
ORDER BY
clause must be comprised of columns
in the select list
Queries that order by columns that aren't contained in the select list result
in cache misses.
Chapter 7
Manage Query Caching
7-45

Factor or Rule Description
Diagnosing cache hit behavior To better assess cache hit behavior, set the
ENABLE_CACHE_DIAGNOSTICS session variable to 4, as shown in the
following example:
ENABLE_CACHE_DIAGNOSTICS=4
Ensure Correct Cache Results When Using Row-Level Database Security
When using a row-level database security strategy, such as a Virtual Private Database (VPD),
the returned data results are contingent on the authorization credentials of the user.
Because of this, Oracle Analytics Cloud must know whether a data source is using row-level
database security and which variables are relevant to security.
To ensure that cache hits only occur on cache entries that include and match all security-
sensitive variables, you must correctly configure the database object and session variable
objects in the Model Administration Tool, as follows:
• Database object. In the Physical layer, in the General tab of the Database dialog, select
Virtual Private Database to specify that the data source is using row-level database
security.
If you're using row-level database security with shared caching, then you must select this
option to prevent the sharing of cache entries whose security-sensitive variables don't
match.
• Session Variable object. For security-related variables, in the Session Variable dialog,
select Security Sensitive to identify them as sensitive to security when using a row-level
database security strategy. This option ensures that cache entries are marked with the
security-sensitive variables, enabling security-sensitive variable matching on all incoming
queries.
Run a Suite of Queries to Populate the Cache
To maximize potential cache hits, one strategy is to run a suite of queries to populate the
cache.
The following are some recommendations for the types of queries to use when creating a suite
of queries with which to seed the cache.
• Common prebuilt queries. Queries that are commonly run, particularly ones that are
expensive to process, are excellent cache seeding queries. Queries whose results are
embedded in dashboards are good examples of common queries.
• SELECT lists with no expressions. Eliminating expressions on
SELECT
list columns
expands the possibility for cache hits. A cached column with an expression can only
answer a new query with the same expression; a cached column with no expressions can
answer a request for that column with any expression. For example, a cached request
such as:
SELECT QUANTITY, REVENUE...
can answer a new query such as:
SELECT QUANTITY/REVENUE...
Chapter 7
Manage Query Caching
7-46

but not the reverse.
• No WHERE clause. If there is no
WHERE
clause in a cached result, then it can be used to
answer queries that satisfy the cache hit rules for the select list with any
WHERE
clause that
includes columns in the projection list.
In general, the best queries to seed cache with are queries that heavily consume database
processing resources and that are likely to be reissued. Be careful not to seed the cache with
simple queries that return many rows. These queries (for example,
SELECT * FROM PRODUCTS
,
where
PRODUCTS
maps directly to a single database table) require very little database
processing. Their expense is network and disk overhead, which are factors that caching
doesn't alleviate.
When Oracle Analytics Cloud refreshes semantic model variables, it examines business
models to determine if they reference those semantic model variables. If they do, Oracle
Analytics Cloud purges all cache for those business models. See How Semantic Model
Changes Affect the Query Cache.
Use Agents to Seed the Query Cache
You can configure agents to seed the Oracle Analytics Cloud query cache.
Seeding the cache can improve response times for users when they run analyses or view
analyses that are embedded on their dashboards. You can accomplish this by scheduling
agents to run requests that refresh this data.
1. In Oracle Analytics Cloud, open the Classic Home page, and select Agent (Create
section).
2. On the General tab, select Recipient for the Run As option. Personalized cache seeding
uses the data visibility of each recipient to customize agent delivery content for each
recipient.
3. On the Schedule tab, specify when you want the cache to be seeded.
4. Optional: Select Condition and create or select a conditional request. For example, you
might have a business model that determines when the ETL process is complete. You
could use a report based on this business model to be the conditional trigger for the cache
seed to begin.
5. On the Delivery Content tab, select an individual request or an entire dashboard page for
which you want to seed the cache. Selecting a dashboard page can save time.
6. On the Recipients tab, select individual users or groups to be the recipients.
7. On the Destinations tab, clear all user destinations and select Oracle Analytics Server
Cache.
8. Save the agent by selecting the Save button in the upper-right corner.
The only difference between cache seeding agents and other agents is that they clear the
previous cache automatically and don't appear on the dashboard as alerts.
Note:
Cache seeding agents only purge exact match queries, so stale data might still exist.
Ensure that the caching strategy always include cache purging, because agent
queries don't address ad-hoc queries or drills.
Chapter 7
Manage Query Caching
7-47

Use Model Administration Tool to Automatically Purge the Cache for Specific Tables
Purging the cache deletes entries from the query cache and keeps your content fresh. You can
automatically purge cache entries for specific tables, by setting the Cache Persistence Time
field for each table in Model Administration Tool.
Note:
If you use Semantic Modeler, see What Are a Physical Table's General Properties?
This is useful for data sources that are updated frequently. For example, if you have a table
that stores stock ticker data that is updated every minute you can use the Cache Persistence
Time setting to purge the entries for that table every 59 seconds. See Cache and Cache
Persistence Timing For Specified Physical Tables.
Configure Advanced Options
Administrators can set several advanced options using the System Settings page.
Topics:
• About System Settings
• Configure System Settings Using Console
• Make Preview Features Available
• Manage System Settings Using REST APIs
About System Settings
Administrators can set a range of advanced, service-level options through the System Settings
page. For example, you might want to change the default currency and time zone for analyses
and dashboards to values that better suit your organization.
• Analytic Content Options
• Connection Options
• Email Delivered by Agents Options
• Format Options
• Other Options
• Performance and Compatibility Options
• Preview Options
• Prompt Options
• Security Options
• Usage Tracking Options
• View Options
Chapter 7
Configure Advanced Options
7-48

Analytic Content Options
You use these options to set defaults and customizations for dashboards, analyses, and
reports. For example, you can configure the analysis editor to open by default to the Criteria
tab or the Results tab.
Note:
If you change an analytic content setting, you must apply the change for the new
value to take effect.
System Setting More Information
Analytics Publisher Reporting
Toolbar Mode
Configures an alternate toolbar for pixel-perfect reports that are included
in a dashboard.
•
1 — Doesn't display a toolbar for pixel-perfect reports.
•
2 — Displays the URL to the report without the logo, toolbar, tabs,
or navigation path.
•
3 — Displays the URL to the report without the header or any
parameter selections. Controls such as Template Selection, View,
Export, and Send are still available.
•
4 — Displays the URL to the report only. No other page information
or options are displayed.
•
6 — Displays parameter prompts for the report in a toolbar.
Valid Values: 1,2,3,4,6
Default: 1
API Key: AnalyticsPublisherReportingToolbarMode
Edition: Enterprise only
Answers Editor Start Tab Specifies whether the analysis editor opens by default to the Criteria tab
or the Results tab.
This setting applies when users click an Edit link for an analysis from a
dashboard, the Home page, or the Catalog page.
Users can override this default setting by specifying the Full Editor
option in the My Account dialog.
•
answerResults — Opens the analysis editor by default to the
Results tab.
•
answerCriteria — Opens the analysis editor by default to the
Criteria tab.
Valid Values: answerResults, answerCriteria
Default: answerResults
API Key: AnswersEditorStartTab
Edition: Enterprise only
Chapter 7
Configure Advanced Options
7-49
System Setting More Information
Answers Subject Area Sorting
Order
Sets the default sort order for subject area content trees. Users can
override this default setting in the My Account: Subject Area Sort Order
dialog.
•
asc — Sorts A to Z.
•
desc — Sorts Z to A.
•
rpd — Uses the subject area sort order specified in the original
analyses.
Valid Values: asc, desc, rpd
Default: rpd
API Key: AnalysisSubjectAreaSortingOrder
Edition: Enterprise only
Custom Links XML Specifies the XML code containing Classic Home page header
customizations.
You can use this XML code to customize the global header section of the
Home page to better meet the needs of your users. For example, you
can disable certain links or add custom ones. See Customize Links on
the Classic Home Page.
API Key: CustomLinksXml
Edition: Enterprise only
URL for Blocking Queries in
Analyses
Specifies the URL for the JavaScript file to validate query criteria and
block queries. See Validate and Block Queries in Analyses Using
Custom JavaScript.
API Key: QueryBlockingScriptURL
Edition: Enterprise only
Writeback Template XML Defines the XML configuration for performing writeback on data
elements.
For example, you can use an XML template to enable users of a
dashboard page or an analysis with the ability to modify, or write back,
the data that they see in a table view.
API Key: WriteBackTemplateXML
Edition: Enterprise only
Connection Options
You use these options to configure connection-related defaults.
Note:
If you change a connection setting, you must apply the change for the new value to
take effect.
Chapter 7
Configure Advanced Options
7-50

System Setting More Information
Connection Externalization
Enabled
Specifies whether to externalize any database connections that
administrators configured for semantic models in Oracle Analytics Cloud,
using Console.
When you externalize the connection information, anyone who uses
Model Administration Tool to edit semantic models can refer to the
database connections “by name” rather than re-entering the connection
details in full (connection pool settings). See Connect to a Data Source
using a Connection Defined Through Console.
•
On — Externalizes the database connections that administrators
define for semantic models through Console.
•
Off — Doesn't externalize database connections details. Anyone
using Model Administration Tool to edit semantic models must enter
the database connection information in the Connection Pool dialog.
Default: On
API Key: EnableConnectionExternalization
Edition: Enterprise only
Email Delivered by Agents Options
You can use these options to customize the way agents deliver email.
System Setting More Information
Maximum Email Size (KB) Specifies the maximum size (KB) of a single email.
If you set a maximum email size, you can avoid situations when SMTP
servers reject emails that are too large, and in the event that an email
exceeds the set limit, the email recipients receive an error message
instead of the agent failing and just alerting the email author.
Valid Values: 0-20480
Default: 0 (unlimited email size)
API Key: EmailMaxEmailSizeKB
Edition: Enterprise only
Maximum Number of
Recipients per Email
Specifies the maximum number of recipients allowed in the To: or Bcc:
line for a single email.
You can set the maximum number of email recipients to avoid some
SMTP servers from filtering out these emails as spam. If the recipient list
exceeds the set limit, the list is split into smaller lists with the maximum
number of allowed recipients in each list.
Valid Values: 0-1024
Default: 0 (unlimited number of email recipients)
API Key: EmailMaxRecipients
Edition: Enterprise only
Safe Domains If you want to restrict the email domain that Oracle Analytics can send
emails to, enter the name of the domain. For example,
examplemaildomain.com
.
Use a comma to separate multiple domain names. For example,
exampledomain1.com,exampledomain2.com
. By default, there are no
restrictions.
API Key: EmailSafeDomains
Edition: Enterprise only
Chapter 7
Configure Advanced Options
7-51
System Setting More Information
Use BCC Specifies whether to include the names of email recipients in the To: or
Bcc: line. By default, email recipients are added to the Bcc: line.
•
On — Add email recipients to the Bcc: line. Names of email
recipients are hidden.
•
Off — Add email recipients to the To: line. Everyone who receives
the email sees the recipient list.
Default: On
API Key: EmailUseBcc
Edition: Enterprise only
Use RFC 2231 Encoding Specifies how to encode MIME email parameters. By default, RFC 2047
is used.
•
On — Use RFC 2231 to encode MIME email parameter values.
RFC 2231 supports multi-byte languages. Select On if you deliver
emails that contain multi-byte characters and use an email server
that supports RFC 2231, such as Microsoft Outlook for Office 365 or
Google Gmail.
•
Off — Use RFC 2047 to encode MIME email parameter values.
Default: Off
API Key: EmailUseRFC2231
Edition: Enterprise only
Format Options
You use these options to configure default currency and time zone settings for analyses and
dashboards.
These options apply only to analyses and dashboards. They don't apply to data visualizations.
Note:
If you change a format setting, you must apply the change for the new value to take
effect.
System Setting More Information
Currencies XML Defines the default currency that's displayed for currency data in
analyses and dashboards. For example, you can change from American
dollars ($) to Euros (E).
API Key: AnalysisCurrenciesXml
Edition: Enterprise only
Chapter 7
Configure Advanced Options
7-52

System Setting More Information
Default Data Offset Time
Zone
Specifies a time zone offset of the original data that users see in
analyses and dashboards. Enter an offset value that indicates the
number of hours away from Greenwich Mean Time (GMT) time.
For example, to display values in United States Eastern Standard Time
(EST), which is Greenwich Mean Time (GMT) - 5 hours, enter the value
GMT-05:00
or the equivalent value in minutes
-300
.
If you don't set this option, no time zone conversion occurs because the
value is "unknown".
Specifying a different offset value for each user
If you want to specify a different offset value where session variables
can be used (for example, expressions, calculations), don't use the
Default Data Offset Time Zone setting. Instead, set the system session
variable DATA_TZ in the semantic model. See About Session Variables.
API Key: DefaultDataOffsetTimeZone
Edition: Enterprise only
Default Time Zone for Date
Calculations
Specifies the time zone used for evaluating date calculations such as
getting the current date/time, truncating datetime values to a date, and
extracting time fields from date/time expressions.
If you leave this field blank, Oracle Analytics uses the Coordinated
Universal Time (UTC) time zone when evaluating date calculations.
API Key: DefaultTimeZoneforDateCalculations
Edition: Professional and Enterprise
Default User Preferred Time
Zone
Specifies a default preferred time zone that users see in analyses and
dashboards before they select their own in the My Account Preferences
dialog.
If you don't set this option, Oracle Analytics uses the local time zone.
Specifying a different time zone for each user
If you want to specify a different offset value where session variables
can be used (for example, expressions, calculations), don't use the
Default User Preferred Time Zone setting. Instead, set the system
session variable TIMEZONE in the semantic model. See About Session
Variables.
API Key: DefaultUserPreferredTimeZone
Edition: Enterprise only
User Currency Preferences
XML
Determines whether users see a Currency option in their My Account
preferences dialog and the list of currencies available to them. If you
provide the Currency option, users can select in which currency they
prefer to view columns of currency data in analyses and dashboards.
API Key: UserCurrencyPreferencesXml
Edition: Enterprise only
Chapter 7
Configure Advanced Options
7-53
Other Options
These system setting options in the Console enable you to set the behavior for a variety of
actions such as database queries, default URLs, display defaults, and sorting.
Note:
If you change one of these settings, you must apply the change for the new value to
take effect unless we note it otherwise.
System Setting More Information
Disable Right Trim for
VARCHAR Data
Specifies whether the automatic removal of trailing spaces from varchar
columns is enabled (Off) or disabled (On). For example, when this
property is enabled (Off), when a user starts entering values in a field,
the filter dialog automatically trims any trailing spaces.
•
On — Preserves trailing whitespaces in varchar columns. If you
primarily use Oracle Database sources, you might want to keep the
default Oracle Database behavior of preserving trailing whitespaces
rather than removing them. When you toggle this property on, you
avoid the overhead of trimming spaces, and this can improve
performance.
If you disable this property (set it to On) and you construct a filter
such as PRODUCT_DESCRIPTION = 'My Product '), you must
make sure the amount of trailing whitespace used exactly matches
the varchar column value. If you don't, the filter won't correctly
match the data values.
•
Off — Trims trailing whitespaces in varchar columns when
processing queries. This is the default for Oracle Analytics. For
example, if a user enters the text 'My Product ', it trims it to 'My
Product'.
Default: Off
API Key: DataQueryDisableRightTrimVARCHARData
Edition: Professional and Enterprise
Enable Subrequest Shipping Specifies if sub-requests to source databases are executed separately
as standalone queries or executed together. By default, sub-requests
are shipped separately which can improve performance if you execute
complex reports with a large group of sub-requests, that is, you prefer to
ship the sub-requests separately in multiple simplified queries rather
than ship a large single complicated query all at once.
In Oracle BI Enterprise Edition, the default is set to
NO
. If you used
Oracle BI Enterprise Edition and want to retain the previous default
behavior, set this property to
NO
to continue executing database sub-
requests together.
•
Default — Database sub-requests are shipped separately. This is
the same as the value YES.
•
YES — Database sub-requests are shipped separately.
•
NO — Database sub-requests are shipped together, all at once.
Default: Default
API Key: EnableSubrequestShipping
Edition: Professional and Enterprise
Chapter 7
Configure Advanced Options
7-54

System Setting More Information
Enforce Safe Domains in
Actons
Determines whether action links that users add to analyses and
dashboards can invoke any URL or only URLs that administrators
specify in the safe domains list.
•
On — Don't allow actions to invoke any URL that's not in the safe
domain list.
•
Off — Allow actions to invoke any URL, even if the URL isn't listed
as a safe domain.
Default: On for a brand new service and Off for an existing service.
Apply Change Required: No
API Key: EnforceSafeDomainsActions
Edition: Enterprise only
Hide EPM Cloud Members
with No Access
Specifies if users can view all EPM dimension members in a hierarchy
prompt list of values or when adding the hierarchy to a canvas, even if
they don't have data access to some of the members.
•
On —Show only those members of an EPM dimension that users
have data access to.
If this setting is On, users who don't have access to the root
member of the dimension hierarchy won't see any EPM members in
hierarchies or hierarchy prompts.
•
Off — Users can view all the members in an EPM dimension even if
they don't have access to view data for some members.
Default: Off
API Key: HideEPMCloudMembersWithNoAccess
Edition: Professional and Enterprise
Hide Loading Messages Specifies if a detailed message is displayed during data load processing.
•
On — Detailed loading messages are hidden and a simplified
message Loading... is displayed instead.
•
Off — Detailed loading messages are displayed.
Default: Off
API Key: HideLoadingMessages
Edition: Professional and Enterprise
Locale Applies to content migrated from Oracle BI Enterprise Edition.
After you migrate content from your Oracle BI Enterprise Edition
environment to Oracle Analytics, you may see a different language in
messages, dates, or currencies within analyses.
For example, if you look at a migrated analysis in Polish, the currencies
or dates might display based on the Oracle Analytics default locale, not
the original Oracle BI Enterprise Edition locale. To preserve the Oracle
BI Enterprise Edition currencies and dates in Oracle Analytics, change
this setting to Polish.
API Key: DataQueryLocale
Edition: Professional and Enterprise
Chapter 7
Configure Advanced Options
7-55

System Setting More Information
Portal Path Specifies the path of the dashboard page that's displayed by default
when users sign in to Oracle Analytics. For example,
/shared/
<folder>/_portal/<name>
.
You can specify a single path for all users and multiple paths by user
role, for example
{"application role 1":"catalog dashboard
path 1","application role 2":"catalog dashboard path
2","default":"catalog dashboard path 3"}
.
This setting applies to all users, but users can override it after they've
signed in.
You can enter a maximum of 5,000 characters in this field.
API Key: PortalPath
Edition: Enterprise only
Recursive Datetime Type
Checking
Specifies whether to enforce strict recursive data type checking for
comparisons between identical data types (for example, integer to
integer) or non-compatible data types (for example, integer to short
integer) on all data sources or with all datasets.
•
On — Enforces strict recursive checking for identical or non-
compatible data types on all data sources or datasets.
•
Off — Relaxes strict recursive checking for date and time data types
on all data sources or datasets. However, if there are too many data
type inconsistencies, you may want to change the data types to be
compatible or use constants of the correct data type when
comparing a column to a value. For example, after you migrate
content from Oracle BI Enterprise Edition to Oracle Analytics, you
might start seeing this type of check error in your reports because
eary versions of Oracle BI Enterprise Edition didn't enforce strict
checks:
[nQSError: 22024] A comparison is being carried out
between non-compatible types <type1> and <type2>.
Default: On
API Key: RecursiveDatetimeTypeChecking
Edition: Professional and Enterprise
Repeat Rows on Excel
Exports for Tables and Pivots
Specifies whether cells that span rows and cells that span columns are
repeated when exporting tables and pivot tables to Excel.
•
On — If switched on, cells that span rows and cells that span
columns are repeated, regardless of the Value Suppression setting
in the Analysis editor.
•
Off — If switched off, the Value Suppression setting in the Analysis
editor is honored and cells that span rows and cells that span
columns don't repeat when exporting tables and pivot tables to
Excel.
Default: Off
API Key: AnalysisRepeatRowsExcelExportsTablesPivots
Edition: Enterprise only
Chapter 7
Configure Advanced Options
7-56
System Setting More Information
Sort Null Values First Specifies whether to sort NULL values before other values (On) or after
(Off). Select the value that matches your database. If this setting doesn't
match your database setting, then the database setting takes
precedence.
•
On — Sorts NULL values before other values.
•
Off — Sorts NULL values after other values.
Default: Off
API Key: SortNullValuesFirst
Edition: Professional and Enterprise
Sort Order Locale Applies to content migrated from Oracle BI Enterprise Edition.
After you migrate content from your Oracle BI Enterprise Edition
environment to Oracle Analytics, you may experience different sorting
behaviors in analyses.
For example, if you look at a migrated analysis in Polish, the upper case
and lower case letters might sort based on the Oracle Analytics default
locale, not the original Oracle BI Enterprise Edition locale. To preserve
the Oracle BI Enterprise Edition sort behavior in Oracle Analytics,
change this setting to Polish.
API Key: DataQuerySortOrderLocale
Edition: Professional and Enterprise
Use Vanity URL to Share
Content in Email
Specifies the Oracle Analytics Cloud URL format that's used to share
links to workbook visualizations in scheduled emails. If your organization
set up a vanity URL for your system, enter the existing vanity URL that
you want to use in the format:
https://myvanity.com/ui/
Alternatively, leave the setting blank to use the standard URL format in
emails. See Share Visualizations Using Workbook Email Schedules.
See also Set Up a Custom Vanity URL
API Key: VanityURLShareContentInEmail
Edition: Professional and Enterprise
Performance and Compatibility Options
You use these options to configure performance and compatibility settings between Oracle BI
Enterprise Edition and Oracle Analytics. For example, you can set the maximum temporary file
size.
LiveLabs Sprint
Note:
If you change a performance and compatibility setting, you must apply the change for
the new value to take effect unless we note it otherwise.
Chapter 7
Configure Advanced Options
7-57

System Setting More Information
Brushing Enabled for
Datasets
Specifies whether brushing is enabled by default for workbooks that use
dataset data.
•
On — Brushing is on by default for workbooks that use dataset
data.
•
Off — Brushing is off by default for workbooks that use dataset
data.
Users can override this setting in the workbook and canvas properties.
Default: On
API Key: EnableBrushingDatasets
Edition: Professional and Enterprise
Brushing Enabled for Subject
Areas
Specifies whether brushing is enabled by default for workbooks that use
data from subject areas.
•
On — Brushing is on by default for workbooks that use subject area
data.
•
Off — Brushing is off by default for workbooks that use subject area
data.
Users can override this setting in the workbook and canvas properties.
Default: On
API Key: EnableBrushingSubjectAreas
Edition: Enterprise only
Cache Dashboard Listing
Dropdown Menu
Specifies how often the Dashboards menu list on the Oracle Analytics
Classic Home page is populated during a user session.
•
On — Dashboards menu lists are only populated once per user
session. This improves performance but may result in stale lists until
the user logs out and back in which refreshes the lists.
•
Off — Dashboards menu lists are populated every time they’re
opened.
Default: Off
API Key: CacheDashboardListingDropdownMenu
Edition: Enterprise only
Cache Enable Specifies whether data query caching is enabled or disabled.
•
On — Data caching is enabled.
•
Off — Caching is disabled.
Default: On
API Key: EnableDataQueryCache
Edition: Professional and Enterprise
Enable Auto Insights on
Datasets
Specifies whether the Auto Insights feature is available when datasets
are created or modified.
•
On — The Enable Insights option is available in the Dataset Inspect
dialog and insights are automatically generated and available for
workbooks that use datasets with the Enable Insights option
selected.
•
Off — Auto Insights and its related features are disabled.
Default: On
Apply Change Required: No, but when you change this setting, it may
take a few minutes to take effect.
API Key: EnableAutoInsightsDatasets
Edition: Professional and Enterprise
Chapter 7
Configure Advanced Options
7-58

System Setting More Information
Enable Database Analytics
Node in Data Flows
Specifies whether the Database Analytics node is displayed in data
flows.
•
On — The Database Analytics node is available in data flows so
that data flow designers can apply database analytics functions to
the data.
•
Off — The Database Analytics node isn't available in data flows.
This prevents data flow designers from generating a potentially high
number of SQL statements and slowing database performance.
Default: On
API Key: EnableDatabaseAnalyticsNodeDataFlows
Edition: Professional and Enterprise
Enable Immediate Dashboard
Rendering
Specifies whether to display available dashboard content immediately or
wait until all the dashboard content is ready.
•
On — Display dashboard content immediately even if some content
is unavailable.
•
Off — Wait for all the dashboard content to be ready before
displaying content.
Default: Off
API Key: EnableImmediateDashboardRendering
Edition: Enterprise only
Evaluate Support Level Specifies who can issue database functions:
EVALUATE
,
EVALUATE_ANALYTIC
,
EVALUATE_AGGR
, and
EVALUATE_PREDICATE
.
By default (
0
), the
EVALUATE
database functions are disabled.
•
1 — Service administrators only. Users with the BI Service
Administrator application role can invoke
EVALUATE
database
functions.
•
2 — Anyone. Any user who signs in to Oracle Analytics can invoke
EVALUATE
database functions.
•
0 (or any other value) — No one. All
EVALUATE
database functions
are disabled in Oracle Analytics.
Valid Values: 0, 1, 2
Default: 0
API Key: EvaluateSupportLevel
Edition: Professional and Enterprise
Load Semantic Models Using
Multiple Threads
Specifies if semantic models load using multiple threads. If you find that
your large datasets load slowly and impact system processing times,
enabling this option may improve performance.
•
On — Semantic models load in parallel.
•
Off — Semantic models don't load in parallel.
Default: Off
API Key: LoadSemanticModelsWithMultipleThreads
Edition: Enterprise only
Maximum Query Limit
(seconds)
Specifies the maximum length of time a single query can run before it's
canceled and users see a timeout message. The default is 660 seconds
(11 minutes).
Valid Values: 60-660
Default: 660
API Key: MaximumQueryLimit
Edition: Professional and Enterprise
Chapter 7
Configure Advanced Options
7-59

System Setting More Information
Maximum Working File
Percent Size
Specifies that the temporary file doesn't exceed a specified percentage
of the global work directory size limit.
The size limit defaults for temporary files is 5% (of 100 GB), equivalent
to 5 GB. The file limit applies individually to each temporary file, while
the size specified for the total global work directory applies collectively to
all temporary files created.
You can increase or decrease this value within the range of 5% to 50%.
This enables temporary file sizes between 5GB and 50GB. Raising this
setting above 50% limits concurrency for large operations.
Valid Values: 5-50
Default: 5
API Key: MaximumWorkingFilePercentSize
Edition: Enterprise only
Mobile Watch Service
Enabled
Specifies if the Data Watch service is active.
•
On — The Data Watch service is active and all mobile users can
specify the threshold value for bring backs.
•
Off — The Data Watch service is inactive.
Default: On
API Key: EnableMobileDataWatchService
Edition: Professional and Enterprise
Mobile Watch Service
Frequency
Specifies the frequency at which the Data Watch service must scan the
server for changes based on the frequency of changes in your data
sources.
The default is 240 (4 hours). You can disable this service by changing
this setting frequency to 0 or by toggling the Mobile Watch Service
Enabled setting to off.
Valid Values: 0-10139
Default: 240
API Key: MobileDataWatchServiceFrequency
Edition: Professional and Enterprise
OBIEE Compatibility Release Specifies the on-premise Oracle BI Enterprise Edition version number
for feature compatibility. This only applies if you upgrade from Oracle BI
Enterprise Edition to Oracle Analytics, and you want to use a feature
from a specific on-premises release in Oracle Analytics.
Valid Values: 11.1.1.9, 11.1.1.10, 11.1.1.11, 12.2.1.0, 12.2.1.1,
12.2.1.3, 12.2.1.4, 12.2.2.0, 12.2.3.0, 12.2.4.0, 12.2.5.0
API Key: OBIEECompatibilityRelease
Edition: Professional and Enterprise
Override Database Features Specifies if users can use request variables to override database
features.
•
1 — Only administrators can override database features.
•
2 — Any user can override database features.
•
0 — No user can override database features.
Valid Values: 0, 1 , 2
Default: 0
API Key: OverrideDatabaseFeatures
Edition: Enterprise only
Chapter 7
Configure Advanced Options
7-60

System Setting More Information
Query Limit Extension Determines whether the query limit can extend to 60 minutes to
accommodate the occasional, longer running query.
•
On — The query limit can be extended to 60 minutes.
•
Off — The Maximum Query Limit setting on this page is used and
never extends.
Default: Off
API Key: QueryLimitExtension
Edition: Professional and Enterprise
Restrict Data Export and
Delivery
Restricts the maximum number of rows users can export or deliver by
email in formatted and unformatted content. Data export and delivery
limits depend on the size of your Oracle Analytics service. See Data
Export and Delivery Limits by Compute Size.
Valid Values: Maximum - no restriction, 90% of Maximum, 80% of
Maximum, 70% of Maximum, 60% of Maximum, 50% of Maximum, 40%
of Maximum, 30% of Maximum, 20% of Maximum, 10% of Maximum,
Minimum - 1000 rows
Default: Maximum - no restriction
API Key: RestrictDataExportAndDelivery
Edition: Professional and Enterprise
Strong Datetime Type
Checking
Specifies whether to enforce strict checking for date and time data types
and whether to reject queries that contain incompatibilities in date and
time data types.
•
On — Enforces strict checking for date and time data types.
•
Off — Relaxes strict checking for date and time data types.
However, invalid queries or queries with severe date and time
incompatibilities may still be still rejected. For example, date and
time incompatibilities might be rejected if your relational database
uses strict checking for those data types.
Default: On
API Key: StrongDatetimeTypeChecking
Edition: Professional and Enterprise
Chapter 7
Configure Advanced Options
7-61

Preview Options
Administrators can turn some preview features on and off. This way, your organization can
evaluate and learn how to use new features before they roll out by default.
System Setting More Information
Preview Workbook Email
Scheduler
Enable this option so that administrators can set up a schedule to
regularly share their workbooks with one or more email recipients in
PDF or PNG format. See Share Visualizations Using Workbook Email
Schedules (Preview).
•
On — Displays the Schedule option in the Actions menu of a
workbook to users with the BI Service Administrator application role
with Read-Write access and the Edit share permission on the
workbook.
•
Off — Disables and hides the Schedule option in the Actions
menu of a workbook.
Default: Off
Apply Change Required: No
API Key: PreviewWorkbookEmailScheduler
Edition: Enterprise only
Preview Workbook Email
Scheduling with Bursting
Enable this option to allow administrators to set bursting options when
emailing workbooks saved in Shared Folders. This option requires
Preview Workbook Email Scheduler to be enabled. See Share
Visualizations Using Workbook Email Schedules (Preview) and Create a
Bursting Workbook Email Schedule (Preview).
•
On — Enables users with a BI Service Administrator application
role with Read-Write access and the Edit share permission for the
workbook to enable the Bursting option in the Email tab of a
workbook schedule if the workbook is saved in Shared Folders.
•
Off — Disables the Bursting option in the Email tab of a workbook
schedule.
Default: Off
Apply Change Required: No
API Key: PreviewWorkbookEmailBursting
Edition: Enterprise only
Prompt Options
You use these options to configure prompt behavior in analyses and dashboards. For example,
you can enable search results to automatically display as highlighted when users enter search
parameters, without the need to click Search.
These options apply only to analyses and dashboards. They don't apply to data visualizations.
Note:
If you change a prompt setting, you must apply the change for the new value to take
effect.
Chapter 7
Configure Advanced Options
7-62

System Setting More Information
Auto Apply Dashboard
Prompt Values
Enables the option to hide the Apply button so that prompt values can
be applied without clicking any button.
If this is property is On:
•
Displays the Show Apply Button and Show Reset Button fields in
the Edit Page Settings dialog.
•
Displays the Prompts Apply Buttons and Prompts Reset Buttons
fields in the Dashboard Properties dialog.
•
Displays the Prompt Buttons on Current Page option on the
dashboard builder's Tools menu.
Default: On
API Key: AutoApplyDashboardPromptValues
Edition: Enterprise only
Auto Search on Prompt Value
Search Dialog
Enables search results to automatically display and highlight when users
enter search parameters, without the need to click Search.
Default: On
API Key: EnableAnalysisAutoSearchPromptDialog
Edition: Enterprise only
Case Insensitive Auto
Complete
Specifies whether, when a user enters a prompt value in analyses and
dashboards, the auto-complete functionality is case-insensitive.
•
On — Case isn't considered when a user enters a prompt value
such as "Oracle" or "oracle."
•
Off — Case is considered when a user enters a prompt value, so
the user must enter "Oracle" and not "oracle" to find the Oracle
record.
Default: On
API Key: AutoCompletePromptDropDownsCaseInsensitive
Edition: Enterprise only
Show Null Value When
Column Is Nullable
Specifies whether to show the term "NULL" at runtime in the column
prompt above the column separator in the drop-down list when the
database allows null values.
•
always — Always shows the term "NULL" above the column
separator in the drop-down list.
•
never — Never shows the term "NULL" in the drop-down list.
•
asDataValue — Displays the data value in the drop-down list, not
the term "NULL" above the separator in the drop-down list.
Valid Values: always, never, asDataValue
Default: always
API Key: AnalysisPromptsShowNullValueWhenColumnIsNullable
Edition: Enterprise only
Support Auto Complete Enables or disables the auto-complete functionality available in prompts.
•
On — Enables auto-complete, which means that the Prompts
Auto-Complete field is displayed and set to On in the My Account
dialog and in the Dashboard Properties dialog.
•
Off — Disables auto-complete, which means that the auto-complete
fields in the My Account and Dashboard Properties dialogs aren't
available.
Default: Off
API Key: EnableAnalysisAutoCompletePrompt
Edition: Enterprise only
Chapter 7
Configure Advanced Options
7-63

Security Options
Use Security options to control how users can perform specific actions in analyses and
dashboards.
These options apply only to analyses and dashboards. They don't apply to data visualizations.
Note:
If you change a security setting, you must apply the change for the new value to take
effect.
System Setting More Information
Allow HTML/JavaScript/CSS
Content
Determines whether users can apply and save HTML, JavaScript, and
CSS markup in various text fields for analyses and dashboards, and how
any previously saved markup is used.
•
Always — Enables users to apply markup. Displays the Contains
HTML/JavaScript/CSS Markup option in dialogs where additional
formatting might be useful. For example:
– For analyses: Various dialogs in the analysis editor, Analysis
Properties dialog, Column Properties (Column Format) dialog,
Edit Column Formula dialog, Narrative dialog, Ticker dialog,
Static Text dialog, and New Calculated Measure dialog.
– For dashboards: Various dialogs in the dashboard editor, Text
Properties dialog, and Edit Header and Edit Footer dialogs
(under Print and Export Options).
•
Never — Prevents users from applying markup. Hides the Contains
HTML/JavaScript/CSS Markup option. Users can only enter plain
text. Oracle Analytics ignores any markup that users previously
entered and saved for their analyses and dashboards.
•
HTML Only — Enables users to apply HTML markup. Displays the
Contains HTML/JavaScript/CSS Markup option in dialogs where
additional formatting might be useful but only safe HTML is allowed
(no JavaScript or CSS). When an analysis or dashboard opens,
Oracle Analytics sanitizes any markup that users have entered and
applies only the HTML markup.
•
On Open — Prevents users from applying additional markup
(existing markup is retained). Hides the Contains HTML/
JavaScript/CSS Markup option so users can enter only plain text.
Any previously saved markup for analyses and dashboards
continues to be applied.
Note: The On Open option was previously named "Off".
API Key: AllowHTMLJavaScriptCSSContent
Edition: Enterprise only
Enable Push Notifications
Specifies if mobile application push notifications are enabled (on) or
disabled (off).
•
On — Enables mobile application push notifications to receive
alerts and messages.
•
Off — Disables mobile application push notifications to stop
receiving alerts and messages.
Default: On
API Key: EnableMobilePushNotifications
Edition: Professional and Enterprise
Chapter 7
Configure Advanced Options
7-64
System Setting More Information
Export Data to CSV and Tab-
Delimited Files as Text
Specifies if leading apostrophes are added when data is exported to
CSV or tab-delimited files, so all fields are treated as text.
•
On — Leading apostrophes are automatically added to CSV and
tab-delimited files during exports.
•
Off — Data is exported to CSV files as-is.
Caution:
When Off, opening exported CSV files may invoke unwanted
formulas.
See Export the Results of Analyses.
Note:
This setting applies only to visualizations
and analyses. It doesn't apply to pixel-
perfect reports.
Default: Off
API Key: ExportDataToCSVFilesAsText
Edition: Professional and Enterprise
Post Logout Redirect URL
Specifies the URL users are redirected to when they sign out of Oracle
Analytics. For example, you might want to redirect users to a company
web page, or display sign in details that open the Classic Home page.
Note:
This setting works for Oracle Analytics
Cloud instances created after January
23rd 2023. If you want to configure a post
logout URL for an Oracle Analytics Cloud
instance that was created before January
23rd 2023, raise a service request with
Oracle Support.
API Key: PostLogoutRedirectURL
Edition: Enterprise only
Chapter 7
Configure Advanced Options
7-65
System Setting More Information
Save Workbook Thumbnails To help people identify workbook content, Oracle Analytics can display
thumbnail images for workbooks on the Home page. The information
that’s shown in these thumbnails is blurred to protect sensitive data from
being exposed to users that don't have the same access as data
authors.
This setting overrides any Save thumbnails value set in the Workbook
Properties dialog at the individual workbook level.
Note:
This setting doesn't apply to watchlists
because they don't use thumbnails.
Instead, watchlists display miniaturized
visualizations that reload whenever you
refresh the Home page.
•
On — Display blurred workbook thumbnails on the Home page. If
this setting enabled (on), workbook owners can hide the thumbnail
for individual workbooks if they need to. See Set Workbook
Thumbnails.
•
Off — Don’t display any workbook thumbnails on the Home page.
Instead, show the standard icon for all workbooks.
Default: On
API Key: SaveWorkbookThumbnail
Edition: Professional and Enterprise
Sign Out Inactive Users
Automatically
Specifies whether to automatically sign out users after the inactivity
timeout is reached.
•
On — Users are automatically signed out when the inactivity
timeout is reached.
•
Off — Users remain signed in even if the inactivity timeout is
reached.
Default: Off
API Key: SignOutInactiveUsersAutomatically
Edition: Professional and Enterprise
URL for Browser Script
Actions
Specifies the URL for the JavaScript file containing custom Browser
Script Actions.
API Key: URLBrowserScriptActions
Edition: Enterprise only
User Inactivity Timeout
(minutes)
Specifies the number of minutes users are inactive before their browser
or mobile connection must be re-authenticated.
Valid Values: 5 - 480
Default: 60
API Key: UserInactivityTimeout
Edition: Professional and Enterprise
Chapter 7
Configure Advanced Options
7-66
Usage Tracking Options
You use these options to specify how you want to monitor system usage. For example, you can
set the number of rows that you want stored in the usage tracking tables.
Note:
If you change an usage tracking setting, you must apply the change for the new
value to take effect.
System Setting More Information
Enable Usage Tracking Specifies whether usage tracking is enabled. You must enable this
setting to activate all other settings in the Usage Tracking section of this
page.
•
On — Any enabled settings in the Usage Tracking section of this
page are activated.
•
Off — No settings in the Usage Tracking section of this page are
activated, even if they are enabled.
Default: On
API Key: EnableUsageTracking
Edition: Enterprise only
Usage Tracking Connection
Pool
Specifies the name of the connection pool you created for your usage
tracking statistics database. For example,
<database
name>.<connection pool name>
.
API Key: UsageTrackingConnectionPool
Edition: Enterprise only
Usage Tracking Init Block
Table
Specifies the name of the fully-qualified database table you use for
inserting records that correspond to the initialization block statistics, as it
appears in the physical layer of your semantic model. For example,
<database name>.<catalog name >.<schema name >.<table
name> or <database name>.<schema name >.<table name>
.
API Key: UsageTrackingInitBlockTable
Edition: Enterprise only
Usage Tracking Logical Query
Logging Table
Specifies the name of the database table you want to use to store logical
query details. For example,
<database name>.<catalog name
>.<schema name >.<table name> or <database name>.<schema
name >.<table name>
.
API Key: UsageTrackingLogicalQueryLoggingTable
Edition: Enterprise only
Usage Tracking Maximum
Rows
Indicates the number of rows allowed in usage tracking tables, with a
value of 0 indicating an unlimited number of rows.
Valid Values: Any positive number (up to 64-bit integer)
Default: 0
API Key: UsageTrackingMaximumRows
Edition: Enterprise only
Chapter 7
Configure Advanced Options
7-67
System Setting More Information
Usage Tracking Physical
Query Logging Table
Specifies the name of the database table you want to use to store
physical query details. For example,
<database name>.<catalog
name >.<schema name >.<table name> or <database
name>.<schema name >.<table name>
.
API Key: UsageTrackingPhysicalQueryLoggingTable
Edition: Enterprise only
User Names as the User
Identifier in Service Logs
Specifies whether to identify users by their user name in service logs.
When this setting is disabled (off), users are identified by their user
GUID in service logs. User names are logged if this setting is enabled
(on), and this might make user identification easier for administrators
who are monitoring logs.
•
On — Record the names of users performing actions in service
logs.
•
Off — Record the GUIDs of users performing actions in service
logs.
Default: Off
API Key: UserNamesInServiceLogs
Edition: Professional and Enterprise
View Options
You use these options to configure default search and viewing settings for users working with
analyses and dashboards.
These options apply only to analyses and dashboards. They don't apply to data visualizations.
Note:
If you change a view setting, you must apply the change for the new value to take
effect.
System Setting More Information
Default Scrolling Enabled Specifies how data scrolls in tables, pivots, heat matrix, and simple and
advanced trellis visualizations.
•
On — Data displays with a fixed header and content scrolling
controls for users to browse the data.
•
Off — Data displays with content paging controls for users to
browse the data.
Default: On
API Key:
AnalysisDefaultScrollingEnabled
Edition: Enterprise only
Chapter 7
Configure Advanced Options
7-68

System Setting More Information
Enable Enrichments in
Workbooks
Specifies whether workbook editors can add dataset enrichments to a
visualization directly from the Data Panel. This setting enables
enrichments in workbooks for all users. Workbook editors who own a
dataset or have editing privileges for it can enable or disable knowledge
enrichments for that dataset using the Enable Knowledge
Enrichments option. See Enable Knowledge Enrichments in the
Workbook Editor.
•
On — Workbook editors can drag and drop enrichment based data
elements to visualization canvases.
•
Off — Knowledge enrichments are not available for datasets.
Default: On
API Key:
EnableEnrichmentsInWorkbook
Edition: Professional and Enterprise
Prompt Auto Complete
Matching Level
Specifies whether the auto-complete functionality uses matching to find
the prompt value that the user enters into the prompt field. This setting
doesn’t apply if the user accesses the Search dialog to locate and
specify a prompt value.
•
StartsWith — Searches for a match that begins with the text that
the user types. For example, the user types M and the following
stored values are displayed: MicroPod and MP3 Speakers System.
•
WordStartsWith — Searches for a match at the beginning of a
word or group of words. For example, the user types C and the
following values are displayed: ComCell, MPEG Camcorder, and 7
Megapixel Digital Camera.
•
MatchAll — Searches for any match within the word or words.
Valid Values: StartsWith, WordStartsWith, MatchAll
Default: MatchAll
API Key:
AnalysisPromptAutoCompleteMatchingLevel
Edition: Enterprise only
Table/Pivot View: Maximum
Visible Rows
Specifies the maximum number of rows you want displayed for content
paging in table and pivot table views in analyses and dashboards.
The minimum number of rows you can specify to display is 100.
Valid Values: 100-5000
Default: 5000
API Key:
TablePivotViewMaximumVisibleRows
Edition: Enterprise only
View Interactions: Add/
Remove Values
Specifies whether the Add/Remove Values option is selected by default
in the Analysis Properties dialog: Interactions tab.
•
On — The Add/Remove Values option is selected by default in the
Analysis Properties dialog: Interactions tab.
•
Off — The Add/Remove Values option isn't selected by default in
the Analysis Properties dialog: Interactions tab.
Default: Off
API Key:
AnalysisViewInteractionsAddRemoveValues
Edition: Enterprise only
Chapter 7
Configure Advanced Options
7-69

System Setting More Information
View Interactions: Create/Edit/
Remove Calculated Items
Specifies whether the Create/Edit/Remove Calculated Items option is
selected by default in the Analysis Properties dialog: Interactions tab.
•
On — The Create/Edit/Remove Calculated Items option is
selected by default in the Analysis Properties dialog: Interactions
tab.
•
Off — The Create/Edit/Remove Calculated Items option isn't
selected by default in the Analysis Properties dialog: Interactions
tab.
Default: Off
API Key:
AnalysisViewInteractionsCreateEditRemoveCalculatedItems
Edition: Enterprise only
View Interactions: Create/Edit/
Remove Groups
Specifies whether the Create/Edit/Remove Groups option is selected
by default in the Analysis Properties dialog: Interactions tab.
•
On — The Create/Edit/Remove Groups option is selected by
default in the Analysis Properties dialog: Interactions tab.
•
Off — The Create/Edit/Remove Groups option isn't selected by
default in the Analysis Properties dialog: Interactions tab.
Default: Off
API Key:
AnalysisViewInteractionsCreateEditRemoveGroups
Edition: Enterprise only
View Interactions: Display/
Hide Running Sum
Specifies whether the Display/Hide Running Sum option is selected by
default in the Analysis Properties dialog: Interactions tab.
•
On — The Display/Hide Running Sum option is selected by
default in the Analysis Properties dialog: Interactions tab.
•
Off — The Display/Hide Running Sum option isn't selected by
default in the Analysis Properties dialog: Interactions tab.
Default: Off
API Key:
AnalysisViewInteractionsDisplayHideRunningSum
Edition: Enterprise only
View Interactions: Display/
Hide Sub-totals
Specifies whether the Display/Hide Sub-totals option is selected by
default in the Analysis Properties dialog: Interactions tab.
•
On — The Display/Hide Sub-totals option is selected by default in
the Analysis Properties dialog: Interactions tab.
•
Off — The Display/Hide Sub-totals option isn't selected by default
in the Analysis Properties dialog: Interactions tab.
Default: Off
API Key:
AnalysisViewInteractionsDisplayHideSubtotals
Edition: Enterprise only
View Interactions: Drill
Specifies whether the Drill (when not a primary interaction) option is
selected by default in the Analysis Properties dialog: Interactions tab.
•
On — The Drill (when not a primary interaction) option is selected
by default in the Analysis Properties dialog: Interactions tab.
•
Off — The Drill (when not a primary interaction) option isn't
selected by default in the Analysis Properties dialog: Interactions
tab.
Default: Off
API Key:
AnalysisViewInteractionsDrill
Edition: Enterprise only
Chapter 7
Configure Advanced Options
7-70

System Setting More Information
View Interactions: Include/
Exclude Columns
Specifies whether the Include/Exclude Columns option is selected by
default in the Analysis Properties dialog: Interactions tab.
•
On — The Include/Exclude Columns option is selected by default
in the Analysis Properties dialog: Interactions tab.
•
Off — The Include/Exclude Columns option isn't selected by
default in the Analysis Properties dialog: Interactions tab.
Default: On
API Key:
AnalysisViewInteractionsIncludeExcludeColumns
Edition: Enterprise only
View Interactions: Move
Columns
Specifies whether the Move Columns option is selected by default in
the Analysis Properties dialog: Interactions tab.
•
On — The Move Columns option is selected by default in the
Analysis Properties dialog: Interactions tab.
•
Off — The Move Columns option isn't selected by default in the
Analysis Properties dialog: Interactions tab.
Default: On
API Key:
AnalysisViewInteractionsMoveColumns
Edition: Enterprise only
View Interactions: Sort
Columns
Specifies whether the Sort Columns option is selected by default in the
Analysis Properties dialog: Interactions tab.
•
On — The Sort Columns option is selected by default in the
Analysis Properties dialog: Interactions tab.
•
Off — The Sort Columns option isn't selected by default in the
Analysis Properties dialog: Interactions tab.
Default: On
API Key:
AnalysisViewInteractionsSortColumns
Edition: Enterprise only
Enable Personalization in
Workbooks
Specifies whether users can personalize workbooks.
•
On — Content designers can enable or disable personalization
options (Filter and Parameter) in their workbooks.
•
Off — Personalization options aren't available for workbooks.
Default: On
API Key:
EnableUserPersonalizationInWorkbooks
Edition: Professional and Enterprise
Configure System Settings Using Console
Use Console to configure and customize system settings to suit your Analytics Cloud
environment.
1. In the Oracle Analytics Home page, click the Navigator, and then click Console.
2. Click System Settings.
3. Update the property value.
4. Click Apply to save you changes and then click OK to confirm.
Wait a few moments for the changes to refresh through the system.
Chapter 7
Configure Advanced Options
7-71

Manage System Settings Using REST APIs
You can use Oracle Analytics Cloud REST APIs to programmatically view and manage system
settings. For example, you might create a script to update usage tracking options.
• Typical Workflow for Using System Setting REST APIs
• REST API Key Values for System Settings
• Examples for System Setting REST APIs
Typical Workflow for Using System Setting REST APIs
Here are the common tasks to start using Oracle Analytics Cloud REST APIs to
programmatically view and manage system settings. If you’re using system setting REST APIs
for the first time, follow these tasks as a guide.
Task Description REST API
Documentation
Understand
prerequisites
Understand and complete several prerequisite
tasks.
You must have administrator permissions in Oracle
Analytics Cloud to manage system settings using
REST APIs (BI Service Administrator).
Prerequisites
Understand OAuth 2.0
token authentication
Authentication and authorization in Oracle
Analytics Cloud is managed by Oracle Identity
Cloud Service. To access the Oracle Analytics
Cloud REST APIs, you need an OAuth 2.0 access
token to use for authorization.
OAuth 2.0 Token
Authentication
Understand API keys for
system settings
Each system setting has a public API key name
that you can use in REST API operations.
REST API Key Values
for System Settings
Get system setting
details
Get details about specific system settings, all
system settings, or system settings that haven't
been applied yet.
Get system settings
Update system settings Update one or more system setting. Update system settings
REST API Key Values for System Settings
Each system setting has its own REST API key name. For example, the REST API key for the
system setting Cache Enable is EnableDataQueryCache. You use this REST API key to
identify the system setting in a REST API operation.
For example, if you want to disable the Cache Enable setting, you specify the name of the key
(
EnableDataQueryCache
) with the value
false
.
{
"items":[
{
"key": "EnableDataQueryCache",
"value": "false"
}
]
}
System Setting Display Name
REST API Key Value
Allow HTML/JavaScript/CSS Content AllowHTMLJavaScriptCSSContent
Chapter 7
Configure Advanced Options
7-72

System Setting Display Name REST API Key Value
Analytics Publisher Reporting Toolbar Mode AnalyticsPublisherReportingToolbarMode
Answers Editor Start Tab AnswersEditorStartTab
Answers Subject Area Sorting Order AnalysisSubjectAreaSortingOrder
Auto Apply Dashboard Prompt Values AutoApplyDashboardPromptValues
Auto Search on Prompt Value Search Dialog EnableAnalysisAutoSearchPromptDialog
Brushing Enabled for Data Sets EnableBrushingDatasets
Brushing Enabled for Subject Areas EnableBrushingSubjectAreas
Cache Dashboard Listing Dropdown Menu CacheDashboardListingDropdownMenu
Cache Enable EnableDataQueryCache
Case Insensitive Auto Complete AutoCompletePromptDropDownsCaseInsensitive
Connection Externalization Enabled EnableConnectionExternalization
Currencies XML AnalysisCurrenciesXml
Custom Links XML CustomLinksXml
Default Data Offset Time Zone DefaultDataOffsetTimeZone
Default Scrolling Enabled AnalysisDefaultScrollingEnabled
Default Time Zone for Date Calculations DefaultTimeZoneforDateCalculations
Default User Preferred Time Zone DefaultUserPreferredTimeZone
Disable Right Trim for VARCHAR Data DataQueryDisableRightTrimVARCHARData
Enable Auto Insights on Datasets EnableAutoInsightsDatasets
Enable Database Analytics Node in Data Flows EnableDatabaseAnalyticsNodeDataFlows
Enable Enrichments in Workbooks EnableEnrichmentsInWorkbook
Enable Immediate Dashboard Rendering EnableImmediateDashboardRendering
Enable Personalization in Workbooks EnablePersonalizationInWorkbooks
Enable Push Notifications EnableMobilePushNotifications
Enable Subrequest Shipping EnableSubrequestShipping
Enable Usage Tracking EnableUsageTracking
Enforce Safe Domains in Actions EnforceSafeDomainsActions
Evaluate Support Level EvaluateSupportLevel
Export Data to CSV and Tab-Delimited Files as
Text
ExportDataToCSVFilesAsText
Hide EPM Cloud Members with No Access HideEPMCloudMembersWithNoAccess
Hide loading messages HideLoadingMessages
Load Semantic Models Using Multiple Threads LoadSemanticModelsWithMultipleThreads
Locale DataQueryLocale
Maximum Email Size (KB) EmailMaxEmailSizeKB
Maximum Number of Recipients per Email EmailMaxRecipients
Maximum Query Limit (seconds) MaximumQueryLimit
Maximum Working File Percent Size MaximumWorkingFilePercentSize
Mobile Data Watch Service Enabled EnableMobileDataWatchService
Mobile Data Watch Service Frequency MobileDataWatchServiceFrequency
OBIEE Compatibility Release OBIEECompatibilityRelease
Override Database Features OverrideDatabaseFeatures
Portal Path PortalPath
Post Logout Redirect URL PostLogoutRedirectURL
Preview Workbook Email Scheduler PreviewWorkbookEmailScheduler
Chapter 7
Configure Advanced Options
7-73

System Setting Display Name REST API Key Value
Preview Workbook Email Scheduling with Bursting PreviewWorkbookEmailBursting
Prompt Auto Complete Matching Level AnalysisPromptAutoCompleteMatchingLevel
Query Limit Extension QueryLimitExtension
Recursive Datetime Type Checking RecursiveDatetimeTypeChecking
Repeat Rows on Excel Exports for Tables and
Pivots
AnalysisRepeatRowsExcelExportsTablesPivots
Restrict Data Export and Delivery RestrictDataExportAndDelivery
Safe Domains EmailSafeDomains
Save Workbook Thumbnail SaveWorkbookThumbnail
Show Null Value when Column is Nullable AnalysisPromptsShowNullValueWhenColumnIsNull
able
Sign Out Inactive Users Automatically SignOutInactiveUsersAutomatically
Sort Null Values First SortNullValuesFirst
Sort Order Locale DataQuerySortOrderLocale
Strong Datetime Type Checking StrongDatetimeTypeChecking
Support Auto Complete EnableAnalysisAutoCompletePrompt
Table/Pivot View: Maximum Visible Rows TablePivotViewMaximumVisibleRows
URL for Blocking Queries in Analyses QueryBlockingScriptURL
URL for Browser Script Actions URLBrowserScriptActions
Usage Tracking Connection Pool UsageTrackingConnectionPool
Usage Tracking Init Block Table UsageTrackingInitBlockTable
Usage Tracking Logical Query Logging Table UsageTrackingLogicalQueryLoggingTable
Usage Tracking Maximum Rows UsageTrackingMaximumRows
Usage Tracking Physical Query Logging Table UsageTrackingPhysicalQueryLoggingTable
Use BCC EmailUseBcc
Use RFC 2231 Encoding EmailUseRFC2231
Use Vanity URL to Share Content in Email VanityURLShareContentInEmail
User Currency Preferences XML UserCurrencyPreferencesXml
User Inactivity Timeout (minutes) UserInactivityTimeout
User Names as the User Identifier in Service Logs UserNamesInServiceLogs
View Interactions: Add/Remove Values AnalysisViewInteractionsAddRemoveValues
View Interactions: Create/Edit/Remove Calculated
Items
AnalysisViewInteractionsCreateEditRemoveCalcula
tedItems
View Interactions: Create/Edit/Remove Groups AnalysisViewInteractionsCreateEditRemoveGroups
View Interactions: Display/Hide Running Sum AnalysisViewInteractionsDisplayHideRunningSum
View Interactions: Display/Hide Sub-totals AnalysisViewInteractionsDisplayHideSubtotals
View Interactions: Drill AnalysisViewInteractionsDrill
View Interactions: Include/Exclude Columns AnalysisViewInteractionsIncludeExcludeColumns
View Interactions: Move Columns AnalysisViewInteractionsMoveColumns
View Interactions: Sort Columns AnalysisViewInteractionsSortColumns
WriteBack Template XML WriteBackTemplateXML
Chapter 7
Configure Advanced Options
7-74

Examples for System Setting REST APIs
REST API for Oracle Analytics Cloud includes several examples that explain how to use the
System Setting REST APIs.
Get system settings - Examples
• Example 1 - Get a list of all the system settings and their current values
• Example 2 - Get current values for a specific set of system settings
• Example 3 - Get a list of system settings that aren't applied yet
Update system settings - Examples
• Example 1 - Update system settings using a JSON file
• Example 2 - Update system settings directly
Chapter 7
Configure Advanced Options
7-75
8
Replicate Data
Use data replication to import data from Oracle Fusion Cloud Applications Suite into high-
performant data stores, such as Oracle Autonomous Data Warehouse and Oracle Database
Classic Cloud Service, for visualization and analysis in Oracle Analytics Cloud.
With data replication, you can import and transform your data without using additional extract-
transform-load (ETL) tools.
Topics
• Typical Workflow to Replicate Data
• Overview of Data Replication
• Replicate Your Data
• Replicate Your Data Regularly
• Modify a Replication Flow
• Monitor and Troubleshoot a Replication Flow
• Move Replicated Data to a Different Target Database
Typical Workflow to Replicate Data
Here are the tasks that Oracle Analytics Cloud administrators can perform to replicate data for
visualizations.
Task Description More Information
Define the data you want
to replicate
Set up connections to your data source
and the replication target, and define the
data you want to replicate.
Replicate Your Data
Set up a replication
schedule
To keep your data fresh, schedule
replication flows to run regularly.
Replicate Your Data Regularly
Monitor replication jobs Monitor a replication flow to check
progress and troubleshoot issues.
Monitor and Troubleshoot a
Replication Flow
Move replicated data to a
different database
If you change the target database for data
replication, you can migrate the current
data to the new database, and reconfigure
your connections to replicate to your new
database.
Move Replicated Data to a
Different Target Database
Overview of Data Replication
Data replication in Oracle Analytics Cloud makes data more readily available for visualization
and analysis without repeatedly executing expensive queries or data extracts on the original
data source. You can also use data replication to build content packs for Oracle Fusion Cloud
Applications.
Tips on implementing data replication
8-1

• Data replication is available in Oracle Analytics Cloud Enterprise Edition.
• For maximum performance, use data replication with extract data stores (that is, View
Objects (VOs) with "ExtractPVO" in the VO name).
• See Top FAQs for Data Replication.
For detailed lists of extract data stores, see Oracle Fusion Cloud Application Suite. For
example:
• Financials
• Procurement
• Sales
• Supply Chain and Manufacturing
Prerequisites For Data Replication
Before you start, make sure you have the correct components required for data replication.
To find out the supported versions of Oracle Planning and Budgeting Cloud Service, see
Supported Data Sources.
You need the following:
• Oracle Analytics Cloud Enterprise Edition.
• Data replication permissions (BI Service Administrator role) in Oracle Analytics Cloud.
• A supported data source, such as an application in Oracle Fusion Cloud Applications Suite
or Oracle Fusion Cloud B2C Service (RightNow) from which to source your data.
• A supported data target, such as Oracle Database or Oracle Autonomous Data
Warehouse in which to replicate your data.
• If you're replicating data from Oracle Fusion Cloud Applications Suite, you need:
– BI Cloud Connector:
* BI Cloud Connector deployed in the Oracle Fusion Cloud Applications Suite
environment.
* Access to BI Cloud Connector Console in the Oracle Fusion Cloud Applications
Suite environment.
* Connection details for the storage instance of Oracle Cloud Infrastructure specified
on the Configure External Storage page of BI Cloud Connector Console.
– Oracle Cloud Infrastructure:
* Compute permissions in Oracle Cloud Infrastructure to be able to administer object
storage.
* Oracle Cloud Infrastructure storage. You can use either Oracle Cloud
Infrastructure Object Storage or Oracle Cloud Infrastructure Object Storage
Classic.
If you already replicate your data from Object Storage Classic, it's easy to switch to
Object Storage.
* Details of an existing storage bucket in Oracle Cloud Infrastructure, including the
storage bucket name, the namespace in which the bucket resides, and the Oracle
Cloud Identifier (OCID) for the tenancy where the bucket resides.
Chapter 8
Overview of Data Replication
8-2

* A user account Oracle Cloud Identifier (OCID) to access the storage bucket from
both Oracle Analytics Cloud and the data source (for example, Oracle Fusion
Cloud Applications).
Information You Need for Data Replication
Before you start, make sure you have the required details for data replication.
Oracle BI Cloud Connector
• The https://{fa_url}/biacm link for your Oracle BI Cloud Connector.
Oracle Fusion Cloud Applications
• The host name and connection details for your Oracle Fusion Cloud Applications instance.
Oracle Cloud Infrastructure Storage
• The host name, storage service name, and container name of your Oracle Cloud
Infrastructure storage instance (Oracle Cloud Infrastructure Object Storage or Oracle
Cloud Infrastructure Classic Storage). Use this information to configure Oracle BI Cloud
Connector to point to your Oracle Storage Cloud storage instance.
• The REST Endpoint URL for your Oracle Cloud Infrastructure storage instance.
The first part of the URL is the Storage host and the last part is the Storage Name/Service
Name. For example:
https://uscom-{location}.storage.oraclecloud.com/v1/Storage-
mystoragecloudclassic
To obtain the REST Endpoint URL, go to Oracle Cloud Infrastructure Classic Console,
navigate to Storage Classic, click Account and copy the REST Endpoint URL.
• Details of your object storage bucket in Oracle Cloud Infrastructure, including the name of
the storage bucket, the namespace in which the bucket resides, and the Oracle Cloud
Identifier (OCID) for the tenancy where the bucket resides.
• The Oracle Cloud Identifier (OCID) for the user with access to the storage bucket.
What Data Can I Replicate?
You can replicate data from these sources.
• Oracle Eloqua
• Oracle Fusion Cloud Applications (with either Oracle Cloud Infrastructure Object Storage
or Object Storage Classic)
• Oracle Fusion Cloud B2C Service (RightNow)
• Oracle Talent Acquisition Cloud (Taleo)
What Target Databases Can I Replicate Data Into?
You can replicate data into these types of database.
• Oracle Autonomous Data Warehouse
• Oracle Autonomous Transaction Processing
• Oracle Database
Chapter 8
Overview of Data Replication
8-3

What Replication Tasks Can I Do?
You can perform numerous data replication tasks.
• Create data flows to replicate your data (known as replication data flows).
• Schedule replication data flows to perform regular incremental updates.
• Limit the data that you replicate using a filter.
What Privileges and Permissions Are Required?
Make sure you have the required privileges and permissions for data replication.
To replicate data, you must have the BI Service Administrator application role or some other
role that includes BI Service Administrator.
For Oracle Database, to replicate into the user’s own schema, the user needs the following
privileges :
• CREATE SESSION
• CREATE TABLE
For Oracle Database, to replicate data into other schemas within the target database, the user
needs all of the following privileges:
• CREATE ANY TABLE
• SELECT ANY TABLE
• ALTER ANY TABLE
• COMMENT ANY TABLE
• INSERT ANY TABLE
• UPDATE ANY TABLE
• DELETE ANY TABLE
• DROP ANY TABLE
• CREATE ANY INDEX
• ALTER ANY INDEX
• DROP ANY INDEX
• ANALYZE ANY
What Options Are Available when Replicating Data from an Oracle Fusion
Cloud Applications Data Source
When you replicate data from an Oracle Fusion Cloud Applications data source, use these
options.
Some View Objects record change history (similar to slowly changing dimensions). To replicate
the change history, click Include History on the replication setup dialog.
Keep replicated data synchronized with the source data using the Include Deletions option on
the replication setup dialog. If you select Include Deletions and a record is deleted from the
source data, it’s also deleted from the target database.
Chapter 8
Overview of Data Replication
8-4

To synchronize data, you use the Include Deletions option in incremental data loads (where
the Load Type option is Incremental). In full data loads, the target table rows are deleted
before the replication starts.
With Custom View Objects, you can replicate data in any custom view using the Add a
custom view object option on the replication setup dialog. Enter the full path and name of the
view, for example, FscmTopModelAM.TaskDffBIAM.FLEX_BI_TaskDFF, then click Add to add
the view to the Replicate Objects list so you can select fields.
Replicate Your Data
In data replication, use a replication flow to copy data from a data source to a data target for
analysis in Oracle Analytics Cloud. For example, you might copy data from an Oracle Fusion
Cloud Applications data source to Oracle Autonomous Data Warehouse.
1. Set up a connection for your data source:
a. From the Home page, click Create, then Replication Connection, and then select the
type of data source you want to copy.
For example, to replicate data from an Oracle Fusion Cloud Applications data source,
click Oracle Fusion Application Storage.
b. At the Create Connection dialog, specify the connection details.
For example, to replicate data from Oracle Fusion Cloud Applications, specify
connection details for your Oracle Cloud Infrastructure Object Storage or Object
Storage Classic instance. See Create a Replication Connection For Oracle Fusion
Cloud Applications.
2. Set up a connection for your data target:
a. From the Home page, click Create, Replication Connection, and then select the type
of data source you want to copy the data into.
b. In the Create Connection dialog, specify the connection details of your data target.
For example, to replicate to Oracle Autonomous Data Warehouse, click Oracle
Autonomous Data Warehouse.
3. From the Home page, click Create, then click Data Replication.
4. In the Create Data Replication-Select Source Connection dialog, select the source
connection that you created in Step 1.
5. In the Create Data Replication-Select Target Connection dialog, select the target
connection that you created in Step 2.
6. If the replication target has multiple schemas, use the Schema list to select the schema to
use.
7. In the Replicate Objects area, select the object that you want to replicate:
• Click the check box next to each object that you want to replicate.
For Fusion Applications data sources, if the view that you want to replicate isn’t
displayed in the list, click the Add a custom view object option below the list. Enter
the full path and name of the view, for example,
FscmTopModelAM.TaskDffBIAM.FLEX_BI_TaskDFF
, then click Add.
• When you select a table, you include all attributes by default. Use the check boxes on
the right-hand pane to select or deselect attributes.
Chapter 8
Replicate Your Data
8-5

• To change a primary key, click the key icon and select Assign Primary Key or
Reorder Primary Key. The primary key is used for upsert operations to determine
whether a record is inserted or updated.
To improve indexing, it’s best practice to order the columns so that the most selective
columns are first and the least selective columns are last. Do this by clicking the
Reorder Primary Key option from the context menu of any of the primary key
columns.
• To use multiple columns as a primary key, select the key icon next to each column to
include in the key.
• To replicate a subset of data based on a filter, click Edit Filter to display the filter editor
and specify a filter expression (without the closing semicolon). The expression format
you use depends on the filter language that your data source supports. Common filter
languages include SQL, XML, and so on. Refer to the documentation for your data
source for details.
Data Source
Type
Example filter expressions
Oracle Fusion
Cloud
Applications
"__DATASTORE__.LookupType not in
('GROUPING_SEPARATOR','HZ_FORMAT_DELIMITERS','ICX_NUMERIC
_CHARACTERS')"
Oracle Fusion
Cloud B2C
Service
(RightNow)
lookupname like 'Admin%'
id > 2
Oracle Eloqua '{{Account.Field(M_Annual_Revenue1)}}' > '2000’
Use the Validate option to verify the expression before you click OK to save the filter.
• To replicate a subset of data based on a timestamp, click the Replicate From calendar
icon and specify a start date.
The Replicate From option only applies to tables that have at least one incremental
identifier column defined.
• Use the Load Type to specify whether to perform an incremental load or a full load.
If you select Incremental, you replicate all data on the first run and on subsequent
runs you replicate only new data. Incremental updates require tables with a primary
key and at least one incremental identifier column.
If you select Full, the target table is initialized and you replicate all data.
8. Save your replication workbook.
9. To start the data load, click Run Replication Flow.
Create a Replication Connection For Oracle Fusion Cloud Applications
To replicate data from Oracle Fusion Cloud Applications, you set up a data replication
connection in Oracle Analytics Cloud.
1. In Oracle Analytics Cloud, click Create, then Replication Connection.
2. Click Oracle Fusion Application Storage.
3. Specify these connection details:
• Storage Type - Select OCI for Oracle Cloud Infrastructure Object Storage or Classic
for Oracle Cloud Infrastructure Object Storage Classic.
Chapter 8
Replicate Your Data
8-6

• Storage Region - Specify the region on Oracle Cloud Infrastructure where the storage
bucket resides (for example, us-ashburn-1). In the Object Storage API endpoint, the
region is specified immediately before
oraclecloud.com
. For example, https://
objectstorage.us-ashburn-1.oraclecloud.com.
• Storage Tenancy OCID - Specify the Oracle Cloud Identifier (OCID) for the tenancy
where the bucket resides.
• Storage User OCID - Specify the Oracle Cloud Identifier (OCID) for the user that will
access the storage bucket.
• Storage Bucket - Specify the name of the storage bucket.
• URL - Specify the API endpoint for the Fusion Enterprise Scheduler Web Service. For
example,
https://<fa-host>/bi/ess/esswebservice
or just the hostname
<fa-
host>
.
• Username - Specify the username of the Oracle Fusion Cloud Applications user with
permissions to access BI Cloud Connector.
• Password - Specify the password of the Oracle Fusion Cloud Applications user with
permissions to access BI Cloud Connector.
• Storage API Key - Click Generate, then click Copy to create an API signing key.
Oracle Analytics Cloud Data Replication uses this key to authenticate when it
accesses the object storage bucket.
• Storage Connection - Specify the storage connection in BI Cloud Connector Console
to use when writing the extracted data. The BI Cloud Connector storage connection
must point to the same bucket as the Oracle Analytics Cloud connection.
4. In separate browser window or tab, navigate to Oracle Cloud Infrastructure Console and
open the navigation menu. Under Identity & Security, click Domains, select the identity
domain that Oracle Analytics Cloud uses, and then click Users. Locate and click the name
of the user for your replication user account.
If you don't see the Domains link, click Users.
5. Under the API Keys section, add these keys:
• Add the public key for the Data Replication connection that you copied to the clipboard
in Step 4.
• Add the public key that was saved when you created the storage connection in BI
Cloud Connector Console on the Configure External Storage page.
6. Return to the Oracle Analytics Cloud browser window or tab, and on the Oracle Fusion
Application Storage dialog click Save. If you've entered the information correctly, the
connection is saved.
Replicate Your Data Regularly
In data replication, you can schedule replication flows to run regularly. For example, if your
source data changes weekly, you might replicate your data once per week to keep it up-to-
date.
1. In the Home page, click Navigator, then click Data, then click Data Replications.
A list of replication flows that you can schedule is displayed. If you haven’t already created
a replication flow, do that first.
2. Right-click the replication flow that you want to execute regularly and click New Schedule.
Chapter 8
Replicate Your Data Regularly
8-7

3. In the Schedule dialog, specify when to start the replication flow and how often you want it
to run.
4. To monitor the progress of your scheduled jobs, in the Home page, click Navigator, then
click Jobs.
5. To change the schedule, right-click the replication flow that you scheduled, click Inspect,
then click Schedule and make your changes.
Modify a Replication Flow
In data replication, you can change how your data is replicated by modifying the replication
flow that loads your data.
1. In the Home page, click Navigator, then Data, then Data Replications.
2. Right-click the replication flow that you want to modify, and click Open, and make your
changes.
Monitor and Troubleshoot a Replication Flow
In data replication, you can monitor a replication flow to check progress and troubleshoot
issues.
See Top FAQs for Data Replication.
If an error occurs during a replication flow and the replication is run again, then the replication
starts from where the previous error was encountered and any duplicate rows are removed.
1. To monitor jobs associated with a replication flow:
a. In the Home page, click Navigator, then Jobs.
b. Review the current status of your job in the Status column.
c. To view job history, right-click the job, click Inspect, then click History.
d. To stop a job, right-click the job and click Cancel.
2. To investigate or troubleshoot the last data load for a replication flow:
a. In the Home page, click Navigator, then Data, then Data Replications.
b. Right-click the replication flow that you want to investigate, click Inspect, then click
Run Details.
The History dialog shows the execution time, status, and duration of each replication run.
To view more details, click the replication run and select the Status tab to view the number
of rows loaded for each table, the number of rows rejected, start time, duration, status, and
warnings for each table.
Move Replicated Data to a Different Target Database
In data replication, if you change the target database, you can migrate the current data to the
new database, and reconfigure your connections to replicate to your new database.
For example, you might need to do this if your organization migrates from Oracle Cloud
Infrastructure - Classic to Oracle Cloud Infrastructure.
1. Make sure that your new target schema has the required privileges and permissions. See
What Privileges and Permissions Are Required?.
Chapter 8
Modify a Replication Flow
8-8

2. Copy the replicated tables and the following replication system tables to the new target
schema.
• All replicated tables (along with corresponding indexes, constraints)
• REPL$_ERR_SUMMARY
• E$_*
• SDS_*
3. Configure a replication connection for the new target database.
• If your new target database is of the same type as your old target database, then
simply edit your existing replication connection and update the connection details.
In the Connections page, locate the replication connection, click Inspect, and use the
General tab to update the details for the new target database.
• If your new target database is of a different type, then create a new replication
connection for that type and specify the connection details.
Click Create, then Replication Connection, select the appropriate type, and specify
the details.
4. Update each data replication entry that is configured to use the old target database
connection details.
a. Open the Data Replications page, and select the data replication you want to edit.
b. In the Replication Target area:
• If your new target database is of the same type as your old target database, make
sure that Schema is set correctly for the new database.
• If your new target database is of a different type, click Select and select the new
target connection, then click Schema and set correctly for the new database.
5. From the Home page, navigate to Data and then Connections. Locate the replication
connection for your target database, click Inspect, and use the Tables tab to verify the
table information for the new target schema.
You can now resume data replication in incremental mode into the new database.
Chapter 8
Move Replicated Data to a Different Target Database
8-9


A
Frequently Asked Questions
This reference provides answers to common questions asked by administrators responsible for
configuring and managing Oracle Analytics Cloud.
Topics:
• Top FAQs to Configure and Manage Oracle Analytics Cloud
– Can I see how many users are currently signed in?
– Where can I find the public key for my service?
– Is there a storage limit for datasets?
– Is there a size limit for custom knowledge files?
– Can I see the SQL generated by an analysis and analyze the log?
– What happens to my content if I terminate my subscription to Oracle Analytics Cloud?
– Can I configure a private mail server to deliver reports and visualizations from Oracle
Analytics Cloud?
• Top FAQs to Back Up and Restore User Content (Snapshots)
– What do I need to back up?
– How often should I take snapshots?
– When should I export snapshots?
– Can I use APIs to automate snapshot operations?
– Can Oracle help to restore lost content?
• Top FAQs for Disaster Recovery
– What capabilities in Oracle Analytics Cloud can I use to implement a disaster recovery
plan?
– Where can I find information about disaster recovery?
• Top FAQs to Index Content and Data
– What can I index?
– What is a certified dataset?
– How often should I schedule a crawl?
– Can I index content in languages other than English?
– Are there considerations when indexing subject areas with large tables?
– How are search results ordered?
– Should I use Don't Index to secure my catalog items?
– How do I build an index most effectively?
– Why are there many select distinct queries on the database during indexing?
• Top FAQs to Configure and Manage Publisher
A-1

– How do I configure a delivery channel for Publisher?
– How do I restrict access to delivery channels?
– How do I configure FTP and SFTP delivery retry?
– How can I enable the viewing of audit data in Publisher?
– How do I upload the configuration-specific files?
• Top FAQs for Data Replication
Top FAQs to Configure and Manage Oracle Analytics Cloud
The top FAQs for configuring and managing Oracle Analytics Cloud are identified in this topic.
Can I see how many users are currently signed in?
Yes. Display the Home page , click Console, and then click Sessions and Query Cache. See
Monitoring Users Who Are Signed In.
Where can I find the public key for my service?
Display the Home page, click Console, Connections, click the menu icon, and then click Get
Public Key.
Is there a storage limit for datasets?
Oracle Analytics Cloud has a fixed 250 GB storage quota for data files that's shared across all
users. The limit for an individual user is 50 GB. When users leave the organization,
administrators can delete their unused datasets to free up storage space.
Is there a size limit for custom knowledge files?
Yes. The maximum file size you can upload is 250 MB.
Can I see the SQL generated by an analysis and analyze the log?
Yes. Display the Home page, click Console, and then click Sessions and Query Cache. See
Analyzing SQL Queries and Logs.
What happens to my content if I terminate my subscription to Oracle Analytics Cloud?
Before you terminate your subscription, take a snapshot of your system, that is, the latest
semantic model, catalog content, application roles, and so on. If you subscribe to Oracle
Analytics Cloud in the future, you can import content from this archive file.
See Uploading Snapshots and Restoring from a Snapshot.
Can I change the default logo and dashboard style for the whole deployment?
Yes. When logged in as Administrator, navigate to the Classic Home page, click the user profile
icon, click Administration, and then click Manage Themes. Create a new theme including
dashboard properties such as logo, branding, page colors, and link colors, and click Active.
This new style is applied for all new browser sessions.
Can I upload a semantic model RPD file from Oracle BI Enterprise Edition and Oracle
Analytics Server?
Yes. If you’ve modeled your business data with Oracle BI Enterprise Edition or Oracle Analytics
Server, then you don't need to start from scratch in Oracle Analytics Cloud.
Appendix A
Top FAQs to Configure and Manage Oracle Analytics Cloud
A-2

• Semantic Modeler - You can upload your RPD file to Semantic Modeler. See Import a File
to Create a Semantic Model.
• Model Administration Tool - You can upload your RPD file to Model Administration Tool.
See Upload Semantic Models from Oracle BI Enterprise Edition and Oracle Analytics
Server.
Can I configure a private mail server to deliver reports and visualizations from Oracle
Analytics Cloud?
No, you can't connect Oracle Analytics Cloud to a private mail server. Oracle Analytics Cloud
supports only SMTP mail servers that are accessible from the public internet. See Set Up an
Email Server to Deliver Reports. For example, you can use the SMTP mail server that’s
available with Oracle Cloud Infrastructure. See Use the SMTP Mail Server in Oracle Cloud
Infrastructure for Email Delivery.
If your publicly accessible SMTP mail server uses an allowlist to restrict access, find the
Gateway IP Address of your OAC instance and add it to your mail server’s allowlist. See Find
the Gateway IP Address of your OAC Instance.
I want to connect Oracle Analytics Cloud to a private data source over a private access
channel. How do I do this?
You use Oracle Cloud Infrastructure Console to set up a private access channel for Oracle
Analytics Cloud and configure access to your private data sources. See Connect to Private
Data Sources Through a Private Access Channel and Top FAQs for Private Data Sources in
Administering Oracle Analytics Cloud on Oracle Cloud Infrastructure (Gen 2).
Top FAQs to Back Up and Restore User Content (Snapshots)
The top FAQs for backing up and restoring user content are identified in this topic.
What do I need to back up?
Oracle recommends that you regularly back up all the content that users create to a file called
a snapshot. User content includes catalog content such as reports, dashboards, data
visualization workbooks, pixel perfect reports, datasets, data flows, semantic models, security
roles, service settings, and so on.
If something goes wrong with your content or service, you can revert to the content you saved
in a snapshot. Snapshots are also useful if you want to move or share content from one
service to another.
To back up user content, see Take a Snapshot.
To restore user content, see Restore from a Snapshot.
How often should I take snapshots?
Oracle recommends that you take snapshots at significant checkpoints, for example, before
you make a major change to your content or environment. In addition, Oracle recommends that
you take regular weekly snapshots or at your own defined frequency based on the rate of
change of your environment and rollback requirements.
You can keep up to 40 snapshots online and export as many as you want offline (that is, to
your local file system or to your own Oracle Cloud storage).
Appendix A
Top FAQs to Back Up and Restore User Content (Snapshots)
A-3

When should I export snapshots?
Oracle recommends that you adopt a regular practice of exporting snapshots to offline storage.
You can export snapshots to your own file system and store them locally. Or, you can export
snapshots to your own Oracle Cloud storage. See Export Snapshots.
If you regularly export large snapshots (over 5GB or larger than the download limit of your
browser), Oracle recommends that you set up a storage bucket on Oracle Cloud and save your
snapshots to cloud storage. This way, you can avoid export errors due to size limitations and
timeouts that can sometimes occur when you export snapshots on your local file system. See
Set Up a Oracle Cloud Storage Bucket for Snapshots.
Can I use APIs to automate snapshot operations?
Yes. See Manage Snapshots Using REST APIs.
Can Oracle help to restore lost content?
No. Customer data backup, retention, and recovery or restoration is the sole responsibility of
the customer using snapshots (BAR files), catalog archives (CATALOG files), and export
archives (DVA files). Oracle-managed infrastructure backups are created to maintain the
service in the event of an infrastructure incident. Oracle-maintained backups aren’t provided for
user-created data management. See Oracle PaaS and IaaS Public Cloud Services - Pillar
document.
Oracle recommends that you use the Logging service in Oracle Cloud Infrastructure to track
and troubleshoot content changes between snapshots. When you enable usage and diagnostic
logs, you can monitor create, update, delete, and permission change operations on all catalog
objects, such as classic analyses, dashboards, workbooks, pixel-perfect reports, folders,
datasets, self-service connections, data flows, sequences, scripts, and so on. See Monitor
Usage and Diagnostic Logs.
Top FAQs for Disaster Recovery
The top FAQs for disaster recovery are identified in this topic.
What capabilities in Oracle Analytics Cloud can I use to implement a disaster recovery
plan?
Oracle Analytics Cloud offers several features that you can implement to minimize disruption
for users:
• Snapshots: Oracle recommends that you back up user content regularly to a snapshot. If
required, you can restore the content in your snapshot to a redundant Oracle Analytics
Cloud environment. See Take Snapshots and Restore.
• Pause and resume: You can deploy a passive backup Oracle Analytics Cloud
environment, and use the pause and resume feature to control metering and minimize
costs. See Pause and Resume a Service.
• Diverse regional availability: Oracle Analytics Cloud is available in several global
regions. You can deploy a redundant Oracle Analytics Cloud environment in a different
region to mitigate the risk of region-wide events. See Data Regions for Platform and
Infrastructure Services.
Appendix A
Top FAQs for Disaster Recovery
A-4

Where can I find information about disaster recovery?
See Technical Papers. For additional help or assistance, engage consulting resources (Oracle
or a third party) or reach out to Oracle Analytics Community.
Top FAQs to Index Content and Data
The top FAQs for indexing semantic models and catalog content are identified in this topic.
What can I index?
Administrators can choose to index:
• Semantic models - Subject area, dimensions names and values, and measure names and
values. You must be an administrator to modify the semantic model indexing preferences.
• Catalog content - Workbooks, analyses, dashboards, and reports. You must be an
administrator to modify the catalog indexing preferences.
• File-based datasets - You can index a file-based dataset so that specified users can build
visualizations with a dataset's data. Or you can certify a file-based dataset so that the
specified users can search for its data from the home page. Any user can set a file-based
dataset to index or certify the dataset.
See Configure Search Indexing.
What is a certified dataset?
Any user can upload a spreadsheet to create a dataset, and uploaded spreadsheets can be of
varying quality. When a user certifies a shared dataset, it means that the user is confirming that
the dataset contains good, reliable data that other users can search for from the home page.
When you and users who've been granted access to datasets search from the home page, the
data in a certified dataset is ranked high in the search results.
How often should I schedule a crawl?
The index updates automatically as users add or modify catalog content. By default, the
catalog and semantic model crawl run once per day. In some cases you might want to change
this default after importing a BAR file, if automatic indexing didn't run, or if your data updates
occur less frequently (for example, monthly).
Can I index content in languages other than English?
Yes. You can index content in 28 languages.
• Semantic models and catalog content - You can generate indexes for multiple
languages at the same time. Go to the Search Index page and Ctl-click to select one or
more of the 28 available languages. For example, if your company's headquarters are in
the United States and you have offices in Italy, you might select English and italiano to
create indexes in both English and Italian. See Configure Search Indexing.
• Datasets - You can index a dataset for a single language at a time. Go to the Inspect
dialog for the dataset and select one of the 28 available languages. See Index a Dataset.
Appendix A
Top FAQs to Index Content and Data
A-5

Note:
If your data is in English and your index language is English, you can't search for the
data in a different language such as French. For example, if your data includes
English product names (such as chair, desk, matches), you can't search using
French product names (such as chaise, bureau, alumettes).
Are there considerations when indexing subject areas with large tables?
You can index any size table, but big tables take longer to index. For large subject areas that
have many tables or large tables, consider indexing only the columns your users need to
search for.
Because index files are compact, it's rare to exceed the storage space that Oracle Analytics
reserves for indexing.
How are search results ordered?
Search results are listed in this order:
1. Semantic model (semantic layer)
2. Certified datasets
3. Personal datasets
4. Catalog items (workbooks, analyses, dashboards, and reports)
Should I use Don't Index to secure my catalog items?
No. Oracle doesn't recommend setting the Crawl Status field to Don't Index as a way of
hiding a catalog item from users. Users won't see the item in search results or on the home
page, but are still able to access the item. Instead, use permissions to apply the proper
security to the item.
How do I build an index most effectively?
For best results only index the subject areas, dimensions, catalog items, and certify datasets
that users need to find. Indexing all items yields too many search results. Oracle recommends
that you deselect all semantic model and catalog items and then select only the items that the
user needs. You can then add items to the index as needed.
Why are there many select distinct queries on the database during indexing?
This is most likely because the semantic model's indexing option is set to Index. When you set
this option to Index, the metadata and values are indexed, which means that during indexing
the select distinct queries are run to fetch the data values for all of the columns in all of the
subject areas that are configured for indexing.
If this system overhead isn't acceptable or if users don't need the additional functionality to
visualize data values from the search bar on the Home page, then go to the Console, click
Search Index, and set the indexing option to Index Metadata Only. Setting this option to
Index Metadata Only indexes dimension and measure names, only, and doesn't run select
distinct queries.
Appendix A
Top FAQs to Index Content and Data
A-6

Top FAQs to Configure and Manage Publisher
The top FAQs for configuring and managing Publisher are identified in this topic.
How do I configure a delivery channel for Publisher?
Use the Publisher administration page to add a connection to a delivery channel and test the
connection.
How do I restrict access to delivery channels?
You can configure role-based access for delivery channels. In the delivery channel
configuration page, from the Available Roles list, select one or more roles you want to provide
access to the delivery channel, and add them to the Allowed Roles list.
How do I configure FTP and SFTP delivery retry?
If you set the Enable FTP/SFTP delivery retry runtime property to true, Publisher makes
another attempt to deliver reports to the FTP or SFTP delivery channel, if the first attempt fails.
How can I enable the viewing of audit data in Publisher?
Use the Enable Monitor and Audit property in the Publisher Server Configuration page to
enable or disable viewing of the audit data of Publisher catalog objects.
How do I upload the configuration-specific files?
Use Upload Center in the Publisher system administration page to upload and manage
configuration–specific files for font, digital signature, ICC profile, SSH private key, SSL
certificate, and JDBC client certificate.
What is the size limit for emails?
15MB is the maximum size of an e-mail message that Oracle.com will accept from the Internet
or deliver from Oracle.com. That means the sum of the sizes of message text, headers,
attachments, and any embedded images must be less than 15MB.
Top FAQs for Data Replication
Use these FAQs to learn more about data replication tasks including extracting and replicating
data from Oracle Fusion Cloud Applications, uploading data to or downloading data from object
storage, and loading data to the target database.
What can I do if a data replication job runs for a long time?
If a job runs for a long time, try the following:
• If the replicated view object (VO) isn't an extract VO (that is, the VO name doesn't end with
ExtractPVO
), then use the Data Replication editor to exclude unnecessary
LastUpdateDate
columns from the new data identifier of the VO.
• If the long running view object has more than one
LastUpdateDate
column selected for the
new data identifier or incremental filter:
– Select the LastUpdateDate option for the primary entity of the VO.
– Deselect the LastUpdateDate option for columns from supplementary entities (non-
functional).
Appendix A
Top FAQs to Configure and Manage Publisher
A-7

• If you can't deselect the option for the new data identifier, then follow these steps:
1. Cancel the job.
2. Drop the Staging table TMP$.
3. Navigate to the main menu, then click Data, then click Connections.
4. Click Target Connection, select Inspect, then click the Tables tab.
5. Select the table, then select the Reset Updated Time, then select Reload all data.
What can I do to improve the performance of the data replication job?
To improve performance, try the following:
• Only replicate with extract data stores (that is, View Objects (VOs) with "ExtractPVO" in the
VO name.
• If the replicated VO is not an extract VO (that is, the VO name doesn't end with
"ExtractPVO"), then use the Data Replication editor to exclude any unnecessary
LastUpdateDate
columns from the new data identifier of the VO.
• Make sure that the Public View Object (PVO) load type isn't set to
FULL
mode
unnecessarily. If the PVO has at least one column configured as a
Key
column and one
LastUpdateDate
column configured as new data identifier, then set the load type to
Incremental
.
• Remove unwanted columns that are selected or enabled for replication.
• If the replication completes with warnings, check the error table from the target schema
and make appropriate changes to the PVO configuration.
• Make sure that the PVO in the Oracle Fusion Cloud Applications data source has data
records deleted frequently. If not, then clear the Include Deletions option.
• If a job fails or is cancelled, drop the staging and error table before running the job again.
Why does the time to run the same data replication differ on certain days?
The time that it takes to run a data replication job can vary due to various factors such as
these:
• Oracle Autonomous Data Warehouse performance might affect the timings on a particular
day.
• An Oracle Analytics Cloud instance running the replication job might be temporarily
unavailable due to scheduled maintenance.
Is there a limit to the number of tables that I can add to a data replication job?
No, there's no limit to the number of tables that you can add to a job. You can execute no more
than three replication jobs concurrently, but you can schedule any number of jobs concurrently.
For example, three jobs can execute concurrently while other jobs are in the queue.
Is there a limit to the amount of data or number of rows that one data replication job can
process?
No, a data replication job can process any amount of data or number of rows.
What other tips should I follow for data replication?
Follow these tips for data replication:
• Create fewer replications with more PVOs in each. Use the recommended extract PVOs.
Appendix A
Top FAQs for Data Replication
A-8

• In the replication definition, deselect unwanted columns from the PVO.
• Use the "low" database service in Oracle Autonomous Data Warehouse for maximum
concurrency.
• Schedule replication jobs to run at times where there's less load on Oracle Autonomous
Data Warehouse.
• Keep the load type of the POVs set to the default, which is incremental mode.
Appendix A
Top FAQs for Data Replication
A-9

B
Performance Tips
This topic contains information to help you analyze and optimize performance in Oracle
Analytics Cloud.
Topics:
• Gather and Analyze Query Logs
• Test Performance with Apache JMeter
Gather and Analyze Query Logs
Query logs contain powerful, diagnostic information that allows administrators to analyze and
troubleshoot issues related to query performance, error scenarios and wrong results. When
you enable query logs in Oracle Analytics, information about parsing, optimization, execution
plans, physical query, summary statistics, and so on are written into the query log.
• Accessing Query Logs
• Query Log Levels
• Reading a Query Log
– Logical SQL Query
– Logical Request
– Execution Plan
– Physical or Database Requests
– Summary Statistics
• Query Log Considerations
• Accessing Query Logs for a Workbook
Accessing Query Logs
Query logs are written serially in the same order of execution of queries across the system.
Each session and request is identified by a unique ID. Administrators can access these query
logs from the Session and Query Cache page in the Console. To learn how to access this
page, see Analyze SQL Queries and Logs.
Note:
Workbook authors can also access query information such as query time, server
time, and streaming time for visualization components in their workbooks. See
Accessing Query Logs for a Workbook, at the end of this topic.
Query Log Levels
• Log level determines the detail and amount of log generated.
B-1

• You can set the log level at system, session, or report level.
• You can define the global log level for your semantic model (RPD) using the System
logging level property (under Tools, Option, Repository) or use the session variable.
• You can override the log level for a report, by adding the
LOGLEVEL
variable to the Prefix
property, available in the Advanced tab for the report.
• To ensure you get complete logs by avoiding cache hits, you can include the variable
DISABLE_CACHE_HIT=1
alongside the
LOGLEVEL
.
• Log level (
LOGLEVEL
) values range between 0-7.
–
LOGLEVEL=0
means logging is disabled.
–
LOGLEVEL=7
is the highest logging level used mainly by the Oracle development team.
–
LOGLEVEL=2
is suitable for performance tuning and basic understanding.
–
LOGLEVEL=3
is required to troubleshoot row-level data security filters.
• Depending on the log level, query logs contain information about the query including the
logical request, navigation and execution plan, physical query generated, execution time,
rows and bytes retrieved at different execution nodes, and cache-related information.
Administrators can extract query logs from the Issue SQL page in the Console by running the
query with the appropriate
LOGLEVEL
and variables settings.
Appendix B
Gather and Analyze Query Logs
B-2
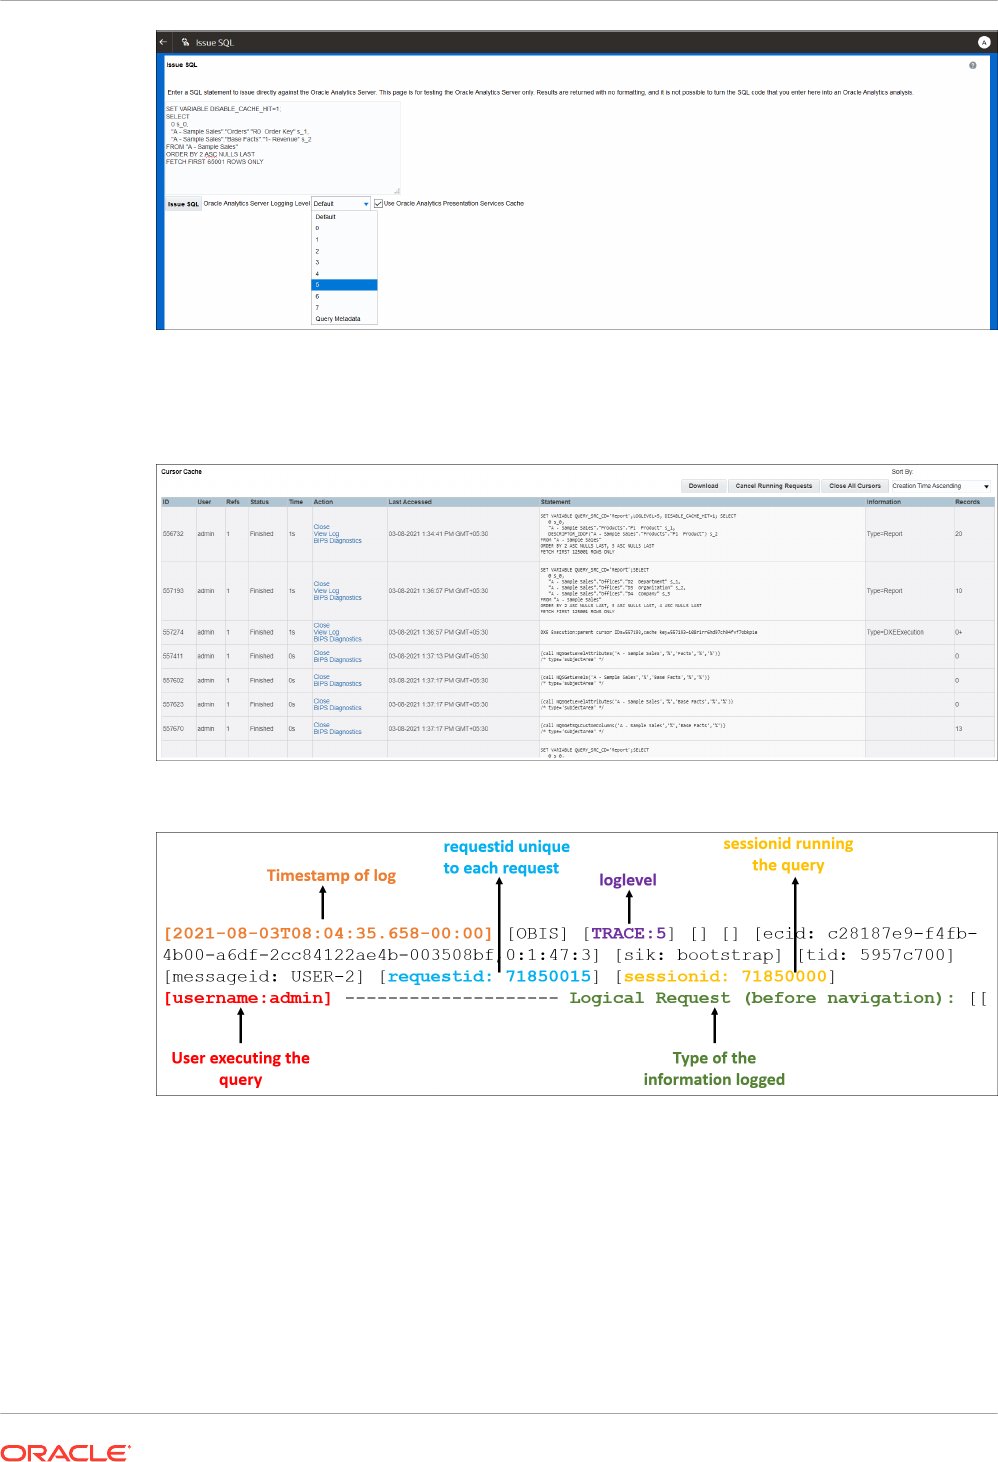
Reading a Query Log
The Session and Query Cache page lists all the queries and sessions that are currently
active. Administrators can access this page from the Console.
Each entry on the page provides access to the query log for a particular query, at the level set
(that is, at the semantic model, session or report level).
Each request has a unique
requestid
in Oracle Analytics.
Logical SQL Query
Here is a sample logical SQL query in Oracle Analytics.
Appendix B
Gather and Analyze Query Logs
B-3
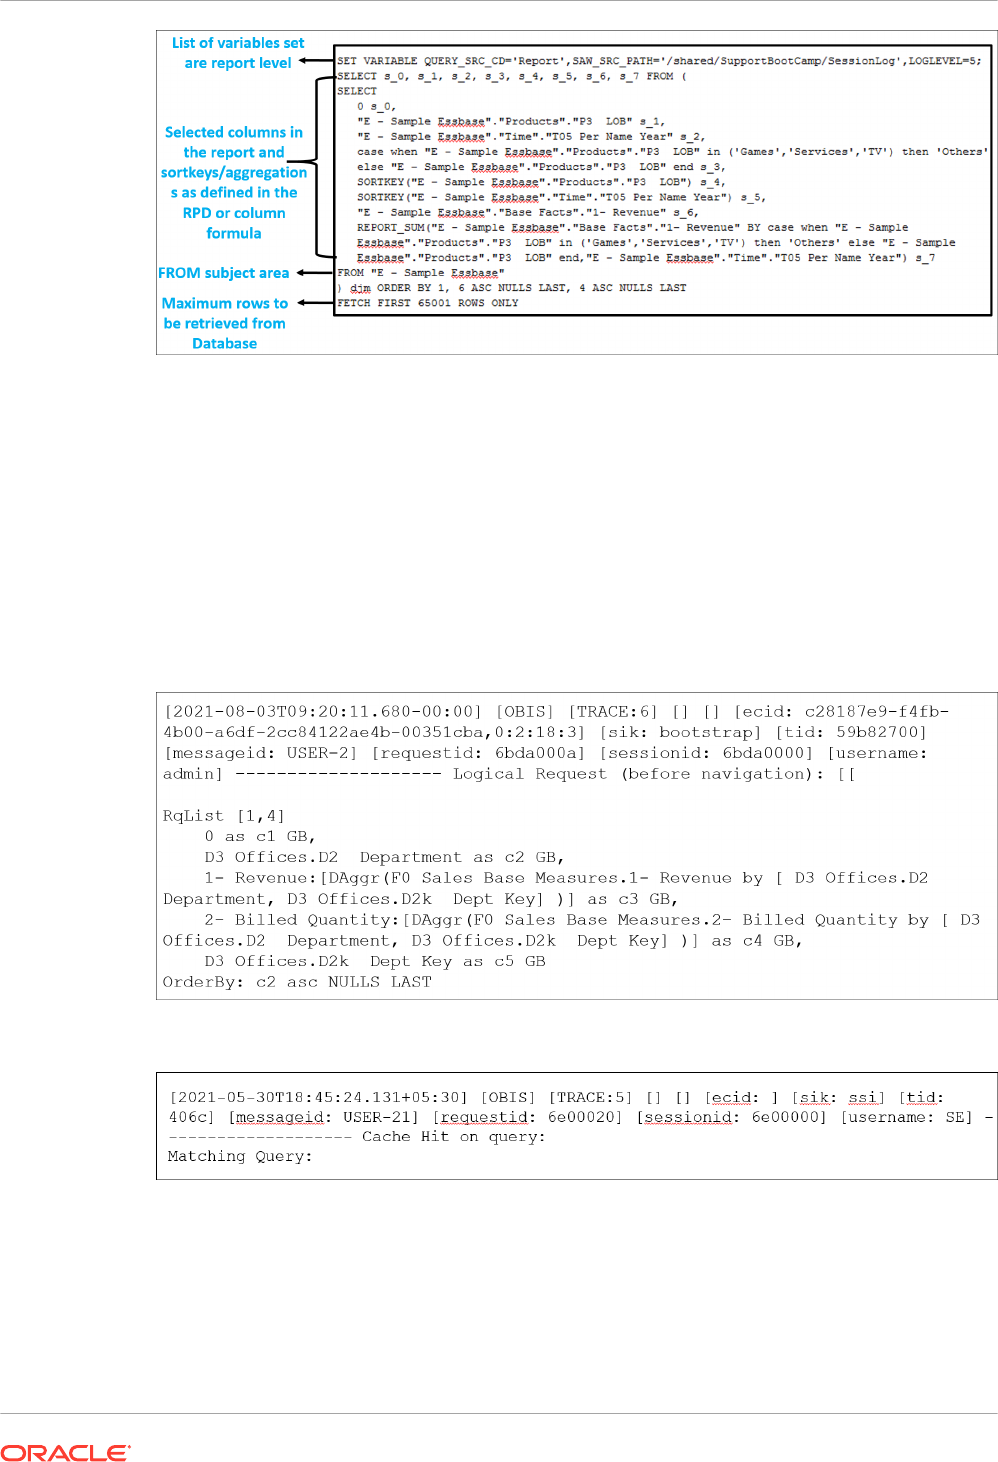
These are some common variables you might see in a logical SQL request:
•
QUERY_SRC_CD
: Origin of the query: Prompt, Report, DV, Issue SQL, and so on.
•
SAW_SRC_PATH
: If the query is saved, path to the query in the catalog.
•
SAW_DASHBOARD
: If the query is included in a dashboard, path to the dashboard in the
catalog.
•
SAW_DASHBOARD_PG
: Name of the dashboard page.
Logical Request
The logical request is the translation of a query from the presentation layer to the business
model and mapping layer after adding security filters, if any.
Based on the logical request, Oracle Analytics decides whether the query hits an existing
cache or must be retrieved from the database.
Execution Plan
The execution plan is the transformation of the actual logical request into an optimized plan for
execution. This includes a shipping plan for each operation, and whether it's performed in the
database or in Oracle Analytics. When an operation is processed in Oracle Analytics, the query
log indicates
[for database 0:0,0]
.
Appendix B
Gather and Analyze Query Logs
B-4

During query execution, Oracle Analytics exactly traverses through this tree. In detailed logs,
information about the rows processed is available at every node of the execution tree.
Physical or Database Requests
Based on the execution plan, Oracle Analytics generates physical SQL to be executed on the
specified database. There could be one or more requests sent to one or more databases.
For every physical request sent to the database, there is a log of the number of rows and bytes
retrieved.
When there are multiple queries, you can use the query ID (in this example,
1914627
) to match
the exact query logged in the section
Sending query to the database
. This allows you to
map the query with rows retrieved when there are multiple database requests.
One report could send multiple queries to one or more databases depending on the report
structure and the semantic model definition. For example, in this query log 3 physical queries
were sent to the database.
The log provides similar rows processed information for all the nodes in execution plan. Finally,
the rows sent to the client is logged.
The log also includes a final summary of statistics that includes the complete execution time.
You can correlate the time here to analyze and investigate performance issues.
Appendix B
Gather and Analyze Query Logs
B-5
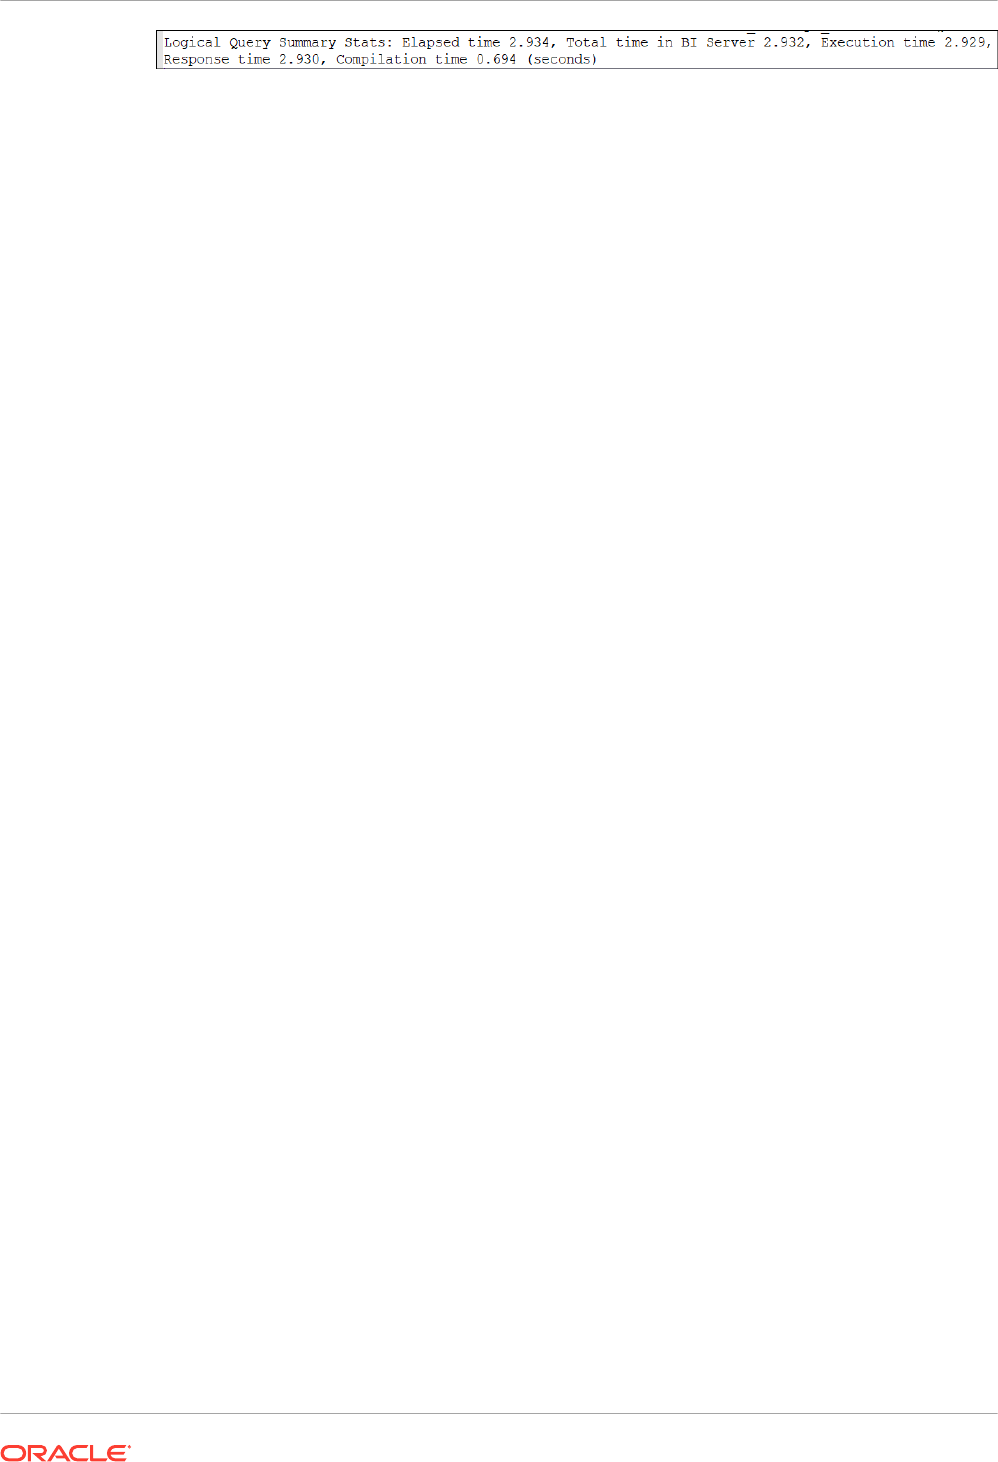
Summary Statistics
Several timing statistics appear in the query log summary.
• Elapsed time - Total elapsed time from when the logical query is received until the client
closes the cursor. If the client allows the user to scroll through the result, as Oracle
Analytics does, then the cursor may stay open for a long time until the user either
navigates to another page or logs out.
• Compilation time - Time that Oracle Analytics uses to generate the execution plan and
physical queries from the logical SQL query.
• Total time in BI Server - Total amount of time that the client is waiting for a response. This
includes physical query execution time, wait time during fetching, and time spent in Oracle
Analytics for internal execution.
• Execution time - Time from when the logical query is received by Oracle Analytics until
the logical query execution completes. This doesn't include any time spent after the logical
query execution is complete when the client is fetching results.
• Response time - Time from when the logical query is received by Oracle Analytics until
the first row is returned to the client.
Query Log Considerations
• Single-threaded activity. Under adverse circumstances, you might experience performance
bottle neck for log levels greater than 2.
• Times listed and computed are for when entries are written to the log and this is almost
always when the event occurred (that is, the activity that initiated the log entry). Unless,
there are other bottlenecks that impact logging.
• Query logging is diagnostic and not intended for collecting usage information. To learn
about usage tracking, see Track Usage.
Accessing Query Logs for a Workbook
Only administrators can access logs through the Session and Query Cache page in the
Console. However, content authors can access log information for visualization queries in their
workbooks through the Developer menu and this is useful tool for authors who want to
troubleshoot query performance. To access the performance tool for workbooks (Developer
menu option), users must switch on Enable Developer Options which is in the Advanced
menu under My Profile.
Appendix B
Gather and Analyze Query Logs
B-6
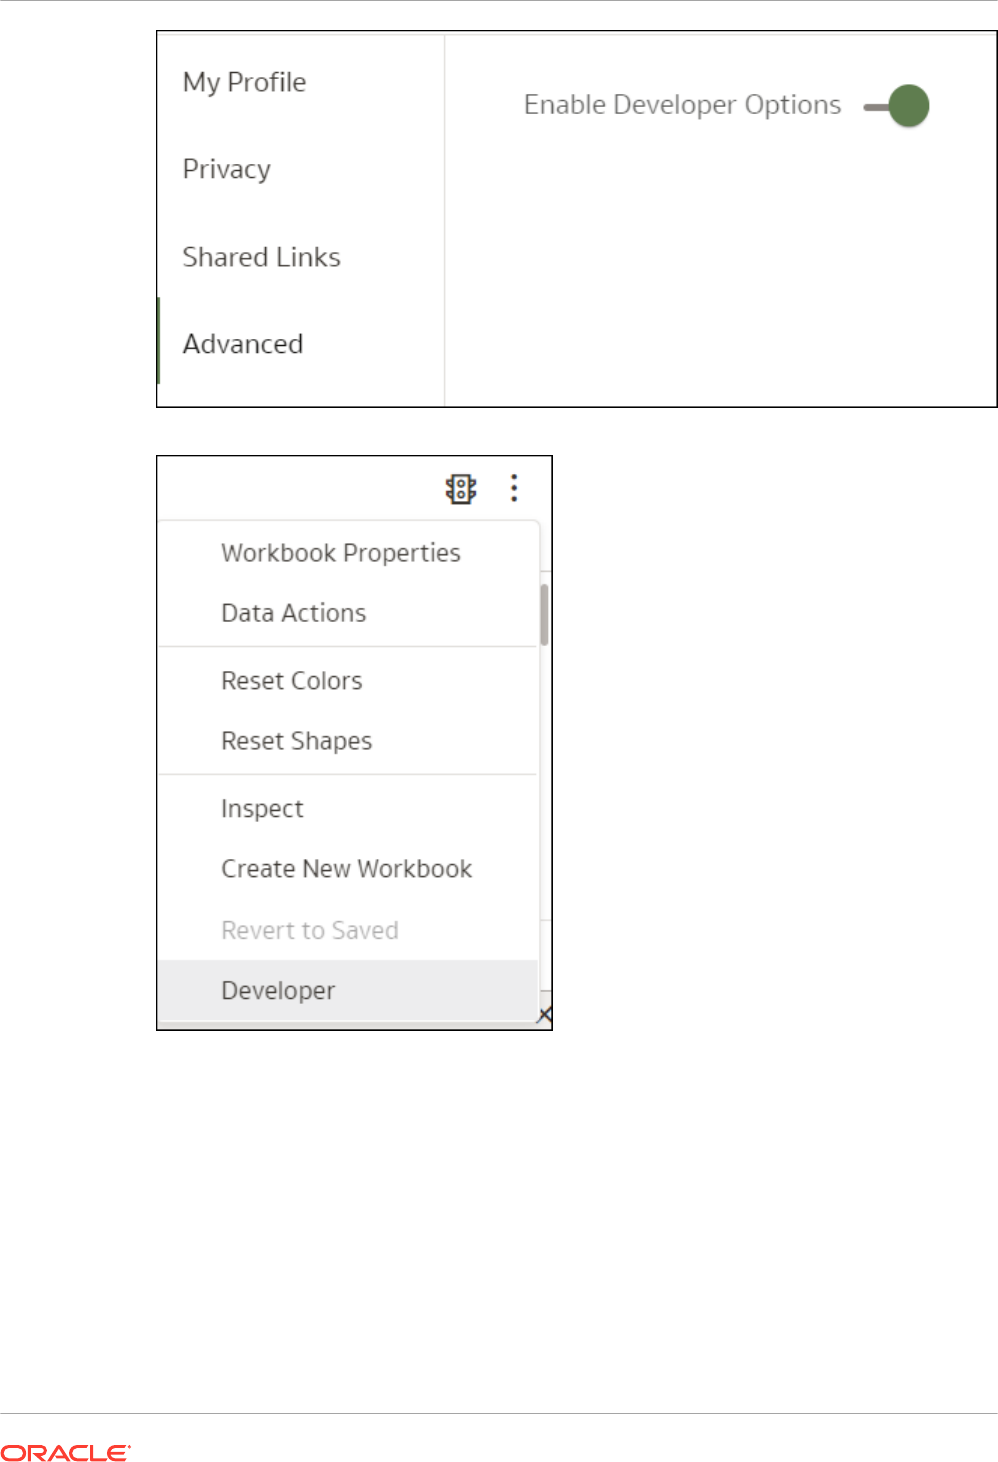
When enabled, the Developer menu option displays in the workbook menu.
The Developer option enables users can view and analyze various logs on the fly for any
visualization on a canvas. A separate frame appears below the canvas that has different tabs
for each type of information. By default, logs are not populated or refreshed when the
visualization is run.
Appendix B
Gather and Analyze Query Logs
B-7
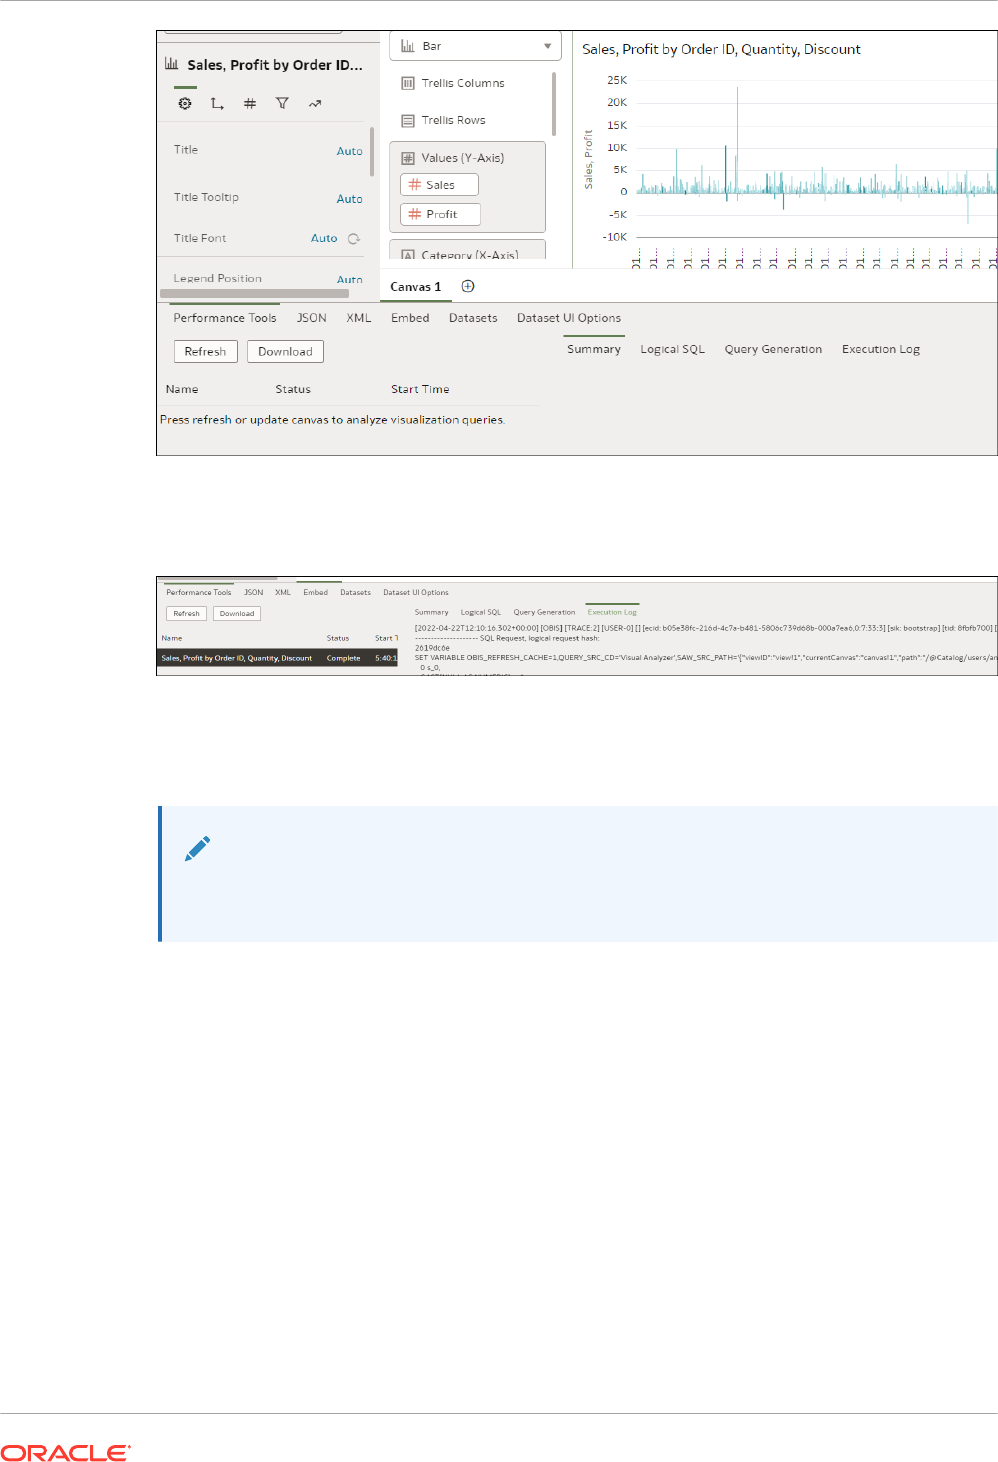
Select the visualization you want to analyze and click Refresh to generate the logs. Once
refreshed, various information related to the visualization displays and you can analyze the log
information for the specific visualization. To analyze multiple visualizations, you must refresh
them individually and analyze them one after the other.
With the Developer option, content authors can analyze a range of information, such as
performance logs, JSON, XML and also dataset-related information. This means they can
analyze logs without the need for administrator access to the Session and Query Cache
page.
Note:
The Developer menu is available only to workbooks. For classic analyses and
dashboards, you access query logs through the Session and Query Cache page.
Test Performance with Apache JMeter
Performance testing is an essential step to ensure that Oracle Analytics Cloud can handle the
expected workload without compromising performance. You can use Apache JMeter, an open-
Appendix B
Test Performance with Apache JMeter
B-8
source tool for performance testing, to simulate real-world user experience and measure the
performance of your Oracle Analytics Cloud reports.
This diagram illustrates the performance testing process for Oracle Analytics Cloud.
1. Determine performance metrics based on realistic scenarios.
To determine performance metrics, you must understand the requirements of Oracle
Analytics Cloud and the expectations of your users. For example, if you expect Oracle
Analytics Cloud to handle a high volume of users, performance metrics should focus on
response time and throughput. Similarly, if you expect Oracle Analytics Cloud to handle a
large amount of data, performance metrics should focus on resource utilization. After
you've defined the performance metrics are defined, you can set the performance goals.
2. Design a test plan for your metrics.
Your test plan must be designed to simulate real-world scenarios and workload. This
means you must identify the number of unique virtual users, the duration of the test, and
the think-time between the requests. Set the number of unique virtual users to a realistic
value that simulates your actual expected workload. Similarly, set the duration of the test to
a realistic value that represents the period of time your users will run reports. Think-time is
the time a user takes between two requests, so you must also set a realistic think-time
value to simulate your real-world scenario.
You must also include pacing in the script, to ensure that requests are sent at a realistic
pace. To achieve accurate and practical results, Oracle recommend that you use different
think times for different activities instead of using a fixed think time. For example, a short
think time of 20 seconds is recommended for simple dashboard navigation, while a
medium think time of 60 seconds for prompt selections. Similarly, when displaying reports,
Oracle advise you use a large think time of 120-200 seconds with randomization. This
approach ensures that the test accurately reflects real-world user behavior and produces
reliable results.
3. Correlate dynamic values.
Correlation involves capturing and replacing dynamic values in the script, such as access
tokens, session state IDs, CSRF tokens, and other dynamic parameters. Failure to
correlate these values can lead to errors and inaccurate results. Correlation is essential for
cloud-based applications like Oracle Analytics Cloud because they use dynamic values to
maintain the session and handle user requests. To make this process easier, you can
Appendix B
Test Performance with Apache JMeter
B-9

download a sample correlation rules library COR file for Oracle Analytics Cloud , which
contains a pre-built set of correlation rules that you can use to create test script for Oracle
Analytics Cloud.
4. Record and replay test scripts.
JMeter provides a feature to record user actions and convert them into test scripts. You
can use this feature to record user actions in Oracle Analytics Cloud and create test scripts
that simulate real-world scenarios. You can replay the recorded scripts multiple times to
validate the report's performance. You must design the test scripts to simulate real-world
scenarios, such as searching for data, generating reports, and visualizing data.
5. Test with a realistic workload.
To simulate a realistic workload, you must set the number of virtual users to a realistic
value that simulates the expected workload. Then, you can gradually increase the
workload to identify the maximum capacity of the application. Oracle recommends that you
run the test for at least one hour to simulate real-world scenarios and design the workload
to simulate peak usage periods, such as the end of the month or the end of the fiscal year.
6. Analyze the results.
When the test is complete, you analyze the results to identify performance bottlenecks,
such as slow response times, high error rates, or excessive query capacity utilization. You
can do this using metrics available through the Oracle Cloud Infrastructure Monitoring
service and JMeter's built-in analysis tools. Once you've identified performance
bottlenecks, you can act on your findings to improve the performance of the reports. This
can include optimizing queries, improving system settings configurations, or scaling up the
number of OCPUs.
If your reports fail to meet your performance goals, you can optimize them by identifying
and addressing the bottlenecks. JMeter's listeners can help you identify the slowest
requests and you can analyze logs to determine the root cause of performance issues. You
might need to optimize your database queries, adjust your cache settings, or scale up your
infrastructure to improve Oracle Analytics Cloud performance.
Follow these guidelines to ensure that Oracle Analytics Cloud meets your performance
requirements and provides a fast, seamless experience for your organization. With regular
performance testing, you can identify and address issues before they impact your users.
Appendix B
Test Performance with Apache JMeter
B-10

C
Troubleshoot
This topic describes common problems that you might encounter preparing data in Oracle
Analytics Cloud and explains how to solve them.
Topics:
• Troubleshoot General Issues
– I can’t sign in
– I'm having trouble resetting my password
– I can’t access certain options from the Home page
– I see a performance decrease when using Mozilla Firefox
– I'm having trouble uploading data from a spreadsheet (XLSX) exported from Microsoft
Access
– My analysis or workbook times out
– Search results on the Home page don't include the data I'm looking for
– I need to provide a HAR file for a Service Request
– I need to provide client script error details for a Service Request
– Users encounter an authentication error after approximately 100 seconds when using
the MS Power BI Connector
• Troubleshoot Configuration Issues
– I can't access options in the Console
– I can’t upload my snapshot
• Troubleshoot Indexing
– A home page search returns no results
– A home page search returns too many or duplicate items
– Expected items are missing from search results
Troubleshoot General Issues
This topic describes common problems that you might encounter and explains how to solve
them.
I can’t sign in to Oracle Analytics Cloud
You’re likely trying to sign in using the incorrect credentials. You must sign in to Oracle
Analytics Cloud using the Oracle Cloud Identity Domain credentials that were mailed to you
from Oracle or provided by your administrator. You can’t sign in to Oracle Analytics Cloud
using your account credentials for Oracle.com.
C-1

I'm having trouble resetting my password
When you sign up to use Oracle Analytics Cloud, you get an e-mail with a temporary
password. Be careful if you copy and paste this password. If you accidentally include a blank
space at the start or end of it when copying, then the password won't be recognized when you
paste it in. Make sure that you paste only the password without any blank spaces.
I can’t access certain options from the Home page
Check with your administrator to ensure that you have the correct permissions to access the
options that you need.
I see a performance decrease when using Mozilla Firefox
If you use Mozilla Firefox and notice a decrease in the performance of the cloud service, then
ensure that the Remember History option is enabled. When Firefox is set to not remember
the history of visited pages, then web content caching is also disabled, which greatly affects
the performance of the service. See Firefox documentation for details on setting this option.
I'm having trouble uploading data from a spreadsheet (XLSX) exported from Microsoft
Access
Open your spreadsheet in Microsoft Excel and resave it as an Excel Workbook (*.xlsx).
When you export spreadsheets from other tools the file format can vary slightly. Saving your
data again from Microsoft Excel can fix this.
Users can't see the Auto Insights option in the Visualize canvas in the workbook editor.
In Console, navigate to System Settings, then Performance and Compatibility, and enable the
Enable Auto Insights on Datasets option. Then ask dataset developers to select the Enable
Insights option on the Dataset Inspect dialog for datasets where they require insights.
Workbook users can then use the Auto Insights option in the Visualize canvas in the
workbook editor.
My analysis or workbook times out
You attempt to run an analysis or workbook and find that it times out. You see a message like
this:
[nQSError: 60009] The user request exceeded the maximum query governing execution
time.
This message is displayed when an Oracle Analytics query spends more than the allotted time
communicating with the data source. For performance reasons, the limit for a single query to
run is 11 minutes. If 11 minutes is too high for your organization, your administrator can select
a lower query limit through system settings. See System Settings - Maximum Query Limit.
Try running the query again. To prevent this error, avoid long-running queries or split the query
into multiple queries.
Appendix C
Troubleshoot General Issues
C-2

Note:
The query limit automatically extends to 60 minutes to accommodate occasional,
longer-running queries. To avoid excessive loads on the database, Oracle Analytics
restricts the number of queries that are allowed to automatically extend at any one
time. Administrators can disable occasional query limit extensions for your
organization through system settings. See System Settings - Query Limit Extension.
Search results on the Home page don't include the data I'm looking for
Datasets that users create from files must be indexed (and in some cases certified) to appear
in search results on the Home page.
• A file-based dataset must be indexed before you can use it to build visualizations from the
Home page.
• A file-based dataset must be indexed and certified before other users with permission to
access the dataset can use it to build visualizations from the Home page.
See About Indexing a Dataset and Visualize Data from the Home Page.
I need to provide a HAR file for a Service Request
If you log a Service Request (SR) to report user performance issues, you might be asked to
record a browser session and provide a report to Oracle Support in HTTP archive format
(HAR). HAR files log the web browser's interaction with Oracle Analytics Cloud.
You can use any supported browser to record the browser session but Oracle recommends
that you use Chrome's Developer Tools. To record a browser session using Chrome:
1. In Chrome, select Customize and control Google Chrome, then More tools, then
Developer tools.
2. Navigate to the Network tab.
3. Select Disable cache and Preserve log, then refresh the page.
4. If the recording hasn't already started, click Record.
5. Perform the steps that cause the performance issue.
6. Click Stop recording network log.
7. Right-click the table or grid and select Save all as HAR with content.
8. Follow the onscreen instructions to save the HAR file locally.
I need to provide client script error details for a Service Request
If you log a Service Request for client-side issues, you might be asked to send client script
error details to Oracle Support.
You can use any supported browser to collect client script errors but Oracle recommends that
you use Chrome's Developer Tools. To collect client script errors using Chrome:
1. In Chrome, sign into Oracle Analytics Cloud and navigate to the page where the issue
occurs.
2. Select Customize and control Google Chrome, then More tools, then Developer tools.
3. Click the Console tab.
4. Click Clear console to remove any existing messages from the console.
Appendix C
Troubleshoot General Issues
C-3
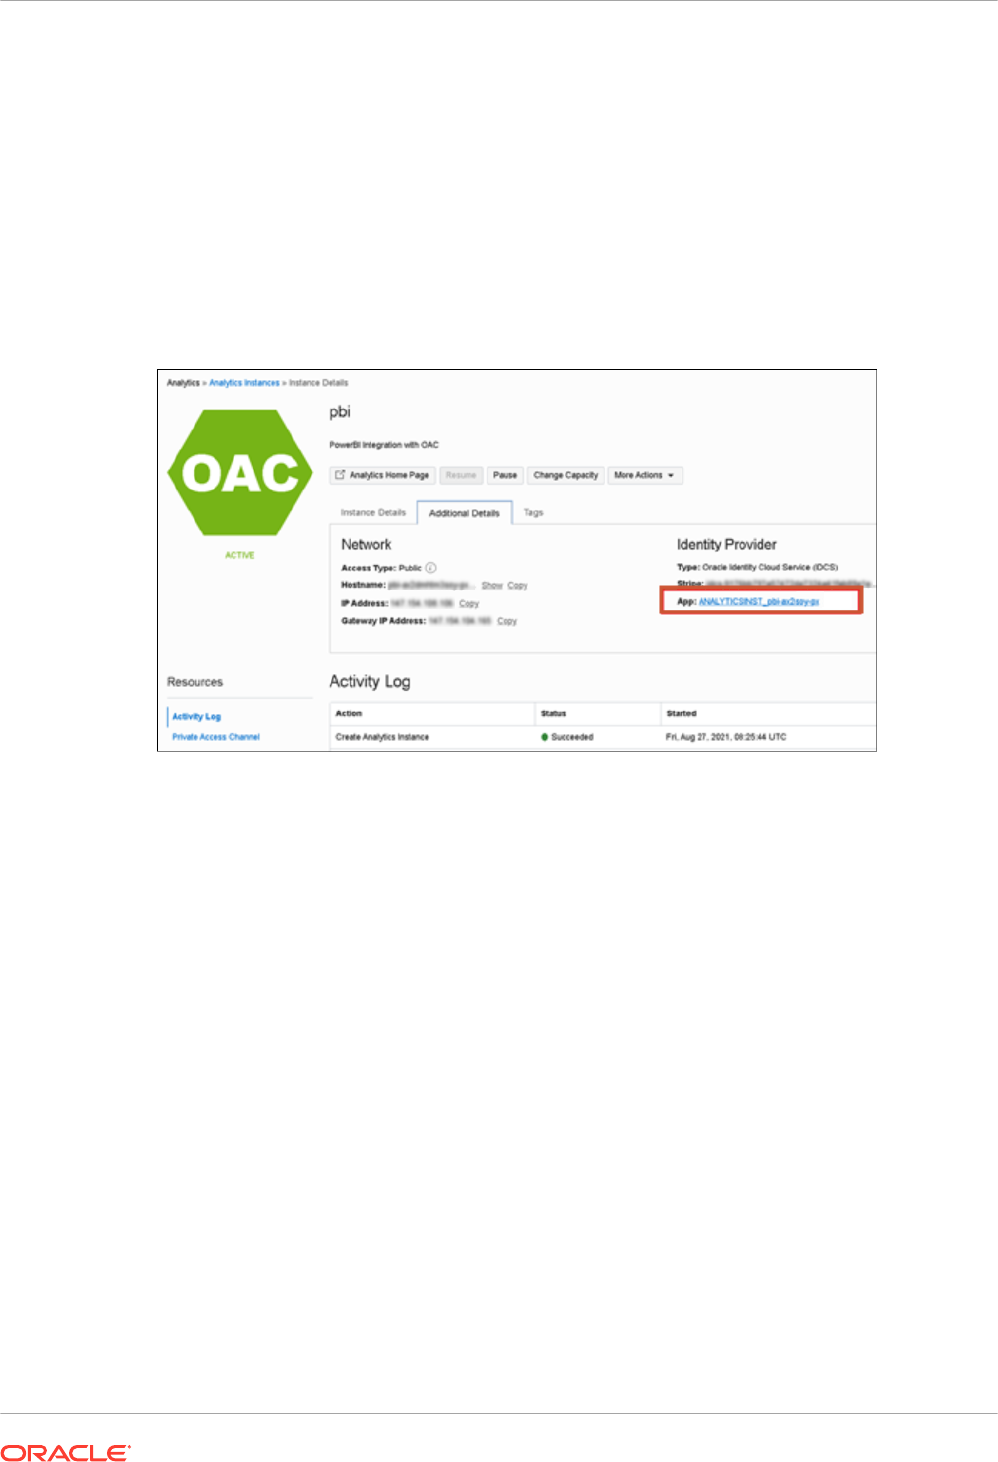
5. Click Show console sidebar, then click the Errors option to display only errors (that is,
the red circle containing a cross).
6. Reproduce the issue and verify that errors have occurred and are recorded in the console.
7. Right-click the error messages, select Save As..., and save the file to your computer.
8. Upload the error file to your SR.
Users encounter an authentication error after approximately 100 seconds when using
the MS Power BI Connector
Adjust the Expiry Time of the Access Token for Oracle Analytics Cloud. In Oracle Cloud
Infrastructure Console, navigate to the Oracle Analytics Cloud instance you want Microsoft
Power BI to connect to.
Click Additional Details, and then click the App link under Identity Provider. In the
Configuration tab, expand Resources, and increase Access Token Expiration Time to 600
seconds (10 minutes).
Appendix C
Troubleshoot General Issues
C-4
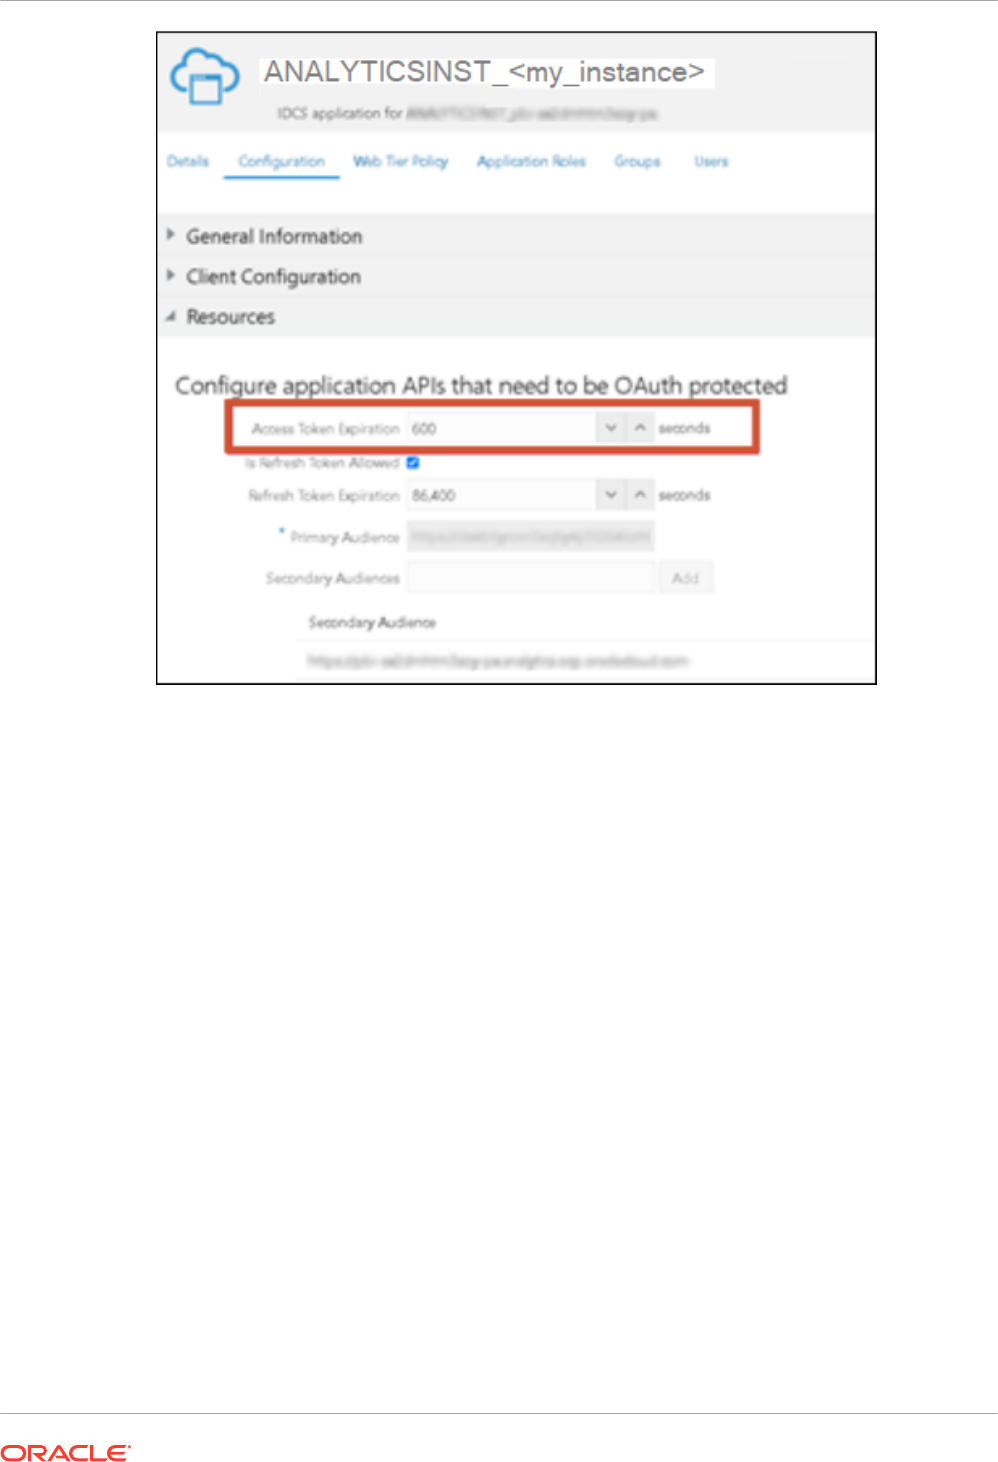
Troubleshoot Configuration Issues
This topic describes common problems that you might encounter when configuring or
managing Oracle Analytics Cloud and explains how to solve them.
I can’t access options in the Console
If you see an "unauthorized” message or don't see an option in the Console, you probably
don’t have the BI Service Administrator application role. You must have the BI Service
Administrator application role to access most Console options, for example Users and Roles,
Snapshots, Connections, Safe Domains, Session and Query Cache, Issue SQL, Virus
Scanner, Mail Server, and Search Index.
Ask an administrator to verify your permissions. See Assign Application Roles to Users.
I can’t upload my snapshot
You can only upload snapshots taken from Oracle Analytics Cloud, Oracle BI Enterprise
Edition (12c), and Oracle Analytics Server. Check where the .bar file you’re trying to upload
was originally downloaded from.
Appendix C
Troubleshoot Configuration Issues
C-5

I can't use Model Administration Tool in SSL mode
If the default security certificates don't work, import the server security certificates. For
example, on the machine where you've installed Model Administration Tool, you might use the
Key and Certificate Management Tool (keytool) to execute these commands:
C:\Oracle\Middleware\oracle_common\jdk\jre\bin\keytool.exe -importcert -alias
oacserver -file
C:\Oracle\Middleware\oracle_common\jdk\jre\lib\security\server.crt -keystore
C:\Oracle\Middleware\oracle_common\jdk\jre\lib\security\cacerts -storepass
thepassword
Troubleshoot Indexing
This topic describes common problems that you might encounter when indexing semantic
models and catalog content and explains how to solve them.
A home page search returns no results
If you search on the home page and no results are returned, then check that the Index User
Folders option is selected. If this option isn't selected then nothing in the catalog is indexed.
This option is located on the Search Index page's Catalog tab.
A home page search returns too many or duplicate items
If your search results aren't meaningful, then reduce the number of items to index. For
example, if a dimension called Sales is included in 20 subject areas and all subject areas are
indexed, then when you search for Sales your results will contain 20 items called Sales.
Go to the Search Index page's Data Model and Catalog tabs and reduce the number of items
to index. Oracle suggests that you deselect everything and then select only the items that you
need.
Expected items are missing from search results
If some items are missing from your search results, then check that the crawl job completed
successfully. Sometimes a crawl was terminated or its progress totals are zero. In such cases,
rerun the crawl.
1. Click Console.
2. Click Search Index.
3. Click Monitor Crawls.
4. Click the Configure Crawls link.
5. In the Data Model tab, deselect and then reselect the Enable Data Model Crawl
checkbox.
6. Click Save.
7. Click the Monitor Crawls link and locate the scheduled job. The revised crawl will run in a
few minutes.
Appendix C
Troubleshoot Indexing
C-6
